Mac

fix-unable-to-type-into-terminal-mac-linux

7 Ways to FIX Unable to Type in Terminal [for Mac & Linux]

The terminal console is a convenient and direct way of communicating with your Mac or Linux systems.

However, you may sometimes encounter an unresponsive terminal or a situation that does not allow you to type into the Terminal.

This results in the Mac terminal not allowing you to type anything, including passwords and commands.

You must rectify this issue differently before you can type into the Terminal again.

This article will show you the different troubleshooting methods you can use to resolve this problem.

How to FIX Cannot Type Anything in Terminal using Mac and Linux

Here are the seven (7) ways to do so.


1. Opening A New Terminal Tab
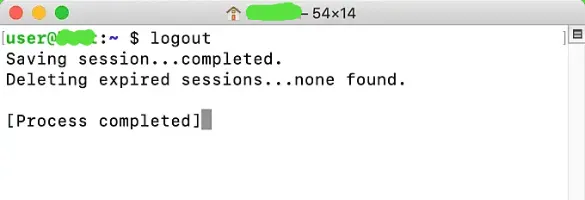
Sometimes you get messages like “Process completed,” but you cannot type anything into the Terminal.

Try opening a new tab in Terminal by going to Shell > New Tab > Basic


2. Check your Terminal Settings

On Mac, open your Terminal> Settings and check the following configurations;

  • On the General tab, ensure <Default login shell> is chosen
  • On the Profiles tab, ensure the <Run command> option is NOT ticked.

3. Entering Admin Password

terminal-type-password

Sometimes, you must enter your admin password on specific screens before you can continue, especially when you use the “sudo” command.

When typing passwords on the Terminal, it can look empty, and nothing is on the console screen.

It is a security feature to make your Terminal appear ‘frozen’ when entering the password.

Just type in your admin password and hit the <Enter> key.

The terminal console will resume back to normal after this.


4. Background Apps Running

Two (2) background processes can affect your Terminal from interacting well with the user.

  • Applications running in the background
  • Current terminal processes running in the background

You may need to force quit these apps or the Terminal itself and restart again.

To force quit an app on Mac

  • Press and hold <Option> + <Command> + <Esc>
  • Choose the app to quit and click <Force Quit>

To force quit an app on Linux

You can search for and open your System Monitor utility depending on your Linux distribution.

System Monitor lists all your running processes currently in your system.

Focus on the <Processes> tab.

Right-click the app and select <End> or <Kill> to force quit the application.

Restart your Terminal and try typing again.


5. Keyboard Connection

When using a desktop PC, check if your keyboard is correctly connected to your computer.

  • If you use a direct USB keyboard, check its cable connection. Then, remove and plug in the cable and test again.
  • If you use a wireless dongle for a wireless keyboard, check your dongle connection and if it is working. Use a wired keyboard to test it further.
  • If you are using a third-party Apple keyboard, try using other keyboards. It may be due to incompatibility issues.

6. Reset or Re-install Terminal

You can consider giving the Terminal a fresh start by reverting back to its original configuration settings.

Here’s how to do it on Mac and Linux.

Reset Terminal on Mac
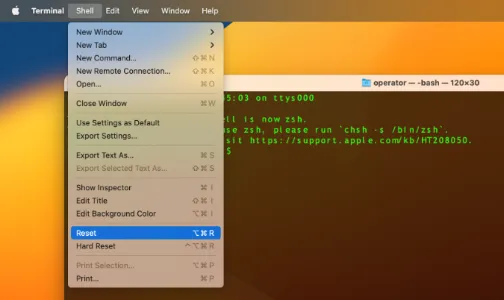
hard-reset-terminal-mac-linux

Open the Terminal and go to Shell > Reset

If <Reset> does not effectively terminate the app or process, you can choose <Hard Reset>.

Re-install Terminal on Linux

Use the command below to uninstall Terminal.

sudo apt remove gnome-terminal

Re-install it back below.

sudo apt install gnome-terminal

7. Restart Your Mac or Linux

As a last resort, always restart your Mac or Linux system and give it a try again.

This usually works as the system is given a fresh boot and removes all previous configurations.


7 Ways to FIX Unable to Type in Terminal [for Mac & Linux] Read More »

delete-hidden-ghost-files-on-mac

[Solved] 3 Ways to Find & Delete Hidden ‘Ghost’ Files on Mac

When using Mac, hidden junk files or app leftovers are cluttering even after uninstalling main applications and emptying the trash.

These files are usually hidden from view and are often called “hidden files” or “ghost files”

These system-created ‘ghost’ files are usually harmless but can take up significant storage space if left unattended.

This applies to any macOS system, whether you use a MacBook, an iMac, or a Mac Pro.

This article will show you how to uncover these hidden ‘ghost’ files, remove them and free up space on your system drive.

How to Find and Delete Hidden ‘Ghost’ Files on a Mac?

Here are the three (3) ways to do so.


Method 1. Using MacKeeper

mackeeper-safe-cleanup-remove-hidden-ghost-files

MacKeeper is a macOS application that is reliable in cleaning, optimizing, and speeding up your mac performance and protecting it from malware and online threats.

The system cleaning process involves removing junk files, user cache files, user log files, duplicate files, etc.

This includes finding and deleting hidden ‘ghost’ files on your Mac system. These ‘ghost’ files can take up a lot of drive space if left unattended.

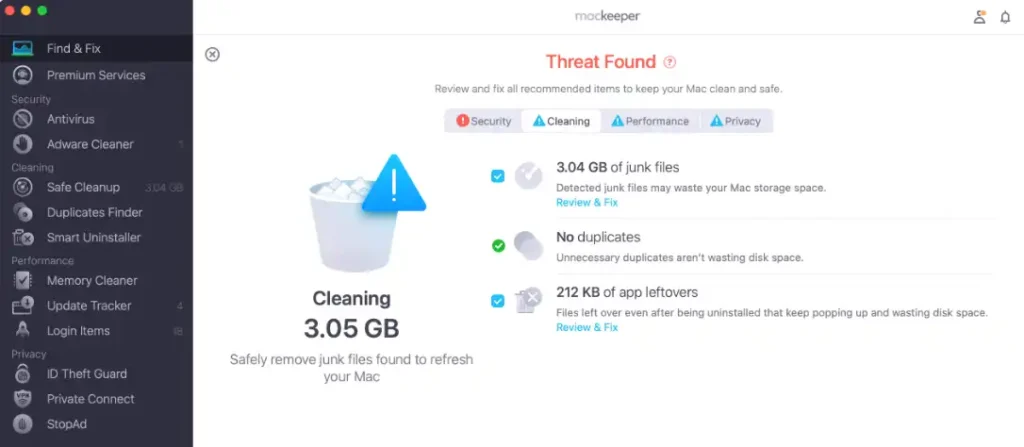
mackeeper-cleaning-junk-files-ghost-hidden

MacKeeper looks into your system automatically, removes the unnecessary hidden files, and reports to you on its suggestion. Then, based on the software’s recommendations, the user decides which to clean and retain.


Method 2. Removing ‘Ghost’ Files Manually

You can use Finder on Mac to manually delete each hidden ‘ghost’ file.

All you need to do is to locate and un-hide these files.

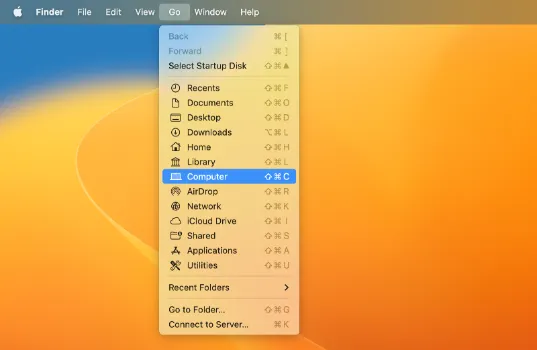
Using Finder, you have to go to your folder directory. For example, if you want to navigate to the Macintosh HD folder.

  • In the top menu of Finder > Go > Computer
mac-finder-go-computer
  • Click <Macintosh HD>
  • On your keyboard, press and hold down <Command> + <Shift> + (period)

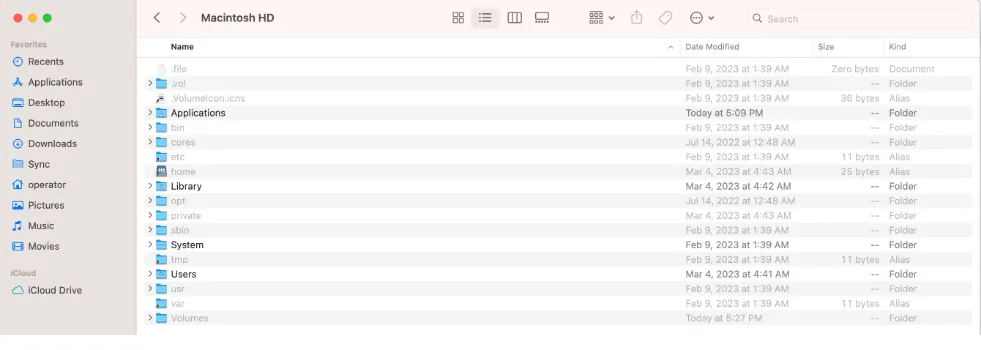
All the hidden ‘ghost’ files will be shown now.

mac-show-hidden-ghost-files

Method 3. Hide ‘Ghost’ Files

Sometimes after cleaning your Mac system, there may be some residue of hidden files left. However, those are usually small and do not occupy significant storage space.

You can easily hide them from your Mac view.

  • Open your Terminal app by searching for ‘Terminal’ on the magnifying glass icon on the top right.
  • One at a time, copy and paste each of these two (2) commands into your Terminal app and hit <Enter>.
defaults write com.apple.finder AppleShowAllFiles FALSE

killall Finder

Alternatively, if you want to make these hidden files visible in the future, use the commands below.

defaults write com.apple.finder AppleShowAllFiles TRUE

killall Finder

[Solved] 3 Ways to Find & Delete Hidden ‘Ghost’ Files on Mac Read More »

CleanMyMac-vs-MacKeeper

CleanMyMac X vs MacKeeper: Tested Results & Reviews [2023]

When you have a Mac computer, you are likely going to install a reliable cleaning and optimization app to speed up your mac performance, as well as protect it from malware and online threats.

This article will review and focus on the features comparison between CleanMyMac and MacKeeper, focusing on their system cleaning and speed optimization results based on our tests.

CleanMyMac vs MacKeeper: Which is the Best Mac Cleaning & Speed Optimization App?

Both CleanMyMac and MacKeeper are well-known in the industry for their ability to be problem fixers for Mac.

We put both CleanMyMac and MacKeeper into 3 stress tests (cleanup, security & protection, and speed optimization) and, compared their pricing, and laid down all their common and distinct features.

The results of the tests conducted using both apps are summarized below.

TestFeaturesCleanMyMacMacKeeper
1CleanupWinner
2Security and ProtectionWinner
3Speed OptimizationWinner
4PriceWinner
5Comparing FeaturesWinner

Below are the details of the tests and reviews.


1. Cleanup

Winner – CleanMyMac

Cleaning up the system files can free up a lot of disk space to boost your Mac’s performance.

The system cleaning process involves removing junk files, user cache files, user log files, duplicate files, etc.

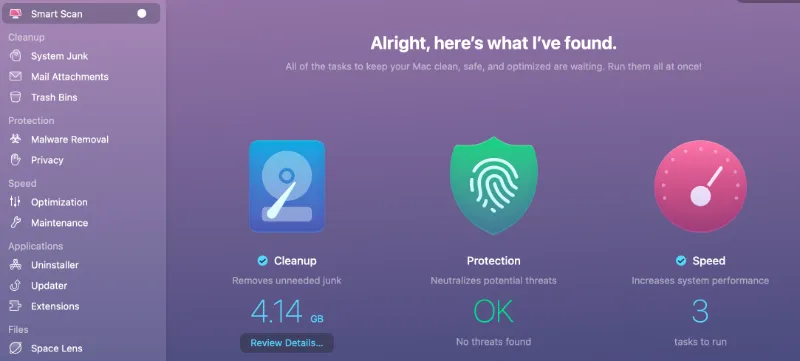
In our tests, CleanMyMac detected 4.14GB of disk space that can be freed up.

cleanmymac-tested-results-review

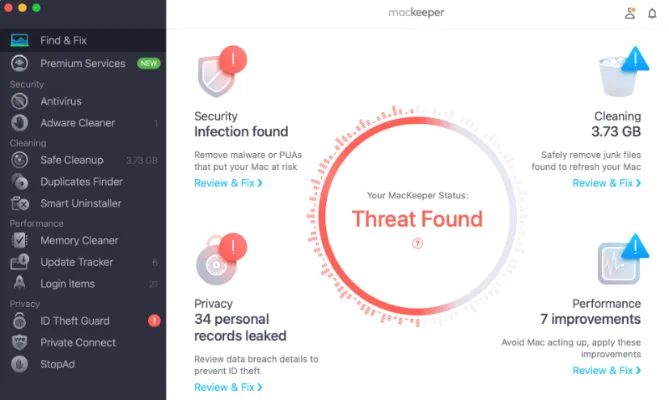
On the other hand, MacKeeper detected 3.73GB of disk space, which is lower than CleanMyMac.

mackeeper-tested-results-review

2. Security and Protection

Winner – MacKeeper

When it comes to security, a good cleaning and optimization app can protect your Mac system from external threats, such as adware, malware, trojans, and viruses.

After conducting a full system scan, MacKeeper found one (1) adware in the Mac system.

MacKeeper-scanning-adware-detected-protection

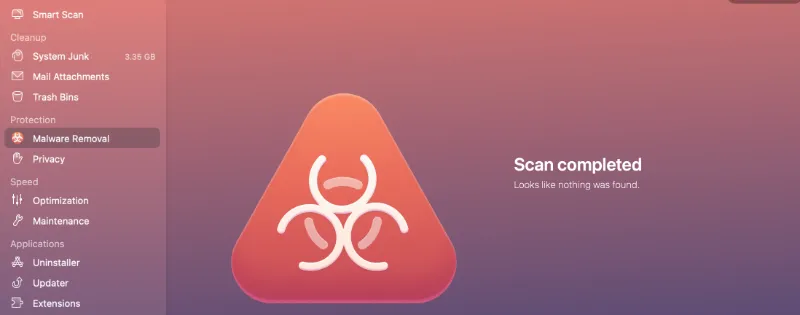
CleanMyMac however, did a full scan and did not detect any adware or malware.

cleanmymac-malware-adware-scanning-protection

3. Speed Optimization

Winner – MacKeeper

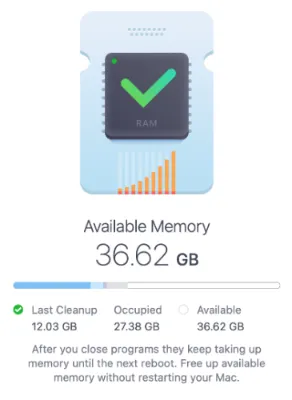
MacKeeper cleaned up over 12GB of memory from the occupied memory of approximately 27 GB. This is freeing up almost 50% of the RAM that is currently in use by the system.

Mackeeper-speed-cleaning-optimization-memory-cleaner

As for CleanMyMac, it only achieved a cleanup of approximately 30% of memory. Some of the speed optimization tasks it does are freeing up purgeable space, running maintenance scripts, flushing the DNS cache, etc.


4. Price

Winner – CleanMyMac

Both CleanMyMac and MacKeeper are priced differently due to the unique features they offer to their customers.

CleanMyMac XMacKeeper
USD 39.95 yearly subscription OR
USD 89.95 one-time purchase
USD 95 yearly subscription

As we can see from the table above, CleanMyMac is more affordable as it is priced lower than MacKeeper, and it offers a one-time purchase without the need for future renewals.

MacKeeper, however, has more features as compared to the others.

Depending on your preference, one should get the app that best suits their system needs.


5. Comparing Features

Winner – MacKeeper

In comparing the four (4) major aspects of both apps, MacKeeper emerges as having more features than CleanMyMac.

You can refer to the unique features in bold in the table shown below.

FeaturesCleanMyMacMacKeeper
Cleanup* Clearing System Junk
* Remove local copies of email downloads and attachments
* Clearing System Junk
* Remove local copies of email downloads and attachments
* Removing duplicates
* Smart Uninstaller (e.g. widgets, plugins)
Security & Protection* Malware Removal
* Removes locally stored items (e.g. cookies)
* Malware Removal
* Antivirus
Speed Optimization* Disable auto-start programs
* Improve disk performance
* Improve search performance
* Disable auto-start programs
* Memory (RAM) cleaner
* Update Tracker (apps that require updates)
Applications* App Uninstaller
* App Updater
* Remove/Disable extensions
* App Uninstaller
* App Updater
* Remove/Disable extensions
* ID Theft Guard (monitor if emails are compromised)
* VPN Connect
* Block ads and online trackers
* New features in Bold

Conclusion

Choose MacKeeper if you prefer to have a comprehensive range of Mac cleaning and protection features, especially on getting notified if our email has been compromised, use of a VPN for internet surfing, and have a dedicated memory (RAM) cleaner.

Choose CleanMyMac if you prefer to have a more affordable price with standard mac protection and cleaning features, such as clearing of system junk, malware removal, disk and search improvements, and advanced app uninstaller features.

CleanMyMac X vs MacKeeper: Tested Results & Reviews [2023] Read More »

convert-images-into-webp-for-mac

How to Install and Convert Images into WebP format on Mac

Here’s how to easily convert your images into the new WebP format on your Mac.

This is an offline method, and there is no need for you to rely on and trust any online 3rd-party services when you upload your images to them.

What are the types of image formats supported?

Only image files can be converted into WebP format. The following image file types are supported; PNG, JPEG, TIFF, WebP or raw Y’CbCr samples. Take note that animated PNG files are not supported in this conversion.

How to install and convert images into WebP format using a Mac?

Here are the steps to do so.

Installing Homebrew

First, you need to install the Homebrew application on your Mac if you haven’t.

  • Launch the Mac Terminal app by typing “Terminal” in your Spotlight Search. It is the magnifying glass icon on the top right-side of your screen.
  • Check first if you have Homebrew installed by typing the command below. A homebrew application is needed before you can install the WebP tool.
which brew

If you encounter this message that says <brew not found>, this means you do not have Homebrew installed.

If you already have Homebrew installed, skip to the Installing cwebp step.

  • To install Homebrew, copy and paste the command below into Terminal.
/bin/bash -c "$(curl -fsSL https://raw.githubusercontent.com/Homebrew/install/HEAD/install.sh)"
  • After installation, if you see this error message below, run the command below to complete the installation.
homebrew-application-update-message-in-mac-terminal
git -C /usr/local/Homebrew/Library/Taps/homebrew/homebrew-core fetch --unshallow

Installing cwebp

You must install the encoder application, cwebp, on your Mac.

The cwebp encoder compresses an image using the WebP format.

  • Use the following command to install the webp tool.
brew install webp

When completed, WebP is now fully installed on your Mac.

Converting Images into WebP formats

  • For example, to convert a JPG image into WebP format, use the command below;
cwebp -q 75 original.jpg -o converted.webp

Change <original.jpg> to your desired original image file. Rename <converted.webp> into your preferred filename, but you must keep the .webp extension at the end.

-q 75 refers to the compression rate.

If you use -q 50, you get a more reduced image size than a -q 75 compression. However, reduced image size may also result in more loss of image quality, so depending on your image quality needs, you should test the compression rate and check against your image quality. For example, if you want the best compression quality, you should use -q 100.

  • If you want a lossless image quality (one that converts itself into WebP format but yet retains all its image quality without any loss), you should use this command;
cwebp -lossless command.png -o converted.webp

To know more about compressing an image file using cWebP and all its other parameters and options, Google has a dedicated page that explains it all.

Check out this video tutorial on installing and converting images into WebP format using macOS Terminal.

What are the advantages of using WebP format?

Developed by Google in 2010, the WebP format is a strong competitor to the current image formats like JPEG, PNG and GIF.

WebP has achieved a better image compression rate, resulting in the image file being smaller in size. Moreover, WebP offers both lossless and lossy formats. Lossless compression retains all the image quality of the original file, whereas Lossy compression discards certain image data to achieve more file size reduction than Lossless compression.

Google had also stated that WebP lossless images are actually approx. 26% smaller in file size compared to PNG files and WebP lossy images are approx. 2%-34% smaller than their JPEG counterparts.

The popularity of the WebP format is increasing, with chat applications like Telegram. and Signal using it for faster sending, receiving and displaying purposes.

Web content creators like bloggers, photographers and social media influencers should consider WebP formats in addition to their usual JPEG and PNG image files. In situations where image loading speed matters, this will be where WebP formats will beat the rest of the competition with their reduced file size.

Conclusion

Installing the cwebp tool on Mac is a free, quick and easy way of converting images into the newer WebP format offline.

There is no need for internet connectivity since WebP is now installed on your laptop, and you do not have to upload your images to any online 3rd-party image conversion services.

The image conversion is due entirely via the Mac Terminal app, and through our testing, the output is very fast, almost instant, on many occasions.

WebP format is here to stay, with all major web browsers supporting it. The file size is reduced significantly yet retains much of its original quality.

Content creators like bloggers and social media influencers should consider using this newer format as it is smaller and offers both lossless and lossy formats.

How to Install and Convert Images into WebP format on Mac Read More »