admin

reset-telegram-password-without-email

3 Ways to Reset Your Telegram Password Without Email

You have forgotten your Telegram password, and you didn’t set up an email for recovery.

Don’t sweat it; you’re not alone. This is a surprisingly common issue that can leave people feeling frustrated and locked out of their own digital lives.

In this guide, we’ll take you through reliable methods for getting back into your account, even when email recovery isn’t an option.

You might think you’re out of options, but don’t throw in the towel just yet. Buckle up, and let’s get you back to chatting with friends, sharing memes, and whatever else you love to do on Telegram.

How to Recover Your Telegram Password Without an Email

Here are the three (3) methods you can use to resolve the issue;


Method 1: Leveraging Your Linked Phone Number

If you have a phone number linked to your Telegram account, you’re already halfway there.

Recovering your account using your phone number is straightforward, and it’s one of the most reliable methods out there. Let’s get into it.

Tools You Might Need:

  • Your mobile phone to receive the SMS code.
  • A notepad or password manager to keep your new password safe.

Step 1: Open Telegram’s Sign-in Page

Open the Telegram app on your device and head to the sign-in page. You’ll see an option that allows you to enter your phone number.

Step 2: Enter Your Phone Number

Punch in the phone number linked to the Telegram account you’re trying to access. Hit the “Next” button to proceed.

Step 3: Receive the SMS Code

An SMS code will be sent to your phone number. If you don’t receive it within a couple of minutes, there should be an option to resend it. Keep your phone nearby!

Step 4: Verify the Code

Once you receive the SMS, enter the code on the Telegram sign-in page to verify your identity. This should give you immediate access to your account.

Step 5: Create a New Password

Once you’re back in, go straight to the settings and set up a new password. This time, maybe jot it down somewhere safe or use a password manager.


Method 2: Making Use of Two-Step Verification

Two-Step Verification can seem like a hassle when you’re trying to log in quickly, but it’s a lifesaver when you’re looking to recover your account without an email.

Even if you’ve forgotten your main password, Two-Step Verification provides an extra layer of security and a way to get back into your account.

Tools You Might Need:

  • Your mobile device to receive the verification code.
  • A secure place to note down your new Two-Step Verification details.

Step 1: Access the Login Page

Fire up the Telegram app and navigate to the login page. Here, you’ll be prompted to enter your phone number or username.

Step 2: Go Through the Usual Steps

Enter the phone number associated with the account and confirm it. You’ll receive a code via SMS. Input that to proceed.

Step 3: Two-Step Verification Screen

You’ll be led to the Two-Step Verification screen, which usually asks for your password. Since you’ve forgotten it, click on the “Forgot Password” link that appears on this screen.

Step 4: Confirm Reset

Telegram will usually give you an option to reset your Two-Step Verification settings, which may lead to the deletion of your previous chat history. Confirm this to proceed.

Step 5: Set Up New Verification

Once the reset is complete, you’ll be asked to set up new Two-Step Verification settings. Go through the steps and secure your account with a fresh password.


Method 3: Reaching Out to Telegram Support

Telegram Support is more helpful than you might assume, and reaching out to them can sometimes be the quickest way to resolve your issue. Here’s a step-by-step guide to walk you through this process.

Step 1: Access Telegram Support

First off, visit the official Telegram support page. You can usually find this by doing a simple Google search or by navigating to the “Help” or “Support” section within the Telegram app if you can access it from another account or device.

Step 2: Provide Your Details

On the support page, you’ll be asked to enter some basic information—like your phone number, username, and the issue you’re facing. Be as detailed as possible. This is your chance to clearly state that you’ve forgotten your password and don’t have an email set up for recovery.

Step 3: Submit a Request

After entering all the necessary details, go ahead and submit your request.

Step 4: Wait for a Response

Telegram Support usually responds within 24-48 hours. You’ll need to be patient, but keep an eye on your alternative contact methods, such as another email or phone number you provided.


How to Prevent This in the Future

Let’s discuss some solid strategies to ensure you won’t be in this situation again.

1. Set Up a Recovery Email

I know, this post is about what to do if you don’t have one. But seriously, having a recovery email can save you a world of stress. Head over to Telegram settings and add one as soon as possible.

Consider using secure email providers such as Protonmail and Tutanota.

2. Use a Password Manager

Remembering passwords can be as challenging as remembering your third cousin’s birthday. A password manager takes that burden off your shoulders.

Apps like LastPass or Dashlane can securely store your passwords and even suggest strong ones for you.

3. Enable Two-Factor Authentication

If you haven’t already set up Two-Step Verification, now’s the time to do so. It adds layer of security and gives you a backup method to regain account access.


Conclusion

Forgetting your Telegram password without an email backup can feel trapped in a digital maze. But as you’ve seen, there are several ways out.

Whether you use SMS verification, enlist the help of your Telegram contacts, or make smart use of Two-Step Verification, you’ve got options.

For more insights into the ever-evolving world of Telegram, check out our deep dive comparing Telegram vs. Messenger to see which platform ticks all your boxes.


3 Ways to Reset Your Telegram Password Without Email Read More »

telegram-passcode-reset-recover

3 Ways To Reset & Recover Forgotten Telegram Passcode

We’ve all been there. You fire up Telegram to catch up on the latest gossip, memes, or important messages and locked.

You’re locked out because you can’t remember your Telegram passcode.

It’s like losing the keys to your digital life, isn’t it? But fret not, you’re not alone, and more importantly—there are ways to get back in.

How to Reset or Recover When You Cannot Remember Your Telegram Passcode

Here are the three (3) methods you can use to fix forgotten Telegram passcode;


Method 1: Two-Step Verification SMS Recovery

Step-by-Step Guide

If you’re stuck at the passcode screen, it’s game time. Here’s how you can utilize Two-Step Verification SMS Recovery to bust through that digital wall.

  • On the Telegram App: Go to the login screen and input your phone number. Hit “Next.”
  • SMS Verification: You’ll receive an SMS with a code. Enter this in the designated field.
  • Forgot Passcode?: Below the passcode input field, you’ll see an option that says, “Forgot Password?” Click it.
  • Confirm via SMS: Telegram will send you another SMS for confirmation. Yep, they’re thorough like that.
  • Reset Passcode: Once confirmed, you’ll be given an option to reset your passcode. Do it, and voila! You’re back in the game!

Now, this method works like a charm if you can access the phone number linked to your Telegram account. But what if you’ve also messed up your two-step verification?

What if I forgot my two-step verification on Telegram?
If that’s the case, hang tight. We’ll cover it in Method 2.


Method 2: Email Recovery

Step-by-Step Guide

Okay, so SMS recovery didn’t work for you, or you’ve got yourself in a deeper hole by forgetting your two-step verification as well.

No worries—there’s another lifeline! Here’s how to use Email Recovery to find your way back into Telegram.

  • Login Attempt: First things first, try logging in. Yeah, you’ll fail, but this prompts Telegram to offer you another recovery option.
  • Select Email Recovery: Telegram will prompt you with different recovery methods. Choose “Recover via email.”
  • Check Your Email: Open your email app and look for a message from Telegram.
  • Follow the Instructions: The email will guide you through the reset process. Just click the link and follow the steps.
  • Set a New Passcode: After you’re done, you’ll have the chance to set a new passcode.

Method 3: Contacting Telegram Support

Step-by-Step Guide

So, you’ve tried the first two methods and still can’t get back into your Telegram account? Don’t sweat it; there’s one more option—reaching out directly to Telegram Support.

  • Visit Telegram Support Page: Navigate to the Telegram Support page on your web browser.
  • Fill Out the Form: You’ll find a form asking for details about your issue. Be as descriptive as possible but keep it short and sweet.
  • Submit the Query: After filling it out, hit that submit button.
  • Wait for a Response: Telegram Support usually responds within 24-48 hours.
  • Follow Their Instructions: They’ll guide you through the steps to reset your passcode and get you back in action.

Frequently Asked Questions (FAQ)

Let’s tackle some common queries people have when they can’t remember their Telegram passcode.

Q1: Can Telegram Support help recover my chats?

Unfortunately, no. Telegram values user privacy, which means even they can’t access your encrypted chats.

Q2: How long will my Telegram account be deleted if I don’t recover my passcode?

Telegram will automatically delete your account if you remain inactive for six months. So, you’ve got a bit of a grace period to sort things out.

Q3: What are some tips for creating a memorable but secure passcode?

Great question! Go for a mix of letters, numbers, and special characters. Also, try using a phrase you can remember easily but is hard for others to guess.

Q4: Can I use a third-party app to recover my Telegram passcode?

While some third-party apps claim to do this, they’re often sketchy and can compromise your data. Always stick to official methods for a safe recovery.

Q5: Is there a limit on how many times I can attempt to enter my passcode?

After multiple failed attempts, Telegram will lock you out for a period to prevent unauthorized access. The lockout time increases with more failed attempts.


Conclusion

We’ve navigated the sometimes murky waters of forgotten passcodes and come out the other side.

Whether it’s the simple Two-Step Verification SMS Recovery, the handy Email Recovery, or the last-ditch effort of Contacting Telegram Support, you now have a toolkit to get back into your Telegram account.

And hey, now that you’re an expert, maybe jot down that new passcode in a super-secret spot? Just a thought!

If this guide has helped you, or you think it could help someone else struggling with their Telegram passcode, feel free to share it around.

Tech problems are like puzzles; the more pieces we have, the easier they are to solve.


3 Ways To Reset & Recover Forgotten Telegram Passcode Read More »

export-telegram-chat-messages

3 Ways To Export Telegram Chat Messages [PDF, CSV, etc]

In this digital age, our online conversations often contain vital information, memorable exchanges, or crucial data that you’d rather not lose. That’s where this guide comes in.

Whether you’re switching phones, backing up your digital life, or need a copy of specific conversations for legal reasons, this blog post will touch on three (3) dependable, effective methods for exporting your Telegram chats to ensure you never lose those important conversations.


How To Export Telegram Chats

Here are the three (3) methods you can use;


Method 1: Using Telegram Desktop’s Built-in Feature

Telegram Desktop comes with a built-in feature that makes exporting your chats simpler than you’d think. So, here’s the step-by-step guide on how to do it:

Step 1: Open Settings

First things first, launch Telegram Desktop. You can grab it from Telegram’s official website if you haven’t downloaded it yet.

Once you’re in, click on the three horizontal lines (that’s the “hamburger menu” for those in the know) in the top-left corner. Navigate to Settings, and then Advanced Settings.

Step 2: Export Chat History

In “Advanced Settings“, you’ll see an option that says “Export Telegram Data“.

Click that. A dialog box with various options will allow you to choose what exactly you want to export—individual chats, group chats, files, etc.

Make your selection, hit ‘Export,‘ and you will get a text file (.txt) format.

How can I export my entire Telegram chat?

Simply follow the steps above, but when you get to the dialog box, check the box that says ‘Export all chats.’

To Export Into PDF format,

Follow the steps below;

  • A computer with Telegram Desktop installed
  • A PDF printer software like Adobe PDF or CutePDF Writer

Step-by-Step Guide:

  • Open Telegram Desktop: If you haven’t already, download and install Telegram Desktop on your computer. Log in to your account.
  • Navigate to the Chat: Open the Telegram chat you want to export.
  • Select Messages: Click and drag to select the messages you want to convert into a PDF. Alternatively, you can go to ‘Options’ and select ‘Export Chat History’ to get a text file first.
  • Print Selected Messages: After selecting the messages, right-click and choose the ‘Print’ option from the context menu.
  • Choose a PDF Printer: When the print dialog box appears, select a PDF printer software like Adobe PDF from the list of available printers.
  • Print to PDF: Click the ‘Print’ button, and the software will prompt you to choose a location for saving the PDF. Click ‘Save‘, and your Telegram chat is now a PDF!

Method 2: Using Telegram Bots to Export Chats into CSV

So, are you intrigued by using Telegram bots to export your chats into a CSV file?

A CSV (Comma-Separated Values) file can be a lifesaver when you want a clean, organized format that can be easily imported into spreadsheet software like Excel or Google Sheets.

With the power of Telegram bots, this can be done in a jiffy.

Tools You’ll Need:

  • A Telegram account (obviously!)
  • Telegram Bot: ChatExportBot or similar

Step-by-Step Guide:

  • Find a Reliable Bot: Search for a reliable Telegram bot specializing in chat exports, like ChatExportBot. Add it to your Telegram.
  • Start the Bot: Initiate the bot by sending a ‘/start’ message.
  • Follow the Prompts: The bot will guide you through the process. Usually, you’ll have to add the bot into the chat you want to export.
  • Grant Permissions: Make sure the bot has the necessary permissions to read messages.
  • Select Export to CSV: Once the bot is in the chat, navigate its menu to find the export options and select ‘Export to CSV.’
  • Download the File: The bot will process the chat and provide a download link or directly send the CSV file.
  • Check Your Data: Open the CSV file using any spreadsheet software to make sure all your data has been correctly exported.

Extra Tips:

  • Make sure the bot you choose is trustworthy; you don’t want your data in the wrong hands.
  • Some bots may offer extra features like selective date ranges for the export or even media inclusion.

How can I export my entire Telegram chat?

When using a bot, you usually have the option to select date ranges. To export the entire chat, select the widest range available.


Method 3: Using Third-Party Software

Sometimes, Telegram’s own features might not cut it for you. You might want a more specialized, feature-rich experience.

That’s when third-party software comes into play. Buckle up, because this one’s gonna be a wild ride!

Step 1: Choose Your Software

You’ve got a smorgasbord of options regarding third-party software for exporting Telegram chats.

One highly recommended tool is ‘BackupTrans,’ known for its user-friendly interface and detailed exporting options.

Step 2: Install and Setup

Once you’ve picked your software, download and install it. Follow the initial setup process, which usually involves logging in to your Telegram account via a QR code or a verification message.

Step 3: Select Chats and Export

Within the software interface, you’ll see a list of all your Telegram chats. Just select the ones you want to export. Click on the ‘Export‘ option, choose your desired format—PDF, TXT, or HTML.


Frequently Asked Questions (FAQ)

Here’s a quick rundown of some of the questions you might be itching to ask.

Q1: Is Exporting Telegram Chats Safe?

Yes, as long as you’re using trusted methods like the Telegram Desktop app or reputable third-party software. Always be cautious with Telegram bots, though. Choose ones with good reviews and ratings.

Q2: Can I Export Media Files Along with Text?

Absolutely! Most methods, including Telegram’s built-in feature and third-party software, allow you to include media files. Just look for that option during the export process.

Q3: What Formats Can I Export My Chats In?

Usually, you can export chats in various formats like TXT, PDF, or HTML. Third-party software often provides the most options in this regard.


Conclusion

Exporting Telegram chats might seem daunting at first, but as you can see, it’s pretty straightforward once you know your options.

Telegram Desktop: This is your go-to if you use official methods. It’s free, safe, and you’re in good hands with Telegram’s own features.

Using Telegram Bots: Bots are your alley if you love to explore and tinker around. Just remember to pick a trustworthy one.

Third-Party Software: The jack-of-all-trades option. It’s handy if you need more customized export settings.

So, which one’s your pick? No matter what you choose, you’re now equipped to save those important chats for posterity or, you know, just for the laughs.

How can I export my entire Telegram chat?

After reading this guide, hopefully, you have a method that suits your needs perfectly. Remember, the best method is the one that makes your life easier.


3 Ways To Export Telegram Chat Messages [PDF, CSV, etc] Read More »

edit-telegram-sent-message

How To Edit Your Telegram Sent Message [Step-by-Step Guide]

Ever sent a message and thought, “Oops, I didn’t mean to say that”? Don’t worry, you’re not alone.

Today, we’ll discuss why sometimes you can’t edit messages on Telegram and how to fix it.


Quick Answer: Why You Can’t Edit a Message on Telegram

So, you’ve found yourself in a pickle because you can’t edit a message on Telegram? Don’t sweat it; you’re in the right place.

You might be facing this issue for a couple of common reasons. Here’s a quick rundown:

Common Reasons

  • Time Limit: You waited too long. Telegram allows you to edit messages only within 48 hours of sending them.
  • Admin Restrictions: Only admins or the original sender can edit messages in group chats.
  • Network Issues: Sometimes, it’s just a bad connection causing a hiccup.

Quick Fixes

  • Restart Telegram: Try giving the app a quick restart.
  • Update Your App: If you’re running an outdated version, make sure to update it.
  • Check Your Network: A stable internet connection is key to smooth messaging.

Understanding Telegram’s Edit Message Feature

Alright, let’s break this down a bit more. The ability to edit messages is one of the awesome features that sets Telegram apart from other messaging apps.

But, like any feature, it comes with its own set of rules and limitations.

Time Limit on Edits

First up, the clock is ticking when you send a message on Telegram. You have a window of 48 hours to make any edits. After that, you’re out of luck.

So, if you’re the type to dwell on that awkward text you sent, know you’ve got a two-day grace period to fix it.

Group Chat vs Private Chat

Things can get a bit more complicated if you’re in a group chat. Only the original sender or admins with editing rights can modify messages.

So, if you’ve sent something in a group and can’t edit it, you might want to check your admin status.

PAA: How can I edit someone else’s message on Telegram? No can do, my friend. Only admins with editing rights or the original sender can edit messages in group chats.


How to Edit a Telegram Message: Step-by-Step Guide

Alright, let’s get to the good stuff—the actual how-to. Whether you’re a Telegram newbie or need a quick refresher, this step-by-step guide is going to be your new best friend.

Accessing the Message

  1. Open the chat where you’ve sent the message you want to edit.
  2. Locate the message. It should be within the last 48 hours for editing to be an option.

Editing the Text

  1. Tap and hold the message until a menu appears.
  2. Select “Edit” from the menu options. If you don’t see “Edit,” you’ve likely passed the 48-hour window.

Confirming Your Edit

  1. Make your changes to the text.
  2. Hit “Save” or “Confirm” to apply the changes.

When you edit a message on Telegram, will they know?

Good question! Telegram will add a small “Edited” label next to the message, but it won’t send out a new notification to alert the recipient.

Why can’t I message a new contact on Telegram?

This could be due to privacy settings or you might not have verified your account. If you’re dealing with verification issues, our guide on how to get Telegram code by email might help you out.


Troubleshooting: When Things Don’t Go as Planned

So you followed all the steps but still can’t edit that pesky Telegram message? No worries—let’s roll up our sleeves and do some troubleshooting.

Restarting Telegram

The oldest trick in the book, but it works. Close the app, take a deep breath, and restart it. Sometimes the simplest solution is the most effective.

Checking for Updates

If you’re not running the latest version of Telegram, that could be the problem. Head over to your app store and see if an update is waiting for you. Click that “Update” button and relaunch the app.

Network Issues

Connectivity problems can mess with the best of us. Ensure you have a stable internet connection. If needed, switch to a different Wi-Fi network or enable data.

How do I edit a message in Telegram?

We’ve covered this earlier, but to recap: tap and hold the message, select “Edit,” make your changes, and then confirm. If this still doesn’t work, you may need to troubleshoot.


Additional Features Affecting Message Edits

At this point, you might be thinking, “Okay, got it. Editing messages on Telegram isn’t rocket science.” But wait, there’s more!

There are a couple of additional features that can impact your message-editing experience.

Admin Rights in Groups

If you’re in a group chat, remember that the admin might have restricted editing rights. Admins can set who gets to edit messages.

So, if you can’t edit, maybe it’s because you’re not an admin or don’t have the necessary permissions.

“Edited” Label

So you made your edits and everything’s peachy, but now there’s an “Edited” label next to your message. Yep, Telegram does that to maintain transparency within conversations.

The label will appear right next to the timestamp of the message.

PAA: When you edit a message on Telegram, will they know?

As mentioned earlier, Telegram slaps an “Edited” label on the message. It’s a small price to pay for the convenience of being able to change what you said.


Frequently Asked Questions (FAQ)

Inevitably, you’ve got questions and we’ve got answers. Here’s a quick FAQ roundup to help you navigate the world of Telegram message editing.

Q1: Can I Edit a Telegram Message After 48 Hours?

Nope, the 48-hour window is set in stone. After that, you can’t edit the message.

Q2: Can I Edit Media Files Like Photos and Videos?

Yes, you can! Just tap and hold on the media file in the chat and select the “Edit” option. Follow the same steps as you would for editing text.

Q3: Will Editing a Message Resend It or Create a New Notification?

No, editing a message will not resend it or trigger a new notification. It just adds an “Edited” label next to it.

Q4: Can I Remove the “Edited” Label?

Sorry, you can’t remove the “Edited” label. It’s there for transparency.

How can I edit someone else’s message on Telegram?

Only admins with the appropriate rights or the original sender can edit messages in group chats. So, you can’t edit someone else’s message unless you fall under these categories.


Conclusion

We’ve dissected the ins and outs of editing messages on Telegram, from the basic how-tos to troubleshooting and those pesky additional features.

At this point, you should be a bona fide expert—or at least proficient enough not to stress over a misplaced emoji or typo.

Remember, if you find yourself unable to edit, it could be a variety of factors: time limitations, admin settings, or even a glitchy app. The good news is that most of these can be fixed with a little know-how.


How To Edit Your Telegram Sent Message [Step-by-Step Guide] Read More »

are-telegram-saved-messages-unlimited

Are Telegram Saved Messages Unlimited? [Storage Explained]

Telegram has quickly skyrocketed as one of the go-to messaging apps for various reasons, from its heavy encryption to those nifty stickers.

But today, we’re focusing on a pretty cool Telegram feature that often flies under the radar: Saved Messages.

Why is everyone talking about it? How useful is it? Most importantly, is the storage space for these saved messages really unlimited?


Quick Answer: Are Telegram Saved Messages Unlimited?

Yes, Telegram’s Saved Messages are technically unlimited.

There’s no set limit on the number of messages, photos, videos, or any other types of files you can store under Saved Messages.

But wait, there’s a small catch, and we’ll get into the nitty-gritty details later on.

Does Telegram Saved Messages Have a Limit? Nah, you’re free to save as many messages as you want. The cloud-based storage system has got you covered.

What is the Storage Limit for Telegram Group? The storage limit for Telegram groups doesn’t affect your Saved Messages. Groups and individual messaging have their own separate storage rules.

Want to find out more about Telegram's unique features? Take a look at how Telegram stands out in our Telegram vs. Messenger comparison.

What is Telegram? A Brief Overview

Telegram is a cloud-based messaging app that offers a slew of features, like group chats, video calls, and even channels where you can broadcast messages to an unlimited number of subscribers.

It’s pretty much the Swiss Army knife of messaging apps.

How Telegram Differs From Other Messaging Apps

Why choose Telegram over, let’s say, WhatsApp or Facebook Messenger?

Telegram prides itself on its strong focus on privacy and super-fast speeds. It even allows you to send self-destructing messages—like those secret-agent type of messages that disappear after a set time.


The Concept of Saved Messages on Telegram

Let’s dive into the beating heart of Telegram: Saved Messages. At its core, this feature is your personal storage locker, a space for anything you want to keep for later.

We’re talking about text messages, audio files, documents, memes—you name it!

Why Use the Saved Messages Feature?

Imagine you’re scrolling through a chat and you find a killer recipe for guacamole. Or maybe you want to save that meme your friend sent so you can laugh at it later.

That’s where Saved Messages come into play. It’s like your digital notepad, a pocket to stuff all those little nuggets of information you don’t want to forget.


Understanding Telegram’s Storage System

Ah, storage. A topic that can either make you yawn or stress you out, depending on how much digital clutter you have.

But when it comes to Telegram, you’re in for a treat. The storage system in Telegram is way different from what you’re used to in other messaging apps.

Cloud-Based vs. Local Storage

Here’s where it gets interesting: Telegram uses cloud-based storage for your saved messages. What does that mean?

Imagine storing your data in a vault in the sky that you can access anytime, from any device. On the other hand, local storage is like keeping your treasures in a shoebox under your bed—accessible only from one location.


Unveiling the Mystery: Are Telegram Saved Messages Truly Unlimited?

You’ve been hanging around to get the inside scoop on whether Telegram’s Saved Messages feature is truly unlimited. So here it is: Yes and no.

Why? Your saved messages on Telegram are technically unlimited when it comes to the cloud storage Telegram provides. But remember, every rose has its thorns.

For instance, if you’re storing huge files like movies or complete seasons of your favorite TV show, you might eventually run into some issues with your device’s local storage.

Remember, you can save the messages in the cloud, but you’ll need to download them actually to use them. That’s when the limits of your device’s storage can kick in.

Does Telegram Saved Messages Have a Limit? Not from Telegram’s end, no. But the storage on your device might raise an eyebrow if you go too wild.


Tips and Tricks for Maximizing Telegram’s Saved Messages

Time to put on that thinking cap and start working smart with Telegram’s Saved Messages. It’s time to unleash the feature’s full potential.

Pinning Important Messages

Did you know you could pin messages within your saved messages?

It’s like sticking a Post-it Note on your computer screen, but digital. You won’t have to scroll for ages to find that one message you saved three months ago.

Categorize Using Hashtags

Another pro tip is to use hashtags to categorize your saved items. For example, #Recipes for all the drool-worthy food pics, or #WorkStuff for those important documents.


Conclusion

From exploring the concept of saved messages on Telegram to diving deep into its almost unlimited storage—there’s a lot to love about this feature.

Now you’re equipped with the know-how to maximize the benefits of your Saved Messages, be it by pinning or categorizing with hashtags.

But hey, the digital world is ever-evolving, and who knows what Telegram might come up with next?

One thing’s for sure—Saved Messages on Telegram is like that Swiss Army knife you didn’t know you needed. Multi-functional, reliable, and, most importantly, almost without limitations.

So, save that meme, pin that important text, and never worry about losing anything again!


Are Telegram Saved Messages Unlimited? [Storage Explained] Read More »

open-mbox-using-mac

5 Easy Ways to Open MBOX Email File on a Mac [Viewer]

So, you’ve got this MBOX file sitting on your Mac, scratching your head, and wondering how to crack it open.

MBOX files often house a treasure trove of emails, usually archived or exported from other platforms. They could be from your Gmail takeout, Thunderbird, or even Apple Mail accounts.

But here’s the kicker: Opening them isn’t as straightforward as double-clicking a PDF or a Word document.

This blog post will cover some of the most effective methods for opening MBOX files on a Mac.


What is an MBOX File?

An MBOX file is a mailbox file that stores email messages in a single, long text file.

It’s commonly used for archiving emails and is supported by various email clients like Thunderbird, Apple Mail, and even some versions of Microsoft Outlook.

Think of it as a zip file, but for emails. Inside this “zip,” each email contains details like the sender, receiver, subject line, and timestamps.

These are crucial if you’re looking to organize or categorize your emails for easier access later on. Essentially, it’s a universal way to keep all your emails in one place.


How To Open MBOX Email File on macOS

Here are the five (5) methods you can use to do so;


Method 1: Using a Specialized MBOX Viewer

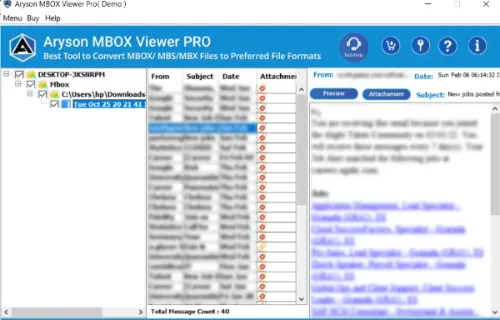
aryson-mbox-viewer

This method requires you to install software on your Mac, in order to open your MBOX file. This is an easy method.

Tool Recommendations:

  • Aryson MBOX Viewer: A great choice with a user-friendly interface. It supports multiple MBOX file formats, giving you the freedom to read almost any MBOX file.

Step-by-Step Guide for Aryson:

  1. Download and Install: Head to Aryson’s official website and download the Mac version. Install it like you would any other software. Easy peasy, right?
  2. Launch Aryson: Open the application, and you’ll find a simple layout waiting for you.
  3. Add MBOX File: Click on the ‘Add File’ button, locate your MBOX file, and hit ‘Open.’
  4. View and Search: Browse through the email list, click to read, and even search for specific emails if needed.

Step-by-Step Guide for MailsDaddy:

  1. Download and Setup: Visit the MailsDaddy website, download the tool, and run the installer.
  2. Open MailsDaddy: Once installed, launch the program. The interface is so intuitive, even a tech newbie would get it.
  3. Find Your MBOX: Go to ‘Add File’, find your MBOX file, and click ‘Open.’
  4. Read Emails: Like Aryson, you can click on each email to read its contents and use advanced search features to find that needle-in-a-haystack email.

Method 2: Converting MBOX to PST for Outlook

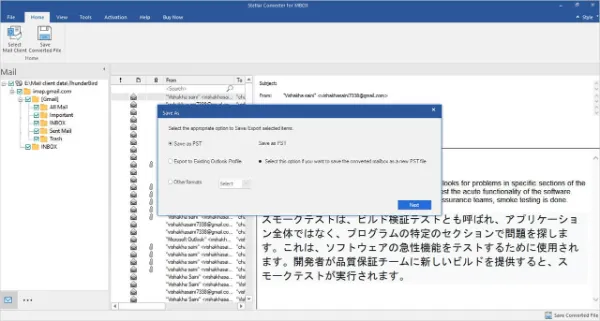
stellar-mbox-converter

Alright, so you’re an Outlook person in a Mac world. No judgments here! You can convert your MBOX files into a format native to Outlook: PST.

Step-by-Step Guide:

  1. Choose a Conversion Tool: First off, you’ll need a reliable MBOX to PST converter. Stellar Converter for MBOX is a solid choice. Download and install the software.
  2. Run the Software: Open Stellar Converter and hit ‘Browse’ to find the MBOX file you’re looking to convert.
  3. Begin the Conversion: Once the file is loaded, click on ‘Convert.’ The software will work its magic, turning your MBOX into a PST file.
  4. Save the PST File: After conversion, you’ll have the option to preview the emails. Satisfied? Click ‘Save’ to store the new PST file.
  5. Import into Outlook: Open Outlook on your Mac, go to ‘File,’ then ‘Import,’ and finally choose ‘Outlook Data File (.pst).’ Locate your newly created PST file and import it.

Method 3: Import into Apple Mail Directly

Who said you need external software to read an MBOX file? Not us! Apple Mail, your Mac’s built-in email client, can also do the job quite nicely.

Step-by-Step Guide:

  1. Fire up Apple Mail: Open the Apple Mail app by clicking on its icon, usually found in your dock or in the Applications folder.
  2. Head to File Menu: Once inside Apple Mail, click on ‘File’ in the menu bar and then choose ‘Import Mailboxes.’
  3. Select File Type: A dialog box will pop up. From the options available, choose ‘Files in mbox format’ and click ‘Continue.’
  4. Locate Your MBOX: Use the file navigator to find the MBOX file you wish to import. Select it and hit ‘Choose.’
  5. Start the Import: Click ‘Continue’ once more to begin importing your MBOX emails into Apple Mail. It might take a little while, so maybe grab a coffee?
  6. Check Imported Mails: After the process is complete, a new mailbox will appear in Apple Mail containing all the emails from the MBOX file.

Method 4: Utilizing Terminal Commands

For the brave at heart and nimble of finger, the Terminal on your Mac offers a way to take a sneak peek at MBOX files.

This isn’t the most user-friendly method, but hey, sometimes the old ways are the best ways!

Step-by-Step Guide:

  1. Open Terminal: The Terminal app is in your Utilities folder within Applications. Double-click to open it.
  2. Navigate to MBOX Location: Use the cd command to navigate to the folder where your MBOX file is stored. For example, if it’s in your Downloads folder, you’d type cd Downloads.
  3. List Files: Type ls to list the files in the folder. Confirm that your MBOX file is there.
  4. Read MBOX File: Now, use the cat command followed by the MBOX file name to read its contents. Like this: cat YourFileName.mbox.
  5. Parse Emails: The output will likely be a mess of text and code. You can use various grep commands to parse the information to make sense of it. For example, cat YourFileName.mbox | grep "From: " will list the senders of the emails.

Method 5: Using Online Services with GroupDocs.App

We’re living in the age of the internet where everything—including opening an MBOX file—is possible online. One service that’s pretty efficient for this is GroupDocs.App. No downloads, no installs, just pure cloud magic.

Steps to Use GroupDocs.App for Opening MBOX Files

  1. Navigate to the Site: First, you’re gonna want to visit the GroupDocs.App MBOX Viewer.
  2. Upload the MBOX File: Click the “Upload Document” button and select the MBOX file from your computer.
  3. Let It Work Its Magic: Once uploaded, the platform automatically loads your emails. Just chill for a bit and let it do its thing!
  4. View Your Emails: After the processing, you can browse the emails within the MBOX file. Yep, it’s that simple!

Pros and Cons, Real Quick

  • Pros:
    • No need to download anything.
    • User-friendly interface.
    • Fast upload and processing.
  • Cons:
    • As with all online services, watch out for privacy concerns.
    • There may be file size limitations for free users.

Considerations

  • Privacy: Make sure you understand GroupDocs.App’s privacy policy before uploading sensitive files.
  • File Size: Check out if there’s a maximum file size limit, especially if you’re working with bulky MBOX files.
  • Stable Internet Connection: Don’t even think about it without a good Wi-Fi connection. You’ll need it for uploading and viewing the files online.

The Takeaway: Online services like GroupDocs.App are a boon for quick and hassle-free access to your MBOX files. No downloads, no installations—just your emails on the screen in no time.


Conclusion

In sum, we’ve explored various approaches to address a critical question: How to open MBOX email files on a Mac.

From utilizing native software like Apple Mail to engaging specialized third-party tools and employing online services such as GroupDocs.App, we’ve reviewed options to suit diverse needs and preferences.

The methods outlined here are designed to provide you with reliable, effective, and accurate solutions to viewing your MBOX files.

The choice of method should align with your technical comfort level, privacy considerations, and specific requirements.

For instance, online services offer expediency but may compromise privacy, whereas Terminal commands give you more control but require a technical aptitude.


5 Easy Ways to Open MBOX Email File on a Mac [Viewer] Read More »

send-telegram-message-to-yourself

3 Ways to Send Message to Yourself on Telegram [Self Notes]

Ever had the itch to send a message to yourself on Telegram but didn’t know how to go about it?

Telegram stands out as a multi-faceted tool, providing more than just basic messaging services. One such feature, often overlooked, is the ability to send messages to oneself.

This can be a convenient method for storing important information, making quick notes, or scheduling reminders.

This comprehensive guide will explore three effective methods for sending a message to yourself on Telegram.


Why Would You Want to Message Yourself on Telegram?

Why would anyone want to send a message to themselves on Telegram?

Sending a message to yourself can serve multiple practical purposes:

  • Note-Taking: Got a brilliant idea or a to-do list? Jot it down and access it anytime, anywhere.
  • Media Storage: Want to keep that funny meme or crucial PDF handy? You can use your Telegram account as a digital locker.
  • Testing: Before sending a critical message or file, test it on yourself. Makes sense, right?
Read More: If you're interested in how this fits into the larger Telegram ecosystem, you might want to read up on how some users leverage Telegram for professional settings like job interviews.

How To Send A Message To Yourself On Telegram

Here are the three (3) methods you can use;


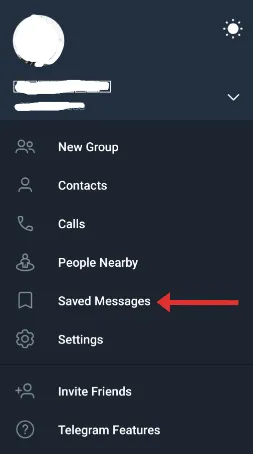
Method 1: Using the “Saved Messages” Feature

Let’s dive into the first, and arguably the most straightforward, method to send a message to yourself on Telegram: the “Saved Messages” feature.

How It Works

Think of “Saved Messages” as your Telegram notepad. Anything you send here is stored like a cloud-based digital locker that only you can access. It’s like talking to a digital mirror!

Steps to Use “Saved Messages”

  • Open Telegram: Launch the Telegram app on your device.
  • Access the Sidebar: Swipe right to reveal the sidebar menu or click on the three horizontal lines on the top-left corner.
  • Find “Saved Messages”: Scroll down to find a folder-like icon labeled “Saved Messages.”
  • Click and Send: Tap on it, and you can send messages, photos, videos, or even voice notes to yourself.

How to send secret message Telegram?

Interestingly, the “Saved Messages” feature could double as a secret vault for you. Since it’s only accessible by you, any ‘secret’ messages you want to store can be sent here for extra safekeeping.


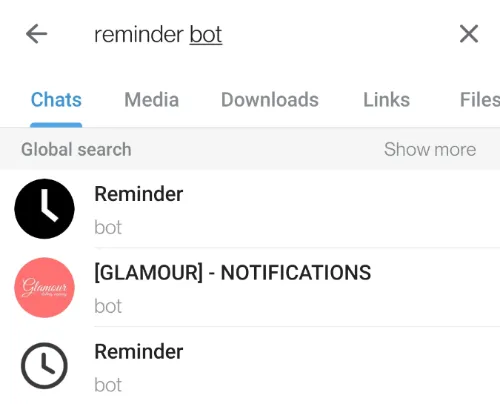
Method 2: Utilizing a Telegram Bot

For the tech-savvy or those who enjoy a bit of automation, using a Telegram Bot is another unique way to send a message to yourself on Telegram.

This method allows for some neat automation and scheduled messaging.

How It Works

Telegram bots are basically small programs that run inside Telegram. You can interact with them via text messages.

For this method, you’d use a bot that’s designed to store and send messages, including scheduling them for a future time if needed.

Steps to Use a Telegram Bot

  • Search for a Bot: Go to the search bar in Telegram and type “reminder bot” or a similar keyword.
  • Select and Start: Choose a bot with good reviews and click “Start” to initiate it.
  • Follow Instructions: Each bot will have its own set of instructions. Follow them to send a message to yourself.

Example Tool: ReminderBot is a popular choice that allows you to schedule messages for future delivery.


Method 3: Creating a Private Channel

Creating a Private Channel might be your jam if you want more customization and control.

This method is especially useful if you’re a content creator, a freelancer, or someone who loves compartmentalizing information.

How It Works

In Telegram, a channel is typically used to broadcast messages to a large audience. When you create a private channel, it’s just you in that space, making it another ideal place to store messages, media files, or any other data.

Steps to Create a Private Channel

  • Open Telegram and Navigate to Menu: Launch the app and hit the pencil icon, usually found on the bottom right corner.
  • Select “New Channel”: From the pop-up options, choose ‘New Channel.’
  • Set It Up: You’ll be prompted to name your channel and add a photo or description optionally.
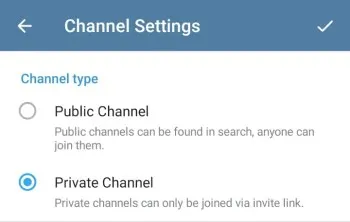
  • Choose ‘Private’: When selecting the type, select ‘Private‘ and not ‘Public.’
  • Finish Setup: Hit ‘Create,’ and your private channel is ready to go.
Fun Fact: Ever wondered how to scrape Telegram group members or transfer them to another group? This is particularly useful when encountering larger groups and channels. 

Frequently Asked Questions (FAQ)

Hey, you’ve made it this far! You’re practically a Telegram self-messaging expert. But just in case you’ve still got some questions floating around, let’s tackle those, shall we?

Q1: Can I Schedule Messages for Myself?

Yes, you can! If you use a Telegram bot like ReminderBot, you can schedule messages to be sent to you at a later time. It’s like having a little robotic personal assistant!

Q2: Is It Safe to Send Important Documents to Myself?

As long as you’re using the “Saved Messages” feature or a private channel, your documents are as safe as they would be in any other Telegram chat.

However, for extremely sensitive files, additional measures like encryption are advised.

Q3: Can I Access Self-Sent Messages on Different Devices?

Absolutely! One of the best parts about Telegram is that it’s cloud-based. Whether you’re on your phone, tablet, or computer, you can access your “Saved Messages” or private channels.

Q4: Do I Need Special Software for These Methods?

Nope, everything you need is baked right into Telegram or accessible via bots within the platform.


Conclusion

And there you have it, folks! Three foolproof methods for sending messages to yourself on Telegram.

Whether you’re a meticulous planner, a tech enthusiast, or just someone who wants a handy digital notebook, Telegram’s got you covered.

From Saved Messages and Private Channels to Telegram Bots, you can choose a method that best suits your style.

So, give one (or all) of these methods a spin and make your digital life a tad easier.


3 Ways to Send Message to Yourself on Telegram [Self Notes] Read More »

how-to-scan-qr-code-telegram-on-pc-mac

3 Ways To Easily Scan Telegram QR Code On Your PC and Mac

Welcome to this blog post designed to assist you in the process of scanning Telegram QR codes on both PC and Mac operating systems.

This article aims to address various methods for achieving this task efficiently and effectively.

Utilizing Telegram’s QR code scanning feature can significantly streamline your experience, whether for adding new contacts or joining a group.

Maybe you’re looking to secure your account, share contact info, or maybe even join a secret group.


How To Scan Telegram QR Code on Windows and macOS

Here are the three (3) methods you can use for PC and Mac;


Method 1: Using Telegram Desktop’s In-built Feature

The easiest way to scan a Telegram QR code on both PC and Mac is by utilizing Telegram’s in-built feature.

Yep, the platform itself provides you with this function—no need for any third-party mumbo jumbo.

Steps to Activate:

  • Open Telegram Desktop: Launch the Telegram Desktop app. If you haven’t downloaded it yet, make sure to grab the latest version from Telegram’s official website.
  • Navigate to Settings: Once you’re in, click on the three horizontal lines (☰) usually at the top left corner, then select ‘Settings.’
  • Select ‘Privacy and Security’: You’ll find this option within the sidebar on the left. Click on it to proceed.
  • Locate ‘QR Code’ Option: Scroll down until you see a subsection that includes the QR code scanning option. It should be fairly obvious, but keep your eyes peeled.
  • Activate Webcam: Click on the ‘Scan QR Code’ option. Your webcam will automatically activate. Make sure any sticker or tape does not block it. (Yes, you’d be surprised how often that’s the problem!)
  • Scan the Code: Place the QR code you want to scan in front of the webcam. Hold still for a few seconds until you hear a ‘ding’ or see a confirmation message.
  • Confirm Action: Depending on what the QR code is for—maybe adding a contact or joining a group—you’ll often need to confirm the action. A dialog box usually pops up for this. Click ‘OK’ or ‘Confirm.’

Troubleshooting Tips

  • If your webcam isn’t recognizing the QR code, ensure there are no lighting issues or obstructions.
  • Double-check if your webcam drivers are up to date. Outdated drivers can wreak havoc.

Method 2: Utilizing Third-Party QR Code Scanners

Third-party QR code scanners can be your go-to solution if you want to step outside the Telegram ecosystem. Be cautious and choose reliable software, as you deal with personal data here.

Recommended Scanners

  • QR-Code Scanner (For PC): This tool is straightforward and gets the job done quickly.
  • Barcode Scanner (For Mac): A free utility app with solid reviews in the Mac App Store.

How to Use:

For PC Users

  • Download & Install: Search for QR-Code Scanner on your preferred download site and install it.
  • Open the Software: Launch the program from your Start Menu.
  • Activate Webcam: The scanner will request access to your webcam. Grant it.
  • Scan Away: Hold the QR code in front of your webcam until it’s recognized.

For Mac Users

  • Download from Mac App Store: Type “Barcode Scanner” in the search bar and download the app.
  • Launch the App: Find it in your Applications folder and double-click to open.
  • Webcam Time: The app will automatically access your webcam.
  • Hold and Scan: Similar to the PC version, hold the QR code up to the webcam.

Troubleshooting Tips

  • Make sure you’ve given the app permission to access your webcam.
  • If the scan isn’t successful, check if there are any updates available for the app.

Method 3: Screen Capture and Online Scanning

In Method 3, we’ll be using a screen capture and an online QR code scanner. This one’s particularly useful if you’re having webcam issues or want to try something different.

Here’s How It Works:

For Both PC and Mac:
  • Capture the QR Code: The first step is to get a screenshot of the QR code you want to scan. You can use the Snipping Tool on PC or the screenshot function (Cmd+Shift+4) on Mac.
  • Save the Screenshot: Make sure you save the screenshot in an easily accessible folder because you’ll need it in the next step.
  • Go to an Online QR Scanner: Plenty of online QR code scanners are available. Some reliable ones include QR Code Reader by Scanova and GoQR.me.
  • Upload and Scan: Once you’re on the online scanner’s webpage, you’ll see an option to upload an image. Browse to the folder where you saved your screenshot, upload it, and let the scanner do its magic!
  • Take Action: You’ll get a result almost instantaneously. It could be a URL, a contact, or even a secret message! Follow through based on what the QR code contains.

Troubleshooting Tips:

  • If the online scanner isn’t reading your screenshot, double-check the quality of the image. It needs to be clear and well-lit.
  • Some online scanners have a size limit for uploads. Make sure your screenshot is below that limit.

Fun tip: This method is also great for capturing QR codes that are not stationary, like those in videos or GIFs. Just pause and snap!


Common Mistakes to Avoid

Alright, folks, we’ve walked through some solid methods to scan a Telegram QR code on your PC and Mac. But like they say, knowing what not to do is as important as knowing what to do.

So, let’s dive into some common mistakes you should steer clear of.

Fuzzy QR Code Images

  • The Mistake: Taking blurry or incomplete screenshots of the QR code.
  • The Fix: Make sure you capture a clear, full image of the QR code to ensure it can be read correctly.

Incorrect Webcam Positioning

  • The Mistake: Holding the QR code too close or too far from the webcam.
  • The Fix: The QR code should fill most of the webcam frame, but not be so close that it’s out of focus.

Ignoring Software Updates

  • The Mistake: Using outdated Telegram Desktop software or third-party apps.
  • The Fix: Regularly update your apps to make sure you have the latest features and security patches.

Denying Webcam Access

  • The Mistake: Not allowing the app to access your webcam by mistake or over privacy concerns.
  • The Fix: Make sure to grant webcam access when prompted. You can always revoke it later in your system settings.

Poor Lighting Conditions

  • The Mistake: Trying to scan a QR code in poor lighting conditions.
  • The Fix: Good lighting is crucial for successful scanning. Ensure you’re in a well-lit area.

If you’re like me and have ventured beyond QR codes to explore more Telegram features, you might find our guide on scrape Telegram group members super useful.


Conclusion

And there we have it, folks—the ins and outs of scanning a Telegram QR code on both PC and Mac.

From Telegram Desktop’s own features to third-party apps, and even some good ol’ screenshot magic, we’ve got you covered.

Remember, the key to a successful scan is a clear QR code, optimal lighting, and the right tools for the job.

Whether you’re a Telegram newbie or an old hand looking for new tricks, I hope this guide improves your Telegram experience.


3 Ways To Easily Scan Telegram QR Code On Your PC and Mac Read More »

telegram-cannot-scan-qr-code

7 Ways to FIX Telegram Cannot Scan QR Code [GUIDE]

You’re staring at that QR code on Telegram, but no matter what you do, it just won’t scan.

Don’t fret; you’re not alone. This issue can happen for various reasons, be it an expired QR code, camera issues, or even app permissions gone awry.

You’ve got this guide to navigate you through, so let’s dive in and get that QR code cooperating!

Fun Fact: The term "QR" actually stands for "Quick Response." If you’re having issues with responsiveness in Telegram, we've got a helpful article on how to fix Telegram messages stuck on sending.

How to FIX When Telegram Cannot Scan QR Code

Here are the seven (7) methods you can use to rectify the issue;


Method 1: Clear Camera Cache and Re-try

Why Clearing Cache Works

You see, cache is like your device’s short-term memory. It stores data temporarily to make processes quicker.

But sometimes, too much data accumulates, causing things to go awry. In the case of Telegram’s QR code scanner, a cluttered cache could lead to scanning issues.

To clear your camera’s cache:

  • Go to Settings on your device.
  • Navigate to Apps & Notifications.
  • Locate the Camera app.
  • Tap on Storage & Cache.
  • Hit Clear Cache.

Method 2: Expired QR Code

Let’s talk about the elephant in the room—expired QR codes. Just like that carton of milk in your fridge, QR codes have a shelf life too.

Why QR Codes Expire

QR codes can expire for a bunch of reasons. Maybe it’s a temporary code for a time-sensitive task, or perhaps the server it’s linked to has moved on to greener pastures.

Whatever the reason, an expired QR code is as useful as a screen door on a submarine.

What to Do When Your QR Code Is Expired

So you’ve got an expired code, now what? First, try regenerating the code from the source. Whether it’s linking a device or sharing contact info, go back to square one and create a fresh QR code.


Method 3: Adjust Camera Focus Manually

The problem could be as simple as a blurry focus. Think of your camera like a person squinting to read fine print—sometimes it needs a little help to see clearly.

The Science Behind Camera Focus

When a camera focuses, it’s aligning the lens to make a subject clear. Sometimes, the auto-focus feature gets a bit lazy or distracted. That’s when you have to step in and say, “Hey, focus!”

To manually adjust your camera focus:

  • Open your Camera App.
  • Tap the screen where the QR code is to force the camera to refocus.
  • Hold the phone steady—no one can focus while shaking, not even your camera.

Method 4: Tinker with App Permissions

Safety Concerns When Altering Permissions

First things first: altering app permissions isn’t something to do willy-nilly. You’re basically telling your phone what an app can and can’t access, so tread carefully.

To alter Telegram’s app permissions:

  • Go to Settings on your smartphone.
  • Scroll down to Apps & Notifications.
  • Find Telegram and tap on it.
  • Hit Permissions.
  • Find the Camera permission and enable it.

Method 5: Use Telegram Web to Scan QR Code

Alright, let’s flip the script here. What if I told you that you could use Telegram’s web version actually to scan that stubborn QR code?

Telegram Web’s Hidden Talent

Most folks use Telegram Web as a fallback for messaging when their mobile app isn’t working. But Telegram Web also has a QR code scanner built right in!

It’s versatile like that Swiss Army knife you keep forgetting you have.

Here’s how you scan a QR code using Telegram Web:

  • Open your Telegram Web on a different device.
  • Go to settings, and look for the “Devices” or “Active Sessions” option.
  • You’ll see a camera icon or a ‘Scan QR Code’ option—click on that.
  • Point it at the QR code you want to scan on your original device.

Method 6: Scan Using an External App

The Why and How of External Scanning

Using an external app to scan a QR code is a workaround, but if it gets the job done, why not? You’ll basically scan the QR code with this other app and then manually enter the data into Telegram.

To do this, you’ll need to:

  • Download a trusted QR code scanning app from your app store.
  • Open the app and scan the QR code.
  • Copy the resulting data or link.
  • Manually enter this into Telegram.

Method 7: Run a Device Compatibility Test

Sometimes the issue might not be with Telegram or the QR code, but rather with your device.

Understanding Compatibility

Compatibility in tech terms is like a love match. Your device and the Telegram app have to get along well enough for all functionalities to work smoothly.

So, let’s make sure your device isn’t the one causing trouble in this relationship.

Here’s how to run a quick compatibility check:

  • Visit Telegram’s official website to see the list of supported devices.
  • Check your device’s system settings to see if it meets the minimum requirements.
  • Update your device’s software, if necessary.
Fun Fact: Did you know that Japan's first QR code was used for tracking automotive parts? If you’re interested in how technology evolves, check out our post on Telegram vs. Messenger.

Conclusion

Phew, we’ve covered some serious ground, haven’t we?

From changing your phone’s settings to tinkering with Telegram Web, you’re now armed with seven unique methods to solve the “Telegram can’t scan QR code” conundrum.

It’s like having a tool belt filled with gadgets—you’re ready for anything Telegram throws your way.

Remember, technology isn’t always foolproof. Sometimes, it’s just about finding that perfect workaround to keep the digital train chugging along.

And if all else fails, Telegram Web is your trusty backup.


7 Ways to FIX Telegram Cannot Scan QR Code [GUIDE] Read More »

find-telegram-id-by-phone-number

3 Proven Ways to Find Telegram ID by Phone Number [GUIDE]

Ever scratched your head over finding a Telegram ID using just a phone number?

Yeah, it sounds like something a spy would do, but don’t worry—we’re diving into legit, straightforward methods that will clear the fog.

Whether you’re about efficiency, networking, or simply curious, understanding how to link a phone number to a Telegram ID can be pretty darn useful.


Telegram 101: Understanding IDs and Phone Numbers

Before we roll up our sleeves and dive into the how-to, it’s crucial to know what exactly we’re talking about. Not all IDs are created equal—especially when it comes to Telegram.

What is a Telegram ID?

A Telegram ID is a unique identifier associated with each Telegram account. This ID is what the Telegram system uses to recognize you, kinda like your social security number but for the digital world.

The Connection Between Phone Numbers and Telegram IDs

Now, why are we gabbing about phone numbers? Because your phone number is essentially your Telegram username when you first sign up.

Your phone number is more than just a string of digits—it’s your gateway to the Telegram universe.


How To Find Telegram ID By Phone Number

Here are the three (3) methods you can use;


Method 1: Add Contact

Step 1: Save the Phone Number

First thing’s first—save that phone number you’re investigating into your phone’s contact list. Open your phone’s contact app, add a new contact, and input the person’s phone number.

Tool Tip: You can use the default Contacts app on Android or the Phone app on iPhone.

Example: Save the contact as “John Doe” with the phone number +1 234-567-8901.

Step 2: Sync with Telegram Contacts

Once you’ve got that locked in, jump over to your Telegram app. Navigate to ‘Settings’ > ‘Contacts’ and tap on ‘Sync Contacts’. This will pull all your phone contacts into Telegram.

Tool Tip: Ensure Telegram has the permissions to access your contacts in your phone settings.

Step 3: Locate the Telegram ID

Go to your Telegram chat list and scroll through your contacts. If the person whose phone number you’ve saved has a Telegram account, you’ll spot them there.

Click on their name to open a chat, and then tap on their profile picture at the top. Tada! You should see their Telegram ID right there.

Example: Telegram ID might look something like “@johndoe” or a string of numbers if they haven’t set up a custom username.


Method 2: Telegram Search

Method 2 is all about utilizing Telegram’s built-in search function. This method works best if you have the phone number but don’t want to add it to your contacts.

Here’s how it goes down:

Step 1: Open Telegram Search

Fire up your Telegram app and locate the search icon, usually a magnifying glass, at the top of the screen.

Tool Tip: Both Android and iOS versions of Telegram have the search feature prominently displayed on the main chat screen.

Step 2: Input the Phone Number

Now, plug that phone number into the search bar. Make sure to use the international format, including the country code.

Example: Instead of typing “234-567-8901,” type “+1 234-567-8901”.

Step 3: Check for Public Accounts

If the person has a public account linked to that phone number, their profile will pop up in the search results. Click on their name to view their Telegram ID.

Tool Tip: Public accounts are those where the person has enabled the “Everybody” option in their privacy settings under “Who can find me by my number.”


Method 3: Telegram Username Search

This one’s perfect for when you don’t have the phone number, but you do know the username. Let’s unravel this, shall we?

Step 1: Navigate to Telegram Search

Open your Telegram app and hit that search icon—the magnifying glass—again at the top of the chat list.

Step 2: Enter the Username

Type in the username of the person you’re trying to find. Don’t forget to include the ‘@’ symbol before the username.

Example: Input @johndoe into the search bar.

Tool Tip: Usernames are case-insensitive, but make sure you have the correct spelling.

Step 3: Click to Reveal ID

If the account is public, it should appear in the search results almost instantly. Click on the profile to unveil the glorious Telegram ID.

Tool Tip: Double-check the username if the profile doesn’t pop up. Sometimes a tiny typo can send you on a wild goose chase.


Frequently Asked Questions (FAQ)

Before we close this chapter, let’s tackle some burning questions that you—or many other readers like you—might still have. Ready? Let’s dive in!

Q1: Is it Possible to Find a Private Telegram Account?

Not really, no. If a Telegram account is private, you won’t be able to find it through the search feature, even if you have the phone number or username.

Q2: What Do I Do if I Can’t Find the Telegram ID Even After Trying All Methods?

In this case, the person might have changed their phone number or deactivated their Telegram account. You might want to check out our guide on Telegram user does not exist for more troubleshooting tips.

Q3: Is There a Way to Know if Someone Is Active on Telegram?

Absolutely! If you see a single tick next to your message, they’re probably offline. But if you see two ticks, that could mean they’re online. For more, read why Telegram shows one tick while online.

Q4: Can Telegram IDs Be Tracked or Hacked?

While Telegram is known for its security, no platform is entirely bulletproof. However, hacking someone’s Telegram ID is illegal and unethical.


Conclusion

Whew! We’ve traversed the winding roads of Telegram’s search features, unearthing golden methods to find someone’s Telegram ID by their phone number—or lack thereof.

Whether you’re a newbie or a Telegram aficionado, these strategies are like a swiss army knife: multifaceted, useful, and dare I say, indispensable.

From the add-as-a-contact strategy to playing Sherlock with Telegram’s own search bar, and finally, getting the most out of Telegram’s username search, you’re now equipped with tools as powerful as a wizard’s wand.


3 Proven Ways to Find Telegram ID by Phone Number [GUIDE] Read More »