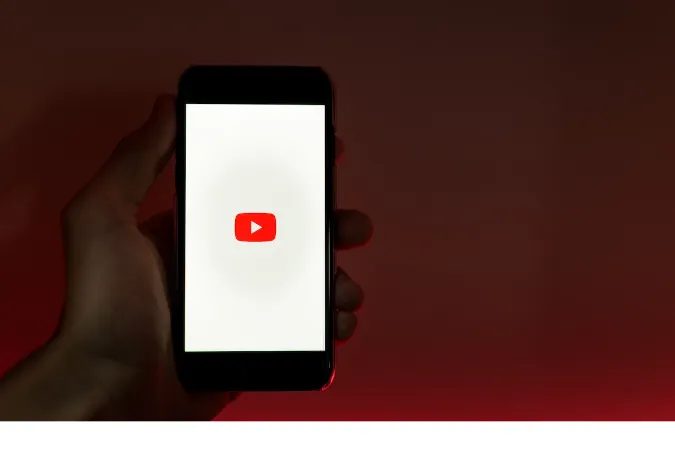
5 Ways to Reset Youtube Shorts Recommendations [Clear Feeds]
Are you tired of seeing the same type of content popping up in your Shorts feed? Wondering how to reset YouTube Shorts recommendations?
Don’t worry; you’re not alone. Many people ask, “Why am I getting weird YouTube Shorts recommendations?”
In this blog post, we’ll explore five different ways to refresh your YouTube Shorts recommendations and make your feed more exciting.
Fun Fact #1: Did you know that YouTube Shorts was launched in September 2020 as a direct competitor to TikTok?
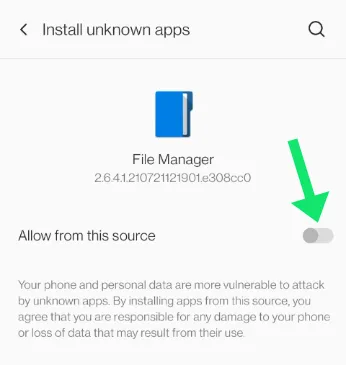
Method 1: Clear Your Watch History
One of the easiest ways to hit the reset button on your YouTube Shorts recommendations is by clearing your watch history.
YouTube’s algorithm uses your watch history to determine which videos to recommend to you.
So, if you’re wondering, “How do you clear YouTube Shorts recommendations?” follow these simple steps:
Step-by-Step Guide:
- Open the YouTube app on your smartphone.
- Tap on your profile picture in the top right corner.
- Go to “Settings” > “History & privacy.”
- Tap on “Clear watch history” and confirm.
How This Affects Your Recommendations:
Once you clear your watch history, YouTube will no longer have that data to base its recommendations on. This means you’ll start seeing different content in your Shorts feed.
However, keep in mind that as you watch more videos, YouTube will learn from your new watch history and adjust its recommendations accordingly.
Fun Fact #2: YouTube Shorts has seen rapid growth, with the platform now boasting more than 3.5 billion daily views worldwide!
Method 2: Manage Your Interests
Another way to reset your YouTube Shorts recommendations is by managing your interests through your Google Account settings.
This allows you to fine-tune your video preferences and get more relevant content.
Accessing Your Google Account Settings:
- Open the YouTube app and tap your profile picture in the top right corner.
- Tap “Your data in YouTube.”
- Scroll down to “YouTube activity controls” and tap “Manage your YouTube activity.”
Adjusting Your Video Preferences:
Once you’re in the YouTube activity controls, you can modify your interests to influence the content recommended to you:
- Tap on “Manage interests” under “Video recommendations.”
- Here, you’ll see a list of categories and topics that YouTube thinks you’re interested in. You can toggle them on or off according to your preferences.
By managing your interests, you’ll be able to tailor your YouTube Shorts recommendations to suit your tastes better.
Method 3: Create a Separate Account for Specific Interests
If you have diverse interests or want to explore different types of content without affecting your main account’s recommendations, consider creating a separate Google Account for specific interests.
This can help you maintain a more focused YouTube Shorts feed on each account.
Setting Up a New Google Account:
- Go to accounts.google.com and click “Create account.”
- Follow the prompts to set up your new account.
- Once your new account is created, sign in to the YouTube app with your new credentials.
Benefits of Having Multiple Accounts:
You can enjoy a more personalized experience on YouTube Shorts by having separate accounts for different interests.
For example, you could have one account dedicated to cooking and another for fitness.
This way, your recommendations on each account will remain focused, and you won’t have to worry about resetting your YouTube Shorts recommendations as often.
Method 4: Interact with Videos You Enjoy
Your interactions with videos on YouTube, such as likes, dislikes, comments, and subscriptions, also influence your Shorts recommendations.
By actively engaging with the content you enjoy, you’re sending signals to YouTube about your preferences.
Liking and Disliking Shorts:
When you come across a short you like, make sure to give it a thumbs-up. Conversely, if you don’t enjoy a particular short, feel free to tap the thumbs-down icon.
This will help YouTube’s algorithm better understand your preferences and tailor your recommendations accordingly.
Leaving Comments and Subscribing:
Another way to influence your YouTube Shorts recommendations is by leaving comments on videos you enjoy and subscribing to channels that produce content you’re interested in.
This further helps YouTube’s algorithm understand your preferences and deliver more relevant recommendations.
Method 5: Send Feedback to YouTube
After clearing your watch history, you can take a more direct approach by sending feedback to YouTube if you’re still unsatisfied with your YouTube Shorts recommendations.
This can help by reporting inappropriate content and requesting more variety.
Reporting Inappropriate Content:
Sometimes, you might get weird or inappropriate YouTube Shorts recommendations that you’d rather not see. In such cases, you can report the content to YouTube. Here’s how:
- Tap on the three-dot menu icon on the right side of the short you want to report.
- Select “Report” from the options.
- Choose the reason for reporting the content and submit your report.
Requesting More Variety:
To let YouTube know that you’d like to see more variety in your Shorts recommendations, you can send feedback:
- Open the YouTube app and tap on your profile picture.
- Select “Help & feedback.”
- Tap on “Send feedback” and compose a message explaining that you’d like more variety in your YouTube Shorts recommendations.
Remember that the YouTube team may not reply to your feedback directly but reviews it to improve the user experience.
Conclusion
Resetting your YouTube Shorts recommendations can help you discover new content and make your feed more engaging.
By following the methods we’ve discussed, such as clearing your watch history, sending feedback to YouTube, managing your interests, interacting with videos you enjoy, and creating separate accounts for specific interests, you’ll be able to make the most of your YouTube Shorts experience.
So go ahead and give these methods a try, and happy watching!
5 Ways to Reset Youtube Shorts Recommendations [Clear Feeds] Read More »