How to

open-mbox-using-mac

5 Easy Ways to Open MBOX Email File on a Mac [Viewer]

So, you’ve got this MBOX file sitting on your Mac, scratching your head, and wondering how to crack it open.

MBOX files often house a treasure trove of emails, usually archived or exported from other platforms. They could be from your Gmail takeout, Thunderbird, or even Apple Mail accounts.

But here’s the kicker: Opening them isn’t as straightforward as double-clicking a PDF or a Word document.

This blog post will cover some of the most effective methods for opening MBOX files on a Mac.


What is an MBOX File?

An MBOX file is a mailbox file that stores email messages in a single, long text file.

It’s commonly used for archiving emails and is supported by various email clients like Thunderbird, Apple Mail, and even some versions of Microsoft Outlook.

Think of it as a zip file, but for emails. Inside this “zip,” each email contains details like the sender, receiver, subject line, and timestamps.

These are crucial if you’re looking to organize or categorize your emails for easier access later on. Essentially, it’s a universal way to keep all your emails in one place.


How To Open MBOX Email File on macOS

Here are the five (5) methods you can use to do so;


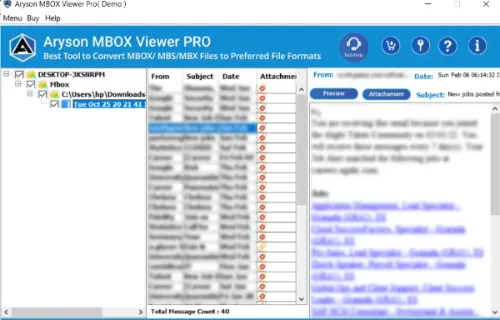
Method 1: Using a Specialized MBOX Viewer
aryson-mbox-viewer

This method requires you to install software on your Mac, in order to open your MBOX file. This is an easy method.

Tool Recommendations:

  • Aryson MBOX Viewer: A great choice with a user-friendly interface. It supports multiple MBOX file formats, giving you the freedom to read almost any MBOX file.

Step-by-Step Guide for Aryson:

  1. Download and Install: Head to Aryson’s official website and download the Mac version. Install it like you would any other software. Easy peasy, right?
  2. Launch Aryson: Open the application, and you’ll find a simple layout waiting for you.
  3. Add MBOX File: Click on the ‘Add File’ button, locate your MBOX file, and hit ‘Open.’
  4. View and Search: Browse through the email list, click to read, and even search for specific emails if needed.

Step-by-Step Guide for MailsDaddy:

  1. Download and Setup: Visit the MailsDaddy website, download the tool, and run the installer.
  2. Open MailsDaddy: Once installed, launch the program. The interface is so intuitive, even a tech newbie would get it.
  3. Find Your MBOX: Go to ‘Add File’, find your MBOX file, and click ‘Open.’
  4. Read Emails: Like Aryson, you can click on each email to read its contents and use advanced search features to find that needle-in-a-haystack email.

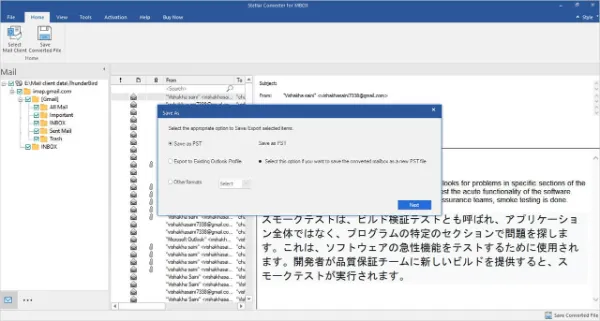
Method 2: Converting MBOX to PST for Outlook
stellar-mbox-converter

Alright, so you’re an Outlook person in a Mac world. No judgments here! You can convert your MBOX files into a format native to Outlook: PST.

Step-by-Step Guide:

  1. Choose a Conversion Tool: First off, you’ll need a reliable MBOX to PST converter. Stellar Converter for MBOX is a solid choice. Download and install the software.
  2. Run the Software: Open Stellar Converter and hit ‘Browse’ to find the MBOX file you’re looking to convert.
  3. Begin the Conversion: Once the file is loaded, click on ‘Convert.’ The software will work its magic, turning your MBOX into a PST file.
  4. Save the PST File: After conversion, you’ll have the option to preview the emails. Satisfied? Click ‘Save’ to store the new PST file.
  5. Import into Outlook: Open Outlook on your Mac, go to ‘File,’ then ‘Import,’ and finally choose ‘Outlook Data File (.pst).’ Locate your newly created PST file and import it.

Method 3: Import into Apple Mail Directly

Who said you need external software to read an MBOX file? Not us! Apple Mail, your Mac’s built-in email client, can also do the job quite nicely.

Step-by-Step Guide:

  1. Fire up Apple Mail: Open the Apple Mail app by clicking on its icon, usually found in your dock or in the Applications folder.
  2. Head to File Menu: Once inside Apple Mail, click on ‘File’ in the menu bar and then choose ‘Import Mailboxes.’
  3. Select File Type: A dialog box will pop up. From the options available, choose ‘Files in mbox format’ and click ‘Continue.’
  4. Locate Your MBOX: Use the file navigator to find the MBOX file you wish to import. Select it and hit ‘Choose.’
  5. Start the Import: Click ‘Continue’ once more to begin importing your MBOX emails into Apple Mail. It might take a little while, so maybe grab a coffee?
  6. Check Imported Mails: After the process is complete, a new mailbox will appear in Apple Mail containing all the emails from the MBOX file.

Method 4: Utilizing Terminal Commands

For the brave at heart and nimble of finger, the Terminal on your Mac offers a way to take a sneak peek at MBOX files.

This isn’t the most user-friendly method, but hey, sometimes the old ways are the best ways!

Step-by-Step Guide:

  1. Open Terminal: The Terminal app is in your Utilities folder within Applications. Double-click to open it.
  2. Navigate to MBOX Location: Use the cd command to navigate to the folder where your MBOX file is stored. For example, if it’s in your Downloads folder, you’d type cd Downloads.
  3. List Files: Type ls to list the files in the folder. Confirm that your MBOX file is there.
  4. Read MBOX File: Now, use the cat command followed by the MBOX file name to read its contents. Like this: cat YourFileName.mbox.
  5. Parse Emails: The output will likely be a mess of text and code. You can use various grep commands to parse the information to make sense of it. For example, cat YourFileName.mbox | grep "From: " will list the senders of the emails.

Method 5: Using Online Services with GroupDocs.App

We’re living in the age of the internet where everything—including opening an MBOX file—is possible online. One service that’s pretty efficient for this is GroupDocs.App. No downloads, no installs, just pure cloud magic.

Steps to Use GroupDocs.App for Opening MBOX Files

  1. Navigate to the Site: First, you’re gonna want to visit the GroupDocs.App MBOX Viewer.
  2. Upload the MBOX File: Click the “Upload Document” button and select the MBOX file from your computer.
  3. Let It Work Its Magic: Once uploaded, the platform automatically loads your emails. Just chill for a bit and let it do its thing!
  4. View Your Emails: After the processing, you can browse the emails within the MBOX file. Yep, it’s that simple!

Pros and Cons, Real Quick

  • Pros:
    • No need to download anything.
    • User-friendly interface.
    • Fast upload and processing.
  • Cons:
    • As with all online services, watch out for privacy concerns.
    • There may be file size limitations for free users.

Considerations

  • Privacy: Make sure you understand GroupDocs.App’s privacy policy before uploading sensitive files.
  • File Size: Check out if there’s a maximum file size limit, especially if you’re working with bulky MBOX files.
  • Stable Internet Connection: Don’t even think about it without a good Wi-Fi connection. You’ll need it for uploading and viewing the files online.

The Takeaway: Online services like GroupDocs.App are a boon for quick and hassle-free access to your MBOX files. No downloads, no installations—just your emails on the screen in no time.


Conclusion

In sum, we’ve explored various approaches to address a critical question: How to open MBOX email files on a Mac.

From utilizing native software like Apple Mail to engaging specialized third-party tools and employing online services such as GroupDocs.App, we’ve reviewed options to suit diverse needs and preferences.

The methods outlined here are designed to provide you with reliable, effective, and accurate solutions to viewing your MBOX files.

The choice of method should align with your technical comfort level, privacy considerations, and specific requirements.

For instance, online services offer expediency but may compromise privacy, whereas Terminal commands give you more control but require a technical aptitude.


5 Easy Ways to Open MBOX Email File on a Mac [Viewer] Read More »

send-telegram-message-to-yourself

3 Ways to Send Message to Yourself on Telegram [Self Notes]

Ever had the itch to send a message to yourself on Telegram but didn’t know how to go about it?

Telegram stands out as a multi-faceted tool, providing more than just basic messaging services. One such feature, often overlooked, is the ability to send messages to oneself.

This can be a convenient method for storing important information, making quick notes, or scheduling reminders.

This comprehensive guide will explore three effective methods for sending a message to yourself on Telegram.


Why Would You Want to Message Yourself on Telegram?

Why would anyone want to send a message to themselves on Telegram?

Sending a message to yourself can serve multiple practical purposes:

  • Note-Taking: Got a brilliant idea or a to-do list? Jot it down and access it anytime, anywhere.
  • Media Storage: Want to keep that funny meme or crucial PDF handy? You can use your Telegram account as a digital locker.
  • Testing: Before sending a critical message or file, test it on yourself. Makes sense, right?
Read More: If you're interested in how this fits into the larger Telegram ecosystem, you might want to read up on how some users leverage Telegram for professional settings like job interviews.

How To Send A Message To Yourself On Telegram

Here are the three (3) methods you can use;


Method 1: Using the “Saved Messages” Feature

Let’s dive into the first, and arguably the most straightforward, method to send a message to yourself on Telegram: the “Saved Messages” feature.

How It Works

Think of “Saved Messages” as your Telegram notepad. Anything you send here is stored like a cloud-based digital locker that only you can access. It’s like talking to a digital mirror!

Steps to Use “Saved Messages”

  • Open Telegram: Launch the Telegram app on your device.
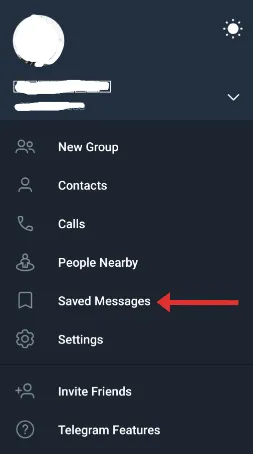
  • Access the Sidebar: Swipe right to reveal the sidebar menu or click on the three horizontal lines on the top-left corner.
  • Find “Saved Messages”: Scroll down to find a folder-like icon labeled “Saved Messages.”
  • Click and Send: Tap on it, and you can send messages, photos, videos, or even voice notes to yourself.

How to send secret message Telegram?

Interestingly, the “Saved Messages” feature could double as a secret vault for you. Since it’s only accessible by you, any ‘secret’ messages you want to store can be sent here for extra safekeeping.


Method 2: Utilizing a Telegram Bot

For the tech-savvy or those who enjoy a bit of automation, using a Telegram Bot is another unique way to send a message to yourself on Telegram.

This method allows for some neat automation and scheduled messaging.

How It Works

Telegram bots are basically small programs that run inside Telegram. You can interact with them via text messages.

For this method, you’d use a bot that’s designed to store and send messages, including scheduling them for a future time if needed.

Steps to Use a Telegram Bot

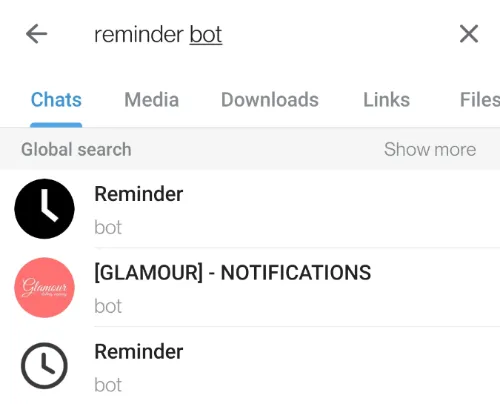
  • Search for a Bot: Go to the search bar in Telegram and type “reminder bot” or a similar keyword.
  • Select and Start: Choose a bot with good reviews and click “Start” to initiate it.
  • Follow Instructions: Each bot will have its own set of instructions. Follow them to send a message to yourself.

Example Tool: ReminderBot is a popular choice that allows you to schedule messages for future delivery.


Method 3: Creating a Private Channel

Creating a Private Channel might be your jam if you want more customization and control.

This method is especially useful if you’re a content creator, a freelancer, or someone who loves compartmentalizing information.

How It Works

In Telegram, a channel is typically used to broadcast messages to a large audience. When you create a private channel, it’s just you in that space, making it another ideal place to store messages, media files, or any other data.

Steps to Create a Private Channel

  • Open Telegram and Navigate to Menu: Launch the app and hit the pencil icon, usually found on the bottom right corner.
  • Select “New Channel”: From the pop-up options, choose ‘New Channel.’
  • Set It Up: You’ll be prompted to name your channel and add a photo or description optionally.
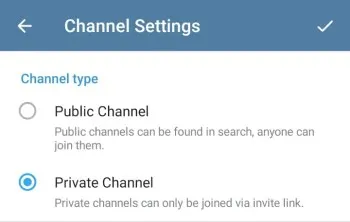
  • Choose ‘Private’: When selecting the type, select ‘Private‘ and not ‘Public.’
  • Finish Setup: Hit ‘Create,’ and your private channel is ready to go.
Fun Fact: Ever wondered how to scrape Telegram group members or transfer them to another group? This is particularly useful when encountering larger groups and channels. 

Frequently Asked Questions (FAQ)

Hey, you’ve made it this far! You’re practically a Telegram self-messaging expert. But just in case you’ve still got some questions floating around, let’s tackle those, shall we?

Q1: Can I Schedule Messages for Myself?

Yes, you can! If you use a Telegram bot like ReminderBot, you can schedule messages to be sent to you at a later time. It’s like having a little robotic personal assistant!

Q2: Is It Safe to Send Important Documents to Myself?

As long as you’re using the “Saved Messages” feature or a private channel, your documents are as safe as they would be in any other Telegram chat.

However, for extremely sensitive files, additional measures like encryption are advised.

Q3: Can I Access Self-Sent Messages on Different Devices?

Absolutely! One of the best parts about Telegram is that it’s cloud-based. Whether you’re on your phone, tablet, or computer, you can access your “Saved Messages” or private channels.

Q4: Do I Need Special Software for These Methods?

Nope, everything you need is baked right into Telegram or accessible via bots within the platform.


Conclusion

And there you have it, folks! Three foolproof methods for sending messages to yourself on Telegram.

Whether you’re a meticulous planner, a tech enthusiast, or just someone who wants a handy digital notebook, Telegram’s got you covered.

From Saved Messages and Private Channels to Telegram Bots, you can choose a method that best suits your style.

So, give one (or all) of these methods a spin and make your digital life a tad easier.


3 Ways to Send Message to Yourself on Telegram [Self Notes] Read More »

how-to-scan-qr-code-telegram-on-pc-mac

3 Ways To Easily Scan Telegram QR Code On Your PC and Mac

Welcome to this blog post designed to assist you in the process of scanning Telegram QR codes on both PC and Mac operating systems.

This article aims to address various methods for achieving this task efficiently and effectively.

Utilizing Telegram’s QR code scanning feature can significantly streamline your experience, whether for adding new contacts or joining a group.

Maybe you’re looking to secure your account, share contact info, or maybe even join a secret group.


How To Scan Telegram QR Code on Windows and macOS

Here are the three (3) methods you can use for PC and Mac;


Method 1: Using Telegram Desktop’s In-built Feature

The easiest way to scan a Telegram QR code on both PC and Mac is by utilizing Telegram’s in-built feature.

Yep, the platform itself provides you with this function—no need for any third-party mumbo jumbo.

Steps to Activate:

  • Open Telegram Desktop: Launch the Telegram Desktop app. If you haven’t downloaded it yet, make sure to grab the latest version from Telegram’s official website.
  • Navigate to Settings: Once you’re in, click on the three horizontal lines (☰) usually at the top left corner, then select ‘Settings.’
  • Select ‘Privacy and Security’: You’ll find this option within the sidebar on the left. Click on it to proceed.
  • Locate ‘QR Code’ Option: Scroll down until you see a subsection that includes the QR code scanning option. It should be fairly obvious, but keep your eyes peeled.
  • Activate Webcam: Click on the ‘Scan QR Code’ option. Your webcam will automatically activate. Make sure any sticker or tape does not block it. (Yes, you’d be surprised how often that’s the problem!)
  • Scan the Code: Place the QR code you want to scan in front of the webcam. Hold still for a few seconds until you hear a ‘ding’ or see a confirmation message.
  • Confirm Action: Depending on what the QR code is for—maybe adding a contact or joining a group—you’ll often need to confirm the action. A dialog box usually pops up for this. Click ‘OK’ or ‘Confirm.’

Troubleshooting Tips

  • If your webcam isn’t recognizing the QR code, ensure there are no lighting issues or obstructions.
  • Double-check if your webcam drivers are up to date. Outdated drivers can wreak havoc.

Method 2: Utilizing Third-Party QR Code Scanners

Third-party QR code scanners can be your go-to solution if you want to step outside the Telegram ecosystem. Be cautious and choose reliable software, as you deal with personal data here.

Recommended Scanners

  • QR-Code Scanner (For PC): This tool is straightforward and gets the job done quickly.
  • Barcode Scanner (For Mac): A free utility app with solid reviews in the Mac App Store.

How to Use:

For PC Users

  • Download & Install: Search for QR-Code Scanner on your preferred download site and install it.
  • Open the Software: Launch the program from your Start Menu.
  • Activate Webcam: The scanner will request access to your webcam. Grant it.
  • Scan Away: Hold the QR code in front of your webcam until it’s recognized.

For Mac Users

  • Download from Mac App Store: Type “Barcode Scanner” in the search bar and download the app.
  • Launch the App: Find it in your Applications folder and double-click to open.
  • Webcam Time: The app will automatically access your webcam.
  • Hold and Scan: Similar to the PC version, hold the QR code up to the webcam.

Troubleshooting Tips

  • Make sure you’ve given the app permission to access your webcam.
  • If the scan isn’t successful, check if there are any updates available for the app.

Method 3: Screen Capture and Online Scanning

In Method 3, we’ll be using a screen capture and an online QR code scanner. This one’s particularly useful if you’re having webcam issues or want to try something different.

Here’s How It Works:

For Both PC and Mac:
  • Capture the QR Code: The first step is to get a screenshot of the QR code you want to scan. You can use the Snipping Tool on PC or the screenshot function (Cmd+Shift+4) on Mac.
  • Save the Screenshot: Make sure you save the screenshot in an easily accessible folder because you’ll need it in the next step.
  • Go to an Online QR Scanner: Plenty of online QR code scanners are available. Some reliable ones include QR Code Reader by Scanova and GoQR.me.
  • Upload and Scan: Once you’re on the online scanner’s webpage, you’ll see an option to upload an image. Browse to the folder where you saved your screenshot, upload it, and let the scanner do its magic!
  • Take Action: You’ll get a result almost instantaneously. It could be a URL, a contact, or even a secret message! Follow through based on what the QR code contains.

Troubleshooting Tips:

  • If the online scanner isn’t reading your screenshot, double-check the quality of the image. It needs to be clear and well-lit.
  • Some online scanners have a size limit for uploads. Make sure your screenshot is below that limit.

Fun tip: This method is also great for capturing QR codes that are not stationary, like those in videos or GIFs. Just pause and snap!


Common Mistakes to Avoid

Alright, folks, we’ve walked through some solid methods to scan a Telegram QR code on your PC and Mac. But like they say, knowing what not to do is as important as knowing what to do.

So, let’s dive into some common mistakes you should steer clear of.

Fuzzy QR Code Images

  • The Mistake: Taking blurry or incomplete screenshots of the QR code.
  • The Fix: Make sure you capture a clear, full image of the QR code to ensure it can be read correctly.

Incorrect Webcam Positioning

  • The Mistake: Holding the QR code too close or too far from the webcam.
  • The Fix: The QR code should fill most of the webcam frame, but not be so close that it’s out of focus.

Ignoring Software Updates

  • The Mistake: Using outdated Telegram Desktop software or third-party apps.
  • The Fix: Regularly update your apps to make sure you have the latest features and security patches.

Denying Webcam Access

  • The Mistake: Not allowing the app to access your webcam by mistake or over privacy concerns.
  • The Fix: Make sure to grant webcam access when prompted. You can always revoke it later in your system settings.

Poor Lighting Conditions

  • The Mistake: Trying to scan a QR code in poor lighting conditions.
  • The Fix: Good lighting is crucial for successful scanning. Ensure you’re in a well-lit area.

If you’re like me and have ventured beyond QR codes to explore more Telegram features, you might find our guide on scrape Telegram group members super useful.


Conclusion

And there we have it, folks—the ins and outs of scanning a Telegram QR code on both PC and Mac.

From Telegram Desktop’s own features to third-party apps, and even some good ol’ screenshot magic, we’ve got you covered.

Remember, the key to a successful scan is a clear QR code, optimal lighting, and the right tools for the job.

Whether you’re a Telegram newbie or an old hand looking for new tricks, I hope this guide improves your Telegram experience.


3 Ways To Easily Scan Telegram QR Code On Your PC and Mac Read More »

telegram-cannot-scan-qr-code

7 Ways to FIX Telegram Cannot Scan QR Code [GUIDE]

You’re staring at that QR code on Telegram, but no matter what you do, it just won’t scan.

Don’t fret; you’re not alone. This issue can happen for various reasons, be it an expired QR code, camera issues, or even app permissions gone awry.

You’ve got this guide to navigate you through, so let’s dive in and get that QR code cooperating!

Fun Fact: The term "QR" actually stands for "Quick Response." If you’re having issues with responsiveness in Telegram, we've got a helpful article on how to fix Telegram messages stuck on sending.

How to FIX When Telegram Cannot Scan QR Code

Here are the seven (7) methods you can use to rectify the issue;


Method 1: Clear Camera Cache and Re-try

Why Clearing Cache Works

You see, cache is like your device’s short-term memory. It stores data temporarily to make processes quicker.

But sometimes, too much data accumulates, causing things to go awry. In the case of Telegram’s QR code scanner, a cluttered cache could lead to scanning issues.

To clear your camera’s cache:

  • Go to Settings on your device.
  • Navigate to Apps & Notifications.
  • Locate the Camera app.
  • Tap on Storage & Cache.
  • Hit Clear Cache.

Method 2: Expired QR Code

Let’s talk about the elephant in the room—expired QR codes. Just like that carton of milk in your fridge, QR codes have a shelf life too.

Why QR Codes Expire

QR codes can expire for a bunch of reasons. Maybe it’s a temporary code for a time-sensitive task, or perhaps the server it’s linked to has moved on to greener pastures.

Whatever the reason, an expired QR code is as useful as a screen door on a submarine.

What to Do When Your QR Code Is Expired

So you’ve got an expired code, now what? First, try regenerating the code from the source. Whether it’s linking a device or sharing contact info, go back to square one and create a fresh QR code.


Method 3: Adjust Camera Focus Manually

The problem could be as simple as a blurry focus. Think of your camera like a person squinting to read fine print—sometimes it needs a little help to see clearly.

The Science Behind Camera Focus

When a camera focuses, it’s aligning the lens to make a subject clear. Sometimes, the auto-focus feature gets a bit lazy or distracted. That’s when you have to step in and say, “Hey, focus!”

To manually adjust your camera focus:

  • Open your Camera App.
  • Tap the screen where the QR code is to force the camera to refocus.
  • Hold the phone steady—no one can focus while shaking, not even your camera.

Method 4: Tinker with App Permissions

Safety Concerns When Altering Permissions

First things first: altering app permissions isn’t something to do willy-nilly. You’re basically telling your phone what an app can and can’t access, so tread carefully.

To alter Telegram’s app permissions:

  • Go to Settings on your smartphone.
  • Scroll down to Apps & Notifications.
  • Find Telegram and tap on it.
  • Hit Permissions.
  • Find the Camera permission and enable it.

Method 5: Use Telegram Web to Scan QR Code

Alright, let’s flip the script here. What if I told you that you could use Telegram’s web version actually to scan that stubborn QR code?

Telegram Web’s Hidden Talent

Most folks use Telegram Web as a fallback for messaging when their mobile app isn’t working. But Telegram Web also has a QR code scanner built right in!

It’s versatile like that Swiss Army knife you keep forgetting you have.

Here’s how you scan a QR code using Telegram Web:

  • Open your Telegram Web on a different device.
  • Go to settings, and look for the “Devices” or “Active Sessions” option.
  • You’ll see a camera icon or a ‘Scan QR Code’ option—click on that.
  • Point it at the QR code you want to scan on your original device.

Method 6: Scan Using an External App

The Why and How of External Scanning

Using an external app to scan a QR code is a workaround, but if it gets the job done, why not? You’ll basically scan the QR code with this other app and then manually enter the data into Telegram.

To do this, you’ll need to:

  • Download a trusted QR code scanning app from your app store.
  • Open the app and scan the QR code.
  • Copy the resulting data or link.
  • Manually enter this into Telegram.

Method 7: Run a Device Compatibility Test

Sometimes the issue might not be with Telegram or the QR code, but rather with your device.

Understanding Compatibility

Compatibility in tech terms is like a love match. Your device and the Telegram app have to get along well enough for all functionalities to work smoothly.

So, let’s make sure your device isn’t the one causing trouble in this relationship.

Here’s how to run a quick compatibility check:

  • Visit Telegram’s official website to see the list of supported devices.
  • Check your device’s system settings to see if it meets the minimum requirements.
  • Update your device’s software, if necessary.
Fun Fact: Did you know that Japan's first QR code was used for tracking automotive parts? If you’re interested in how technology evolves, check out our post on Telegram vs. Messenger.

Conclusion

Phew, we’ve covered some serious ground, haven’t we?

From changing your phone’s settings to tinkering with Telegram Web, you’re now armed with seven unique methods to solve the “Telegram can’t scan QR code” conundrum.

It’s like having a tool belt filled with gadgets—you’re ready for anything Telegram throws your way.

Remember, technology isn’t always foolproof. Sometimes, it’s just about finding that perfect workaround to keep the digital train chugging along.

And if all else fails, Telegram Web is your trusty backup.


7 Ways to FIX Telegram Cannot Scan QR Code [GUIDE] Read More »

find-telegram-id-by-phone-number

3 Proven Ways to Find Telegram ID by Phone Number [GUIDE]

Ever scratched your head over finding a Telegram ID using just a phone number?

Yeah, it sounds like something a spy would do, but don’t worry—we’re diving into legit, straightforward methods that will clear the fog.

Whether you’re about efficiency, networking, or simply curious, understanding how to link a phone number to a Telegram ID can be pretty darn useful.


Telegram 101: Understanding IDs and Phone Numbers

Before we roll up our sleeves and dive into the how-to, it’s crucial to know what exactly we’re talking about. Not all IDs are created equal—especially when it comes to Telegram.

What is a Telegram ID?

A Telegram ID is a unique identifier associated with each Telegram account. This ID is what the Telegram system uses to recognize you, kinda like your social security number but for the digital world.

The Connection Between Phone Numbers and Telegram IDs

Now, why are we gabbing about phone numbers? Because your phone number is essentially your Telegram username when you first sign up.

Your phone number is more than just a string of digits—it’s your gateway to the Telegram universe.


How To Find Telegram ID By Phone Number

Here are the three (3) methods you can use;


Method 1: Add Contact

Step 1: Save the Phone Number

First thing’s first—save that phone number you’re investigating into your phone’s contact list. Open your phone’s contact app, add a new contact, and input the person’s phone number.

Tool Tip: You can use the default Contacts app on Android or the Phone app on iPhone.

Example: Save the contact as “John Doe” with the phone number +1 234-567-8901.

Step 2: Sync with Telegram Contacts

Once you’ve got that locked in, jump over to your Telegram app. Navigate to ‘Settings’ > ‘Contacts’ and tap on ‘Sync Contacts’. This will pull all your phone contacts into Telegram.

Tool Tip: Ensure Telegram has the permissions to access your contacts in your phone settings.

Step 3: Locate the Telegram ID

Go to your Telegram chat list and scroll through your contacts. If the person whose phone number you’ve saved has a Telegram account, you’ll spot them there.

Click on their name to open a chat, and then tap on their profile picture at the top. Tada! You should see their Telegram ID right there.

Example: Telegram ID might look something like “@johndoe” or a string of numbers if they haven’t set up a custom username.


Method 2: Telegram Search

Method 2 is all about utilizing Telegram’s built-in search function. This method works best if you have the phone number but don’t want to add it to your contacts.

Here’s how it goes down:

Step 1: Open Telegram Search

Fire up your Telegram app and locate the search icon, usually a magnifying glass, at the top of the screen.

Tool Tip: Both Android and iOS versions of Telegram have the search feature prominently displayed on the main chat screen.

Step 2: Input the Phone Number

Now, plug that phone number into the search bar. Make sure to use the international format, including the country code.

Example: Instead of typing “234-567-8901,” type “+1 234-567-8901”.

Step 3: Check for Public Accounts

If the person has a public account linked to that phone number, their profile will pop up in the search results. Click on their name to view their Telegram ID.

Tool Tip: Public accounts are those where the person has enabled the “Everybody” option in their privacy settings under “Who can find me by my number.”


Method 3: Telegram Username Search

This one’s perfect for when you don’t have the phone number, but you do know the username. Let’s unravel this, shall we?

Step 1: Navigate to Telegram Search

Open your Telegram app and hit that search icon—the magnifying glass—again at the top of the chat list.

Step 2: Enter the Username

Type in the username of the person you’re trying to find. Don’t forget to include the ‘@’ symbol before the username.

Example: Input @johndoe into the search bar.

Tool Tip: Usernames are case-insensitive, but make sure you have the correct spelling.

Step 3: Click to Reveal ID

If the account is public, it should appear in the search results almost instantly. Click on the profile to unveil the glorious Telegram ID.

Tool Tip: Double-check the username if the profile doesn’t pop up. Sometimes a tiny typo can send you on a wild goose chase.


Frequently Asked Questions (FAQ)

Before we close this chapter, let’s tackle some burning questions that you—or many other readers like you—might still have. Ready? Let’s dive in!

Q1: Is it Possible to Find a Private Telegram Account?

Not really, no. If a Telegram account is private, you won’t be able to find it through the search feature, even if you have the phone number or username.

Q2: What Do I Do if I Can’t Find the Telegram ID Even After Trying All Methods?

In this case, the person might have changed their phone number or deactivated their Telegram account. You might want to check out our guide on Telegram user does not exist for more troubleshooting tips.

Q3: Is There a Way to Know if Someone Is Active on Telegram?

Absolutely! If you see a single tick next to your message, they’re probably offline. But if you see two ticks, that could mean they’re online. For more, read why Telegram shows one tick while online.

Q4: Can Telegram IDs Be Tracked or Hacked?

While Telegram is known for its security, no platform is entirely bulletproof. However, hacking someone’s Telegram ID is illegal and unethical.


Conclusion

Whew! We’ve traversed the winding roads of Telegram’s search features, unearthing golden methods to find someone’s Telegram ID by their phone number—or lack thereof.

Whether you’re a newbie or a Telegram aficionado, these strategies are like a swiss army knife: multifaceted, useful, and dare I say, indispensable.

From the add-as-a-contact strategy to playing Sherlock with Telegram’s own search bar, and finally, getting the most out of Telegram’s username search, you’re now equipped with tools as powerful as a wizard’s wand.


3 Proven Ways to Find Telegram ID by Phone Number [GUIDE] Read More »

can-bluetooth-signals-go-through-walls

Can Bluetooth Go Through Walls? [3 Ways to Improve Signal]

Are you scratching your head about Bluetooth signals and walls? You’re not alone.

Many people are asking, “Can Bluetooth signals go through walls?”.

Whether you’re trying to create a seamless smart home experience or want to groove to your favorite tunes without any hiccups, we’re diving deep into this topic today.

From setting up a home theater to managing smart lights, understanding how Bluetooth signals interact with walls can really make or break your seamless tech experience.

Fun Fact: Bluetooth was named after a 10th-century Scandinavian king, Harald Bluetooth, who united Denmark and Norway. Nothing like uniting devices, right?

Quick Answer: Do Bluetooth Signals Go Through Walls?

In a nutshell, Bluetooth signals can go through walls, but it’s not that simple.

The ability of Bluetooth signals to penetrate walls depends on various factors like the type of wall material, its thickness, and other physical obstructions.

Factors That Affect Signal Penetration

Drywall, wood, and glass are somewhat Bluetooth-friendly. You might experience a reduced range, but the connection generally stays intact.

On the flip side, materials like concrete and metal are basically signal fortresses. They can significantly weaken or even block your Bluetooth connection.

How far does Bluetooth reach through walls?

It varies, but usually, it’s around 10 meters (or about 33 feet) for most Bluetooth devices. However, higher versions like Bluetooth 5.0 can extend up to 40 meters (or about 131 feet) indoors.


The Science of Bluetooth Signals

Let’s dig into the nitty-gritty of Bluetooth signals and how they’re like social butterflies at a party — they love interacting with their surroundings, but sometimes walls can be the ultimate party-poopers.

What is Bluetooth?

Bluetooth is a wireless technology designed for transferring data over short distances.

Think of it as a digital handshake between your smartphone and other Bluetooth-enabled devices like speakers, headphones, or even your car.

Frequency and Wavelength Explained

Bluetooth signals usually operate on a 2.4 GHz frequency. The frequency is like the chatterbox in a room; higher frequencies mean more information but also less capability to move through obstacles.

Does Bluetooth go through or around walls? Well, it attempts to go through but often gets partially absorbed, reflected, or sometimes, if lucky, passes through the wall.

How Bluetooth and Walls Interact

When Bluetooth signals meet walls, they have a few options. Some of the signal gets absorbed, some get reflected, and a tiny part manages to go through.


Types of Walls and Their Impact on Bluetooth Signals

So, you’ve got your Bluetooth device all set up, but that pesky wall between your living room and kitchen is ruining the vibe.

What’s up with that? Not all walls are created equal when it comes to allowing Bluetooth signals to pass through.

Drywall

Drywall is like the cool neighbor who never complains about your weekend parties. It’s generally the most forgiving for letting Bluetooth signals through.

Wood

Wood is a bit of a mixed bag. While it’s not as forgiving as drywall, it still allows a fair amount of the Bluetooth signal to pass through. Just don’t expect it to be the life of the party.

Glass

What can Bluetooth not pass through? While it might surprise you, glass can be tricky. Even though it’s see-through, it can sometimes mess with your Bluetooth signals, especially if it’s double-glazed or treated in a specific way.

Metal and Concrete

These are the arch-nemeses of your Bluetooth signal. Metal and concrete walls are like those grumpy neighbors who file noise complaints: they block your Bluetooth signal and spoil the fun.

How to Tell What Type of Wall You Have?

A simple knock test or using a stud finder can help. For the tech-savvy, a wall-scanning app might be up your alley.


How to Improve Your Bluetooth Signal Through Walls

Here are the three (3) surefire methods to give your Bluetooth signals some oomph when they’re getting a bit lazy due to walls.


Method 1: Use a Bluetooth Range Extender

Hold onto your hats, folks, because a Bluetooth Range Extender can be a real game-changer. Think of it like a megaphone for your Bluetooth signal.

Not only does it amplify the signal, but it also extends the range, making it easier for your signal to navigate through walls.

It’s basically like your signal was just chilling in its hometown and suddenly got a full-expense-paid trip to explore the world—or at least your whole house.

How Does it Work?

A Bluetooth Range Extender picks up the signal from your primary Bluetooth device, amplifies it, and then rebroadcasts it. This amplified signal is like the Hulk of Bluetooth signals: bigger, stronger, and much more resilient against walls.

Top Picks for Bluetooth Range Extenders

  • Avantree Oasis Plus: This one supports aptX Low Latency and offers a long-range of up to 164 feet. It’s particularly good for audio applications.
  • 1Mii B03 Long Range Bluetooth Transmitter Receiver: This extender offers dual-link aptX Low Latency for both TX & RX and can extend the range up to 230 feet.
  • Miccus Home RTX 2.0: With a range of up to 160 feet, this extender is great for multiple uses, including connecting headphones and streaming audio.

Step-by-Step Guide to Setting Up

  1. Unbox and Connect: Take your Bluetooth Range Extender out of its box and plug it into a power source.
  2. Pair with Your Primary Device: Turn on the Bluetooth on your primary device (like your smartphone). Now, activate the pairing mode on your extender. They should find each other like two friends at a crowded concert.
  3. Test the Range: Walk around the space where you want an extended range and see if the signal strength has improved.
  4. Enjoy the Freedom: Once you confirm that the extender is working as expected, you’re good to go!

Method 2: Opt for Dual Antenna Technology

If you’re looking for something that’s less about additional gadgets and more about built-in solutions, Dual Antenna Technology is your ace in the hole.

Imagine your Bluetooth device is like a car, then adding dual antennas would be akin to upgrading from a standard sedan to a sports car—faster and way more powerful.

Why Dual Antenna?

Traditional Bluetooth devices have a single antenna that broadcasts and receives signals. But with Dual Antenna Technology, you’ve got two antennas that work in tandem to enhance your signal’s reach and reliability. It’s like having two expert navigators instead of one when you’re venturing through a maze of walls.

Top Devices with Dual Antenna Technology

  • ASUS USB-BT400: This is a Bluetooth dongle with enhanced technology, including dual antennas, to improve your device’s Bluetooth capabilities.
  • TP-Link WiFi 6 Router AX1800: Although it’s a Wi-Fi router, it also has Bluetooth capabilities and dual antennas to maximize range and performance.
  • Certain High-End Laptops: Brands like Dell and HP sometimes include dual antennas in their premium models, so keep an eye out for this feature when shopping for a new laptop.

How to Upgrade to Dual Antenna

  1. Identify Compatibility: First, make sure your existing device can accommodate an antenna upgrade. If not, consider purchasing a new device that already has dual antennas.
  2. Install the Antenna: For external antennas, installation is typically a plug-and-play operation. For internal upgrades, you may need to unscrew the device casing to install the new antenna.
  3. Run Tests: After installation, run tests to make sure the new antennas are working as expected. This usually involves connecting to a Bluetooth device and checking the range and signal quality.
  4. Optimize Placement: To get the best performance, place your device in a central location in your home. The dual antennas will take care of the rest!

Method 3: Update to Bluetooth 5.0 or Higher

Last but definitely not least, updating to Bluetooth 5.0 or higher is like going from a flip phone to the latest smartphone.

You’ll be wondering how you ever lived without it. With Bluetooth 5.0, not only do you get a better range, but you also get faster data transfer rates. It’s like upgrading from a tricycle to a superbike!

Why Bluetooth 5.0?

Bluetooth 5.0 offers a range that’s almost four times greater than its older versions. Plus, it’s more energy-efficient. This technology can offer a range of up to 800 feet in open space and up to 40 meters (around 131 feet) indoors.

Devices with Bluetooth 5.0

  • iPhone 8 and newer: Apple jumped on the Bluetooth 5.0 bandwagon starting with the iPhone 8.
  • Samsung Galaxy S8 and newer: Samsung has also been integrating Bluetooth 5.0 into its newer models.
  • Google Pixel 2 and up: Google’s Pixel phones offer Bluetooth 5.0, making them a smart choice for Android users.

How to Update

  1. Check Your Current Version: Head to your device’s settings to see what version of Bluetooth you’re currently running. This is usually found in the “About Phone” or “System Information” section.
  2. Research Compatibility: Some older devices might not be compatible with Bluetooth 5.0. In that case, you’ll need to invest in a new device.
  3. Update or Upgrade: If your device is compatible but not updated, you can usually update the software in the settings menu. If it’s not compatible, it’s shopping time!
  4. Test It Out: After updating or upgrading, pair your device with a Bluetooth accessory to ensure that everything’s running smoothly.

How far does Bluetooth reach through walls? With Bluetooth 5.0, you’ll find that your signal has greater freedom to move around, even through walls.


Frequently Asked Questions (FAQ)

Alright, you’ve got questions, and I’ve got answers. Here’s a quick rundown of some of the most common curiosities folks have about Bluetooth signals and walls.

Q1: Can Bluetooth Signals Go Through Walls?

Yes, but the strength and reliability depend on various factors such as the Bluetooth version, wall material, and distance between devices. Upgrading to Bluetooth 5.0 can significantly improve this situation.

Q2: How Far Does Bluetooth Reach Through Walls?

The range varies based on the version of Bluetooth you’re using. Bluetooth 5.0, for instance, can go up to 40 meters (around 131 feet) indoors.

Q3: Does Bluetooth Go Around or Through Walls?

Both, actually. Bluetooth signals mainly go through walls but can also reflect off surfaces to go around obstructions. Using signal boosters or changing wall materials can improve signal reach.

Q4: What Can Bluetooth Not Pass Through?

Dense and metallic materials like concrete and metal are the most challenging for Bluetooth signals. However, certain modifications like using signal-friendly paint can alleviate this issue.

Q5: How Far Does Bluetooth Reach in a House?

Again, it’s mostly about the Bluetooth version. For Bluetooth 4.0, it’s usually around 60 meters (about 200 feet) in open spaces. Bluetooth 5.0 can reach up to 240 meters (about 800 feet) outdoors.

Q6: Are There Any Health Risks?

Nope! Bluetooth operates at a very low frequency and is generally considered safe. No need to don your tinfoil hat!

Q7: Can Multiple Walls Affect Bluetooth Signal?

Absolutely, the more walls and obstacles, the weaker the signal becomes. This can be improved by repositioning devices or using signal-boosting methods.


Conclusion

We’ve journeyed through the intricate world of Bluetooth signals and walls, and I gotta say, it’s been quite an educational rollercoaster.

We kicked things off by addressing the burning question: Can Bluetooth signals go through walls? The short answer is yes, but as we’ve learned, there’s a lot more to the story.

We also discovered some genuinely game-changing methods to boost your Bluetooth signal.

Whether you’re a techie who loves to upgrade hardware or someone who enjoys a good old DIY wall modification, there’s something here for everyone.


Can Bluetooth Go Through Walls? [3 Ways to Improve Signal] Read More »

telegram-for-dating

3 Surprising Ways to Use Telegram for Modern Dating [GUIDE]

You’re scrolling through Telegram, catching up on your favorite channels, and suddenly it hits you. Could Telegram be a place to find romance?

I mean, the app’s got everything: privacy, public channels, even secret chats. But does love, the real heart-pounding kind, lurk in those digital corridors?

You’re not the only one pondering this modern-day mystery. This article aims to answer the question: Is Telegram used for dating?

Hidden Gem: You can actually scrape Telegram group members and move them to another group. This feature can come in handy if you want to create your own dating channel by inviting folks who might be interested in the same thing.

Quick Answer: Is Telegram Used for Dating?

Yes, but It’s Not the Primary Use

Yes, people do use Telegram for dating, but that’s like saying people use the gym to socialize—it’s true, but not the main goal.

Telegram is designed as a messaging app with a focus on speed and security.

However, its range of features like private and public chats and the People Nearby function make it possible for lovebirds to connect.

Why would someone want to talk on Telegram?

Telegram offers end-to-end encryption and privacy features that give you that secret hideaway feel, a cozy spot to get to know someone new. So, if privacy’s your jam, Telegram has got you covered!


How To Use Telegram for Dating

You’re wondering how to turn Telegram from a messenger app into your personal Cupid. No worries, here are the three (3) methods to do so;


Method 1. Telegram “People Nearby” feature

So, the first method to transform Telegram into your personal dating app is by using the People Nearby feature.

This one’s pretty nifty for a couple of reasons. First, it doesn’t require you to hop into dedicated dating groups, and second, it feels like serendipity.

You know, the kind of spontaneous meeting that can kick off a rom-com? Yeah, that.

What You Need:

  • Telegram App (latest version)
  • Smartphone with GPS enabled
  • An open mind!

Step-by-Step Guide:

  1. Open Telegram: If you haven’t downloaded the Telegram app yet, now’s the time to do it. You’ll find it in your respective app store. Install and set it up.
  2. Navigate to the Menu: Once inside Telegram, click on the menu icon (usually three horizontal lines or dots, depending on your phone).
  3. Click on ‘Contacts’: This is where the magic happens. You’ll find one that says ‘Contacts‘ among the various options. Click on it.
  4. Find ‘People Nearby’: Scroll down, and you’ll see a category called ‘People Nearby‘. It may also ask for permission to access your location. Grant it.
  5. Enable and Browse: Once enabled, you’ll see a list of profiles that are near your location. You can browse through these and even see how far away they are from you.
  6. Strike up a Conversation: Found someone interesting? Simply click on their profile and start chatting. It’s that easy!

Example Tool: To make your profile stand out, you can use an app like Canva to create a captivating Telegram profile picture. Remember, the first impression is the last impression!

Fun Fact: Ever wondered why your Telegram messages have different types of ticks? For instance, a single tick means the message was sent but not yet received. You can read more about it in our article on why Telegram shows one tick while online.

Method 2. Participating in Telegram Dating Groups & Channels

Maybe you’re looking for someone who shares a very specific hobby with you, like hiking or gaming. That’s where Telegram’s dating channels come into play.

Telegram channels are like thematic chat rooms where people share content, ideas, and, yes, sometimes phone numbers.

But these aren’t your average chat rooms. Telegram offers a multitude of dating channels, each catering to different interests, locations, or age groups.

What You Need:

  • Telegram App (up-to-date)
  • A sense of adventure!

Step-by-Step Guide:

  1. Open Telegram and Go to Search: Head to the search bar at the top of your Telegram home screen.
  2. Search Keywords: Type in dating-related keywords like “singles,” “dating,” or even more specific terms related to your interests.
  3. Join the Channel: Once you find a channel that catches your eye, click on it and then click “Join.”
  4. Read the Rules: Many channels have rules about what you can and can’t post. Make sure to glance at those to avoid getting booted.
  5. Introduce Yourself: This is your moment! Share a bit about yourself, what you’re looking for, or even a fun fact to break the ice.
  6. Engage: Start engaging with posts, comments, or directly with other members.

Method 3. Telegram Dating Bots

Ever wished you had a virtual wingman to ease those awkward “getting-to-know-you” chats? Say hello to dating bots!

They’re like the Chuck Norris of matchmaking—efficient, fast, and they don’t miss.

What You Need:

  • Telegram App (no surprises here)
  • A sprinkle of curiosity

Step-by-Step Guide:

  1. Search for Dating Bots: Open up Telegram and head to the search bar. Simply type “Dating Bots” or specific bot names if you know any.
  2. Review and Choose: A list of available dating bots will appear. Read their descriptions, and maybe even some reviews if they have them, then choose the one that looks like your virtual matchmaker.
  3. Start the Bot: Click on the bot’s profile and hit the “Start” button. Brace yourself; love is about to get automated!
  4. Answer the Questions: Most dating bots will ask you a series of questions to understand your preferences. Be honest; bots don’t judge.
  5. Get Matched: The bot will start suggesting potential matches based on your answers. Swipe right, swipe left—you get the gist.
  6. Initiate Contact: If you and your match are interested, the bot will open a secure chat. Time to turn on the charm!

Here are some dating bots on Telegram that have gotten the thumbs-up from users:

  • @DatingBot: This is like the OG of Telegram dating bots. It has an easy-to-use interface and a decent user base. It’s especially great for beginners who want to get their feet wet.
  • @LoveMatchBot: If you’re all about compatibility and long-term relationships, give this bot a try. It uses a range of questions to match you with like-minded people.
  • @SpeedDatingBot: This one’s for the adventurous types. You’ll get quick matches, and you can decide whether to take things further or not within a set period.
Example Tools: Want to track how many people liked your profile? Bots like @LoveMeter_bot can keep tabs on your Telegram dating success rate.

Pros and Cons of Using Telegram for Dating

Let’s break down the pros and cons of using Telegram for your love life.

The Pros

  • Privacy Galore: Telegram is encrypted from end to end. Your chats stay between you and your match, which is a blessing in the digital age.
  • Feature-Rich: With voice messages, video calls, and even fun stickers, Telegram makes the chat more engaging than just plain old text.
  • Global Reach: Telegram isn’t just for locals; you can connect with people from different countries. If you’re into accents, this is your playground.
  • Efficient Dating Bots: As we’ve discussed, bots can streamline the dating process. No need to sift through profiles; let the bots do the matching for you.
  • Group Dynamics: Telegram’s groups can be hotspots for shared interests. Like a book club, but for love.

The Cons

  • Not Specifically for Dating: Telegram wasn’t created as a dating platform, so it lacks some targeted features you might find on dedicated dating apps.
  • Risk of Scams: Where there’s love, there’s often a way for scammers to creep in. Always be cautious who you’re talking to.
  • No Profile Verification: Telegram doesn’t verify profiles unlike dating-specific platforms, making it easier for catfish to roam freely.
  • Too Many Options: This could be overwhelming. Too many groups, too many bots, too many people. It’s like a dating buffet, and sometimes, less is more.
  • Tech Glitches: Whether it’s messages stuck on sending or other minor bugs, Telegram is not without its quirks.

Conclusion

By now, you should be pretty well-versed in the ins and outs of using Telegram as a potential matchmaker.

From its privacy features to the array of dating bots and public groups, Telegram is a veritable landscape for those looking to meet someone special.

It’s got its quirks, sure. It’s not a dedicated dating app, and you do need to tread carefully to avoid scams or just plain ol’ weirdos.

But if you value a feature-rich, privacy-centric platform, Telegram offers a fresh and off-the-beaten-path option for your dating ventures.


3 Surprising Ways to Use Telegram for Modern Dating [GUIDE] Read More »

telegram-not-sending-SMS-code

9 Ways to FIX Telegram Not Sending SMS Code [How-To Guide]

So, you’ve decided to join the Telegram revolution but are stuck at the SMS verification step.

You’re not alone! Let’s dive into why this SMS verification is so important in the first place.

Why Telegram SMS Verification is Crucial

Telegram uses SMS verification to ensure you’re the rightful owner of the number you’re registering. It adds a solid layer of security to your account and keeps those pesky imposters at bay.


How to FIX Telegram Not Sending SMS Code

Here are the nine (9) ways you can use to rectify the issue;


Method 1: Switch to Voice Call Verification

If the SMS codes a no-show, why not try voice call verification?

Think of it as a backup band when the main act cancels. It’s a feature Telegram offers when SMS doesn’t get through.

Tools Needed:

  • Your smartphone
  • A quiet environment to receive a call

Step-by-step Guide:

  1. Initiate Voice Call:
    • Start the Telegram login process as usual, entering your phone number.
    • After waiting a minute for the SMS that never arrives, you’ll see an option that says “Haven’t received the code?” Click on it.
    • Among the options presented, choose “Request a voice call.”
  2. Receive and Enter Code:
    • Pick up the incoming call from Telegram.
    • Listen carefully to the spoken code and jot it down.
    • Enter the voice code in the Telegram app to complete your verification.

Why This Method Works:

Voice call verification is like the trusty old landline in a smartphone-obsessed world. It’s less susceptible to the typical issues that plague SMS delivery, such as carrier restrictions or network congestion.


Method 2: Use a Different Phone Number

Sometimes, switching your phone number can be the winning play.

You can use a different number, either a secondary phone or a family member’s, to receive that vital Telegram code.

Tools Needed:

  • A secondary phone with a different phone number
  • Access to Telegram login page

Step-by-step Guide:

  1. Log Out of Telegram:
    • If you’re stuck in the verification process on your main phone, cancel it.
  2. Start Fresh:
    • Open the Telegram app again and this time enter the different, secondary phone number.
  3. Verify:
    • You should receive the SMS code on the secondary phone. Enter the code in your main device to complete the verification.

Why This Method Works:

Using a different number rules out the possibility that the issue is specifically tied to your primary number. Maybe it’s on some kind of carrier blocklist or facing other restrictions you’re unaware of.

Note: By the way, if you're intrigued by the different verification methods, you might want to check out our article on how to bypass Gmail phone verification.

Method 3: Check for Proper Signal Reception

Your phone can’t receive that precious SMS code if it’s not correctly connected to the cellular network. Here’s how to ensure you’re “in the field” when Telegram throws that code your way.

Tools Needed:

  • Your smartphone
  • Your carrier’s coverage map (available on their website or app)

Step-by-step Guide:

  • Check Signal Bars:
    • Look at the top corner of your smartphone. Those tiny bars aren’t just for decoration; they indicate your signal strength. Make sure you’ve got at least 3 bars.
  • Move to a Different Location:
    • If the signal is weak, move to an area where your carrier’s coverage is stronger. Outdoors or near a window usually works better.
  • Toggle Airplane Mode:
    • Turn on Airplane Mode for about 30 seconds, and then turn it off. This can refresh your connection to the cellular network.

Method 4: Clear Telegram Cache

Alright, time to talk about the clutter. A cluttered app cache could interfere with SMS code delivery just like a desk buried under heaps of papers won’t help you work efficiently.

Let’s declutter and make room for that elusive Telegram code to come through.

Tools Needed:

  • Your smartphone
  • Access to Telegram app settings

Step-by-step Guide:

  1. For Android Users:
    • Go to ‘Settings’ on your phone.
    • Tap on ‘Apps & notifications.’
    • Find Telegram and tap on it.
    • Choose ‘Storage & cache,’ then tap ‘Clear Cache.’
  2. For iOS Users:
    • Unfortunately, iOS doesn’t allow you to clear cache for a specific app through settings. However, you can uninstall and reinstall Telegram to achieve the same effect. Just ensure you back up your chats first!

Why This Method Works:

Clearing the cache is like doing spring cleaning. It removes temporary files that might cause glitches or conflicts within the app, including the problem of not sending SMS codes.


Method 5: Check for Outages or Maintenance

You wouldn’t blame your TV for a bad signal during a storm, right? Sometimes the issue is beyond your control, like when Telegram itself is down for maintenance or experiencing an outage.

In this case, you’re basically trying to shop at a store that’s temporarily closed.

Tools Needed:

  • Internet access
  • Social media platforms or outage reporting websites (like DownDetector)

Step-by-step Guide:

  1. Check Telegram’s Official Channels:
    • Go to Telegram’s official Twitter or their blog to see if there are any announcements about server issues or maintenance.
  2. Use Outage Reporting Websites:
    • Websites like DownDetector offer real-time information on outages. Simply search for “Telegram” to check the status.
  3. Wait It Out:
    • If Telegram is indeed down, you might just have to be patient until the issue is resolved.

Why This Method Works:

It helps you understand if the issue is universal, affecting all Telegram users, rather than a problem with your individual account or device.

This way, you can save time and energy on fixes that won’t work because the issue is not on your end to begin with.


Method 6: Check Carrier Restrictions

Sometimes, the issue isn’t with Telegram or your device; it’s your carrier playing hard to get. SMS codes may not reach you due to carrier restrictions or issues like spam filtering.

Tools Needed:

  • Your smartphone
  • Access to carrier settings or customer service

Step-by-step Guide:

  1. For All Users:
    • Log in to your carrier’s online portal or app.
    • Navigate to the ‘Settings’ or ‘Account Management’ section.
    • Look for any SMS or spam filters that could be blocking incoming messages from Telegram.
  2. Alternative: Contact Customer Service
    • If you can’t find the settings or aren’t sure, reach out to your carrier’s customer service for assistance. Ask them to ensure that SMS from short codes are not being blocked.

Why This Method Works:

Carriers sometimes classify automated messages like verification codes as spam or promotional content.

By checking these settings or contacting customer support, you ensure that the pathway for Telegram’s SMS code is clear.


Method 7: Update the Telegram App

Updating the app can often fix bugs, including ones related to SMS code delivery.

Tools Needed:

  • Internet connection
  • Access to Google Play Store (Android) or App Store (iOS)

Step-by-step Guide:

  1. Go to Your App Store:
    • Open Google Play Store on Android or the App Store on iOS.
  2. Search for Telegram:
    • Type ‘Telegram’ in the search bar and hit enter.
  3. Click Update:
    • If there’s an ‘Update’ button next to Telegram, tap it. If it says ‘Open,’ you’re already up to date.

Why This Method Works:

Updates usually come with bug fixes and new features. Updating your Telegram app could resolve any compatibility issues with your phone’s OS that might be preventing the SMS code from coming through.


Method 8: Restart Telegram App

Simple yet effective, restarting the Telegram app can sometimes be the quick fix you’re searching for.

It’s like when your coffee machine isn’t working, and you realize it’s just because you forgot to hit the “on” button—sometimes, simple is better.

Tools Needed:

  • Your smartphone with Telegram installed

Step-by-step Guide:

  1. Close Telegram:
    • Swipe up to your recent apps and swipe Telegram away, or go to your settings and force stop the app.
  2. Wait a Moment:
    • Take a breather, count to 10 or take a sip of your coffee. Give the app a second to shut down completely.
  3. Relaunch Telegram:
    • Open the Telegram app again and try the verification process anew.

Why This Method Works:

Restarting the app refreshes its internal state and can resolve temporary glitches or freezes. It’s the least invasive troubleshooting method and often a good first step before trying more drastic measures.


Method 9: Re-install Telegram App

Last resort? Maybe. Effective? Definitely. Re-installing an app is like moving out of your cluttered apartment and into a fresh, new space.

This often solves issues that other troubleshooting steps can’t touch.

Tools Needed:

  • Internet connection
  • Access to your phone’s app store

Step-by-step Guide:

  1. Uninstall Telegram:
    • Go to your phone’s settings, find the Telegram app and uninstall it. For Android, it’s under ‘Apps & notifications.’ For iOS, long-press the app icon and choose ‘Delete App.’
  2. Restart Your Phone:
    • Turn off your phone and then turn it back on. This ensures all temporary cache is cleared.
  3. Re-install Telegram:
    • Head to Google Play Store for Android or App Store for iOS, search for ‘Telegram,’ and hit the ‘Install’ button.

Why This Method Works:

Re-installing is the tech version of a hard reset for an app. It can fix underlying issues by replacing old files with new, clean ones. It’s especially useful if the app update didn’t resolve the issue.


Conclusion

There you have it, folks! We’ve dived into the nitty-gritty of why Telegram might not be sending that all-important SMS code and given you nine foolproof methods to get things back on track.

We’ve covered all bases from restarting your app to the more drastic step of re-installing it.

Remember, technology isn’t perfect; it’s kinda like us in that way—quirky but fixable.

The next time you find yourself staring at your phone, waiting for that elusive Telegram SMS code, just come back to this guide. We’ve got your back!

If you’re still in the Telegram rabbit hole and loving it, check out our take on Telegram vs. Messenger to see how it stacks up against other messaging apps.


9 Ways to FIX Telegram Not Sending SMS Code [How-To Guide] Read More »

fix-telegram-stuck-on-sending

7 Ways to Fix Telegram Messages Stuck on Sending [SOLVED]

Welcome to this comprehensive guide that aims to resolve a technical issue: Telegram messages stuck on sending.

We understand that encountering this problem can disrupt your important conversations and workflows.

In this article, we’ll explore the underlying reasons behind this glitch and present various reliable solutions to get you back to seamless messaging.

By the end of this guide, you should have a clear pathway to rectifying the issue of messages stuck on sending in Telegram.


How to Fix Telegram Messages Stuck on Sending

We’ve all been there—messaging someone on Telegram and then… nothing. Your message is just hanging there, like a paper airplane that never took off.

Here are seven (7) handpicked methods to lift that messaging blockade. These methods are tried and true, so let’s get started.


Method 1: Use a VPN to Circumvent Network Restrictions

Sometimes, network restrictions might be the secret culprit behind your Telegram woes. This could be particularly true if you’re in a location with restricted internet access.

Using a Virtual Private Network (VPN) can help you bypass these obstacles.

Step-by-Step: How to Use a VPN with Telegram

  • Choose a VPN Service: Look for a reliable VPN service like NordVPN, Surfshark, or IPVanish. They all have physical servers in countries where Telegram is not restricted.
  • Download and Install: Once you’ve chosen a VPN, go ahead and download the application on the same device you’re using Telegram on. Install it and open the application.
  • Connect to a Server: Open the VPN app, sign in, and connect to a server in a country where Telegram is accessible. This will essentially trick the network into thinking you’re in that particular location.
  • Open Telegram and Test: With the VPN active, open your Telegram app. Try sending a message to see if it goes through this time.

Choose the following reliable VPN services;

  • NordVPN (Has the most number of servers, over 5000+, in 60 countries to choose from. Uses a unique Onion Over VPN feature to mask your online traffic for maximum anonymity.)

  • Surfshark VPN (One of the few providers that allow unlimited device connections with just a single subscription. You can connect all your devices with no logs policy)

  • IPVanish (Supports all platforms, routers, and TV. Uses SOCKS5 web proxy feature for faster anonymous connection speed)

Why is this method unique?

Many people don’t consider network restrictions as a reason for Telegram issues. Using a VPN is a unique but effective way to navigate around any geofencing or firewalls that might be blocking your messages.


Method 2: Clear Telegram Cache and Data

Accumulated cache can sometimes make Telegram buggy, causing messages to get stuck. Clearing the cache and data can be a refreshing start.

Step-by-Step: How to Clear Telegram Cache and Data on Android

  • Go to Settings: On your Android device, navigate to “Settings.”
  • Find Apps or App Management: The naming can differ depending on the device, but you’re looking for something along those lines.
  • Locate Telegram: Scroll down until you find Telegram and tap on it.
  • Clear Cache and Data: Here, you’ll see two options—clear cache and clear data. Tap on both.

For iPhone Users:

  • Go to Settings: Open the “Settings” app on your iPhone.
  • Scroll to Telegram: Scroll down and tap on “Telegram.”
  • Reset Cache: An option should allow you to “Reset Cache.” Tap on that.

Note: Clearing data will log you out of Telegram, so ensure you have access to the number associated with your account for re-login.

Why is this method effective?
It’s like giving your Telegram app a fresh start. Any minor glitches or bugs often get resolved when you clear out the accumulated data and cache. This could be the quick fix you need to resolve delayed or stuck messages.


Method 3: Update Telegram to the Latest Version

Stuck using an outdated Telegram version? Running an old version might be why your messages take a virtual coffee break instead of reaching their destination.

Step-by-Step: How to Update Telegram

For Android Users:
  • Open Google Play Store: Locate and tap the Google Play Store app on your device.
  • Search for Telegram: Use the search bar at the top and type “Telegram.”
  • Update: You’ll see an “Update” button if an update is available. Tap it and wait for the process to finish.
For iPhone Users:
  • Open App Store: Go to your App Store on the iPhone.
  • Tap on Profile: It’s usually an icon at the top right corner.
  • Locate Telegram: Scroll down to find Telegram in the list of apps that need updating.
  • Update: Tap the “Update” button next to Telegram.

Note: After the update, you might need to log in again, so have your login credentials ready.

Why is this method reliable?
Developers regularly release updates to fix bugs and improve performance. An outdated app is more likely to have issues, so keeping it updated ensures you’re getting the best performance.


Method 4: Check Your Internet Connection

Sometimes, the culprit might be closer to home—like, right in your router. A spotty or slow internet connection can delay message sending on Telegram or even halt it altogether.

Step-by-Step: How to Test Internet Connection

  • Run a Speed Test: Websites like Speedtest.net or apps like Fast can give you an idea of your internet speed.
  • Compare with Telegram Requirements: Telegram doesn’t require much—a speed of at least 1 Mbps should suffice for text messaging. Make sure your speed aligns.
  • Check for Packet Loss: Some speed test tools also offer packet loss information. Packet loss above 2% is a red flag.
  • Restart Router or Phone: Unplug your router, wait for 30 seconds, and plug it back in. Sometimes a simple restart can resolve connection issues.

Method 5: Check Telegram Server Status

You’ve tweaked settings on your end, but what if the issue isn’t you—it’s them?

Sometimes Telegram servers can experience downtime or lag, affecting message sending.

Step-by-Step: How to Check Telegram Server Status

  • Visit a Server Status Website: Head to websites like Downdetector or IsItDownRightNow to check if Telegram is experiencing server issues.
  • Check Social Media: Sometimes Telegram will announce server issues or maintenance on their official Twitter or other social media channels.
  • Join Telegram Communities: Various Telegram user communities often discuss server downtimes. You might want to join one to stay in the loop.

Method 6: Reinstall Telegram App

When all else fails, sometimes you’ve gotta go nuclear—uninstall and reinstall Telegram.

Think of it as a “spring cleaning” for your app, removing any corrupted files that may have been causing the issues.

Note: Reinstalling will log you out, so ensure you have your login credentials or access to the phone number linked to your Telegram account.

Why is this method foolproof?
It’s the digital equivalent of a hard reset. By reinstalling the app, you’re essentially starting from a clean slate, free of any glitches or corrupted files that could be causing the issue.


Method 7: Contact Telegram Support

Okay, we’ve reached the final frontier—directly reaching out to Telegram’s customer support. This should be your last resort if all the other methods have failed to deliver (pun intended).

Step-by-Step: How to Contact Telegram Support

  • Open Telegram: Navigate to the Telegram app on your device.
  • Go to Settings: Tap on the three horizontal lines (☰) in the upper-left corner and select ‘Settings.’
  • Choose ‘Help’: Scroll down until you find the ‘Help’ section.
  • Tap ‘Ask a question’: This will usually connect you to a chat with a Telegram support bot, which can guide you through common solutions or escalate the issue to human support if needed.

Pro Tip: Before contacting support, gather relevant information like screenshots, error messages, and other details to help them understand your issue better.


Conclusion

By now, you should have a firm grasp on how to solve the annoying issue of Telegram messages getting stuck on sending.

From checking your internet connection to diving into app settings and even contacting Telegram Support, we’ve covered all the bases to make sure you can keep those messages flowing smoothly.

Remember, tech issues are just bumps on the digital highway—totally conquerable with the right tools and know-how.

Keep this guide bookmarked for the next time your Telegram acts up, or share it with a friend who’s battling the same issue.

And hey, while you’re at it, why not check out our comparison between Telegram vs. Messenger?


7 Ways to Fix Telegram Messages Stuck on Sending [SOLVED] Read More »

telegram-sent-but-not-received

7 Ways To Fix Telegram Message Sent But Not Received Error

If you’ve landed on this page, you’re probably scratching your noggin about why your Telegram messages are sent but not received.

Trust me, it’s as confusing as finding out that your pet goldfish is actually a better listener than some people you know.

In this guide, we’ll dissect the why’s and how’s, from network glitches to app-related quirks, we’ve got you covered with 7 foolproof methods to get those messages back on track.


Verifying the Issue: Checks Before You Troubleshoot

To avoid unnecessary troubleshooting, let’s narrow down why your Telegram messages are sent but not received.

Check Recipient’s Status

Ever wonder why is Telegram showing one tick but online? It could mean the recipient hasn’t opened Telegram yet. No need to start troubleshooting your app if the issue lies on the other end.

Are You Blocked?

It’s awkward to consider, but maybe you’ve been blocked. No judgment here! It happens to the best of us. Blocked? You’ll see one tick but no delivery.

Test with Another Contact

Before banging your head against the wall, send a message to another contact. If that works, the issue might be specific to your original chat.


How To Fix Telegram Message Sent But Not Received Error

Here are the seven (7) ways you can use to resolve the problem;


Method 1: Check Blocked Contacts

It’s a convenient feature when you want to cut off communication, but sometimes it works a bit too well.

If someone claims they haven’t received your Telegram messages, you might’ve unintentionally blocked them. So let’s roll up our sleeves and figure this out!

Step-by-Step Guide:

  • Open Telegram App: First things first, open the Telegram app on your smartphone or desktop.
  • Navigate to Settings: You’ll find the “Settings” icon usually shaped like a gear at the bottom-right on Android or top-left on iOS. Click on it.
  • Go to Privacy and Security: Scroll down and you’ll find a section called “Privacy and Security.” Tap on it.
  • Check Blocked Users: In this section, you’ll see an option that says “Blocked Users.” Click it and a list will appear.
  • Review the List: Scan through the list to see if the person you’re trying to communicate with is on there.
  • Unblock if Necessary: If you find the person, click on their name and then hit “Unblock.”
  • Test it Out: After unblocking them, try sending a message to confirm it’s been resolved.

Method 2: Disable VPN

Are you a fan of virtual private networks (VPNs) for that extra layer of security or access to geo-restricted content?

While they’re great for anonymity, VPNs can sometimes interfere with delivering your Telegram messages. Let’s dive into how you can disable your VPN to test if it’s the culprit.

Step-by-Step Guide:

  • Identify the VPN App: Locate the VPN app on your device. Common ones include NordVPN, ExpressVPN, and CyberGhost.
  • Open VPN Settings: Launch the app and go to the settings or preferences menu, usually represented by a gear icon.
  • Disconnect: There should be an option to disconnect or turn off the VPN. Tap on it.
  • Verify: Make sure that your VPN is fully disconnected. You’ll usually see a notification or symbol indicating the VPN status.
  • Send a Test Message: Now, go back to Telegram and try sending a message to see if it gets through this time.
  • Check Internet Connection: Sometimes disabling a VPN might mess with your connectivity. Verify you’re still connected to Wi-Fi or cellular data.

Method 3: Check App Permissions

Permissions, permissions, permissions! Yep, we’ve all blindly clicked “Allow” when new apps ask for access to various parts of our phones.

But sometimes, altering or denying specific permissions can cause an app like Telegram to malfunction. So let’s set things right!

Step-by-Step Guide:

  • Open Device Settings: Head to your device’s main settings. You’ll usually find this as a standalone app or within your phone’s dropdown menu.
  • Navigate to Apps or Applications: The wording might vary, but you’re looking for a section that lists all the apps installed on your device.
  • Locate Telegram: Scroll or search until you find Telegram and then tap on it.
  • Go to Permissions: There should be a “Permissions” tab. Tap it to see what permissions Telegram currently has.
  • Check Necessary Permissions: Make sure that Telegram has permission for storage, contacts, and notifications at the very least. These are crucial for the app’s functionality.
  • Toggle Permissions: If any of the necessary permissions are disabled, toggle the switch to ‘Allow.’
  • Restart Telegram: Close Telegram completely and relaunch it to ensure the changes take effect.
  • Send a Test Message: Try sending a message to see if the issue is resolved.

Method 4: Check the Telegram Server Status

Sometimes, the issue isn’t you; it’s them. Servers can go down; when that happens, there’s not much you can do except wait it out. So, let’s find out how to check the server status.

For All Users:

  • Visit Downdetector: Head to Downdetector’s Telegram page.
  • Check Server Status: Look for any reports of server outages or issues.
  • Visit Telegram’s Twitter: Often, Telegram will post server updates on their official Twitter account.
  • Check Reddit: Sometimes, the Telegram subreddit is a reliable source for server issues. Users will post if they’re experiencing similar problems.

What does one tick on Telegram mean?

A single tick indicates the message has been sent but not received. This could be due to server issues, which you can verify through Downdetector or other social channels.


Method 5: Clear Cache and Data

Picture your device’s cache like a cluttered desk—it might not bother you at first, but eventually, you’ll have trouble finding anything.

Clearing the cache is like a Marie Kondo session for your device; it only keeps what truly matters. Here’s how:

For Android Users:

  1. Go to Settings: Navigate to your ‘Settings’ app and select ‘Apps’ or ‘Applications.’
  2. Find Telegram: Scroll through your app list until you find Telegram.
  3. Tap ‘Storage’: Once you’re in the Telegram settings, you’ll see a ‘Storage’ option. Tap it.
  4. Clear Cache and Data: You’ll find the buttons for ‘Clear Cache’ and ‘Clear Data.’ Hit both.

For iOS Users:

  • Unfortunately, iOS doesn’t offer an easy way to clear cache for individual apps. However, reinstalling the app (Method 4) also clears the cache.

How do I know if my text was delivered on Telegram? If you see two ticks, you’re golden! Cache issues can sometimes interfere with message delivery, so keep an eye out.


Method 6: Check Cloud Settings

In the digital age, the cloud is basically our lifeline, right? We store everything there, from cute dog photos to important documents.

But, if your Telegram cloud settings are messed up, it might just be the reason your messages aren’t getting delivered. Let’s fix that!

Step-by-Step Guide:

  • Open Telegram: You know the drill; launch the Telegram app on your device.
  • Navigate to Settings: That handy gear icon should be your next destination.
  • Select ‘Data and Storage’: This is where Telegram manages all things storage and cloud-related. Tap on it.
  • Go to ‘Storage Usage’: This will reveal all your storage-related settings, including cloud options.
  • Check Automatic Media Download: Telegram has a setting where it can restrict downloads based on your network connection. Ensure it’s not set to prevent downloads when you’re trying to receive messages.
  • Inspect Chat Backup: Make sure you’ve enabled chat backup. This is more of a preventative measure for future issues.
  • Refresh Telegram: Exit out of Telegram and open it again to apply any changes you’ve made.
  • Send a Test Message: Time for another test run! Send a message and see if it’s received on the other end.

Method 7: Update the Telegram App

Still struggling with undelivered messages? An outdated app can be the cause of the problem. It’s time to update Telegram to the latest version and see if that works.

For Android Users:

  • Go to Google Play Store: Open the app and tap on the menu icon (three horizontal lines).
  • Select ‘My apps & games’: This will show you a list of apps with available updates.
  • Find Telegram: If you see Telegram in that list, tap ‘Update’ next to it.

For iOS Users:

  • Open App Store: Locate and open the App Store on your device.
  • Tap on ‘Today’ at the Bottom: Then tap on your profile icon at the top.
  • Find ‘Updates’: Scroll down to find a list of apps that need updating.
  • Update Telegram: If Telegram appears, tap the ‘Update’ button next to it.

Frequently Asked Questions (FAQ)

Ah, the FAQ section—your go-to spot for all those burning questions that didn’t quite fit into the main text. Let’s dive in!

Q1: Why is Telegram showing one tick but online?

A single tick usually means the message is sent but not yet received. However, “online” status may indicate that the app is running in the background, but the recipient hasn’t opened the chat.

Q2: How can I tell if someone has blocked me on Telegram?

If you can no longer see the person’s last seen or online status, and your messages are stuck with one tick, there’s a high chance you’ve been blocked.

Q3: Are Telegram messages encrypted?

Telegram offers end-to-end encryption, but it’s not enabled by default. You have to start a “secret chat” to activate this feature.

Q4: Can Telegram messages disappear on their own?

Messages in “secret chats” can be set to self-destruct; otherwise, messages don’t typically disappear.

Q5: How do I use Telegram without a phone number?

You can’t sign up for Telegram without a phone number, but you can use services to bypass Gmail phone verification as an alternative.


Conclusion

So there you have it, folks! We’ve delved deep into the perplexing world of “Telegram messages sent but not received.”

From checking your connection to updating the app, and even doing a little server sleuthing, we’ve covered the most effective, reliable, and accurate methods to troubleshoot this pesky issue.

If you’ve tried everything and still find yourself in message purgatory, it might be time to contact Telegram support.

Remember, technology has its quirks, but a little patience and a dash of know-how can go a long way. Happy texting, and may your ticks always turn into double ticks!


7 Ways To Fix Telegram Message Sent But Not Received Error Read More »