How to

How-to-know-if-someone-mute-you-on-Telegram

11 Ways to Know If Someone Had Blocked You on Telegram

When you are being blocked in Telegram, there are several tell-tale signs to know and find out if this is true.

During blocking, all your messages cannot be delivered to the person and will not be delivered, even after unblocking.

What are the tell-tale signs to know if someone has blocked you on the Telegram app?

Here are the eleven (11) ways you can use to find out if you are being blocked in Telegram.


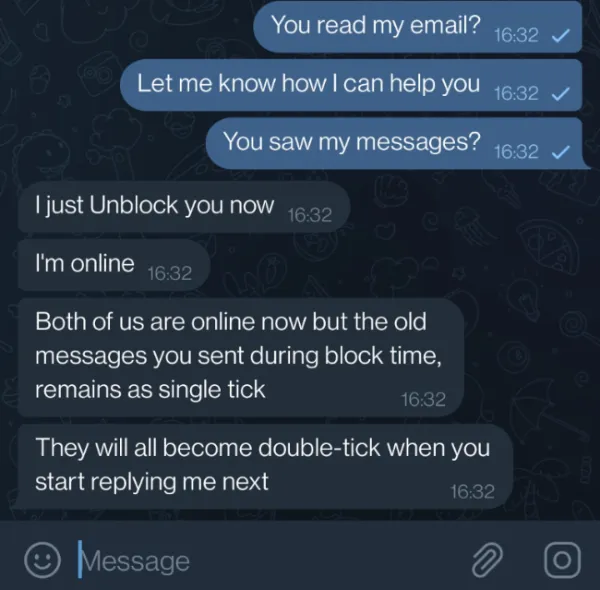
1. Paradox of single & double-ticks

telegram-blocked-paradox-single-tick-double-tick

When the person starts to UNBLOCK you and send you messages, you will notice a strange phenomenon where all your previously sent messages still have only single ticks.

This seems to be a paradox because the person must have seen all your previous messages before they can send you their following replies. It does not make sense at first glance.

The only explanation for this paradox is that you were blocked previously and recently unblocked.

Once you start to send replies, all these single ticks of yours will become double ticks.


2. Observing too many unread messages

telegram-too-many-unread-messages

A double-tick beside your sent message indicates the “read” state in Telegram settings. This suggests that the recipient has received and read your message.

When you are being blocked in Telegram, these messages are not immediately informed; therefore, a sizable portion of your sent messages are frequently “unread.”

The person may continue to use Telegram as usual, as they will still be notified of incoming messages from others who are not blocked.
Your message will eventually be “read” when that person decides to unblock it. In this case, you can see that all your sent but “unread” messages will become “read” at the same time.

Tell-tale signs

Observe if your messages often get delayed “read,” and a significant portion of them get “read” at the same time when the person unblocks you.


3. Unable to add the person in a Group Chat

blocked-telegram-contact-unable-to-add-into-group-chat

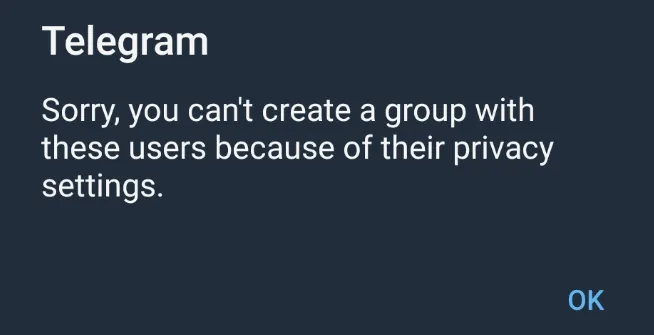
One quick way to know if you are being blocked is to try adding the person to a new Group chat.

You will encounter the following error: “Sorry, you can’t create a group with these users because of their privacy settings.

When you see this, you are likely to be blocked by this person.

This situation only applies to you. For the person who blocked you, they can add you (if they wish) to another new Group. They will not receive any Telegram error messages.


4. Unable to make Telegram Call

Telegram-blocked-unable-to-call

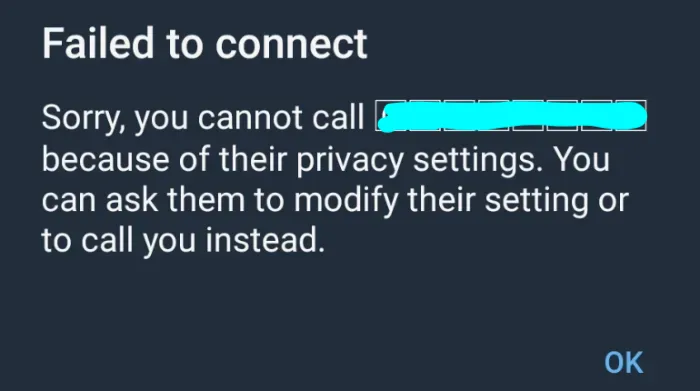
When you are blocked, you cannot make a Telegram Call to the person.

Try making a Telegram Call to the person, and you will encounter this error message that says, “Sorry, you cannot call <person> because of their privacy settings. You can ask them to modify their settings or to call you instead.


5. Use another phone number to send a Telegram message

telegram-blocked-muted

The best way to confirm if you are being blocked is to send a message to the person using another phone number.

You may want to pretend to be another person with a new Telegram account and ask the person some questions to get them to reply to you. Unfortunately, if they respond, this means you are likely to be blocked in your old Telegram account.


6. No presence of pop-up message notification

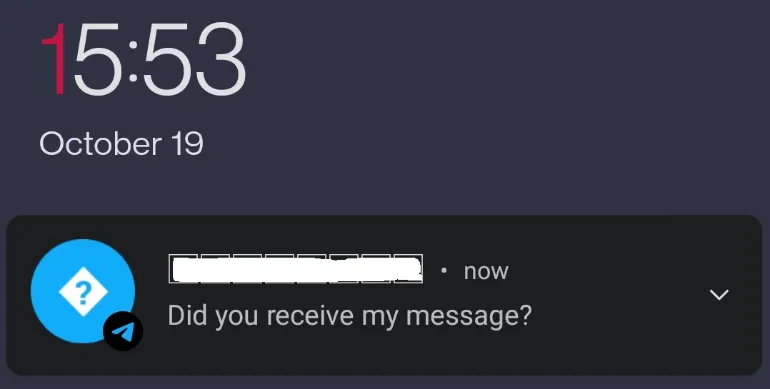
telegram-block-no-presence-of-pop-up-notifications

Be present while the target phone is being used, such as when it is set down on a desk.

Make sure you are close enough to feel the phone vibrate and see the screen of the phone.

Now, send your Telegram message to the target phone.

  • Observe if the phone has any notification rings when you send the message.
  • Even if you are not being muted, your Telegram messages should have a visual pop-up notification on their screen.

Observation

You are likely to be blocked or muted if there are no visual pop-up notifications of your message.


7. Analysis of Last Seen Timestamp

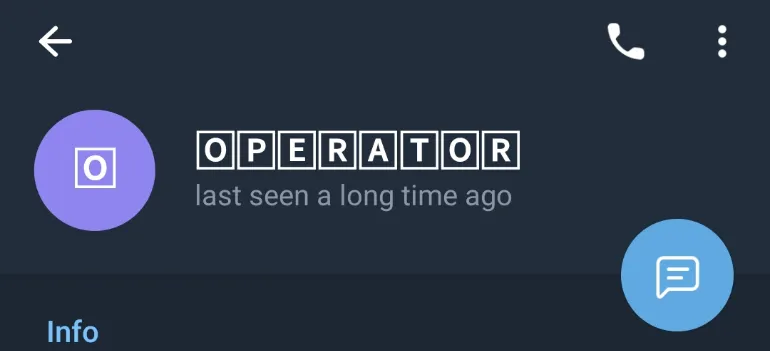
telegram-blocked-timestamp-status-analysis-last-seen-a-long-time-ago

When you are blocked, you will see the person’s status as “last seen a long time ago“.

The best evidence is physically seeing the person using the Telegram app, but you still see this timestamp status. Or you had communicated with the person using another Telegram account, yet the timestamp status remains the same.


8. No Display/Profile Pic Shown

When the person is blocking you in Telegram, you can no longer see their display or profile picture.

The blocked display pic will be like the image shown above (5. Absence of Online status).


9. Absence of Online status

telegram-blocked-cannot-see-online-status-timestamp-analysis

As mentioned above, you will always see the person’s status as “last seen a long time ago”.

Therefore, you will never see the “Online” status of the person, as long as you remain blocked in Telegram.


10. You no longer appear in their Contacts list

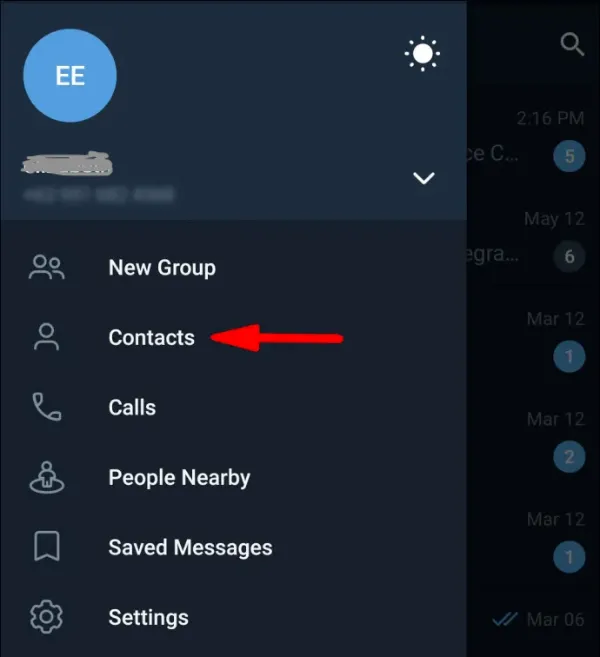
telegram-blocked-contact-list

If you’re not on someone’s contact list, they may have blocked you.

Blocking someone on Telegram will prevent them from appearing in your contact list.

This is because the person you blocked has decided to hide their profile from you.


11. Check if Account is deleted

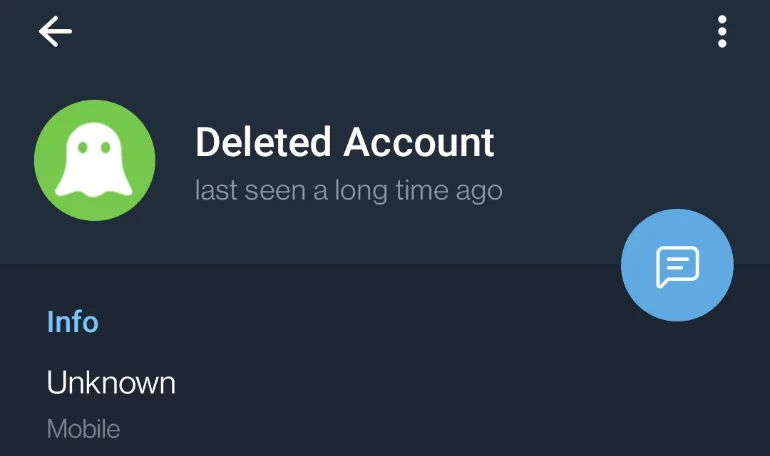
telegram-blocked-deleted-account

Telegram users can choose to delete their accounts and once removed, the deleted account can behave similar to a person who had blocked you in Telegram, e.g. your messages keep getting single ticks and etc.

To make sure the person did not delete their Telegram account, go into their profile and see their name. You should not see “Deleted Account” here.

If you did not see it, you are highly to be blocked by the person as the person is still using the Telegram app.


11 Ways to Know If Someone Had Blocked You on Telegram Read More »

How-to-know-if-someone-mute-you-on-Telegram

7 Easy Ways to Know If Someone Muted You on Telegram [2022]

If you’ve been muted on Telegram, there are some tell-tale signs you can look out for to find out.

The Telegram mute action hides pop-up notifications. This means that the person will not be notified of your incoming messages.

However, all of your sent messages will still be visible when the person opens the Telegram app. So it’s up to them to decide if they want to read them.

Also read: How to know if someone muted you on Whatsapp

How Do You Know If Someone Has Muted Your Telegram Messages?

Here are the seven (7) ways you can use to see if someone has muted your Telegram messages.


1. Presence of pop-up message notification

telegram-notification-message-pop-up-mute

Be present while the target phone is being used, such as when it is set down on a desk.

Make sure you are close enough to feel the phone vibrate and that you can see the screen of the phone.

Now, send your Telegram message to the target phone.

  • Observe if the phone has any notification rings when you send the message.
  • Even if you are not being muted, your Telegram messages should have a visual pop-up notification on their screen.

Observation

You are likely to be muted if there are no visual pop-up notifications of your message.


2. Observing too many unread messages

telegram-notification-too-many-messages-unread-mute

A double-tick beside your sent message indicates the “read” state in Telegram settings. This suggests that the recipient has received and read your message.

Since they are not immediately informed when someone mutes your Telegram chat, a sizable portion of your delivered messages are frequently “unread.”

The person may continue to use Telegram as usual, as they will still be notified of incoming messages from other people who are not muted.
Your message will eventually be “read” when that person decides to review it. In this case, you can see that all sent, but “unread” messages become “read” at the same time.

Observation

Observe if your messages often get delayed “read,” and a significant portion of them get “read” at the same time.


3. Send a Test message (e.g. using tempting or urgent content)

send-tempting-urgent-curious-message-as-testing-if-muted-telegram

Our goal here is to test in real-time if the person has muted their Telegram message.

If the person doesn’t reply to you in a reasonable amount of time, there is a high chance that they have muted you.

The closer you are physically to the person, the better the results. For example, if your girlfriend’s Telegram messages remain “unread” even though she checks her phone regularly, you’re muted.

Observation

Send a tempting, curious or even urgent message to the person, and give it reasonable time for a reply.


4. Analysis of Last Seen Timestamp

telegram-last-seen-recently-muted-timestamp-analysis

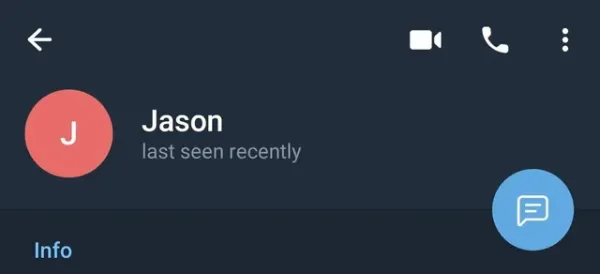
It would help if you compared the timestamp of your message to the recipient’s most recent sighting.

If you sent a Telegram message an hour ago, and the recipient’s last saw timestamp was recent, but your message is still listed as “unread,” you may have been muted.

Observation

The person’s last seen timestamp was very recent on Telegram, but your messages remain “unread” for hours or longer.


5. Mute Duration

telegram-mute-notifications-configure-duration-options

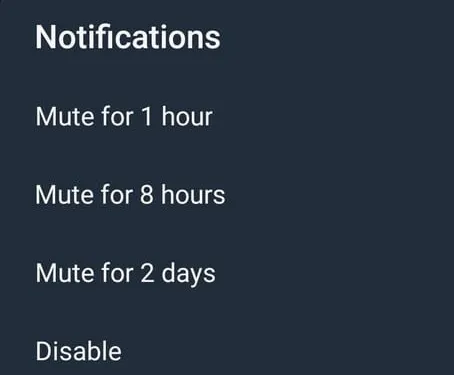
Currently, there are four (4) mute durations available in Telegram.

  • 1 hour
  • 8 hours
  • Mute for 2 days
  • Disable

The <Disable> option is a permanent mute duration until the person un-mutes it.

Sometimes the best thing to do is wait til the mute duration is over and hope you aren’t muted permanently.

After the muting duration has passed, your Telegram messages will return to normal, and the other person will receive your message notifications again.

Observation

Wait for the mute duration to expire since it can be set to 1 hour, 8 hours or 2 days.


6. Presence of Mute Icon

telegram-muted-notification-icon-message

You can take the phone, open Telegram, and check to see if the “Mute” icon appears next to your name.

You are muted if you see this icon (see the image above).

To unmute yourself, long-press your name and click on the ringtone icon on the top menu.


7. Use Telegram Calling

telegram-mute-make-voice-calling

This applies to both Telegram’s voice and video calling features.

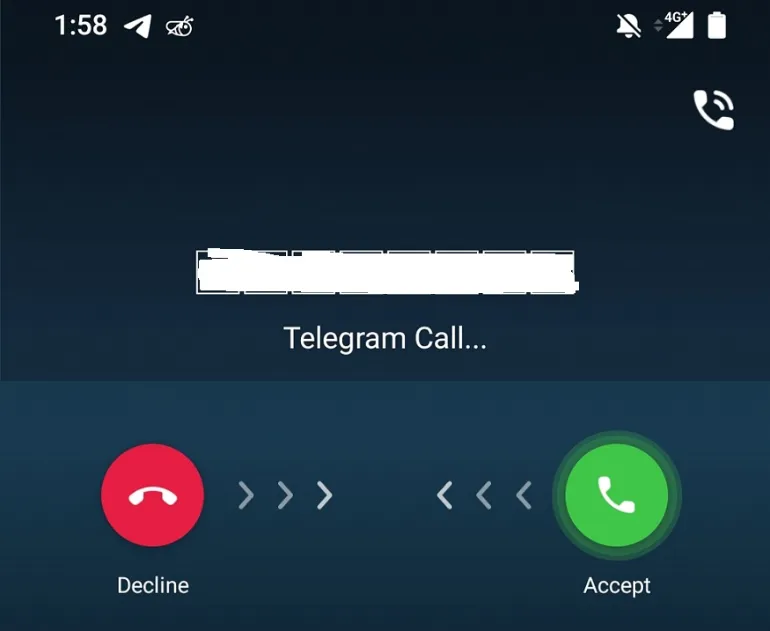
When you initiate a Telegram call, the other party will be notified (unless they specifically set it to <Nobody> under the Calls option in Settings)

Even if you are muted, the Telegram audio/video call will be sent to that person’s phone, and they will have to accept or decline your call.

Conclusion

Make a Telegram Voice call to the person.

If this is not picked up, there will still be a pop-up notification on the phone screen.

Your Telegram messages are more likely to be read now that the recipient has been notified.


7 Easy Ways to Know If Someone Muted You on Telegram [2022] Read More »

How-do-you-know-if-Someone-Muted-Your-Whatsapp-Message

7 Easy Ways to Know If Someone Muted You on Whatsapp [2022]

When you are being muted on Whatsapp, there are several signs you can look out for to know this.

The mute action on WhatsApp makes the pop-up notification disappear, meaning that the person will not be notified of your income messages.

However, all your sent messages will remain visible when they open their Whatsapp. So it is up to them to decide if they want to read them.

Also read: How to know if someone muted you on Telegram

How Do You Know If Someone Has Muted Your WhatsApp Messages?

Here are the seven (7) signs you can use to see if someone has muted your Whatsapp messages.


1. Presence of pop-up message notification

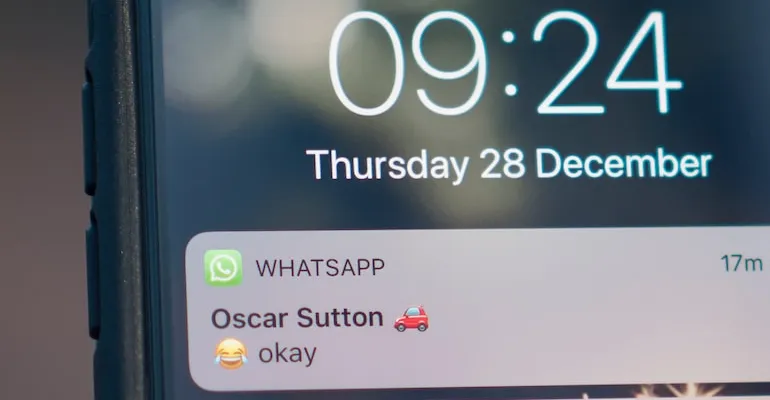
muted-whatsapp-notifications-pop-up

Be physically near the person and the target phone, for example, when it is placed on a desk. Make sure you can visually see the phone screen and close enough to detect if the phone is vibrating.

Now, send your WhatsApp message to the target phone.

  • Observe if the phone has any notification rings when you send the message.
  • Even if you are not being muted, your Whatsapp messages should have a visual pop-up notification on their screen.

Observation

You are likely to be muted if there are no visual pop-up notifications of your message.


2. Observing too many unread messages

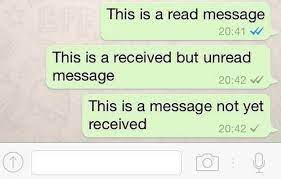
whatsapp-unread-messages

In Whatsapp settings, a double-tick (grey or blue) equates to the “read” status. This means your message has been delivered and read by the person.

When someone mutes your WhatsApp message, a good chunk of your sent messages are often “unread” since the person does not get notified in real-time.

The person is likely to be using Whatsapp as usual since they still get notified of incoming messages from others they did not mute.

Your messages will eventually get “read” once the person decides to check them out. When this happens, you will notice that all your sent, but “unread” messages will get “read” at the same time.

Observation

Observe if your messages often get delayed “read,” and a big portion of them get “read” at the same time.


3. Sending a tempting or urgent message

whatsapp-send-temping-curious-urgent-fake-message

The aim here is to test whether the person has muted your Whatsapp messages in real-time.

If the person did not reply to you in a reasonable time, you could be sure that they had muted you.

The results will be better if you are physically near the person. For example, if the person checks their phone regularly, but your Whatsapp messages remain ” unread”, you have been muted.

Observation

Send a tempting, curious or even urgent message to the person, and give it reasonable time for a reply.


4. Analysis of Last Seen Timestamp

whatsapp-last-seen-timestamp-analysis

You need to observe the timestamp of your sent message versus the last seen timestamp of the person.

If you had already sent your Whatsapp message an hour ago and the last seen timestamp of the person was recently, but yet your message remains “unread”, this is an indicating sign of you being muted.

Observation

The person’s last seen timestamp was very recent on Whatsapp, but your messages remain “unread” for hours or longer.


5. Mute Duration

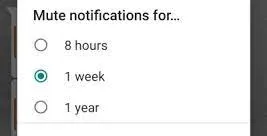
whatsapp-mute-settings-duration

Currently, there are three (3) mute durations available in Whatsapp.

  • 8 hours
  • 1 week
  • Always

Sometimes the best way is to wait it out and hope it is not muted to “Always” (permanent).

After the mute duration, your Whatsapp messages will return to normal, and the person will receive your message notification.

Observation

Wait for the mute duration to expire since it can be set to 8 hours or 1 week.


6. Presence of Mute Icon

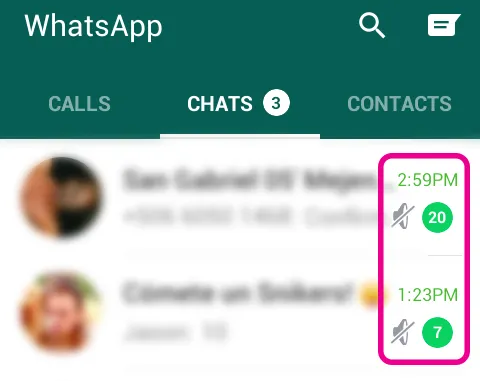
muted-icon-on-whatsapp-messages

Depending on your situation, you can take the phone, open Whatsapp, and see if this “Mute” icon is next to your name (see image above).

This icon means you are being muted.

To unmute yourself, press the three dots menu on the top-right and select <Unmute notifications>.


7. Use Whatsapp Calling

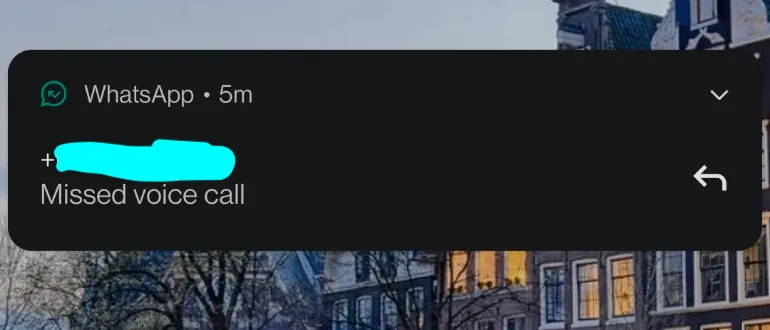
whatsapp-missed-voice-call-muted-notifications

This applies to both Whatsapp Voice and Video calling features.

The person will get notified when you start a Whatsapp call to them.

Even if you are being muted, your Whatsapp voice/video call will get through to the person’s phone, and the person will have to either pick up or reject your call.

Conclusion

Give the person a Whatsapp Voice call. If this is not picked up, there will still be a pop-up notification on the phone screen.

The chances of your Whatsapp messages getting read now are high since the person is notified.


7 Easy Ways to Know If Someone Muted You on Whatsapp [2022] Read More »

mac-terminal-command-clean-speed-up

5 Terminal Commands to Clean & Speed Up Your MacBook Daily

There are certain routine habits you can do to clean your Mac device and to boost its performance.

All these can be done simply using command lines and inserting them into your Mac Terminal app.

Learning to use command lines are very useful as graphical user interface (GUI) can change when software versions get a major upgrade, however the command lines are always the same.

Search for “Terminal” and open the app to begin.

How to Clean and Speed Up macOS Using the Terminal Command line?

Here are the five (5) easy Mac terminal command lines you can use to clean and speed up your macOS device.


1. Clear up RAM memory

For every application we use and every system process that is running, they are stored in the Random Access Memory (RAM) of your MacBook.

Even when they are not active at the moment, they are still stored as inactive RAM. In short, they are still taking up space in your RAM.

Freely up these inactive RAM can smooth up your Macbook performance significantly. To do so, use this command in Terminal.

sudo purge

2. Flush DNS Cache

DNS Cache stores all the IP addresses of the websites you visited.

You may encounter 404 error code when visiting certain webpages. This may be caused by the location of the web server changes before the entry of your DNS cache updates.

Regularly flush your DNS Cache so that you always get the latest nameservers and ensure all websites you visit are working fine.

To do this, use this command in Terminal.

sudo dscacheutil -flushcache; sudo killall -HUP mDNSResponder;

3. Clear user log files

macOS keeps certain logs files in their system and these background logs are mainly for crash reports and error reporting purposes.

The more you use your MacBook, the more log files you have.

Removing these logs files regularly can significantly clean up your macOS performance and free up more disk space.

To do so, use this command in Terminal.

cd ~/Library/Logs
sudo rm -rf ~/Library/Logs/*

4. Remove System Logs

Apple periodically clean this up automatically and these system log files occur from previous system upgrades and updates. However sometimes it can get really big in size, e.g. 10GB.

It is a good practice to clear them regularly. To do this, use this command in Terminal.

sudo rm -rf /private/var/log/*

5. Restart your Mac regularly

Mac users usually do not reboot their Mac computers because it is easier to just close the laptop lid when you are using the Macbook.

However, Mac devices are computers and they need a fresh reboot and restart once a while.

As a good practice of habit, try to restart your Mac computer once a week. The entire rebooting and restarting should only take a minute or so.

To reboot, use this command in Terminal.

sudo shutdown -r now

Optional Steps

Empty your Trash regularly

Trash can contain large gigabytes of files over a period of time. Freeing up the space will increase your storage capacity, as well as reducing your system resources.

Select on the Trash icon on your Dock and click <Empty>.

Update to the latest macOS version

It is important to keep your system up-to-date with the latest version to protect your computer from vulnerbitilies as well as getting the latestest features.

Try to search for any new updates once a month. To do so, use this command in Terminal.

softwareupdate -l

Uninstall Unwanted Applications

Always check your installed application regularly and make sure you un-install those that you no longer need.

These unwanted applications take up storage space and take up system resources at times, especially those operate in the background and uses your system resources all the time.

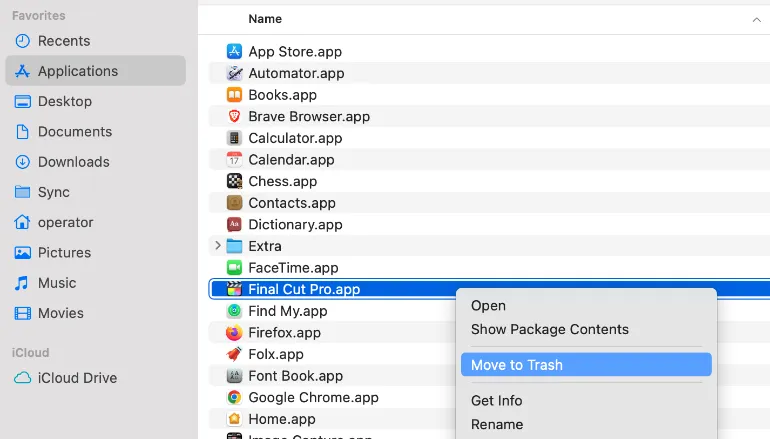
uninstall-mac-application-finder-macos

To un-install application from your Mac computer, go to Finder and select <Applications>, right-click on the unwanted application and click <Move to Trash>.

Install CleanMyMac X

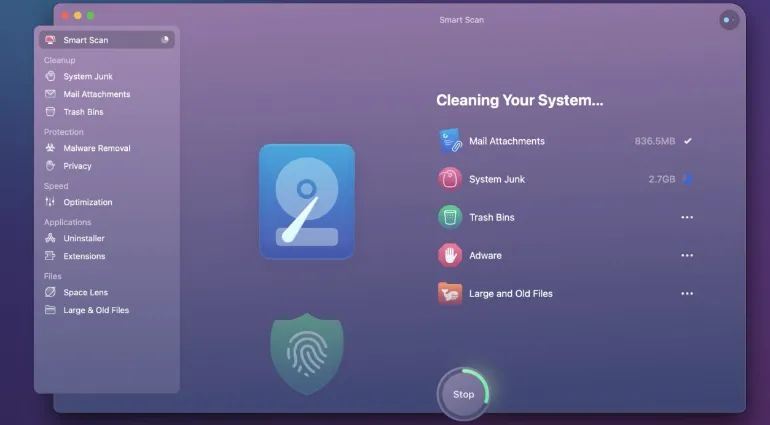
cleanmymac-x-cleaning-speed-up-macos

Probably the most convenient Mac cleaning tool with lots of positive reviews, CleanMyMac X is a easy & automated cleaning utility for your Mac device that helps you remove system junk and speed up your system resources.

The software looks into your system files, photos, emails, iTunes, analyze large and old files automatically and reports back to you on its suggestion. The user ultimately decides which to clean and which to retain, based on the software’s recommendations.


5 Terminal Commands to Clean & Speed Up Your MacBook Daily Read More »

create-admin-account-on-mac-without-admin-rights

3 Ways to Create an Admin Account on Mac Without an Admin

Have you ever found yourself in a situation where you need to create an admin account on your Mac, but there’s no existing admin to do so?

Don’t worry; you’re not alone. Many people have faced this conundrum, whether due to losing admin access or acquiring a used Mac without one.

In this blog post, we’ll guide you through two methods to create an admin account on your Mac without an existing admin.

Fun Fact #1: Did you know that Apple's macOS operating system is built on a Unix-based foundation, making it more similar to Linux than to Windows?

How to Create an Admin Account on Mac without Admin Access Privilege

Here are the three (3) different ways to do so;


Method 1. Using Recovery Mode

Recovery Mode on a Mac is a handy built-in feature that allows you to perform various tasks, like repairing your disk, reinstalling macOS, or in our case, creating a new admin account without an existing admin.

Here’s a step-by-step guide on how to do it:

Step 1: Boot into Recovery Mode

  • Shut down your Mac if it’s on.
  • Press and hold the Power button until you see the Apple logo or another image, then immediately press and hold Command (⌘) + R.
  • Release the keys when you see the Apple logo or another image. Your Mac is now in Recovery Mode.

Step 2: Access Terminal

  • In the macOS Utilities window, select Utilities from the top menu bar.
  • Click on Terminal to open it.

Step 3: Create a New Admin Account

  • In Terminal, type the following command and press Enter: resetpassword
  • The Reset Password window will appear. Click on the dropdown menu, select your primary hard drive, and choose the user account you want to promote to admin.
  • Enter a new password, confirm it, and provide a hint.
  • Click on Save to reset the password.
  • Close the Reset Password window and Terminal.

Step 4: Restart Your Mac and Log In

  • In the macOS Utilities window, click on Apple in the top left corner, and select Restart.
  • Once your Mac restarts, log in with the user account you just promoted to admin using the new password you set.
Fun Fact #2: The first Macintosh computer, the Macintosh 128K, was introduced on January 24, 1984, and was the first mass-market personal computer to feature a graphical user interface and a mouse!

Method 2. Using Single-User Mode

Single-User Mode is another way to create an admin account on your Mac without an existing admin.

This method involves booting your Mac into a command-line interface and creating a new admin account from there. Here’s how to do it:

Step 1: Boot into Single-User Mode

  • Shut down your Mac if it’s on.
  • Press the Power button to turn on your Mac, and immediately press and hold Command (⌘) + S.
  • Release the keys when you see text on the screen. Your Mac is now in Single-User Mode.

Step 2: Mount the File System

  • In the command-line interface, type the following command and press Enter: /sbin/mount -uw /
  • Wait for the command to execute, and you’ll see a new command prompt.

Step 3: Create a New Admin Account

  • Type the following command and press Enter: rm /var/db/.AppleSetupDone
  • This command tricks your Mac into thinking it’s being set up for the first time, allowing you to create a new admin account.

Step 4: Restart Your Mac and Log In

  • Type the following command and press Enter: reboot
  • Your Mac will restart and display the “Welcome to Mac” setup screen.
  • Follow the on-screen instructions to set up a new admin account.
  • After the setup is complete, log in with your new admin account.

Method 3. Using a Bootable USB Installer

Another method to create an admin account without an existing admin is to use a bootable USB installer.

This technique involves installing macOS on an external USB drive, booting your Mac from that drive, and then creating a new admin account. Here’s how to do it:

Step 1: Create a Bootable USB Installer

  • Download the macOS installer from the App Store on another Mac with admin access.
  • Insert an empty USB drive (at least 16GB) into the Mac.
  • Open Terminal and enter the following command (replace “MyVolume” with the name of your USB drive): sudo /Applications/Install\ macOS\ [version].app/Contents/Resources/createinstallmedia --volume /Volumes/MyVolume
  • Press Enter and provide your admin password when prompted. The process may take a while to complete.

Step 2: Boot Your Mac from the USB Installer

  • Shut down your Mac if it’s on.
  • Insert the bootable USB installer into your Mac.
  • Press the Power button, and immediately press and hold the Option (⌥) key.
  • Release the key when you see the Startup Manager window.
  • Select your bootable USB drive and press Enter. Your Mac will boot from the USB installer.

Step 3: Install macOS on the External Drive

  • In the macOS Utilities window, select Install macOS and click Continue.
  • Follow the on-screen instructions and choose the external USB drive as the installation destination.
  • Wait for the installation to complete. Your Mac will restart and boot from the external USB drive.

Step 4: Create a New Admin Account

  • Follow the on-screen instructions to set up a new admin account.
  • After the setup is complete, log in with your new admin account.

Step 5: Restart Your Mac and Log In

  • Shut down your Mac.
  • Remove the bootable USB installer.
  • Press the Power button to turn on your Mac.
  • Log in with the new admin account created on the external drive.
  • Open System Preferences > Users & Groups.
  • Click the lock icon to make changes and enter your admin password.
  • Click the “+” button to create a new admin account on your Mac’s primary hard drive.
  • Set the new account as an admin, and create a username and password.
  • Log out of the current admin account and log in with the new admin account you just created.

Conclusion

Gaining admin access on a Mac without an existing admin can be a challenging task, but it’s entirely possible with the help of Recovery Mode and Single-User Mode.

Remember to use these methods responsibly and only on a Mac you legally own or have permission to access.

Proper user account management is vital to ensuring your Mac remains secure and well-organized.

Always make sure to have at least one admin account on your Mac to prevent future issues with admin access.


3 Ways to Create an Admin Account on Mac Without an Admin Read More »

fix-telegram-video-playback-android-iphone

7 Ways to Fix Telegram Cannot Play Video on Android & iPhone

Are you a Telegram user who’s ever wondered, “Why can’t I play video in Telegram?” or “Why are Telegram videos not playing on my iPhone?”

Fret not; you’re not alone! Video playback issues can be a real bummer, especially when you’re trying to catch up on the latest viral videos or share memories with friends and family.

That’s why we’ve compiled this comprehensive guide to help you fix Telegram video playback issues on Android and iPhone devices.

Fun Fact #1: Did you know that Telegram was launched in August 2013 by brothers Nikolai and Pavel Durov? It's now one of the fastest-growing messaging platforms with over 500 million monthly active users!

How to Fix Telegram App Unable to Play Video on iPhone and Android Phones

Here are the seven (7) ways you can use to resolve the problem.


Method 1. Check the Video File Format

Although Telegram supports a wide range of video formats, occasionally, you might come across a video that isn’t compatible with the platform.

This could be the reason why you’re asking, “Why can’t I play video in Telegram?” To resolve this issue, check the video file format and ensure it’s supported by Telegram.

Telegram supports popular video formats like MP4, MOV, MKV, AVI, and more.

If the video you’re trying to play is in an unsupported format, consider using a video converter tool to change it to a compatible format, such as MP4, before sharing it on Telegram.


Method 2. Disable VPN or Proxy Services

If you’re using a VPN (Virtual Private Network) or proxy service on your device, it could be affecting your Telegram video playback experience.

These services can sometimes cause slower connections or limit the bandwidth available for streaming video content.

To see if this is the issue, try temporarily disabling your VPN or proxy service and then attempt to play a video in Telegram.

If the video plays without any problems, you might need to consider using a different VPN or proxy service or adjusting your current service’s settings to improve performance.


Method 3. Enable Storage Permissions

If you find yourself wondering, “Why are Telegram videos not playing on my iPhone or Android?“.

It could be because the app doesn’t have the necessary permissions to access your device’s storage.

Enabling storage permissions will allow Telegram to read and write files, which is essential for video playback.

For Android users:

  • Open the Settings app on your device.
  • Navigate to “Apps” or “Applications.”
  • Find Telegram and tap on it.
  • Tap “Permissions,” then enable “Storage” by toggling the switch.

For iPhone users:

  • Open the Settings app on your device.
  • Scroll down and tap on “Telegram.”
  • Ensure the “Photos” permission is set to “Read and Write.”

After adjusting the permissions, check if you can now play videos in Telegram.


Method 4. Clear Cache and Data

As you use Telegram, it accumulates cache and data, which can sometimes cause issues like video playback problems.

Clearing the cache and data can be a quick and effective way to resolve these issues.

For Android users, follow these steps:

  • Open the Settings app on your device.
  • Navigate to “Apps” or “Applications.”
  • Find Telegram and tap on it.
  • Tap “Storage” and then tap “Clear Cache” and “Clear Data.”

For iPhone users, you’ll need to delete and reinstall the app to clear cache and data, as iOS doesn’t provide an option to clear cache for individual apps.

Keep in mind that clearing data may require you to log back into your Telegram account, so make sure you remember your login credentials.


Method 5. Check Your Internet Connection

Sometimes, you might ask, “Why can’t I play video in Telegram?” simply because of a poor or unstable internet connection.

Video playback requires a stable and relatively fast connection, so you must ensure you’re connected to a reliable network.

Try loading a website or streaming a video on a different app to test your connection. If you’re experiencing slow speeds, consider switching between Wi-Fi and mobile data to see if there’s an improvement.

If you’re using public Wi-Fi or a shared network, keep in mind that connection speeds might be slower due to multiple users.


Method 6. Update Your Telegram App

One of the first things you should do when faced with Telegram video playback issues is to ensure you’re using the latest app version.

Developers are constantly working to improve the app’s performance, fix bugs, and add new features. So, updating your app might just resolve the problem of “Telegram cannot play video.”

For Android users, head over to the Google Play Store, search for Telegram, and tap “Update” if an update is available. iPhone users can do the same via the App Store.


Method 7. Restart Your Device

It may sound cliché, but sometimes the easiest solution to tech issues is to restart your device. Turning your phone off and on again can clear temporary glitches and help your device run smoother.

To restart your Android device or iPhone, follow these steps:

  • Press and hold the power button on your device until a menu appears.
  • Tap “Restart” or “Power off” and wait for your device to turn off.
  • If you chose “Power off,” wait for a few seconds and then press and hold the power button again to turn your device back on.

Once your device has restarted, open Telegram and try playing a video to see if the problem is resolved.


Conclusion

We’ve covered 10 methods to help you resolve Telegram video playback issues on Android and iPhone devices.

With these tips, you should be able to fix the “Telegram cannot play video” problem and get back to enjoying your favorite video content on the platform.

Remember to keep your app and device updated, maintain a stable internet connection, and don’t hesitate to reach out to Telegram Support if needed.

Stay connected with friends and family, and enjoy smooth video playback on Telegram!


7 Ways to Fix Telegram Cannot Play Video on Android & iPhone Read More »

make-status-bar-transparent-android

3 Ways to Make the Status Bar Transparent on Android Screen

Are you tired of looking at your Android phone’s dull, opaque status bar? If so, you’re in the right place!

In this blog post, we’ll discuss how to make the status bar transparent in Android.

By giving your status bar a sleek, transparent look, you’ll be able to enjoy a more immersive and visually appealing experience on your device.

Fun Fact #1: Did you know that the Android operating system was initially developed for digital cameras, not smartphones? It wasn't until later that the creators pivoted toward the smartphone market!

Prerequisites

Before we dive into how to make the status bar transparent on Android, it’s important to ensure your device is compatible and that you have the necessary tools and software.

Let’s go through these prerequisites:

Android Version Compatibility

The methods we’ll discuss in this post are compatible with Android 4.4 (KitKat) and later versions.

You might need to update your device or explore alternative solutions if you have an older version.

Necessary Tools and Software

Depending on the method you choose, you might need a custom launcher, a system UI tuner app, or Android Studio (for developers). We’ll go over the specifics in the upcoming sections.

What is a translucent status bar, you ask? It’s simply a status bar that allows some of the background to show through, creating a more seamless look.

Now that you’ve got the basics, let’s move on to the different methods to achieve a transparent status bar!

Fun Fact #2: The first commercially available Android smartphone, the HTC Dream (also known as the T-Mobile G1), was released in 2008, and it featured a sliding keyboard and trackball! A far cry from the sleek touchscreens we see today.

How to Make Status Bar Transparent on Android

Here are the three (3) methods;


Method 1: Using a Custom Launcher

A custom launcher is one of the easiest ways to get a transparent status bar. These launchers provide a fresh look to your device and can easily change the appearance of your status bar.

Let’s walk through the steps:

Popular Custom Launchers

Several custom launchers, such as Nova Launcher, Action Launcher, and Smart Launcher, are available on the Google Play Store.

Each one offers unique features, so choose the one that best suits your needs and style.

Setting up a Custom Launcher for Transparent Status Bar

Once you’ve installed your chosen launcher, you can tweak its settings to achieve the desired transparency.

For instance, in Nova Launcher, go to “Settings” > “Look & Feel” > “Notification Bar” and toggle the “Transparent Notification Bar” option.


Method 2: Editing the System UI

For those who prefer a more hands-on approach, editing the system UI is another way to make your status bar transparent.

Keep in mind that this method can be a bit more technical and may involve rooting your device.

Rooting Your Android Device:

To edit the system UI, you may need to root your device. Rooting gives you superuser access, allowing you to modify system settings that are typically restricted.

Be cautious, as rooting can void your warranty and potentially harm your device if not done correctly.

Using a System UI Tuner App:

Once your device is rooted, you can use a system UI tuner app to customize the appearance of your status bar.

Apps like GravityBox or SystemUI Tuner allow you to change various aspects of the status bar, including transparency. Follow the app’s instructions to make the desired changes.


Method 3: Modifying Your App’s Theme (For Developers)

If you’re an app developer looking to implement a transparent status bar within your app, this method is for you.

We’ll walk you through creating a custom theme and applying the transparent status bar to your app.

Creating a Custom Theme:

Open your app project in Android Studio and navigate to the “res” > “values” > “styles.xml” file. Create a new style with a parent theme that supports transparent status bars, such as “Theme.AppCompat.Light.NoActionBar.” Add the necessary attributes to enable transparency, like this:

<style name="MyTransparentStatusBarTheme" parent="Theme.AppCompat.Light.NoActionBar">
    <item name="android:windowTranslucentStatus">true</item>
    <item name="android:windowTranslucentNavigation">true</item>
</style>

Implementing the Transparent Status Bar in Your App

Apply your new custom theme to your app by adding the “android:theme” attribute to your app’s manifest file:

<application
    android:theme="@style/MyTransparentStatusBarTheme">

How to change the status bar on Android for developers?

Following these steps, you’ve implemented a transparent status bar within your app!


Frequently Asked Questions

In this section, we’ll address some common questions that might pop up when trying to make the status bar transparent on Android.

Q1. Will These Methods Work on All Android Devices?

While the methods we’ve discussed should work on most devices running Android 4.4 (KitKat) and later, some exceptions may be due to manufacturer-specific customizations or software limitations.

Researching your specific device model before attempting any changes is always a good idea.

Q2. Can I Customize the Status Bar Further?

Absolutely! Besides making the status bar transparent, you can apply various other customizations, such as changing the color, icons, and layout.

Many custom launchers and system UI tuner apps offer these options.

Q3. Is There Any Risk Involved in Modifying the Status Bar?

Using a custom launcher is generally safe and risk-free. However, rooting your device and editing system files can carry risks, such as voiding your warranty or causing software issues.

Always proceed with caution and make sure to back up your data before making any significant changes.

3 Ways to Make the Status Bar Transparent on Android Screen Read More »

3 Ways to Hide Youtube Progress Bar And Make It Disappear

Ever found yourself asking, “How do I make the progress bar disappear on YouTube?

We’ve all been there. Sometimes, the progress bar can be a little distracting when you’re trying to enjoy a video.

Luckily, there are a few ways to make it vanish and create a distraction-free viewing experience.

You might wonder, “Why won’t the progress bar go away on YouTube?

Well, by design, the progress bar is there to help you navigate through the video. But it can also steal your focus, especially when you’re watching a captivating video or trying to concentrate on the content.

That’s where the idea of hiding the progress bar comes in handy.

Fun Fact #1: Did you know that YouTube started as a dating site? The original idea was for users to upload videos introducing themselves and stating what kind of partner they were looking for. However, the creators quickly realized that people were more interested in sharing all kinds of videos, so they pivoted to a video-sharing platform.

How To Make The YouTube Progress Bar Disappear and Go Away When Watching Videos

Here are the three (3) ways to do so.


Method 1: Using a Browser Extension

Browser extensions can be a game-changer when it comes to customizing your online experience.

One such extension, Magic Actions, can help answer the question, “What is the shortcut to hide the bar on YouTube?

Let’s explore how it works.

The Magic Actions Extension

Magic Actions is a browser extension available for both Google Chrome and Mozilla Firefox.

It comes with many features designed to enhance your YouTube experience, including the ability to hide the progress bar.

How to Install and Configure Magic Actions

  • First, visit the Magic Actions website or search for it in your browser’s extension store.
  • Install the extension by clicking “Add to Chrome” or “Add to Firefox,” depending on your browser.
  • Once installed, you’ll see a new icon in your browser’s toolbar. Click on it to access the settings.
  • Look for the “Hide Player Controls” option and enable it. This will automatically hide the progress bar along with other controls when you hover off the video player.

Now, you might ask, “How do I get rid of the bottom bar while watching YouTube?

Well, Magic Actions is as simple as hovering off the video player, and the progress bar will disappear, providing you with a cleaner viewing experience.

Fun Fact #2: Did you know that YouTube's first video, "Me at the zoo," was uploaded by one of the co-founders, Jawed Karim, on April 23, 2005? This 18-second video features Jawed at the San Diego Zoo talking about elephants. Today, it has millions of views and is still available on the platform.

Method 2: Fullscreen Mode and Auto-Hide

If you prefer not to use browser extensions, another simple solution can help you enjoy a distraction-free YouTube experience: fullscreen mode and auto-hide.

Enabling Fullscreen Mode

To enter fullscreen mode, follow these steps:

  • Start playing a video on YouTube.
  • Look for the fullscreen icon in the bottom-right corner of the video player. It looks like a square with two arrows pointing outward.
  • Click on the icon, and the video will expand to fill your entire screen.

Taking Advantage of Auto-Hide

When you watch a video in fullscreen mode, YouTube automatically hides the progress bar and other controls after a few seconds of inactivity.

To bring them back, move your cursor. This auto-hide feature allows you to enjoy a cleaner, more immersive viewing experience without any additional effort.


Method 3: Custom CSS for YouTube

For those who like to tinker with their browsing experience, you can hide the YouTube progress bar by using custom CSS.

This method requires a bit of technical know-how, but it’s an effective way to personalize your YouTube interface.

Accessing the Browser Developer Tools

You’ll need to access your browser’s developer tools to add custom CSS. Here’s how:

  • Open YouTube and start playing a video.
  • Right-click on the progress bar and select “Inspect” (Chrome) or “Inspect Element” (Firefox) to open the developer tools.
  • Look for the “Styles” or “CSS” tab in the developer tools panel.

Adding Custom CSS to Hide the Progress Bar

Now that you have the developer tools open, follow these steps:

  • Find the CSS selector for the YouTube progress bar. It should look something like .ytp-progress-bar-container.
  • Add the following custom CSS to the “Styles” or “CSS” tab:
.ytp-progress-bar-container {
   display: none;
}
  • The progress bar should now be hidden. Keep in mind that this change is temporary and will reset when you close the browser or navigate to a different site.

And there you have it! You now know three different ways to hide the YouTube progress bar for a distraction-free viewing experience.


Conclusion

Now that you’ve learned three different ways to hide the YouTube progress bar, it’s time to choose the best method.

Whether you opt for a browser extension like Magic Actions, take advantage of fullscreen mode and auto-hide, or use custom CSS to personalize your experience, you’re sure to enjoy a cleaner, more immersive YouTube experience.

So, go ahead and bid farewell to that pesky progress bar! Immerse yourself in your favorite videos without any distractions and maximize your time on the platform.

Enjoy your new distraction-free YouTube experience and happy watching!


3 Ways to Hide Youtube Progress Bar And Make It Disappear Read More »

reset-youtube-shorts-recommendations

5 Ways to Reset Youtube Shorts Recommendations [Clear Feeds]

Are you tired of seeing the same type of content popping up in your Shorts feed? Wondering how to reset YouTube Shorts recommendations?

Don’t worry; you’re not alone. Many people ask, “Why am I getting weird YouTube Shorts recommendations?

In this blog post, we’ll explore five different ways to refresh your YouTube Shorts recommendations and make your feed more exciting.

Fun Fact #1: Did you know that YouTube Shorts was launched in September 2020 as a direct competitor to TikTok?

Method 1: Clear Your Watch History

One of the easiest ways to hit the reset button on your YouTube Shorts recommendations is by clearing your watch history.

YouTube’s algorithm uses your watch history to determine which videos to recommend to you.

So, if you’re wondering, “How do you clear YouTube Shorts recommendations?” follow these simple steps:

Step-by-Step Guide:

  • Open the YouTube app on your smartphone.
  • Tap on your profile picture in the top right corner.
  • Go to “Settings” > “History & privacy.”
  • Tap on “Clear watch history” and confirm.

How This Affects Your Recommendations:

Once you clear your watch history, YouTube will no longer have that data to base its recommendations on. This means you’ll start seeing different content in your Shorts feed.

However, keep in mind that as you watch more videos, YouTube will learn from your new watch history and adjust its recommendations accordingly.

Fun Fact #2: YouTube Shorts has seen rapid growth, with the platform now boasting more than 3.5 billion daily views worldwide!

Method 2: Manage Your Interests

Another way to reset your YouTube Shorts recommendations is by managing your interests through your Google Account settings.

This allows you to fine-tune your video preferences and get more relevant content.

Accessing Your Google Account Settings:

  • Open the YouTube app and tap your profile picture in the top right corner.
  • Tap “Your data in YouTube.”
  • Scroll down to “YouTube activity controls” and tap “Manage your YouTube activity.”

Adjusting Your Video Preferences:

Once you’re in the YouTube activity controls, you can modify your interests to influence the content recommended to you:

  • Tap on “Manage interests” under “Video recommendations.”
  • Here, you’ll see a list of categories and topics that YouTube thinks you’re interested in. You can toggle them on or off according to your preferences.

By managing your interests, you’ll be able to tailor your YouTube Shorts recommendations to suit your tastes better.


Method 3: Create a Separate Account for Specific Interests

If you have diverse interests or want to explore different types of content without affecting your main account’s recommendations, consider creating a separate Google Account for specific interests.

This can help you maintain a more focused YouTube Shorts feed on each account.

Setting Up a New Google Account:

  • Go to accounts.google.com and click “Create account.”
  • Follow the prompts to set up your new account.
  • Once your new account is created, sign in to the YouTube app with your new credentials.

Benefits of Having Multiple Accounts:

You can enjoy a more personalized experience on YouTube Shorts by having separate accounts for different interests.

For example, you could have one account dedicated to cooking and another for fitness.

This way, your recommendations on each account will remain focused, and you won’t have to worry about resetting your YouTube Shorts recommendations as often.


Method 4: Interact with Videos You Enjoy

Your interactions with videos on YouTube, such as likes, dislikes, comments, and subscriptions, also influence your Shorts recommendations.

By actively engaging with the content you enjoy, you’re sending signals to YouTube about your preferences.

Liking and Disliking Shorts:

When you come across a short you like, make sure to give it a thumbs-up. Conversely, if you don’t enjoy a particular short, feel free to tap the thumbs-down icon.

This will help YouTube’s algorithm better understand your preferences and tailor your recommendations accordingly.

Leaving Comments and Subscribing:

Another way to influence your YouTube Shorts recommendations is by leaving comments on videos you enjoy and subscribing to channels that produce content you’re interested in.

This further helps YouTube’s algorithm understand your preferences and deliver more relevant recommendations.


Method 5: Send Feedback to YouTube

After clearing your watch history, you can take a more direct approach by sending feedback to YouTube if you’re still unsatisfied with your YouTube Shorts recommendations.

This can help by reporting inappropriate content and requesting more variety.

Reporting Inappropriate Content:

Sometimes, you might get weird or inappropriate YouTube Shorts recommendations that you’d rather not see. In such cases, you can report the content to YouTube. Here’s how:

  • Tap on the three-dot menu icon on the right side of the short you want to report.
  • Select “Report” from the options.
  • Choose the reason for reporting the content and submit your report.

Requesting More Variety:

To let YouTube know that you’d like to see more variety in your Shorts recommendations, you can send feedback:

  • Open the YouTube app and tap on your profile picture.
  • Select “Help & feedback.”
  • Tap on “Send feedback” and compose a message explaining that you’d like more variety in your YouTube Shorts recommendations.

Remember that the YouTube team may not reply to your feedback directly but reviews it to improve the user experience.


Conclusion

Resetting your YouTube Shorts recommendations can help you discover new content and make your feed more engaging.

By following the methods we’ve discussed, such as clearing your watch history, sending feedback to YouTube, managing your interests, interacting with videos you enjoy, and creating separate accounts for specific interests, you’ll be able to make the most of your YouTube Shorts experience.

So go ahead and give these methods a try, and happy watching!


5 Ways to Reset Youtube Shorts Recommendations [Clear Feeds] Read More »