ExifTool by Phil Harvey is probably the BEST EXIF metadata viewer for many file types, such as image files, document types and multimedia files. This article will show you how to install and use ExifTool on Windows, macOS and Ubuntu operating systems, through both simple drag & drog and easy command line instructions.
The easiest way is to use a drag-and-drop approach for Windows and a simple terminal command for Mac and Linux systems.
How to Install and Use ExifTool on Windows, Mac and Linux?
Here are the steps below for the three (3) different operating systems.
Install and Use ExifTool on Windows
Go to the official homepage of ExifTool and download the stand-alone Windows executable version.
It is usually a zip file.
Install on Windows
Unzip and you will see the ExifTool file named as “exiftool(-k).exe”.
There is no installation required here, as you are using the standalone lightweight ExifTool executable. You can move the “exiftool(-k).exe” to any directory folder you want.
How to Use ExifTool on Windows
Now, drag and drop your image or multimedia file to the ExifTool executable file.
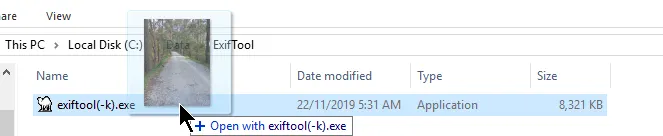
Your Windows command prompt will automatically open now to display the Exif metadata output.

Install and Use ExifTool on Mac
Go to the official ExifTool homepage and find the latest macOS version. It is a macOS package and in a .dmg format.
Download it onto your Mac.
Install on Mac
Double-click to install the dmg package and follow the instructions.
If you are stopped with an “unidentified developer” message and unable to proceed with the installation, make sure you go to <System Preferences>, <Security & Privacy>, unlock the padlock with your Mac password and allow the app to pass through.
How to Use ExifTool on Mac
Open the Terminal app by clicking on the magnifying glass and type in “Terminal”
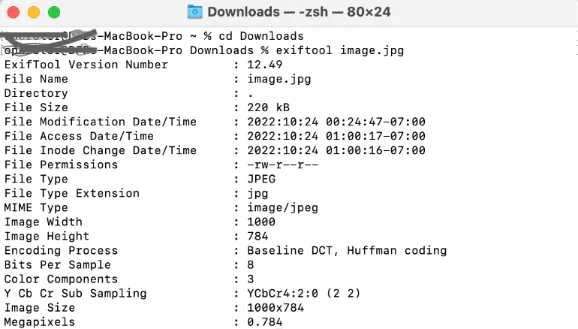
Navigate the Terminal into the exact folder where the image file resides. In this example, my image file is in the Downloads folder. I will run the following command.
cd ~/Downloads/Now, run the exiftool application against the image file (shown below)
exiftool photo.jpgYour Terminal will now display the EXIf metadata of the file.
To uninstall ExifTool from your Mac, type “open /usr/local/bin” (without the quotes) into Terminal. You will now see two files namely “exiftool” and “lib”. Delete these two files to uninstall ExifTool.
Install and Use ExifTool on Linux (Ubuntu)
In this example, I will be installing and using it on Ubuntu distribution.
Go to the official ExifTool homepage and find the latest Linux version. It is a zipped package and in a .tar.gz format.
Install on Ubuntu
Unzip the package and navigate into the extracted folder using the following commands;
    cd <your download directory>
    gzip -dc <ExifTool version>.tar.gz | tar -xf -
    cd <ExifTool version>
Install ExifTool in Ubuntu by;
    perl Makefile.PL
    make test
    sudo make install
How to Use ExifTool on Ubuntu
To use ExifTool on a image file, this works similar to macOS method. Just navigate to the image file directory and type the following command.
exiftool image.jpgTo uninstall ExifTool from Linux, type the command below;
sudo apt-get remove exiftool

![[7 Ways] You May Not Have a Proper App for Viewing this Content](https://www.ticktechtold.com/wp-content/uploads/2023/02/Featured_error-message-you-may-not-have-a-proper-app-for-viewing-this-content-android-whatsapp.webp)
![7 Ways to FIX Telegram Banned Number [Recover Account Unban]](https://www.ticktechtold.com/wp-content/uploads/2023/03/Featured_fix-recover-telegram-this-phone-number-is-banned.webp)