How to

monitor-someone-whatsapp-online-status

5 Ways to Get Whatsapp Alerts When Someone Is Online

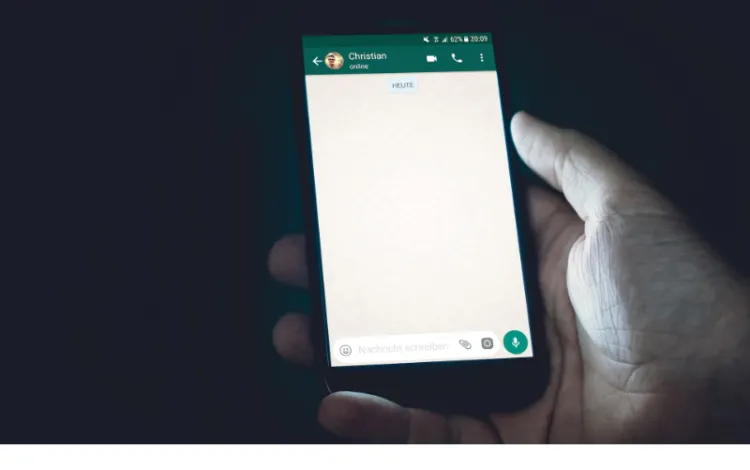
Hey there, fellow WhatsApp users! Ever found yourself wanting to chat with someone on WhatsApp, but you don’t know when they’re online?

It’s a common problem, and we’ve got you covered. In this blog post, we’ll explore different ways to get a notification alert when someone you’re interested in is online on WhatsApp.

This way, you can catch them when they’re available and never miss a chance to connect. Let’s dive in!


Why Monitor Someone’s Online Status on WhatsApp?

Before we get into the nitty-gritty, let’s talk about why you might want to monitor someone’s online status on WhatsApp. There are a few reasons why this could be useful:

  • Staying connected with friends and family: We all have busy lives, and sometimes it’s hard to catch up with our loved ones. Knowing when they’re online can help us find the perfect time to start a conversation and stay connected.

  • Business communication: Knowing when your colleagues or clients are online can be helpful if you’re using WhatsApp for work. This way, you can get quick responses and keep projects moving forward.

  • Online dating: If you’ve met someone special on a dating app and moved your conversations to WhatsApp, it’s natural to want to chat when they’re available. Knowing when they’re online can make it easier to have engaging conversations.

It’s important to remember that monitoring someone’s online status should be done respectfully and with their consent.

Now, let’s explore the different methods to track online status on WhatsApp.


Available Methods for Tracking Someone’s WhatsApp Online Status

There are a few ways to track someone’s online status on WhatsApp.

Let’s take a look at each of these five (5) methods.


Method 1. WhatsDog

whatsdog-monitor-online-status

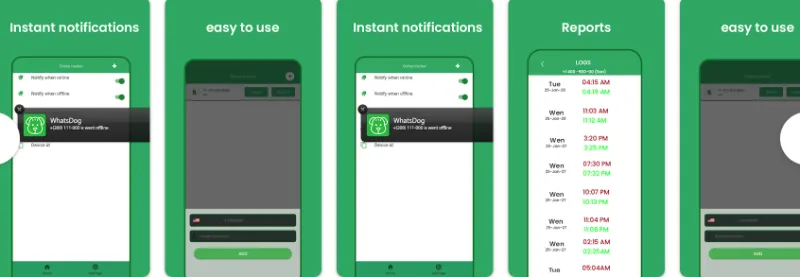
WhatsDog is an Android app that claims to be able to track a specific WhatsApp user’s online status and activity.

The app works by continuously monitoring the activity of the target user, and it sends notifications to the user whenever the target user is online or offline.

To use WhatsDog, the user needs to provide the phone number of the target user, and the app will start monitoring their WhatsApp activity.

Whenever the target user goes online or offline, the app sends a notification to the user who installed the app, providing information about the target user’s online activity.


Method 2. ChatWatch

chatwatch

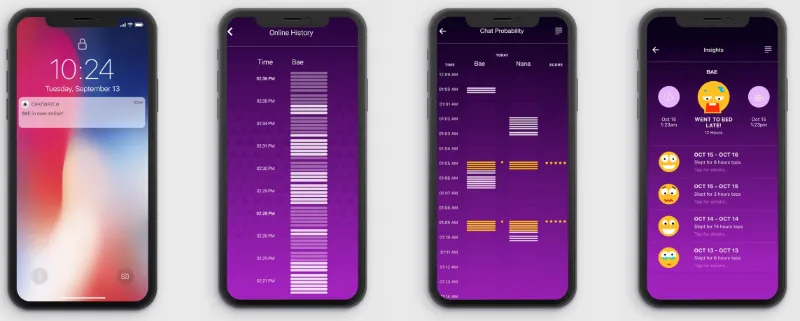
Chatwatch is a paid online service that claims to be able to track the online activity of WhatsApp users.

It works by analyzing the timestamps of the user’s online and offline activity to determine their behavior patterns and infer who they are chatting with.

Chatwatch provides a range of features, such as tracking multiple WhatsApp users simultaneously, receiving alerts when a user comes online or goes offline, and viewing detailed reports and statistics about user behavior.

The service also claims to be able to detect if two WhatsApp users are chatting with each other, even if they have not added each other as contacts.

To use Chatwatch, the user needs to provide the phone number of the target WhatsApp user they want to track and their phone number.

The service then begins to monitor the activity of the target user and generates reports about their online and offline behavior, including when they are most active and who they are likely chatting with.


Method 3. WaStat

wastat

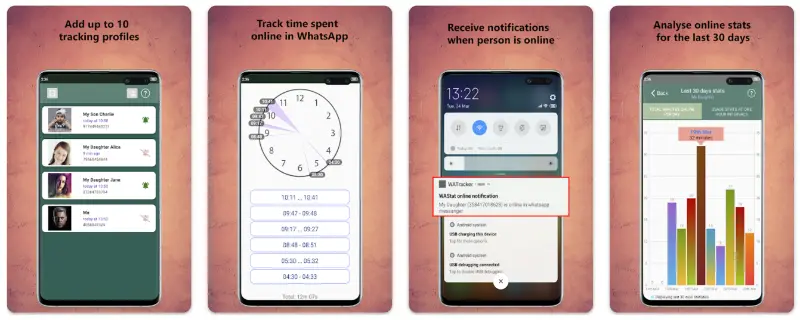
WaStat is an Android app that allows users to track the online activity of their WhatsApp contacts.

It displays information about when a particular WhatsApp contact comes online or goes offline and provides insights into their activity patterns.

WaStat provides a range of features, including the ability to track the activity of multiple contacts simultaneously, set up custom notifications, and view detailed statistics about the online activity of each contact.

The app also allows users to analyze activity patterns over time, providing insights into when a particular contact is most active on WhatsApp.

To use WaStat, the user needs to install the app on their Android device and grant it permission to access their WhatsApp contacts. The app then monitors the selected contacts’ activity in real time and displays a log of their online and offline status.


Method 4. Whatster

whatster

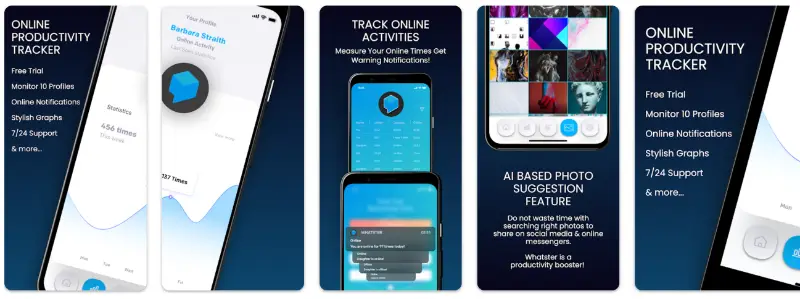
Whatster is an Android app that allows users to view and analyze their WhatsApp chat history in various ways.

It provides users with detailed statistics and insights about their chat activity, such as the number of messages exchanged, the frequency of messages, and the average response time.

Whatster provides a range of features, including the ability to view the most active contacts, see the most frequently used words and emojis, and monitor the length and duration of conversations.

The app also allows users to export their chat history to other apps or services, such as email or Google Drive.

To use Whatster, the user needs to download the app and grant it access to their WhatsApp chat history.

The app then processes the data and generates various reports and charts that help users better understand their messaging patterns.


Method 5. mSpy

mSpy is a mobile phone monitoring software that allows users to remotely monitor the activity of a target device.

It is marketed as a parental control tool or an employee monitoring solution, but it can also be used for other purposes, including spying on a partner’s phone.

Once installed on the target device, mSpy can track various types of data, such as monitoring Whatsapp online status, call logs, text messages, emails, social media activity, and GPS location.

It can also record phone calls and capture screenshots and keystrokes.

To use mSpy, the user needs to purchase a subscription plan and install the app on the target device.

The app runs in the background and sends the collected data to a remote server, which the user can access via a web-based dashboard.

mSpy provides a range of features, such as viewing all incoming and outgoing calls and texts, monitoring internet browsing history, and tracking the target device’s location in real-time.

It also allows users to set up geofencing alerts and receive notifications when the target device enters or leaves a particular location.


Privacy Considerations and Etiquette

While it’s tempting to know when your friends, family, or colleagues are online on WhatsApp, it’s crucial to consider privacy and etiquette. Here are some points to keep in mind:

  • Consent: Always ask for permission from the person you want to monitor. It’s essential to respect their privacy and only track their online status if they’re comfortable with it.
  • Transparency: Be open about your intentions and why you want to monitor their online status. Transparency can help build trust and ensure everyone is on the same page.
  • Do not abuse the information: Use the online status information responsibly and avoid stalking, harassment, or invading someone’s privacy.
  • Respect boundaries: Remember that everyone has a right to their privacy and personal space. If someone doesn’t want you to monitor their online status or becomes uncomfortable, respect their wishes and stop monitoring them.

By remembering these points, you can use WhatsApp online status monitoring responsibly and maintain healthy relationships with the people you care about.


Conclusion

So, there you have it! We’ve explored different methods for tracking someone’s online status on WhatsApp and how to set up notification alerts using third-party apps and monitoring websites.

Using these tools responsibly and respecting privacy allows you to stay connected with your friends, family, or colleagues without missing an opportunity to chat.

Remember, always seek consent, be transparent, and respect boundaries when monitoring someone’s online status.

With these guidelines in mind, you can enjoy a more engaging and connected WhatsApp experience.


5 Ways to Get Whatsapp Alerts When Someone Is Online Read More »

fix-telegram-calls-keep-dropping

11 Ways to Fix Why Telegram Calls Keep Dropping [Disconnect]

Have you noticed that sometimes when you make a Telegram voice call, the connection isn’t good enough?

Why do Telegram calls keep dropping?” Well, you’re not alone. Telegram call issues can be a bummer, especially when trying to catch up with friends or get some work done.

But don’t worry! In this blog post, we’ll explore 11 different ways to fix those pesky dropped calls and get you back to seamless communication.

So, let’s dive in and start tackling those Telegram call problems one by one!


Method 1. Change Telegram’s Voice Call Settings

Did you know that Telegram has built-in settings for voice calls that can affect their quality and stability?

Adjusting these settings might be the key to fixing those dropped calls and reconnecting with your contacts.

To access Telegram’s voice call settings:

  1. Open the Telegram app and tap on the menu (☰) button in the top-left corner.
  2. Select “Settings” > “Calls.”
  3. Experiment with the following options:
    • Use Less Data for Calls: Enabling this option can help improve call stability on slower connections. However, it might reduce call quality, so it’s a trade-off.
    • Peer-to-Peer (P2P) Calls: P2P calls can offer better quality and lower latency, but they might not work well with certain network configurations or VPNs. Try toggling this option on or off to see which setting works best for you.

Method 2. Disable Battery Optimization for Telegram

Sometimes, your device’s battery optimization settings can interfere with Telegram calls, causing them to drop or not connect at all.

Disabling battery optimization for Telegram ensures the app has the resources it needs to keep your calls going strong.

To disable battery optimization for Telegram:

  • For Android: Go to “Settings” > “Apps & notifications” > “Special app access” > “Battery optimization” (or search for “Battery optimization” in your settings). Locate Telegram in the list, tap on it, and select “Don’t optimize.”
  • For iOS: Battery optimization settings are managed automatically by iOS, so there’s no need to adjust them manually for specific apps.

Method 3. Disable VPN or Proxy

VPNs and proxies can sometimes interfere with Telegram calls, causing them to drop or fail. If you’re using a VPN or proxy service, it might be worth disabling it temporarily to see if that’s the root of the issue.

To disable a VPN or proxy on your device:

  • For Android: Go to “Settings” > “Network & Internet” > “VPN” (or “Advanced” > “VPN” on some devices). If you see an active VPN, tap on it and select “Disconnect” or “Forget VPN.”
  • For iOS: Head to “Settings” > “General” > “VPN.” If a VPN is enabled, toggle the switch off to disconnect it.

After disabling your VPN or proxy, try making a Telegram call to see if the connection is more stable.

If this is the problem, consider looking for an alternative VPN service or adjusting your proxy settings for better compatibility with Telegram.


Method 4. Disable Data Saver Mode

If you’re using your mobile data for Telegram calls, Data Saver mode might be the reason your calls keep dropping.

Data Saver mode restricts app data usage to save your precious gigabytes, but it can also lead to unstable connections and call issues.

To disable Data Saver mode on your device:

  • For Android: Head to “Settings” > “Network & Internet” > “Data Saver” (or search for “Data Saver” in your settings). Toggle the switch off to disable Data Saver mode.
  • For iOS: Go to “Settings” > “Cellular” > “Cellular Data Options” > “Low Data Mode.” Toggle the switch off to disable Low Data Mode (the iOS equivalent of Data Saver mode).

Method 5. Clear Telegram Cache and Data

Clearing the Telegram app’s cache and data can work wonders in resolving call issues like dropped connections or call failures.

It’s like giving the app a fresh start and wiping away any potential glitches that might be causing trouble.

Here’s how to clear the cache and data for Telegram:

  • For Android: Go to “Settings” > “Apps & notifications” > “See all apps” > “Telegram” > “Storage & cache.” Tap on “Clear Cache” and then “Clear Storage” (or “Clear Data”). Note that this will log you out of your Telegram account, so you’ll need to sign back in afterward.
  • For iOS: Unfortunately, there’s no direct way to clear the cache for individual apps on iOS devices. Instead, you can delete and reinstall the Telegram app (see Step 12) to achieve a similar effect.

Method 6. Check for App Conflicts

Believe it or not, other apps on your device might be causing conflicts with Telegram, leading to dropped calls or call failures.

Security apps, battery savers, and other communication apps can sometimes interfere with Telegram’s functionality.

To identify potential app conflicts:

  • Take note of any apps you’ve recently installed or updated around the time you started experiencing Telegram call issues.
  • Temporarily uninstall or disable the suspected apps one by one, testing your Telegram calls after each removal.
  • If the issue is resolved after removing a particular app, you’ve found the culprit! Look for alternative apps or adjust the settings of the conflicting app to avoid interference with Telegram.

Method 7. Contact Telegram Support

If you’ve tried everything on this list and your calls are still dropping, it might be time to reach out to the experts.

Telegram’s support team is there to help you resolve issues and get the most out of the app.

To contact Telegram support:

  1. Open the Telegram app and tap the menu (☰) button in the top-left corner.
  2. Select “Settings” > “Ask a Question.”
  3. Describe your issue in detail, including the steps you’ve already tried to resolve it. Be sure to mention that you’ve followed this comprehensive guide! 😉

Telegram support should get back to you with additional guidance or solutions to help you fix your call problems. With their expertise on your side, you’ll be well on your way to smooth, uninterrupted Telegram calls!


Method 8. Switch to a Different Network (Wi-Fi or Mobile Data)

Sometimes, the solution to dropped Telegram calls is as simple as switching to a different network. If you’re on Wi-Fi, try using mobile data, and vice versa.

Different networks can offer varying levels of stability and performance, so it’s worth giving both a shot to see which one works best for you.


Method 9. Check Your Internet Connection

It’s always a good idea to start with the basics. A weak or unstable internet connection can be the main culprit behind Telegram calls dropping.

So, before diving into more complex solutions, let’s make sure your connection is up to par!

  • Speed Test: Run a quick speed test using websites like Speedtest.net or Fast.com to see if your connection is strong enough to support voice calls. Ideally, you’ll want a minimum upload and download speed of 1 Mbps for smooth call quality.
  • Router Reset: If you’re connected to Wi-Fi, try rebooting your router. Unplug it for about 30 seconds, and then plug it back in. This simple trick can often resolve connectivity issues.
  • Wi-Fi Signal Strength: Ensure you’re within your Wi-Fi router’s range. If you’re too far away or there are walls or other obstacles between you and the router, the signal might be too weak for stable calls.

Method 10. Update the Telegram App

Are you running the latest and greatest version of Telegram? If not, you might be missing out on important bug fixes and improvements that could resolve your call problems. Updating the app is a simple but often overlooked solution to common issues like dropped calls or call failures on Telegram.


Method 11. Reinstall & Restart the Telegram App

If all else fails, sometimes the best solution is to start fresh with a clean slate.

Reinstalling the Telegram app can help eliminate any lingering glitches or issues that might be causing your calls to drop or fail.

After that, restarting your device can clear out temporary issues and give your phone or tablet a fresh start.


11 Ways to Fix Why Telegram Calls Keep Dropping [Disconnect] Read More »

How-to-unbanned-from-whatsapp-quickly

7 Ways to Get UnBan From WhatsApp Quickly [Temp vs. Perm Ban]

WhatsApp has become an indispensable part of our lives, allowing us to communicate with friends, family, and colleagues all over the world.

Unsurprisingly, it’s one of the most popular messaging apps, with its simple interface and plethora of features.

However, when users are suddenly unable to access their accounts, they may wonder, “How to get unbanned from WhatsApp quickly?

The reasons for being banned on WhatsApp could range from violating the app’s terms of service to using unauthorized third-party applications.

In this blog post, we’ll look at the various types of bans, how to get unbanned, and how to avoid being banned in the first place. So, let’s get started!

Understanding WhatsApp Bans

There are two main categories: temporary bans and permanent bans.

Temporary bans

These are usually imposed when a user has been flagged for violating WhatsApp’s terms of service or for using an unauthorized third-party app, such as WhatsApp Plus or GBWhatsApp.

As the name suggests, these bans are temporary and usually last for a few hours up to a few days.

So, if you’re wondering, “How long does it take to be unbanned from WhatsApp?” it largely depends on the severity of the violation.

Permanent bans

On the other hand, permanent bans are more serious.

These bans are typically reserved for users who repeatedly violate the terms of service or engage in activities that severely harm the app’s ecosystem, like spamming or spreading malicious content.

A permanent ban raises the question, “Can I get my number unbanned from WhatsApp?” which, unfortunately, can be more challenging to address.

How to Get Unbanned Quickly

Let’s explore the methods to get unbanned from WhatsApp quickly. We’ll break it down into two sections: appealing a temporary ban and dealing with a permanent ban.

Dealing with a Permanent Ban


Method 1. Using a Virtual Phone Number app

You could try a Virtual Phone Number app if you can’t use a new number. These apps provide temporary phone numbers that can be used for account verification.

But be cautious, as using such apps might violate WhatsApp’s terms of service, leading to another ban.

A quick and easy way is to can use Hushed or Numero to register for a new WhatsApp account and receive SMS verification codes.


Method 2. Contacting WhatsApp Support

If you believe your ban was unjust or an error, you can try reaching out to WhatsApp Support for help. Be polite and explain your situation. However, remember that there’s no guarantee they’ll remove the ban.

  • Open WhatsApp and tap on “More options” (the three dots in the top-right corner).
  • Select “Settings” and then “Help.”
  • Tap on “Contact us.”
  • Write a detailed message explaining the situation and requesting assistance.
  • Tap on “Submit.”

As WhatsApp does not have a customer service phone number or email address, this is the only way to contact them.

Keep in mind that accounts that violate WhatsApp’s terms of service, such as sending spam messages, promoting illegal activities, or using unauthorized third-party apps, are banned.

If you believe your account was banned in error, make sure to explain your situation in your message to the support team.


Method 3. Creating a new account with a new number

In some cases, you might have to accept the ban and start fresh. You can create a new WhatsApp account using a different phone number.

There are several ways to bypass WhatsApp SMS verification, as well as using virtual numbers to register for a new WhatsApp account.

For online services capable of receiving SMS messages from Whatsapp for verification purposes, try OnlineSIM and Quackr.


Method 4, Seek help from the community

Sometimes, the wisdom of the crowd can provide valuable insights and potential solutions. You can reach out to online forums, social media groups, or other communities that discuss WhatsApp-related issues.

Remember that this approach’s effectiveness might vary, and always double-check any advice you receive against WhatsApp’s terms of service.


Appealing a Temporary Ban


Method 5. Uninstall unauthorized apps

If you’re using any unauthorized third-party apps like WhatsApp Plus or GBWhatsApp, uninstall them immediately. These apps violate WhatsApp’s terms of service and are a common reason for temporary bans.

Method 6. Wait it out

In most cases, the best course of action is to wait for the ban to be lifted.

Depending on the violation, temporary bans can range from a few hours to several days. Patience can be the key here.

Method 7. Update WhatsApp to the latest version

If you’re using an outdated version of the app, updating it could help lift the ban. Visit your device’s app store and make sure you have the latest version installed.


Conclusion

Getting unbanned from WhatsApp can be a stressful experience, but knowing the right steps to take can help you regain access to your account quickly.

Remember, the best way to avoid bans is to follow WhatsApp’s terms of service and maintain proper etiquette on the platform.

By respecting other users’ privacy and avoiding spammy behavior, you can enjoy a hassle-free messaging experience.

In the end, it’s crucial to stay informed and responsible when using WhatsApp.

After all, it’s a fantastic tool that connects us with our loved ones, and by following the rules, we can ensure that everyone has a great time using the app. So, let’s keep our WhatsApp experience fun, safe, and ban-free!


7 Ways to Get UnBan From WhatsApp Quickly [Temp vs. Perm Ban] Read More »

Fix-WhatsApp-Contacts-Not-Showing-Up

9 Ways to Fix Contacts Not Showing Up On WhatsApp [Solved]

WhatsApp has become a vital communication tool for millions of people all over the world, connecting friends, family, and coworkers.

However, a common problem that users face is that their contacts do not appear on WhatsApp.

This frustrating problem can result in missed messages and a sense of disconnect.

In this blog post, we’ll look at a number of solutions to help you resolve this problem and reconnect with your loved ones. So, let’s get started!

How to Fix Contact Names Not Showing Up On WhatsApp

Here are the nine (9) ways to do so.


1. Grant WhatsApp Permission to Access your Contacts

WhatsApp requires access to your phone’s address book in order to display your contacts within the app.

If you haven’t granted the necessary permissions, or if they were accidentally revoked, this could be the cause of your contacts not appearing in WhatsApp.

Here’s how to check WhatsApp’s permissions and troubleshoot permissions on Android and iOS:

How to ensure WhatsApp has the proper permissions:

For Android:

  • Open the Settings app on your phone.
  • Scroll down and tap “Apps” or “Apps & Notifications.”
  • Find WhatsApp in the list and tap on it.
  • Tap “Permissions.”
  • Make sure the toggle switch next to “Contacts” is turned on.

For iOS:

  • Open the Settings app on your iPhone.
  • Scroll down and tap “WhatsApp.”
  • Tap “Contacts.”
  • Make sure the switch next to “Contacts” is turned on (green).

2. Check your Contact’s Privacy Settings

Through privacy settings, WhatsApp allows users to control who can see their information, such as their profile picture, last seen, and online status.

If your contact has changed their privacy settings, they may be removed from your WhatsApp contact list.

How to access privacy settings:

For Android:

  • Open WhatsApp.
  • Tap the three vertical dots in the top-right corner.
  • Select “Settings.”
  • Tap “Account,” followed by “Privacy.”

For iOS:

  • Open WhatsApp.
  • Tap the “Settings” tab at the bottom-right corner of the screen.
  • Tap “Account,” followed by “Privacy.”

3. Verify your Contacts’ Phone Numbers

Your contacts may not appear in WhatsApp because their phone numbers are incorrectly stored in your phone’s address book.

WhatsApp requires the proper international format to recognize and display phone numbers in the app. Let’s go over how to check and edit the phone numbers of your contacts:

Importance of the correct international format:

The international format for phone numbers includes the country code, area code, and local phone number. This format is crucial because it helps WhatsApp identify users from different countries and ensures that your contacts are displayed correctly within the app.

Here’s an example;

  • Country Code: +1 (United States) Area Code: 415 Local Number: 555-1234
  • International Format: +1 415 555 1234

In this example, the country code for the United States is +1, and the area code for San Francisco, California is 415.

The local number is 555-1234. When formatted correctly in the international format, the country code and area code are separated by a space, and the local number is separated by spaces or hyphens.


4. Refresh your WhatsApp contacts list

Sometimes, refreshing your contacts list within the app is all that is required to resolve the issue of contacts not showing up in WhatsApp.

This simple action will prompt the app to re-check your phone’s address book for any missing contacts. Here’s how to manually refresh your contact list, as well as what to do if your contacts are still missing:

How to manually refresh your contact list:

For Android:

  • Open WhatsApp.
  • Tap the green chat icon in the bottom-right corner to access the “Contacts” tab.
  • Tap the three vertical dots in the top-right corner.
  • Select “Refresh.”

For iOS:

  • Open WhatsApp.
  • Tap the “Chats” tab at the bottom of the screen.
  • Tap the new chat icon in the top-right corner (a square with a pencil).
  • Pull down the contacts list to refresh it.

5. Sync your phone’s contacts with WhatsApp

Another possible reason your contacts are not showing up in WhatsApp is that your phone’s contacts aren’t syncing properly.

To resolve this issue, you can try enabling contact syncing or troubleshooting any sync-related problems. Here’s how:

How to enable contact syncing:

For Android:

  • Open the Settings app on your phone.
  • Scroll down and tap “Accounts” or “Users & accounts.”
  • Tap “WhatsApp” or “Add account” and then select “WhatsApp” if it’s not already listed.
  • Make sure contact syncing is enabled.

For iOS: Contact syncing is automatically enabled on iOS, so there’s no need to enable it manually.


6. Make sure you have the latest version of WhatsApp

Before we get into the more involved fixes, ensuring that you’re using the most up-to-date version of WhatsApp is crucial.

Developers continuously work to improve the app, and an outdated version could be the cause of your contacts issue. Here’s how to check for updates and update your WhatsApp:

How to check for updates:

For Android:

  • Open the Google Play Store.
  • Tap the menu icon (three horizontal lines) in the top-left corner.
  • Select “My apps & games.”
  • Scroll down to find WhatsApp in the list. If there’s an update available, it will be indicated next to the app’s name.

For iOS:

  • Open the App Store.
  • Tap your profile icon in the top-right corner.
  • Scroll down to see available updates. If an update for WhatsApp is available, it will appear in the list.

How to update WhatsApp:

For Android:

  • Follow the steps above to check for updates.
  • If an update is available, tap “Update” next to WhatsApp.

For iOS:

  • Follow the steps above to check for updates.
  • If an update is available, tap “Update” next to WhatsApp.

After updating the app, check if your contacts are now visible in WhatsApp. If not, let’s move on to the next solution!


7. Reset your phone’s network settings

Problems with your phone’s network settings can sometimes cause problems with WhatsApp, such as contacts not showing up.

Restoring your network settings to their default state can assist in resolving such issues. Remember that resetting network settings will also delete any saved Wi-Fi networks and Bluetooth pairings.

Why network settings can cause the issue:

Network settings control how your phone connects to the internet and other devices. If these settings are misconfigured, it could interfere with WhatsApp’s ability to access your contacts and other app functions.

How to reset network settings on Android:

  • Open the Settings app on your phone.
  • Scroll down and tap “System” or “General management.”
  • Tap “Reset” or “Reset options.”
  • Select “Reset network settings” or “Reset Wi-Fi, mobile & Bluetooth.”
  • Tap “Reset settings” or “Reset” to confirm.

How to reset network settings on iOS:

  • Open the Settings app on your iPhone.
  • Scroll down and tap “General.”
  • Tap “Reset.”
  • Select “Reset Network Settings.”
  • Enter your passcode if prompted and tap “Reset Network Settings” again to confirm.

8. Reinstall WhatsApp

If none of the preceding methods have worked, you may wish to reinstall WhatsApp as a last resort. Reinstalling the app may help resolve any underlying issues that are preventing your contacts from appearing.

Before you begin, make a backup of your chats and data to avoid losing any vital information. Here’s how you can reinstall WhatsApp without losing your conversations or data:

When to consider reinstalling the app:

Reinstalling WhatsApp should be considered as a final step when all other methods have failed to resolve the issue.

This process can help eliminate any lingering issues that may not have been fixed by the previous solutions.

How to reinstall without losing your chats and data:

For Android:

  • Open WhatsApp and tap the three vertical dots in the top-right corner.
  • Select “Settings.”
  • Tap “Chats.”
  • Tap “Chat backup.”
  • Tap “Back Up” to create a backup of your chats and media.
  • Once the backup is complete, uninstall WhatsApp from your phone.
  • Reinstall WhatsApp from the Google Play Store.
  • Open the app and verify your phone number.
  • Follow the on-screen instructions to restore your chat backup.

For iOS:

  • Open WhatsApp and tap the “Settings” tab at the bottom-right corner.
  • Tap “Chats.”
  • Tap “Chat Backup.”
  • Tap “Back Up Now” to create a backup of your chats and media.
  • Once the backup is complete, uninstall WhatsApp from your iPhone.
  • Reinstall WhatsApp from the App Store.
  • Open the app and verify your phone number.
  • Follow the on-screen instructions to restore your chat backup.

After reinstalling and restoring your chats, check if your contacts are now visible in WhatsApp. If the issue still persists, it’s time to contact WhatsApp Support.


9. Contact WhatsApp Support

If you’ve tried all of the methods listed above and your contacts are still not showing up in WhatsApp, it’s time to contact WhatsApp Support.

Their team can assist in investigating the problem and providing additional advice on how to resolve it.

Here’s how to get in touch with WhatsApp Support and what you should include in your support request:

How to reach WhatsApp Support:

For Android:

  • Open WhatsApp.
  • Tap the three vertical dots in the top-right corner.
  • Select “Settings.”
  • Tap “Help.”
  • Tap “Contact us.”

For iOS:

  • Open WhatsApp.
  • Tap the “Settings” tab at the bottom-right corner of the screen.
  • Tap “Help.”
  • Tap “Contact Us.”

What to include in your support request:

When contacting WhatsApp Support, be sure to provide the following information:

  • A clear description of the issue you’re experiencing, including the fact that your contacts aren’t showing up in WhatsApp.
  • The steps you’ve already taken to try to resolve the issue.
  • Your phone’s make and model, as well as the operating system version.
  • The version of WhatsApp you’re using.

WhatsApp Support may take some time to respond, but they should be able to provide further assistance in resolving the issue with your contacts.

Remember to be patient and provide any additional information they may request to help expedite the process.


9 Ways to Fix Contacts Not Showing Up On WhatsApp [Solved] Read More »

creation-date-telegram-channel-group

3 Ways to Check the Creation Date of Telegram Channel & Group

Are you looking for the creation date of a Telegram channel or group?

Whether or not you are a member of the channel or group, knowing the creation date can provide useful information about its history and development.

Unfortunately, Telegram makes it difficult to find the creation date, and many users have difficulty locating this information.

This blog post will go over three different methods for determining the creation date of a Telegram channel or group.

We’ve got you covered, from using the Telegram app to relying on third-party websites and even exploring the creator’s profile.

So, whether you’re a curious user or a social media marketer, keep reading to learn how to find out when a Telegram channel was created.

How to Check the Creation Date of a Telegram Channel or Group

Here are the three (3) ways to do so.


Method 1. Using TGStat

TGStat is a third-party website that provides statistics and analytics for Telegram channels and groups.

It offers a variety of tools and features for Telegram users, including searching for channels and groups, tracking their growth and engagement, and checking the creation date.

This is how you can use TGStat;

  • Go to the TGStat website and search for your Telegram Channel or Group
  • Select the right channel or group and scroll down the page until you see the <Channel’s age>.

Alternatively, you can use a faster method by using this URL address;

https://tgstat.com/channel/@name/stat

Replace @name with your actual Telegram Channel or Group name.


Method 2. Search Old Chats

telegram-group-channel-creation-date-earliest-message

You can know the exact creation date of a Telegram Channel or Group by looking at the timestamps of the oldest messages in the chat.

The timestamp will show you the date and time the message was sent, so you can estimate when the group or channel was created based on the date of the oldest message.

The quickest way of doing so is to get to the earliest chat messages by scrolling through the media files.

Here’s how to do so;

  • Open the Telegram app and go into the Telegram Channel or Group
  • Tap on the Profile icon
  • Under the <Media> tab, scroll down to the earliest media file and select it.
  • Click the menu icon on the top-right (3 dots) and select <Show in chat>. You will be brought to the earliest chats where the first media file is shared.
  • Scroll to the earliest chat message to see the creation date of the Telegram Channel or Group.

This is the actual Channel or Group creation date. This is not the date that you joined the channel or group.


Method 3. Using Telegram Bot

There is a Telegram bot called “Creation Date Bot.”

This bot allows users to find out the creation date of any Telegram account, including your own account or the account of other users.

To use the bot, open the link from @creationdatebot and click on the <Start> button to initiate a conversation with the bot.

By default, the bot will automatically display the account creation date of the logged-in Telegram account in the day, month, and year format.

Type the following command into the bot;

/cd groupname

Replace “groupname” with the Telegram Channel or Group name.

The bot will return the creation date of the Telegram channel or group.


3 Ways to Check the Creation Date of Telegram Channel & Group Read More »

how-to-know-teelgram-account-creation-join-date

3 Ways To Check Your Telegram Account Creation Date

Telegram is a well-known instant messaging app that allows users to send and receive messages, photos, videos, and other types of content.

If you use Telegram, you might be curious about the exact date you created your account.

You may require this information for a variety of reasons, including troubleshooting issues with your account or for security purposes.

In this blog post, we will go over several methods for determining the creation date of your Telegram account.

We’ll look at both manual methods, like checking your chat history, and automated methods, like using a Telegram bot.

Whether you’re a seasoned Telegram user or new to the platform, this guide will provide you with the knowledge you need to determine your Telegram account creation date.

How To Check Telegram Account Creation Date

Here are the three (3) different ways to know the date that you join and start using the Telegram app.


Method 1. Using Telegram Settings

Using the Telegram app itself, you can know the account creation date via its Settings.

To find out, follow the steps below;

  • Open the Telegram app on your device.
  • Go to the <Settings> section by tapping on the three-line icon at the top left corner of the screen.
  • Select <Data and Storage>
  • Choose <Data Usage>

You will be able to see all your network data used in the app since you joined Telegram until date.

At the top of the page, you will see your Telegram account creation date when you first joined the app.


Method 2. Using Telegram Bot

telegram-bot-check-account-creation-date

There is a Telegram bot called “Creation Date Bot.”

This bot allows users to find out the creation date of any Telegram account, including your own account or the account of other users.

To use the bot, open the link from @creationdatebot and click on the <Start> button to initiate a conversation with the bot.

By default, the bot will automatically display the account creation date of the logged-in Telegram account in the day, month, and year format.


Method 3. Check Your Old Chats

If you want to determine the approximate creation date of your Telegram account, you can check the date of the oldest message in your chat history.

Here’s how you can do it:

  • Open the Telegram app on your device.
  • Go to your chat list and find your oldest chat in your chat history. This could be a chat with a friend or a group chat.
  • Scroll up to the very first message in the chat.
  • You are specifically looking for messages that were sent by you. Check the timestamp on the message to determine the date it was sent.
  • Use this information to estimate the date when you created your Telegram account.

Keep in mind that this method will only give you an approximate creation date, as you may have deleted older chats.

If you want a more accurate account creation date, you can use Method 1 or Method 2 mentioned above.


3 Ways To Check Your Telegram Account Creation Date Read More »

check-telegram-login-active-session-activity

How to Check Your Telegram Login History [Privacy Guide]

In this blog post, I’ll show you how to view your Telegram login history.

With rising privacy concerns, it’s critical to understand who is accessing your account and from which device. “Can someone log into my Telegram without my knowledge?” you may wonder.

That is a possibility, but by the end of this post, you will understand how to track your own Telegram activity.

Telegram is a popular, secure messaging app known for its end-to-end encryption and features such as self-destructing messages, secret chats, and channels.

However, having an extra layer of security to protect your account from unauthorized access is always a good idea.

By reviewing your Telegram login history, you can ensure the security of your account and be alerted to any suspicious activity.

So, let’s get started with checking your Telegram login history.


Why Check Telegram Login History?

You might be wondering why checking your Telegram login history is important.

Well, there are a few reasons why you should keep track of your login sessions:

  • Security: Checking your Telegram login history can help you identify any unauthorized access to your account. If you notice any suspicious activity, you can take immediate action and change your password to secure your account.

  • Privacy: By monitoring your login sessions, you can protect your privacy. You can see who has access to your account and from which devices.

  • Peace of mind: By regularly reviewing your login sessions, you can know that your account is secure and that you’re the only one who has access to it.

So, with these reasons in mind, let’s dive into the steps to check your Telegram login history.


Steps to Check Telegram Login History

Now that you understand why it’s important to check your Telegram login history, let’s go through the steps to do so:

Step 1: Open Telegram App

The first step is to open the Telegram app on your device. If you’re not already logged in, enter your phone number and verification code to access your account.

Step 2: Go to Settings

Once you’re logged in, click on the three horizontal lines in the top left corner of the screen to access the Telegram menu. From there, click on <Settings>

Step 3: Select Privacy and Security

In the <Settings> menu, scroll down and select <Privacy and Security>

Step 4: Choose Active Sessions

Under <Privacy and Security>, look for the <Active Sessions> option and click on it.

Step 5: Review Login History

You’ll now see a list of all the active sessions that are currently logged into your account. You can see each active session’s device type, IP address, and location here.

If you notice any suspicious activity, you can click <Terminate All Other Sessions> to log out of all sessions except for the one you’re currently using.


How to Interpret Telegram Login History

Now that you know how to check your Telegram login history, it’s important to understand how to interpret the information provided. Here are some things to keep in mind:

  • Device Type: The device type tells you which device was used for logging in to your Telegram account, such as a mobile phone or desktop computer.

  • IP Address: The IP address is a unique identifier that tells you the location of the device used to log in. Seeing an IP address from an unfamiliar location could be a sign of unauthorized access.

  • Location: The location shows you the city and country of the device used to log in. If you see a location that doesn’t match your location, it could indicate unauthorized access.

By regularly reviewing your Telegram login history, you can ensure that your account is secure and take action if you notice any suspicious activity.

If you notice any unauthorized access, you must change your password immediately to protect your account.


Conclusion

In conclusion, checking your Telegram login history is an important step in ensuring the security and privacy of your account.

By following the simple steps outlined in this post, you can easily review your login history and keep track of any unauthorized access to your account.

Remember, regularly monitoring your login sessions can give you peace of mind and prevent any potential security breaches.

If you ever notice any suspicious activity, take immediate action to protect your account by changing your password and terminating all other sessions.

We hope you found this guide helpful and informative. If you have any questions or comments, feel free to leave them below. Thank you for reading!


How to Check Your Telegram Login History [Privacy Guide] Read More »

How-to-know-if-someone-saved-your-contact-on-whatsapp-secretly

3 Ways To Know If Someone Saved Your Number On Whatsapp Secretly

WhatsApp is a popular messaging app used by millions of people around the world. It offers a wide range of features, including voice and video calls, file sharing, and end-to-end encryption for secure messaging.

One important aspect of using WhatsApp is knowing if someone has saved your number in their contacts.

This information can be useful for various reasons, such as confirming if someone has received your message or knowing if someone is intentionally ignoring you.

In this post, we’ll explore how to know if someone saved your number on WhatsApp without them knowing.

How To Know If Someone Had Saved Your Number in their WhatsApp Contact

Here’s everything you need to know.


How Does WhatsApp Save Contact Information?

When you first install WhatsApp, it will automatically sync with your device’s contact list.

If anyone in your contact list uses WhatsApp, their name and phone number will be added to your WhatsApp contacts.

However, just because you have someone’s phone number in your device’s contact list does not mean they have it saved on their WhatsApp account.

WhatsApp saves contact information in two places: on your device and within the app.

If you save someone’s contact information on your device, such as in your phone’s address book, it will automatically appear in your WhatsApp contacts.

When you save someone’s phone number on WhatsApp, it is only saved on the app and not in your device’s contact list.

This means that while you may have someone’s phone number saved on your device, they may not save it on their WhatsApp account.


How to Check if Someone Saved Your Number on WhatsApp

If you’re curious to know if someone has saved your number on WhatsApp, you can try a few methods.

Keep in mind that these methods are not foolproof, and there’s no guarantee that they will work in all situations.


Method 1: Check the Profile Picture

One way to know if someone has saved your number on WhatsApp is by looking at their profile picture.

If you can see their profile picture, it means that they have your number saved on their WhatsApp account.

However, if their profile picture is not visible to you, it doesn’t necessarily mean that they don’t have your number saved.

They may have hidden their profile picture from certain contacts or everyone.


Method 2: Check the About Section

whatsapp-about-section

Another way to check if someone saved your number on WhatsApp is by looking at their About section.

If they have added any information to their About section, such as a status message or a bio, it means that they have your number saved.

However, if their About section is blank, it doesn’t necessarily mean that they don’t have your number saved.


Method 3: Send a Message

Finally, you can try sending a message to the person in question.

If your message is delivered and you can see two checkmarks next to it, it means that they have your number saved on their WhatsApp account.

However, if your message remains undelivered or only shows one checkmark, it doesn’t necessarily mean that they don’t have your number saved.

They may have their notifications turned off or may not have seen your message yet.


Can You Really Know If Someone Saved Your Number on WhatsApp?

While the methods described in the preceding section may indicate whether someone has saved your WhatsApp number, they are not conclusive.

According to WhatsApp’s privacy policies, the app does not notify users when someone adds or removes them from their contacts list.

This means there is no surefire way to know if someone has saved your phone number to their WhatsApp account.

Furthermore, some users’ privacy settings may be set up so that they do not share their profile picture or About section with specific contacts.

In this case, just because you can’t see their profile picture or About section doesn’t mean they don’t have your phone number saved.

While it’s natural to be curious about whether someone has saved your WhatsApp number, keep in mind that there’s no foolproof way to know for sure.

The methods described in this post are only a starting point for your investigation; you should always proceed with caution and respect for the other person’s privacy.


Conclusion

In conclusion, knowing whether someone has saved your number on WhatsApp can be useful in certain situations.

While you can try a few methods to get an idea of whether someone has saved your number on their WhatsApp account, these methods are not definitive and may not always work.

WhatsApp’s privacy policy ensures that users can maintain their privacy and control who sees their profile picture and other information.

Ultimately, if you’re curious about whether someone has saved your number on WhatsApp, the best way to find out is to ask them.

However, be respectful of their privacy and don’t pressure them into sharing information they’re uncomfortable with.

If you are more privacy-focused, you should consider using a VPN service when using WhatsApp, to protect your traffic connection, your data and prevent malicious attacks.

Choose from the following reliable VPN services;

  • NordVPN (Has the most number of servers, over 5000+, in 60 countries to choose from. Uses a unique Onion Over VPN feature to mask your online traffic for maximum anonymity.)

  • Surfshark VPN (One of the few providers that allow unlimited device connections with just a single subscription. You can connect all your devices with no logs policy)

  • IPVanish (Supports all platforms, routers and TV. Uses SOCKS5 web proxy feature for faster anonymous connection speed)

At the end of the day, WhatsApp is a tool for communication, and it’s important to use it to foster positive and respectful relationships with others.


3 Ways To Know If Someone Saved Your Number On Whatsapp Secretly Read More »

screen-recording-quicktime-player

How to Stop Screen Recording with QuickTime Player [Guide]

Screen recording is a useful tool for capturing video footage of your computer screen, making it ideal for developing tutorials, walkthroughs, and presentations.

And if you’re a Mac user, you can get started right away with QuickTime Player.

In this blog post, I’ll teach you how to start and stop screen recording in QuickTime Player and some recording optimization recommendations.

You’ll be able to generate high-quality screen recordings in no time, whether you’re a seasoned pro or a newbie. So let’s get started!

How to Start & Stop Screen Recording Using QuickTime Player?

Below are the instructions to start and stop screen recording and a section on troubleshooting issues with the QuickTime player if you encounter any technical problems.


Starting a Screen Recording With QuickTime Player

To start a screen recording with QuickTime Player, follow these simple steps:

  1. Open QuickTime Player on your Mac.
  2. Click on “File” in the menu bar, and select “New Screen Recording.”
start-new-screen-recording-quicktime-player
  1. You can choose to record your entire screen or just a portion of it. Simply click and drag to select the area you want to record.
  2. You’ll see a screen recording toolbar appear. Click the <Record> button to start recording.
screen-recording-quicktime-player-record-full-selected-portion

That’s it! QuickTime Player will begin recording your screen and audio (if you choose to enable it).

Make sure to test your microphone beforehand if you plan to record audio. You can pause or stop the recording at any time by clicking on the “Pause” or “Stop” button on the recording toolbar.

If you need to cancel the recording altogether, click the “x” button in the corner of the toolbar.


Stopping a Screen Recording with QuickTime Player

Once you’re done recording, it’s important to know how to stop the recording and save it for future use.

Here’s how to stop a screen recording with QuickTime Player:

  1. Look for the <Stop> button in the menu bar. It looks like a square inside a circle.
  2. Click the <Stop> button to end your recording.
  3. Your screen recording will automatically open in a new QuickTime Player window.

That’s it! Now you can edit your recording, save it, or export it to share with others.

Keep in mind that if you recorded audio along with your screen recording, it would be saved as a separate audio file.

You can easily merge the audio and video files together in QuickTime Player or any other video editing software.


Troubleshooting Screen Recording Issues with QuickTime Player

Despite its ease of use, screen recording with QuickTime Player can sometimes encounter issues.

Here are some common issues you may face and how to troubleshoot them:

  • The recording won’t start: If you’re having trouble starting the recording, try closing other apps or restarting your computer. Also, make sure that you have enough storage space on your computer to save the recording.

  • The recording is laggy or choppy: This is usually a result of your computer’s processing power struggling to keep up with the recording. Try closing other apps and windows to free up processing power. You can also try reducing the quality of the recording by selecting a smaller area to record or lowering the resolution.

  • The audio quality is poor: If you’re recording audio and your screen recording, ensure your microphone is working properly and positioned correctly. Also, try recording in a quiet environment to avoid background noise.

  • The recording won’t save or export: This could be due to a lack of storage space on your computer or an issue with the file format. Try exporting the recording in a different file format or freeing up space on your computer.

By following these troubleshooting tips, you should be able to resolve most issues with screen recording using QuickTime Player.

If you’re still encountering issues, you can try reaching out to Apple support for further assistance.


Conclusion

This tutorial covered everything you need to know to start and stop screen recording with QuickTime Player on your Mac.

This article covers step-by-step instructions for starting a screen recording, stopping a screen recording, and troubleshooting common issues.

We also covered some tips for optimizing your screen recording and getting the best possible results.

By now, you should be able to create high-quality screen recordings using QuickTime Player with ease.

Remember to check your settings before recording, keep an eye on your storage space, and troubleshoot any issues that may arise. You’ll become a pro at screen recording in no time with practice!

If you have any questions or suggestions, feel free to leave them in the comments below. Happy screen recording!


How to Stop Screen Recording with QuickTime Player [Guide] Read More »

Set-Screen-Lock-Time-Using-Mac

How to Set The Screen Lock Time On Macbook [Delay Timeout]

If you’re a Mac user, you’ve probably noticed that your screen locks after a certain amount of inactivity.

While this is an important security feature, it can be inconvenient if the screen locks too quickly, interfering with your work.

Fortunately, you can change the screen lock time on your Mac to suit your needs.

In this blog post, we will walk you through the process of setting the screen lock time on your Mac.

In addition, we’ll give you some pointers on improving your device’s security. Let’s get started!


Why Setting Screen Lock Time on Mac is Important

Setting the screen lock time on your Mac is an important security measure to prevent unauthorized access to your device.

When you step away from your computer, the screen lock feature prevents unauthorized access to your computer.

Setting the screen lock time allows you to control how long your computer remains unlocked after inactivity, lowering the risk of someone gaining unauthorized access to your device.

It also aids in keeping your confidential information safe from prying eyes. As a result, setting the screen lock time on your Mac is critical to ensuring your privacy and security.


How to Set the Screen Lock Time on Mac

mac-system-preferences-lock-screen-options

Now that you know why setting the screen lock time on your Mac is essential, let’s dive into how to do it.

Here are the three (3) steps to set the screen lock time on your Mac:

  1. Open System Preferences: Click on the Apple icon in the top-left corner of your screen and select “System Preferences” from the drop-down menu.

  1. Click on “Lock Screen”: You will see all the available options here for customizing your lock screen.

  1. Set the Screen Lock Time: Choose from the dropdown menu to select your preferred timing (e.g., 5 minutes or Never) for the screensaver to kick in after the specified timing.

Once you have set the screen lock time, your Mac will automatically lock the screen after the specified period of inactivity.

This feature is especially helpful when you need to step away from your computer for a brief period and want to keep your information secure.


Additional Tips to Secure Your Mac

Apart from setting the screen lock time, you can take other security measures to protect your Mac from potential threats.

Here are some additional tips to enhance the security of your Mac:

  • Enable Two-Factor Authentication: Two-factor authentication adds an extra layer of security to your Mac by requiring a password and a verification code to access your account.

  • Install Antivirus Software: Installing antivirus software can help protect your Mac from viruses and malware that could potentially compromise your device’s security.

  • Keep Your Operating System Up-to-Date: Apple regularly releases security updates for macOS. Keeping your operating system up-to-date is crucial to ensure that you have the latest security features and protection against potential threats.

  • Disable Automatic Login: Disabling automatic login means you need to enter your password every time you want to access your computer, which adds an extra layer of security to your device.

By following these additional security tips, you can enhance the protection of your Mac and keep your information safe from potential threats.


Conclusion

Setting the screen lock time on your Mac is an essential security feature that can help protect your device from unauthorized access.

Following the simple steps outlined in this blog post, you can adjust the screen lock time to suit your needs and secure your confidential information.

In addition, implementing the additional security measures we’ve outlined can enhance the overall security of your device and provide added peace of mind.

Remember to stay vigilant and take necessary precautions to protect your Mac from potential threats. We hope you found this guide helpful!


How to Set The Screen Lock Time On Macbook [Delay Timeout] Read More »