admin

bulk-image-compression-batch-process-offline-method

5 Ways to Batch Process Image Compression [Offline Methods]

Sometimes you do not want to use an online image compression service. This can be due to file sensitivity, privacy issues, or even a work-related task.

There are several ways to perform bulk compression of images offline without the need to upload these images online.

This article will focus on the different tools you can use to conduct offline mass image compression, which works well for commonly-used image file types, e.g., JPG, PNG, and others.

How to Perform Bulk Image Compression Using Offline Method?

Here are the five (5) ways to do so.


1. RIOT

For Windows | Free to Use

RIOT-batch-compress-image-optimizer

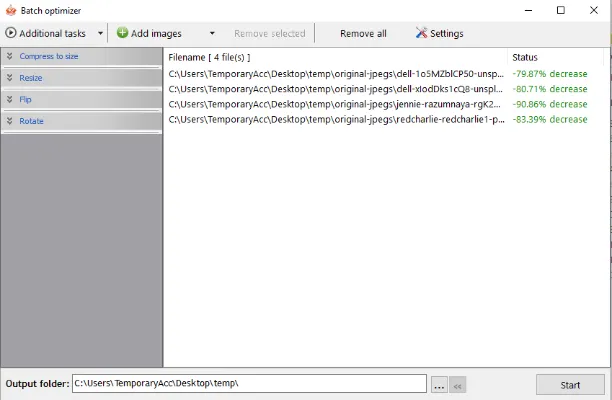
RIOT (Radical Image Optimization Tool) is a simple, offline Windows program that can compress images (JPEG, PNG, and GIF formats) individually and as a batch compression.

When you install and open the application, choose the <Batch optimizer> menu option and select multiple images for compression.

Click the arrow on the <Additional tasks> button to select more options, such as adjusting compression ratio, image flipping, or image resizing.


2. Image Optimizer

For Windows | Free to Use

image-optimizer-desktop-version-settings

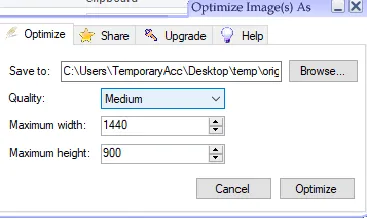
Image Optimizer offers an offline desktop version for Windows in addition to the online compression method on their website.

After installing the PC application, you will see two (2) options when you right-click a Windows folder containing images inside.

  • <Optimize Here>
  • <Optimize Images As>
image-optimizer-right-click-compress-as

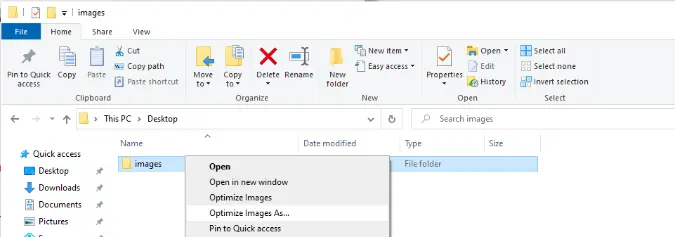
Choose <Optimize Here> if you want images compressed by the program’s default values.

Choose <Optimize Image As> to configure your preferred compression settings.


3. WonderShare UniConverter

For Windows & macOS | Free to Try

wondershare-uniconverter-image-converter-feature-batch-compression

As a complete video toolbox that does video conversion, compression, and editing, WonderShare UniConverter does a decent job of converting and compressing images.

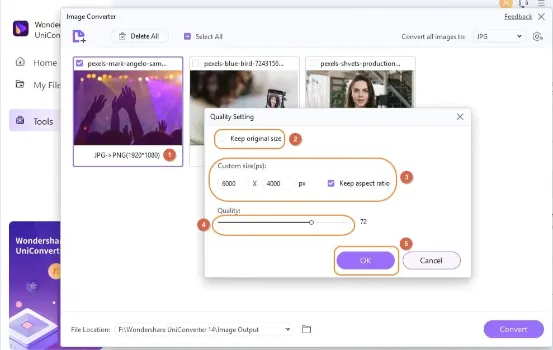
The Image Converter feature enables the conversion and compression of photos in practically all formats to well-known file types, including JPG, JPEG, BMP, PNG, and TIFF.

Multiple files can be converted simultaneously using offline batch processing, which is supported by the application.

You can adjust the following options during image compression;

  • Select if you want to <Keep Original Size>
  • Select if you want to <Keep Aspect Ratio>
  • Adjust the slider for Compression Quality

4. HitPaw Compressor

Windows, macOS & Web | Free to Try

hitpaw-compressor-image-settings-batch-compression

HitPaw Compressor can significantly reduce video and image file sizes without losing substantial quality. It is available as an online web service and offline installation on Windows and Mac computers.

HitPaw Compressor supports the compression of image formats (JPG, JPEG, BMP, PNG, GIF) and video formats (MP4, WMV, AVI, FLV, MOV, MKV).

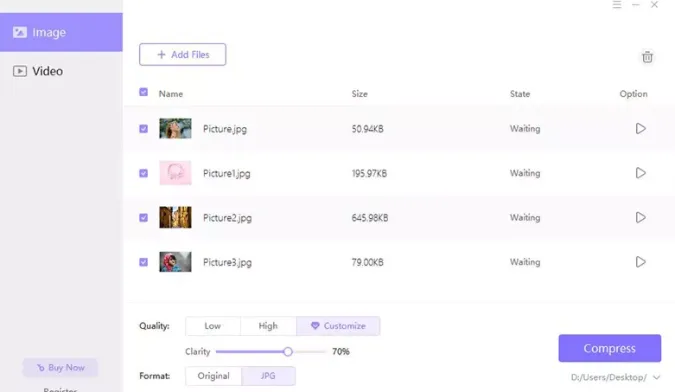
There are three (3) image compression qualities to choose from;

  • Low quality = 30% compression rate
  • High quality = 85% compression rate
  • Customized quality = Adjust image clarity using a slider

5. WonderShare PDFelement

Windows, macOS, iOS, and Android | Free to Try

wondershare-pdf-element-image-batch-compression

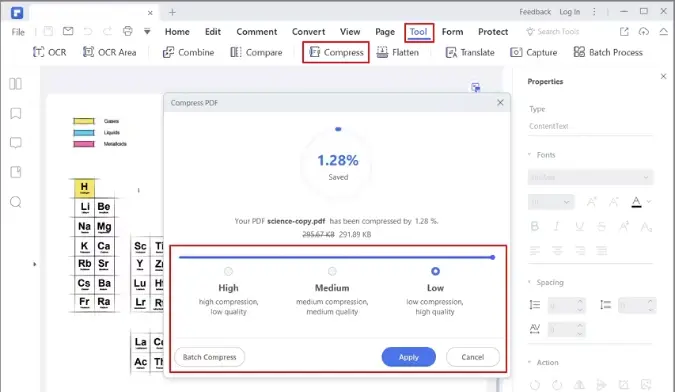
If you want to perform batch image compression and subsequent conversion into a PDF document, then WonderShare PDFelement is the one for you.

The versatile, full-suite PDF and document management tool is available on Windows, macOS, iOS, and Android operating systems.

It includes a PDF editor and annotator, compressor, file converter, password security, forms manager, file and page organizer, and more.

You can perform a single-file operation or do a batch process for image compression.

Select Tool > Batch Process for batch processes and open multiple JPEG files.


5 Ways to Batch Process Image Compression [Offline Methods] Read More »

WhatsApp-View-Once-Take-Snapshot-Screenshot-Bypass-Image

7 Ways to Take Screenshots on WhatsApp View-Once Images

Whatsapp has a privacy feature called “View Once“, where you can send self-destructing and disappearing media files (images and videos) to your contact.

The recipient cannot share, forward, save or take a screenshot of your image or video file.

When you attempt to do so, you may get an error message that says;

  • Taking screenshots isn’t allowed by the app or your organization

This article will focus on how to bypass this view-once restriction and show you several methods you can consider using to take a snapshot of your screen interface.

How to Bypass and Take a Screenshot of View-Once Disappearing Media on WhatsApp?

Here are the seven (7) different ways to do so.


Method 1: Use WhatsApp Web

You can use the web version of WhatsApp without needing a phone.

When you use WhatsApp Web on a desktop computer, you can use screen recording software to capture screenshots of your app interface.

For Windows, you can use the following;

Bandicam offers the capability to record videos of the entire screen or designated sections while simultaneously providing the functionality for taking screenshots via designated hotkeys.

It is especially handy for various applications, such as documenting in-game experiences, elucidating technical issues, or preserving specific presentation slides.

  • Screencast-O-Matic (create screencast videos with editing features)
  • Snagit (Professional Screen Capture with screen drawing, audio recording and more)

For macOS, you can use the built-in video screen recording feature. Press <Command> + <Shift> + <5>, select <Record Entire Screen> and click <Record>.

To end the recording, press <Esc>. The recordings will be saved to the desktop (default location).


Method 2: Screen Mirroring

Screen mirroring is the technology that reflects (mirrors) your screen from one device to another. 

You can take a screenshot when you mirror the screen from one phone to another.

Mirroring from Photo to Phone

Both phones must install the same screencasting application and be connected to the same network, e.g. in the same home Wi-Fi.

You can use any of these three (3) apps below;

Mirroring from Phone to Windows PC

In Windows 10, an in-built feature called the <Connect> app will enable screen mirroring from your phone to your Windows machine.

You can then use any recording tool to record your screen.

To begin, make sure both devices are on the same Wi-Fi network. Next, search for the word “Connect” using Windows Search to find the <Connect> app. Finally, click on <Projecting to this PC>.

Depending on the make & model of your phone, search for the word “Wireless Projection” or “Cast” and enable it. You should be able to detect your PC’s name and connect to it.

On Windows 10, you will receive a prompt to confirm the connection. Click “OK“.

Use any screen recording software for Windows 10 devices, such as RecMaster, to start your screen capturing.


Method 3: Using the Zoom Screen Sharing feature

Zoom allows you to share your entire desktop or phone screen or even a portion of your screen with another device. This means you can perform screen recording on your mirrored device.

How to start Zoom screen sharing?

For iOS, find the button in your Zoom meeting controls called <Share Content>.
For Android, Windows, Mac & Linux, it is named <Share Screen>.

Once successfully cast onto another device, use any screen recording tool to capture the screenshot or record a screen video.

Make sure that you have configured the screen-sharing feature beforehand.

Zoom supports Windows, macOS, Android, iOS and Linux operating systems.


Method 4: Disable Hardware Acceleration in Chrome

Streaming services like Netflix and protected apps use your device’s hardware to prevent you from taking screenshots and screen recording.

Disabling hardware acceleration in your Chrome web browser can fix this issue when using the WhatsApp Web version.

Follow the steps below;

  • Open Chrome web browser
  • Type chrome://settings/ into the URL address bar and press <Enter>.
  • Search <hardware acceleration>.
disable-hardware-acceleration-chrome-browser-take-screenshot
  • Toggle OFF the button that says <Use hardware acceleration when available>.
disable-hardware-acceleration-chrome-browser-take-screenshot-whatsapp-view-once

Method 5: Use Google Assistant

This technique automates taking screenshots on your device using the Google Assistant app.

This works well for apps not supporting screenshot gestures, such as the WhatsApp view-once feature and Telegram Secret Chat mode, and applies to iOS and Android users.

If you have problems taking screenshots using Google Assistant, you can configure its settings to fix it.

Make sure your settings are correct.

  • Open Google Assistant and click on your profile picture (top-right corner).
  • Scroll down and click <General> menu
  • Ensure that <Google Assistant> and <Use screen context> are toggled ON.

Now, open Google Assistant and say, “Take a screenshot“.

The app automatically takes a screenshot of your screen and saves it to your photo album.


Method 6: Use ADB

This method requires an Android phone.

Android Debug Bridge (ADB) can take a snapshot or record WhatsApp screen interactions using simple commands.

Before this, you need to install Android Studio and enable USB debugging by going to Settings > About Device > Tap Build Number seven times.

Use this command to take a screenshot;

adb shell screencap -p > screenshot.jpg

Use this command to take a video screen recording;

adb shell screenrecord /sdcard/videorecording.mp4

Method 7: Take a Photo using Another Device

using-another-phone-to-take-whatsapp-view-once-disappearing-image

This method is the easiest and fastest if you are not particular about the image quality of the screenshot.

Use another phone to take a picture of the screen you want to capture.

You can do this as often as many times as you want until the image quality is satisfactory.

Note that you need to keep the WhatsApp view-once image OPEN while doing so.

Once you exit the image, it will be automatically deleted.


** Recommendations **

For bypassing internet censorship, blocked sites and yet browsing with online anonymity., only choose the following reliable VPN services;

  • NordVPN (Has the most number of servers, over 5000+, in 60 countries to choose from. Uses a unique Onion Over VPN feature to mask your online traffic for maximum anonymity.)
  • Surfshark VPN (One of the few providers that allow unlimited device connections with just a single subscription. You can connect all your devices with no logs policy)
  • IPVanish (Supports all platforms, routers, and TV. Uses SOCKS5 web proxy feature for faster anonymous connection speed)

7 Ways to Take Screenshots on WhatsApp View-Once Images Read More »

export-youtube-playlists-csv-excel-xls-format-offline

3 Ways to Export YouTube Playlists [CSV, Excel formats]

Creating YouTube playlists is useful and makes it easy to bookmark and revisit videos of interest.

What if you want to export these playlists in an offline format?

This article will show you the different ways to export all your favourite YouTube playlists into CSV and Excel XLS file formats.

How to Export YouTube Playlists into offline formats (Excel, CSV format)

Here are the three (3) ways to do so.


Method 1. Using YouTube Playlist Backup – [CSV format]

Make sure your YouTube Playlist privacy settings are set to <Public> or <Unlisted>

youtube-playlist-privacy-settings-set-as-public-unlisted
Set YouTube Playlist privacy settings

Copy and paste your playlist URL into the YouTube Playlist Backup and click <Export>.

Your CSV backup file will be ready for download.

youtube-playlist-backup-download-csv-file

The CSV file will look like this below;

youtube-playlist-backup-open-csv-file-format
Example of a YouTube Playlist CSV file

Use the Youtube video ID (ID column on the left) to get the exact URL to the video.

Follow the standard YouTube URL below and replace the <paste-ID-here> with your ID characters.

https://www.youtube.com/watch?v=paste-ID-here

Method 2. Using Google Takeout – [CSV format]

YouTube is a service by Google, and the company has a feature that allows users to export selected content to their Google Account and its associated services. This includes exporting YouTube playlists as well.

Follow the steps below to export your YouTube playlist via the Google Takeout feature.

  • To begin, go to the Google Takeout page.
  • Deselect all, and select only <YouTube and YouTube Music>.
google-takeout-select-youtube-and-youtube-music
  • Click on <All YouTube data included>
  • Select only <playlists>
  • Choose your preferred download link (e.g. via email, google drive or dropbox)
  • Click <Create export>
  • The download link will soon appear in your email inbox.
  • Download and unzip the compressed file.
  • Your CSV playlist file is under Takeout > YouTube and YouTube Music > playlists > your-playlist.csv

The CSV file from Google Takeout will look like this below.

google-takeout-csv-file-format-export-youtube-playlist

Example of a YouTube playlist export from Google Takeout


Method 3. Using Google API – [Excel XLS format]

This straightforward programming method uses the Google API to export YouTube playlists in Excel (XLS) format.

  • The Excel file will be automatically downloaded onto your computer

The Excel file will look like this below.

export-youtube-playlist-xls-excel-file-format
Example of an Excel (XLS) file containing exported YouTube playlists

Note that this method conveniently reveals the full URL of each YouTube video in the playlist.


3 Ways to Export YouTube Playlists [CSV, Excel formats] Read More »

Delete-Uninstall-Open-Mac-Application

How to Completely UnInstall & Open an App Using Mac Terminal

When using a Mac computer, you can use the Terminal to open an app, as well as uninstall & deleting the app.

This article will show you how to;

  • Use Mac Terminal to Uninstall and Delete an App
  • Use Mac Terminal to Open an App

How to Uninstall and Delete an App using Mac Terminal?

To open the Mac Terminal app, go to Spotlight Search (magnifying glass icon on the top-right) and type <Terminal>.

Use the following command to uninstall and delete an app.

sudo uninstall VLC.app

Replace <VLC.app> with the application that you want to uninstall.

  • Always use a .app extension at the end of the app name
  • To know the exact name of the app before typing it into Terminal, you can go to Finder > Applications

Alternative Methods

Here are the other different ways you can delete an app from a Mac computer

S/noMethodComments
1Use CleanMyMac or MacKeeper to uninstall and delete an app from your Mac completely.Cleanest Method
2Drop the App into the TrashSimplest Method

How to Open an App using Mac Terminal?

Here are the three (3) steps to do so.


Step 1. Navigate to the /Applications folder

mac-terminal-navigate-applications-folder-open-uninstall-apps

Open the Terminal app, type the following command and hit <Enter>;

cd /Applications

You will be in the main Applications folder, where all your apps are installed.

Step 2. List all the names of the apps

list-apps-ls-command-mac-terminal-open-uninstall-applications-folder

Before you open an app, you may want to know the exact name.

List down all the apps on your Mac using the following command and hit <Enter>;

ls

Step 3. Open the app you want

Now you know the exact name of the app, to open it, use the following command;

open VLC.app

Your app will now be launched. You can check for it on your dock.

Note that apps are all case-sensitive. So, for example, a capital “V” is not the same as a small letter “v”.

mac-terminal-open-vlc-application

How to Completely UnInstall & Open an App Using Mac Terminal Read More »

WhatsApp-View-Once-Privacy-Self-Destruct-Disappearing-Photo-Video-Media-File

3 Steps to Send WhatsApp Disappearing Photo [View Once]

Since 2021, Whatsapp has rolled out its privacy feature, “View Once”, to all iOS and Android users.

View Once is a new feature where you can send self-destructing media (only photo and video files) to your WhatsApp contact. However, the recipient can only view it once and can’t take a screenshot, save or view it for a second time.

This privacy feature is similar to Telegram (Secret Chat mode), Snapchat, etc.

| Related Posts |
How to Bypass WhatsApp View-Once Screenshot Restriction

How will the Media File Disappear?

Once the recipient opens the media file and exits it after viewing it, it is automatically deleted from both the Sender’s and recipient’s devices.

Also, if the media file is unopened after 14 days of being sent, it will be automatically deleted as well.


Can You Know If the Receiver Viewed the Media File?

This is what you see as a Sender.

When you send the view-once file, you will see it as <Photo> or <Video>, depending on which file type you are sending.

whatsapp-view-once-photo-file-name

When the recipient opens your file, it will be changed to <Opened>.

whatsapp-view-once-changed-to-opened

How to Send “View-Once” Disappearing Media File in WhatsApp?

Here are the three (3) easy steps to do so.


Step 1. Attach the media file

whatsapp-attach-file-view-once-feature
  • Click the attachment icon below and select <Gallery> to choose either a photo or video to send.

Step 2. Tap the View-Once icon

  • Click on the view-once icon 1
whatsapp-view-once-icon
  • The icon will turn green to confirm that the media file is now a view-once attachment.
whatsapp-view-once-icon-turned-green

Step 3. Tap Send

  • Click <Send>
  • Double blue ticks beside the attachment mean that the recipient has opened WhatsApp but has not yet viewed the photo.
  • When the attachment is renamed <Opened>, the recipient has already viewed the media file.

Is it possible to save the media file or take a screenshot before it disappears?

Yes, it is possible to bypass the WhatsApp view-once restriction using several methods if you intend to do so.

WhatsApp does not allow the recipient to take a screenshot of the view-once media file. In addition, the recipients cannot save a copy of it, copy it, share it, or forward it to anyone.

When opening the view-once attachment, the recipient can only perform the following;

  • Delete it
  • Report the media file as Spam
  • Block the contact

3 Steps to Send WhatsApp Disappearing Photo [View Once] Read More »

best-fastest-web-browsers-for-macOS

7 BEST Web Browsers for macOS Monterey: [Fastest Speed Test]

We installed several popular web browsers on a MacBook, running the latest macOS Monterey, and put them into three (3) different benchmark speed tests to find out which is the fastest and lightest web browser for Mac devices.

The environment for the benchmark speed tests is as follows;

  • Laptop used: Macbook Pro (16-inch, 2021 model), running Apple M1 Max chip with a memory RAM of 64GB.
  • Condition: No other running applications present except the web browser and no other browser tabs except the speed test site

The benchmark sites used for the web browser speed tests are;

S/noBenchmark siteTest Measurements
1JetStream2Measures the browser’s ability to start up quickly, execute code speedily and run smoothly
2SpeedometerMeasures the browser’s Web app responsiveness
3Speed BattleMeasure the speed of Javascript in the browser

Web Browsers Speed Test Results

The table below shows the results for the seven (7) web browsers used in the MacBook.

The higher the score number, the better the results for all the benchmark tests.

S/noWeb BrowserJetStream2SpeedometerSpeed Battle
1Safari267.916375 runs/minute2423.48
2Vivaldi256.582282 runs/minute1448.09
3Brave221.081313 runs/minute1151.98
4Microsoft Edge219.203291 runs/minute1125.83
5Google Chrome214.344286 runs/minute1151.67
6Opera210.087270 runs/minute1124.16
7Firefox156.219222 runs/minute1233.83

Which Web Browser is the Fastest & Lightest for macOS Monterey?

Our speed test results showed that Safari is the fastest and most lightweight web browser when you are using a macOS computer, e.g. a MacBook, iPhone, iPad, etc.

1. Safari

The Fastest and the BEST Web Browser to run on any macOS device.

safari-web-browser

Safari scored the highest in all three (3) speed tests.

Safari is the fastest to start up quickly based on the JetStream2 results, scoring 267.916.

safari-web-browser-jetstream2-speed-test-results

The web browser clocks a high 375 runs/minute on measuring the web app’s responsiveness using the Speedometer’s speed test.

safari-web-browser-speedometer-speed-test-results

It also has the fastest speed of running Javascript in its browser, scoring 2423.48 using Speed Battle’s test.


2. Vivaldi

Ranked 2nd in the JetStream2 (fast startup) and Speed Battle (Javascript speed) speed tests

vivaldi-web-browser

Vivaldi’s newest update supports Apple’s M1 computers, giving itself a significant boost in speed and performance.

The web browser has several efficient features, such as the

  • Built-in calendar, mail client, translator, ad blocker and many more
  • Intelligent resource management for a faster browsing experience
  • Tab management for users to unlimited group tabs into 2-level stacks
  • Privacy browser as it does not track users’ behaviour
  • Syncing across different devices from different operating systems

3. Brave

Ranked 2nd in the Speedometer test, which measures the browser’s web app responsiveness

brave-web-browser

Started in 2015, the privacy-focused Brave web browser has hit 50 million monthly active users since January 2022.

The web browser, by default, blocks trackers and ads on every website you visit while allowing users to opt-in to earn their cryptocurrency token, called the Basic Attention Token (BAT), by watching privacy-respecting ads.

BAT tokens can be stored in the browser’s built-in Brave wallet, sold in exchanges or used to swap for other crypto tokens.

Some of Brave’s features are;

  • Block cross-site trackers and invasive ads
  • Block cookies
  • Block Fingerprinting
  • Malware and phishing protection
  • Anonymized Network Routing (TOR mode)

4. Microsoft Edge

microsoft-edge-web-browser

Starting in 2015, Microsoft Edge is the web browser created to replace the old Internet Explorer.

The web browser works with various operating systems, e.g. Windows, macOS, iOS, Android devices, Windows Servers and even Linux machines.

Some of Microsoft Edge’s features are;

  • Kids Mode – For kids with built-in protection and custom designs
  • Personalized gaming homepage with exclusive XBOX content
  • Productivity features like vertical tabs and immersive reading mode
  • Security features like password breach monitor and inPrivate tab for privacy surfing

5. Google Chrome

google-chrome-web-browser

If you are running on Windows or Linux machines, you should probably get a Google Chrome web browser.

The web browser is engineered for speed and security with automatic updates to keep your surfing safe and secure.

Some of the useful features of Chrome as;

  • Built-in Safety Checks notify users if passwords are compromised and if browser extensions are a security risk
  • Built-in Privacy controls allow users to set their privacy level, e.g. clear browsing history, control website access permissions like webcam, etc
  • Password syncing across devices when users sign in to their Chrome account
  • Plenty of Chrome extensions add-ons

6. Opera

opera-web-browser

The Opera project started in 1994 and was considered one of the pioneers in web browsing.

The Opera browser supports Windows, macOS, Linux, Chromebook, Android and iOS. Besides the main browser, the company offers Opera GX for gamers and Opera Mini for a light data-saving browser.

Some of Opera’s features include;

  • Built-in Ad Blocker, which is customizable
  • Built-in Integrated Messengers. e.g. Facebook messenger, Whatsapp, Telegram
  • Secure encrypted file-sharing between connected devices
  • Optional VPN feature

7. Firefox

firefox-web-browser

Started in 2004, the Mozilla Firefox web browser was created to achieve a faster and more privacy-focused surfing experience for users.

In fact, users of Firefox stick by their browsers due to the fact that it is highly configurable in its settings. You can set and customize almost any aspect of the web browser.

Some of the features of the Firefox web browser include;

  • Picture-in-picture mode for easy streaming and multitasking
  • DNS over HTTPS (DoH) prevents internet service providers from selling your data
  • Fingerprinting and crypto mining blocking
  • Plenty of browser extensions add-ons
  • Sync across devices

7 BEST Web Browsers for macOS Monterey: [Fastest Speed Test] Read More »

digital-forensics-tool-software

7 BEST Digital Forensics Tools [Mobile, Mac, Cloud, Window]

The field of digital forensics is used by law enforcement agencies when it comes to criminal investigations to extract evidence, as well as in the private sector, where incidents such as data breaches, litigation, inside threats, fraud, etc., require the need for forensics investigations to find out the truth.

The sub-discipline of digital forensics includes mobile forensics, cloud forensics, memory forensics and many more.

Every digital forensics tool has its own strengths when it comes to examining the different types of devices. There are always specific forensic tools that cater for a specific operating system.

Not to be confused with data recovery, the four (4) steps involved in a digital forensics scientific methodology begin with;

StepsStage/sComments
1CollectionThe proper seizure procedure of devices to prevent physical damage and/or file contamination
2PreservationThe forensic process of acquiring (imaging) a forensic image of the device
3AnalysisThe examination stage to uncover any inculpatory or exculpatory digital evidence using digital forensic tools
4PresentationExplaining the forensic findings, typically presented in a court of law when used by law enforcement agencies

List of the Best Digital Forensics software

Depending on the type of device and operating system you are acquiring, we can choose the best digital forensics tools for each sub-discipline of digital forensics.


1. EnCase Forensic

Court-proven computer forensic tool used by law enforcement around the world

opentext-encase-forensic-software-tool

Starting in the early days of 1998, EnCase is the pioneer in the field of computer forensics when it comes to criminal investigations and analysis.

Used by the majority of law enforcement agencies in the world, the strength of EnCase Forensic software lies in its competency in acquiring forensic images from a wide array of computer systems. It is especially good at analysing Windows operating systems and commonly-used file systems such as NTFS, FAT/FAT32/exFAT/, ext4 and many more.

EnCase Forensic – Key Features

  • Analyze data from multiple platforms—Windows, Linux, AIX, OS X, Solaris, and more
  • Uncover suspicious files, e.g. hiding, cloaking, or deletion
  • Manage large data volume, including deleted files, unallocated space and file slack.
  • Indexing, keyword searching and automated evidence-processing features
  • Create exact forensic duplicates through verifiable hash values and Cyclic Redundancy Check (CRC) values
  • Easy transfer of evidence files to external parties, such as legal representatives

2. Cellebrite UFED

cellebrite-ufed-mobile-digital-forensics

Since entering the mobile forensics industry in 2007, Cellebrite UFED has been the leading market leader in this space for many years.

Cellebrite is an Israeli digital intelligence company focusing mainly on extracting data from mobile devices. The company has several offices across the world, including Washington D.C, Germany and Singapore.

The UFED capability is available on platforms such as desktop computers (UFED4PC) and a standalone handheld console (UFED Touch2).

Cellebrite UFED – Key Features

  • Unlocking of mobile devices via pattern bypass and PIN locks
  • Perform logical, file system and physical extractions
  • Use of bootloaders, automatic EDL capability, smart ADB connection and more
  • Wide range of supported mobile devices across many different brands
  • Extract evidence from mobile phones, SIM cards, drones, SD cards, GPS devices and more

3. SIFT Workstation

sans-sift-workstation-forensics

Created in 2007 by Rob Lee from SANS Institute, the SIFT Workstation is a free Linux Ubuntu distro that is packed with open-source digital forensics and incident response tools.

SIFT is designed to perform detailed digital forensic examinations and incident response capabilities, typically on computer systems. Most of the forensic tools installed onto SIFT requires some form of command-line knowledge, although there are other tools with GUI interface as well, e.g. Sleuthkit.

SIFT Workstation – Key Features

  • File system support for NTFS, raw, HFS+, FAT/exFAT, swap, RAM data and more
  • Evidence image support for E01, raw, dd, ewf, aff, vmdk, vhd, etc
  • Forensic tools installed, such as Volatility, bulk_extractor, imagemounter, libewf, Sleuthkit, RegRipper, etc

4. Sumuri Recon Lab

sumuri-recon

Sumuri’s flagship forensic suite is the Recon Lab. The digital forensics software can take in forensic images, mounted volumes, optical disk images, RAM images and its own RECON FS block image.

Recon is to be installed on a macOS machine, and it has several useful features such as skin tone detection, face analysis, RAM memory analysis, indexing and keyword searching.

Sumuri – Key Features

  • Parse and recover thousands of artefacts with Automated Analysis of macOS, Windows, Android, iOS and Google Takeout files.
  • Advanced forensic viewers for macOS plist, SQLite databases, HEX and Window’s Registry
  • Timeline support for placing events in chronological order
  • Advanced-Data Correlation feature
  • Include Paragon’s Mac Toolbox and Linux drivers
  • Integrated Report Editor
  • Support over 270 unique timestamps

5. Oxygen Forensics

oxygen-forensics

Similar to Cellebrite UFED, Oxygen Forensics is a Russian company headquartered in Alexandria, Virginia and provides mobile forensics capabilities to law enforcement, federal agencies and enterprises.

The forensic software is an all-in-one platform that can extract mobile forensic images, decode them and parse them in its interface for investigators to analyse easily. Multiple extractions can be investigated in a single Oxygen Forensic interface to have a complete picture of all the acquired data.

Oxygen Forensics – Key Features

  • File system-level extraction on most mobile devices
  • Drone forensics possible
  • Bypass screen lock on popular Android devices
  • Cloud extraction – Acquire data from cloud services and storage
  • Support import of call data records

6. Magnet Axiom

magnet-axiom-forensics

Magnet AXIOM is a forensic platform that can take in different types of forensic images (mobile, computer and cloud data), process them and present them in an analytical interface for examiners to find key evidence quickly.

The forensic tool supports the analysis of Android, iOS, Windows, macOS, Linux and extraction dumps of over 50+ cloud services.

Magnet AXIOM – Key Features

  • Analyze vehicle data with support for Berla iVE extractions
  • Dedicated artefacts support for most popular and relevant sources
  • Built-in support for GrayKey (mobile acquisition)
  • Analytics tools, such as visualizing connections between people and devices
  • Reporting and Case Sharing feature

7. FTK® Forensic Toolkit

FTK-Forensic-Toolkit

Similar to EnCase Forensic, FTK is a digital investigation solution frequently used by law enforcement and in civil cases. it is primarily used in computer forensics and is well-regarded in terms of its fast processing speed and intuitive interface. It uses distributed processing and true multi-threaded/multi-core support to ingest large amounts of digital data.

FTK Forensic Toolkit is a full disk image collection, processing and analysis solution that parses data in a forensically-sound manner. This allows investigators to preserve the integrity of the data while utilizing time to analyze files and perform advanced deep dives in areas such as data craving and file decryption.

FTK – Key Features

  • Email Analysis
  • Customizable data views
  • Indexing upfront so searching and filtering are faster subsequently
  • Ability to train FTK for facial and image recognition
  • Ability to create custom Python scripts

Bonus

Mac Target Disk Mode

apple-target-disk-mode-two-mac-file-transfer-forensics

Apple has a built-in “Target Disk Mode” feature for all their Mac series of computers. Mac users can boot into this unique startup mode that enables them to perform data transfers from one Mac to another.

The condition here is you must have two (2) Mac computers.

The Mac you initiated in the target disk mode will act as an external hard drive for the other Mac.

To begin target disk mode, do the following steps;

  • Connect the two (2) Macs with the same cable (e.g. USB C or Thunderbolt)
  • Decide on the Mac that you want to act as an external drive
  • If the Mac is Off, start it up and long-press the T key
  • If the Mac is On, click the Apple icon on the top-left > System Preferences > click Startup Disk > Click Target Disk Mode
  • You can start to transfer files by dragging them once you see the disk icon
  • Once done with the file transfer, eject the disk by dragging its icon to the Trash

7 BEST Digital Forensics Tools [Mobile, Mac, Cloud, Window] Read More »

How-to-Word-Count-on-Website

3 Ways to Count Exact Number of Words on a Website URL

In order to count the number of words on a website, there are a variety of tools you can use. This technique is called “Word Count”.

Depending on the word count you need on selected paragraphs, sentences or the entire page of a website, you will use the appropriate method stated in this article.

How to Count the Total Number of Words on a Website?

The following three (3) methods are all very easy to use and reliable as they are word count automation tools.


1. Use a Chrome browser extension

This is the most accurate way of counting words because you have to highlight the exact length of words for the tool to calculate.

Use the Chrome (or Brave) web browser and install the Word Counter Plus extension.

chrome-extension-word-counter-plus

Once installed, do the following steps;

  • Go to the webpage you want to count the words
  • Highlight the paragraph(s) you want to count
  • Right-click and select “Word Counter Plus

You will be able to see the word count instantly.

word-counter-plus-tool

2. Using other Web browsers

If you do not intend to use the Chrome browser, you can still use your favourite web browsers to highlight the selected paragraphs and do a word count using WordCounterTool or WordCounter.

wordcountertool

Using this method, you do not need to use the Chrome web browser, and you do not need to install any extensions. Instead, you can stick to your web browsers such as Firefox, Edge, Safari, etc.


3. Use online Website Word Counters

This method is the most convenient as you only need to input the URL website address, and it will automatically count the total number of words on that page.

Note that these online word counters count the entire webpage (and not selected paragraphs). It will also include the sidebars (if any), advertisements (if any), menu bar and page footers. In short, it counts everything on that page.

Note that this is not counting the entire website (i.e. all the web pages inside the website).

If this is what you want to count, use any of the below;

sitechecker-count-words-on-webpage

What’s more

If you are looking for more than just word count, you can try text analytics.

Voyant-text-analytics

Input the URL of the webpage into Voyant Tools, and you can see dashboard visualisation such as;

  • Word Cloud
  • Word Terms – frequently used words by count
  • Readability Index
  • Average words per paragraph
  • Word Links (which words are linked to each other)
  • and many more

3 Ways to Count Exact Number of Words on a Website URL Read More »

cloaking-affiliate-links-manually-without-wordpress-plugins

Cloaking Affiliate Links Without WordPress Plugin (Load Faster)

When you manually cloak your affiliate links without installing and using any WordPress plugins, your website performance will improve and load faster.

All you need to do is a few simple, easy steps, explained here in this article.

How to Cloak Your Affiliate Links Without Installing Any WordPress Plugin (Manual Way)

You can do so by quickly editing your .htaccess file. This is found inside your web hosting account, and you should use its File Manager to access it.

Here are the five (5) simple steps to do so.


Step 1: Decide on the URL Slug / Prefix

URL slug/prefix is the word you chose to distinguish easily that it is a link to an external website, typically an affiliate website.

Here are some of the URL slug/prefix examples;

https://www.ticktechtold.com/visit/affiliatesite
https://www.ticktechtold.com/go/affiliatesite
https://www.ticktechtold.com/goto/affiliatesite
https://www.ticktechtold.com/recommends/affiliatesite

You can choose your own URL slug/prefix.


Step 2: Use the File Manager from your Web Hosting

file-manager-from-wpx-hosting

Log in to your web hosting account and navigate your File Manager menu.

If you are using WPX hosting, you can go to <My Services>, <WordPress Hosting>, click on your domain name and select <File Manager> on the left-hand menu. Then, confirm by clicking on <Open File Manager>.


Step 3. Go to the .htaccess file

Now you need to find the .htaccess file inside your web hosting account. In this example, we will be using a WPX hosting account.

wpx-hosting-domains-file-manager

If you have multiple domains (websites), click on <domains>, and you need to select the right one.

If you only have one (1) domain (website), then click on <public-html).

wpx-hosting-using-file-manager-htaccess

Double-click the <.htaccess> file to open it up.


Step 4: Edit the .htaccess file

You need to insert new codes into this .htaccess file.

## refers to comments I have written, and these words will not affect the file in any way. For example, I use ## to include the words AFFILIATE LINK URLs because it is easier for me to understand the next time I need to edit this file again.

The real codes start with <Redirect 302 ……. >

## AFFILIATE LINK URLs ##

Redirect 302 /go/bluehost http://www.bluehost.com/track/affiliateuserid
Redirect 302 /go/wpxhosting http://www.wpx.net/track/affiliateuserid
Redirect 302 /go/dreamhost http://www.dreamhost.com/track/affiliateuserid

/go refers to the URL slug/prefix I have chosen, followed by the name of the affiliate brand/company. You can enter a short-form name or abbreviation if you wish.

Lastly, you need to provide the full (unique) affiliate link.


Step 5: Edit the robots.txt file

You need to disallow the rule on your robots.txt file to prevent Google from crawling, indexing, and following all your Redirects.

In Step 3, you will see the file <robots.txt>; double-click to access it.

Insert the disallow code as shown below.

User-agent: *
Disallow: /go/

Enter the URL slug/prefix of your own. /go/ is just an example here.


What are the Benefits of Affiliate Link Cloaking?

Here are reasons why cloaking affiliate links is better;

1. Easier to understand for visitors

In reality, the actual affiliate links are unique and lengthy URLs. This may confuse the visitors on where exactly the external link is heading. By cloaking it nicely, you can let your visitors see and understand them quickly.

2. Protect yourself from link theft

There are malicious malware and hacking activities out there that can steal bloggers’ affiliate commissions. The few unique ID characters in the URL are necessary to uniquely identify you as an affiliate marketer. If your webpage is compromised, the hacker can replace your affiliate ID with their own.

3. Easier to maintain when affiliate links get more

As content creators, your content may increase as time goes by. Having a neat and consistent naming for all your affiliate links is important for tracking and preventing errors. Affiliate links are very lengthy and are easier to misspell and mis-type.

4. Easier to share with others

Not all social media platforms can accommodate a lengthy URL. Twitter, for example, only accepts a maximum of 280 characters. When sharing your affiliate links in a neat cloaked URL, your links will not appear spammy and messy to others.

5. Easier Link Tracking

Using link tracking tools to analyse where your visitors are coming from, going out, session times, etc. It is very useful if you have a neat and organised affiliate link-cloaking process.


What’s more

Always use a “nofollow” attribute for all your affiliate links, as stated by Google’s guidelines.

In WordPress, when you insert a new link, you can right-click on it and select <Edit as HTML>.

edit-html-affiliate-link-wordpress

Now you can insert the “nofollow” attribute into the raw HTML code.

See the example below. The bold text is the “nofollow” attribute.

<a href="https://google.com" rel="nofollow">Google</a>

Cloaking Affiliate Links Without WordPress Plugin (Load Faster) Read More »

move-access-delete-trash-mac-using-terminal-app

How to Move, Access and Delete Trash using the Mac Terminal

You can use the Mac Terminal app for performing various daily tasks, especially deleting and emptying files.

This article will show you how to use the terminal app to move files and folders into the Trash folder and permanently delete them.

To open the Mac Terminal app, go to Spotlight search and type in <Terminal>.

mac-spotlight-search-terminal-app

Click on the Terminal.app to launch it.

How to Move Files to Trash and Empty Trash using the Mac Terminal?

Here are the three (3) ways to do so.

1. Moving Files and Folder to Trash

Using the Mac Terminal, you can quickly move files and folders to the Trash folder.

Type the following command into Terminal.

mv file.jpg ~/.Trash

Replace <file.jpg> with the actual file you want to delete.


2. Accessing the Trash

To open and view the contents of your Trash folder, you need to first grant full disk access to the terminal app.

Go to System Settings > Privacy & Security > Full Disk Access > Toggle ON the Terminal app.

mac-full-disk-access-terminal

Now, navigate to the Trash folder

cd ~/.Trash

List down all the deleted files to be emptied.

ls -l
mac-listing-ls-command-trash-folder-files

3. Emptying the Trash

To permanently delete a single file, use the following command.

rm -r file.jpg

To empty the entire trash folder, use this.

rm -rf ~/.Trash/*

If the Terminal asks for higher permissions, you can add a sudo in front. So the command will be like this.

sudo rm -rf ~/.Trash/*

How to Quickly Delete Files and Empty the Mac Trash Instantly?

Use the following command in Terminal.

rm file.jpg

This action will permanently delete the file.jpg without emptying it in the Trash can.

This is an irreversible action, so use it with caution.


How to Move, Access and Delete Trash using the Mac Terminal Read More »