How FAST is Astra WordPress Theme (Speed Test Results + Data)
Astra is the most downloaded WordPress theme, and the speed test data in this article will tell you why.
With over 1 million+ downloads, Astra is easily the most popular and the most used WordPress theme.
Astra has over 180+ starter WordPress themes (both free and paid) for you to choose from. Once you have installed Astra in your WordPress, activate the [Importer Plugin] to download your preferred Starter Templates.
In this article, we are going to conduct speed tests on the Astra theme to see how well it fares across 5 different test sites.
Speed Test – Environment
WordPress Theme used: Astra WordPress Theme version 3.7.5
Web Hosting: We are using a fast & reliable web hosting service called WPX Hosting
Installation: We reset our entire WordPress database and settings to achieve a clean start. We used our dedicated test domain for this experiment (https://www.testedsite.com).
Configuration: To make the speed test as accurate as possible, there will be no extra posts, pages, media or even plugins to influence our experiment. The aim is to use a clean Astra theme, making it as lightweight as possible.
Speed Test – Sites Used
These are the five (5) sites that we used to conduct speed tests;
- PageSpeed Insights
- GTMetrix
- Pingdom Tools
- WebPageTest
- ByteCheck
Below are the screenshots of the test results for each site.
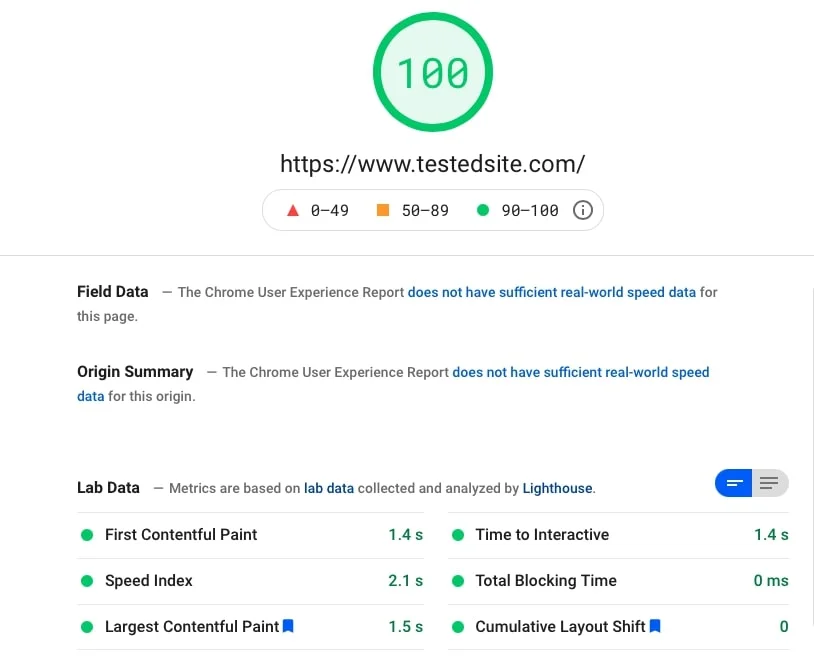
PageSpeed Insights
GTMetrix

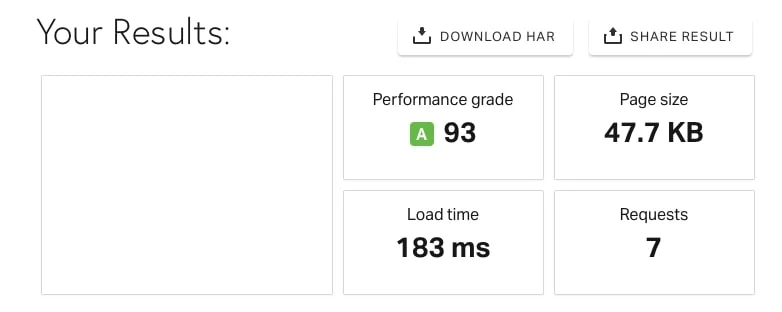
Pingdom Tools
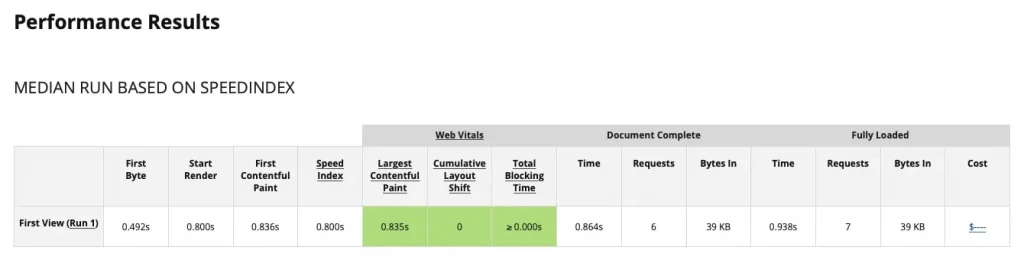
WebPageTest
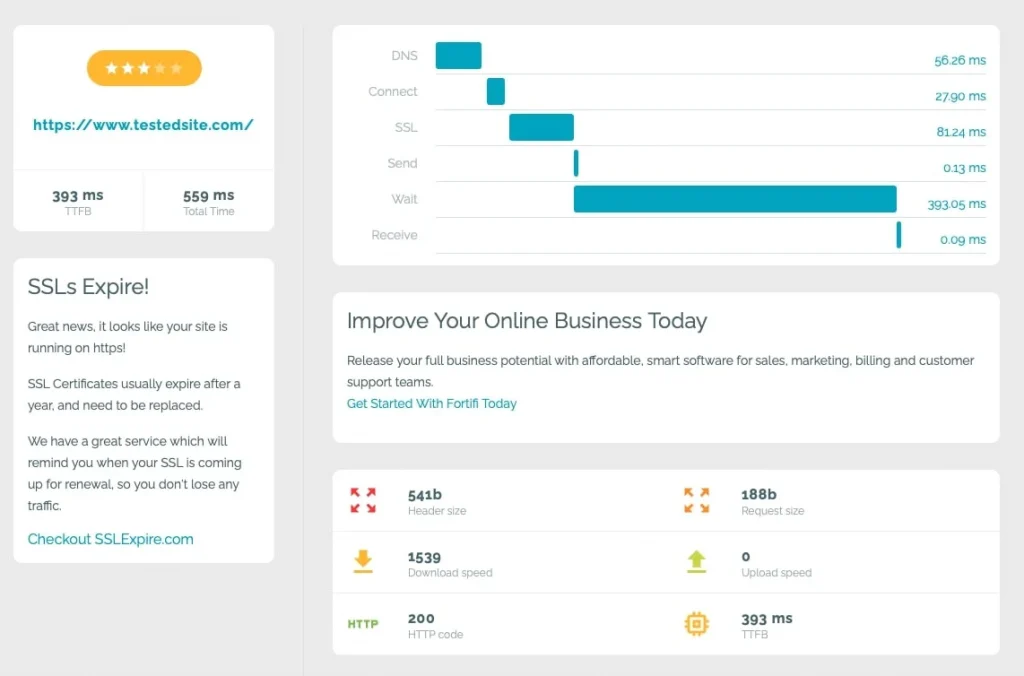
ByteCheck
Overall Results
Here are all the speed test results displayed in one table.
| S/no | Speed Test – Sites used | Results |
|---|---|---|
| 1 | PageSpeed Insights | Score 100, FCP 1.4 sec, Speed Index 2.1 sec, LCP 1.5 sec Time to Interactive 1.4 sec, TBT 0ms, CLS 0 |
| 2 | GTMetrix | Grade A, Performance 100%, Structure 100%, LCP 532ms, TBT 0ms, CLS 0 |
| 3 | Pingdom Tools | Grade A 93, Page Size 47.7 KB, Load Time 183ms, Requests 7 |
| 4 | WebPageTest | First Byte 0.492 sec FCP 0.836 sec, Speed Index 0.8 sec, LCP 0.835 sec, TBT 0ms, CLS 0 |
| 5 | ByteCheck | TTFB 393ms, Total Time 559ms, Header Size 541 bytes, Request Size 188 bytes |
Conclusion
The Astra WordPress Theme is one of the fastest themes out there we have tested.
It scored a perfect 100 on Google’s PageSpeed Insights and GTMetrix tests, with commendable FCP and LCP timing.
FCP measures how your visitors perceive the performance of your website, as opposed to what a speed test tool measures.
LCP tells us the time it takes to load the most significant capacity piece of content on your site, and it can be an image or graphic.
It is not easy to score a high A 93 on Pingdom Tools, and Astra is definitely one of the few themes out there that can do it.
Time To First Byte (TTFB) is a blazing fast speed of 393 milliseconds. For this test, the lesser time, the better it is.
TTFB is the total duration between when your web browser requests the web page and when that first byte arrives.
To install Astra, you can either;
- Search for “Astra” in your WordPress interface via Appearance – Themes – Add New.
- Visit the Astra Officlal website
The entire speed test experiment and results can also be seen here in this video.
How FAST is Astra WordPress Theme (Speed Test Results + Data) Read More »