admin

how-to-identify-virtual-numbers

3 Ways To Identify Virtual Phone Numbers [How to Tell]

Ever wondered, “Can you trace a virtual phone number?

With the rise in technology and the ease of communication, virtual phone numbers have become increasingly popular.

While they have many legitimate uses, such as running a business or making international calls, they can also be misused by scammers and telemarketers.

In this blog post, we’ll explore three ways to detect and identify virtual phone numbers, helping you stay one step ahead of unwanted callers.

Fun Fact #1: Virtual phone numbers aren't tied to a specific location, making them extremely versatile. This is why many businesses and individuals use them for various purposes, such as providing a local number for their international clients.

How to identify Virtual Phone Numbers

Here are the three (3) methods you can use to detect and tell if it is a virtual number.


Method 1: Reverse Phone Lookup Services

So, how do you identify a virtual phone number? One popular method is using reverse phone lookup services.

These services are designed to provide you with information about the owner of a phone number, like their name, address, and more.

They can help you determine whether a number is virtual by revealing whether it’s associated with a traditional landline or a VoIP service.

There are several reverse phone lookup services available, both free and paid. Some popular options include Whitepages, Truecaller, and Spokeo.

To use these services, enter the phone number you want to investigate, and the service will present you with the available information.

Fun Fact #2: Reverse phone lookup services often rely on databases that contain millions of phone numbers, allowing them to provide a wealth of information about the number in question.


Method 2: Analyzing Call Patterns

Another way to detect virtual phone numbers is by monitoring and analyzing call patterns. Unusual call patterns, such as a high volume of short-duration calls, can be a sign that a number is virtual.

These patterns might indicate that the number is being used for spamming, robocalls, or other malicious activities.

You can use call analytics tools, like CallRail or Phonexa, which provide insights into call duration, frequency, and location to track call patterns.

By monitoring your incoming calls, you’ll be better equipped to identify potential virtual phone numbers and block them if necessary.

Of course, it’s important to remember that not all virtual phone numbers are used for nefarious purposes.

Some businesses and individuals use them for legitimate reasons, so evaluating the context of the calls you receive is crucial before taking any action.


Method 3: Use of Third-Party Services and APIs

If you’re wondering, “How do I find out who owns a virtual number?” third-party services and APIs might be the answer.

These services specialize in identifying and providing information about virtual phone numbers, including VoIP numbers, which can sometimes be harder to distinguish from traditional landlines.

Popular APIs and services for detecting virtual phone numbers include Twilio’s Lookup API, Numverify, and Telnyx.

These tools can be integrated into your system or application, allowing you to automatically identify virtual numbers and take appropriate action, such as blocking or flagging the calls.

Keep in mind that while these services can be effective, they may not cover all virtual phone number providers or be able to identify every virtual number.

That’s why it’s best to use a combination of the methods mentioned in this blog post for more accurate results.


Conclusion

Detecting and identifying virtual phone numbers can be a challenge, but with the right tools and methods, it’s definitely possible. To recap, the three main ways to identify virtual phone numbers are:

  • Reverse phone lookup services
  • Analyzing call patterns
  • Using third-party services and APIs

Remember, no single method is foolproof, so combining these strategies for the most accurate results is best.

By staying vigilant and keeping an eye out for unusual call patterns or suspicious numbers, you’ll be better equipped to protect yourself and your business from unwanted callers and potential scammers.

Now that you know what a virtual phone number looks like and how to find out who owns one, you’re prepared to tackle any virtual number-related challenges that come your way.


3 Ways To Identify Virtual Phone Numbers [How to Tell] Read More »

use-virtual-phone-number-telegram

[5 Ways] How To Get and Use Virtual Number For Telegram App

Are you tired of giving out your real phone number when signing up for messaging services like Telegram? Well, you’re in luck!

In this blog post, we’ll explore 7 awesome ways how to get a virtual number for Telegram. That’s right; you’ll finally be able to join Telegram with a fake number, keeping your privacy intact.

Plus, we’ll even answer the burning question: “How to get a free fake number for Telegram?

So, buckle up and get ready to dive into the world of virtual numbers. 🚀

Fun Fact #1: Did you know that Telegram was created by the same brothers who founded the popular Russian social network VKontakte (VK)? It's true! Pavel and Nikolai Durov launched Telegram in 2013 with a focus on privacy and security.

Why Use a Virtual Number for Telegram?

You might be wondering, “Why would I even need a virtual number for Telegram?

Well, there are several benefits to using a fake number instead of your real phone number. Let’s break down the top reasons:

  • Privacy: With a virtual number, you can hide your phone number, protecting your personal information from potential hackers or scammers.
  • Avoiding Spam: Using a virtual number can reduce the risk of receiving unwanted calls or texts on your real phone number.
  • Multiple Accounts: Want to have separate Telegram accounts for different purposes? A virtual number lets you do just that!
  • International Use: Virtual numbers can make communicating with people in other countries easier without the need for expensive international calling plans.
Fun Fact #2: Telegram hit a whopping 550 million monthly active users by the end of 2021. That's a lot of people looking for secure and private messaging options!

How To Get A Virtual Number For Telegram

Here are the five (5) ways to do so.

1. Mobile Apps for Virtual Numbers

In today’s digital age, our smartphones are the key to staying connected.

That’s why mobile apps for virtual numbers have become increasingly popular, providing users with an easy and convenient way to generate fake numbers for Telegram and other messaging platforms.

Here’s a quick rundown of some popular mobile apps for obtaining virtual numbers:

  • Hushed: Hushed is another app offering virtual numbers, with options for temporary and permanent numbers. The app provides various plans, giving you the flexibility to choose the one that fits your requirements. You can use the virtual number from Hushed to join Telegram with a fake number.

  • Numero eSIM: Numero eSIM is an app that offers virtual numbers using eSIM technology. It supports multiple phone numbers on a single device and has a wide range of available numbers from different countries. With various plans to choose from, you can select the best option for your needs and use the virtual number for Telegram and other services.

These mobile apps make it super easy to obtain a virtual number, ensuring you can join Telegram without compromising your privacy. Just remember to read user reviews and understand the app’s features, limitations, and pricing before making your choice. Happy texting!


2. Virtual Number Providers

If you’re looking for a more reliable and feature-rich solution to obtain a virtual number for Telegram, you might want to consider using dedicated virtual number providers.

These providers specialize in offering virtual phone numbers for various purposes, including messaging, calls, and business communications.

Here’s a brief overview of some popular virtual number providers:

  • Twilio: Twilio is a well-known provider of virtual phone numbers and communication APIs. They offer a wide range of numbers from different countries and area codes, along with features such as SMS, voice calls, and call forwarding. You can use a Twilio virtual number for Telegram and take advantage of their robust infrastructure.

  • Sonetel: Sonetel is another virtual number provider that allows you to purchase local and international phone numbers. With their easy-to-use platform, you can manage your virtual numbers, set up call forwarding, and even integrate with other communication tools. A Sonetel virtual number can be a reliable option for your Telegram account.

3. Using a Virtual Private Network (VPN) with a Virtual Number

Some virtual number providers may have restrictions on using their services in certain countries.

In these cases, you can use a VPN to change your IP address and gain access to virtual number services. This method can also help improve your privacy while using Telegram.

Here are two examples of using a Virtual Private Network (VPN) with a virtual number:

NordVPN with Google Voice

Let’s say you’re in a country where Google Voice isn’t available but want to use it to get a virtual number for Telegram.

First, sign up for a VPN service like NordVPN.

Once you’ve set up the VPN and connected to a server in a country where Google Voice is supported (such as the United States), you can then create a Google Voice account and obtain a virtual number.

This virtual number can be used for Telegram verification while maintaining a higher level of privacy.

ExpressVPN with Sonetel

If you want to use a virtual number provider like Sonetel but face restrictions in your country, you can use a VPN service like ExpressVPN.

After setting up ExpressVPN, connect to a server in a country where Sonetel is accessible. You can then create a Sonetel account and obtain a virtual number, which you can use for Telegram verification.


4. Using Online SMS Receiving Services

For those who prefer a quick and easy solution to obtain a virtual number for Telegram, online SMS receiving services can be a handy option.

These websites provide temporary virtual numbers that can receive SMS messages, allowing you to complete the Telegram verification process.

Here’s a brief introduction to using online SMS-receiving services:

  • Choose a Service: Search the web for online SMS-receiving services, and you’ll come across several options, such as Receive-SMS-Online.info, SMS-Online.co, and FreePhoneNum.com. Keep in mind that these services may have limitations and vary in terms of reliability and privacy.

  • Select a Virtual Number: Browse through the available virtual numbers on the website and choose one that suits your needs. Ensure that the number is from a supported country and can receive SMS messages.

  • Use the Number for Telegram Verification: Enter the selected virtual number when signing up for Telegram. Telegram will send an SMS verification code to this number.

  • Retrieve the Verification Code: Return to the online SMS receiving service’s website and check the messages for the virtual number you chose. Find the verification code from Telegram and enter it in the app to complete the verification process.

5. Landline Forwarding Services

Some landline phone providers offer call forwarding services that can be used to create a virtual number. This option may be useful if you have an existing landline that you want to use for Telegram verification.

Here are a few examples of landline forwarding services that can help you create a virtual number for your Telegram account:

Grasshopper

Grasshopper is a virtual phone system designed for small businesses, but it can also be used by individuals. It offers a range of features, including call forwarding, voicemail, and custom greetings. You can forward calls from your virtual number to your landline, allowing you to use it for Telegram verification.

RingCentral

RingCentral is another popular virtual phone system with a variety of features, including call forwarding, auto-attendant, and voicemail-to-email. You can easily set up a virtual number and forward calls to your landline, giving you the flexibility to use it for Telegram and other messaging services.

eVoice

eVoice is a virtual phone service that provides call forwarding, voicemail, and other useful features. You can select a virtual number and forward calls to your landline, making it perfect for creating a separate number for Telegram.

Please note that these services often charge a monthly fee, and the available features may vary depending on the plan you choose. Make sure to explore each provider’s offerings to find the best fit for your needs.


Important Considerations When Choosing a Virtual Number

Before you jump into getting a virtual number for Telegram, it’s essential to weigh some important factors. Here are a few considerations to keep in mind:

  • Privacy and Security: Not all virtual number providers offer the same level of privacy and security. Make sure to choose a reputable provider that values data protection and keeps your information confidential.

  • Reliability: Some virtual number services may have occasional downtimes or delays in message delivery. Look for a provider with a track record of reliability and prompt customer support.

  • Cost: With varying pricing models, virtual number services can range from free to paid. Consider your budget and whether you’re willing to pay for additional features or a more reliable service.

  • Geographical Restrictions: Some virtual number providers may not be available in your country, or Telegram may not support their numbers. Check for compatibility before committing to a service.

  • Longevity: If you plan to use your virtual number for an extended period, ensure that the provider offers a stable service and won’t suddenly shut down or deactivate your number.

Frequently Asked Questions about Virtual Numbers for Telegram

Here are some common questions and their answers related to virtual numbers and their use with Telegram:

Q1: Can I use the same virtual number for multiple Telegram accounts?

A: Generally, no. Each Telegram account requires a unique phone number for verification. Using the same virtual number for multiple accounts may lead to flagging or restricting one or both accounts.

Q2: How can I join Telegram with a fake number?

A: To join Telegram with a fake number, obtain a virtual number using one of the methods discussed in this blog post.

Then, follow the steps in the “How to Set Up Your Virtual Number on Telegram” section to create your account.

Q3: Is it safe to use a virtual number for Telegram?

A: Using a virtual number can help protect your privacy, but the safety of your information depends on the virtual number provider’s security measures.

Choose a reputable provider that prioritizes data protection to ensure the safety of your personal information.

Q4: How to get a free fake number for Telegram?

A: Some mobile apps and online services offer free virtual numbers. However, these options may not be as reliable or private as paid services.

Explore the different methods mentioned in this blog post to find a free virtual number that works for you.


[5 Ways] How To Get and Use Virtual Number For Telegram App Read More »

youtube-not-remember-where-left-off

3 Ways to Fix Youtube Not Remembering Where You Left Off

Ever find yourself asking, “Why does YouTube not resume where I left off?” or “How do you continue watching from where you left off on YouTube?

Well, you’re not alone. Many of us have experienced the frustration of losing our spot in a video and having to find it again manually.

But worry not, my friends! In this blog post, we’ll explore 7 ways to fix this issue and make sure YouTube remembers your video progress.

Fun Fact #1: Did you know that over 500 hours of video content are uploaded to YouTube every minute? That's a whole lot of videos to watch!

How to Fix Why YouTube Is Not Remembering Where You Left Off

Here are the seven (7) ways to rectify the problem.


1. Enable Watch History

First, let’s ensure your YouTube watch history is enabled. This feature allows YouTube to keep track of the videos you’ve watched and where you left off.

If it’s disabled, YouTube won’t remember your progress.

How to Enable Watch History

Follow these simple steps to enable watch history on your YouTube account:

  • Sign in to your YouTube account.
  • Click on your profile picture in the top-right corner.
  • Select “Settings” from the dropdown menu.
  • In the left sidebar, click on “Privacy.”
  • Find the “History & Privacy” section.
  • Make sure the box next to “Pause watch history” is unchecked. If it’s checked, click on it to uncheck it.
Fun Fact #2: YouTube was created by three former PayPal employees in 2005, and just a year later, Google bought it for a whopping $1.65 billion in stock.

2. Sign in to Youtube (Google) Account

Sometimes, simply signing out and signing back into your Google account can fix the issue of YouTube not remembering where you left off.

This process refreshes your account settings and can resolve any syncing issues between your account and YouTube.

Troubleshooting Google Account Issues

Follow these steps to sign out and sign back into your Google account:

  • Go to YouTube and click on your profile picture in the top-right corner.
  • Select “Sign out” from the dropdown menu.
  • Close your browser, then reopen it.
  • Go back to YouTube and click “Sign in” in the top-right corner.
  • Enter your Google account email and password, then click “Next.”

3. Use Incognito Mode

If none of the previous solutions have worked, you can try using Incognito Mode (also known as Private Browsing) in your browser. This mode disables extensions, doesn’t save browsing data, and can sometimes help with issues like YouTube not remembering where you left off.

How to Enable Incognito Mode in Different Browsers

Here’s how to enable Incognito Mode in some popular browsers:

Google Chrome:

  1. Click the three vertical dots in the top-right corner.
  2. Select “New incognito window.”

Mozilla Firefox:

  1. Click the three horizontal lines in the top-right corner.
  2. Select “New Private Window.”

Safari:

  1. Click “File” in the top-left corner.
  2. Select “New Private Window.”

Once you’re in Incognito Mode, sign in to your YouTube account and see if it remembers your video progress. Keep in mind that Incognito Mode doesn’t save your browsing history, so you’ll need to sign in to your account each time you use it.


4. Reset YouTube App on Mobile Devices

If you’re experiencing this issue on your mobile device, it’s possible that the YouTube app itself is causing the problem.

Resetting the app can help fix any glitches or bugs that might be preventing YouTube from remembering where you left off.

How to Reset the YouTube App

Here’s how to reset the YouTube app on Android and iOS devices:

Android:

  1. Go to “Settings” on your device.
  2. Scroll down and tap on “Apps” or “Applications.”
  3. Find the YouTube app in the list and tap on it.
  4. Tap on “Storage,” then click “Clear Cache” and “Clear Data.”
  5. Restart your device.

iOS:

  1. Go to “Settings” on your device.
  2. Scroll down and tap on “YouTube.”
  3. Tap “Reset App.”
  4. Restart your device.

5. Disable Browser Extensions

Browser extensions can sometimes interfere with YouTube’s ability to remember where you left off in a video. Disabling these extensions can help identify if they are causing the problem.

Guide to Disabling Extensions on Popular Browsers

Here’s how to disable extensions on some common browsers:

Google Chrome:

  1. Click the three vertical dots in the top-right corner.
  2. Go to “More tools” and select “Extensions.”
  3. Toggle off the extensions one by one to see if any of them are causing the issue.

Mozilla Firefox:

  1. Click the three horizontal lines in the top-right corner.
  2. Select “Add-ons” and then click “Extensions.”
  3. Click the blue toggle switch next to each extension to disable them one by one.

Safari:

  1. Click “Safari” in the top-left corner.
  2. Select “Preferences.”
  3. Go to the “Extensions” tab.
  4. Uncheck the box next to each extension to disable them individually.

6. Clear Browser Cache and Cookies

Sometimes, the culprit behind YouTube not remembering where you left off could be your browser’s cache and cookies.

These temporary files can cause issues with YouTube’s functionality, so clearing them might just do the trick!

Steps to Clear Browser Cache and Cookies

Here’s how you can clear your browser’s cache and cookies on some popular browsers:

Google Chrome:

  • Click the three vertical dots in the top-right corner.
  • Go to “More tools” and select “Clear browsing data.”
  • Choose a time range, or select “All time” to clear everything.
  • Check the boxes for “Cookies and other site data” and “Cached images and files.”
  • Click “Clear data.”

Mozilla Firefox:

  • Click the three horizontal lines in the top-right corner.
  • Select “Options.”
  • Go to the “Privacy & Security” tab.
  • Scroll down to the “Cookies and Site Data” section.
  • Click “Clear Data.”
  • Check the boxes for “Cookies and Site Data” and “Cached Web Content.”
  • Click “Clear.”

Safari:

  • Click “Safari” in the top-left corner.
  • Select “Preferences.”
  • Go to the “Privacy” tab.
  • Click “Manage Website Data.”
  • Click “Remove All” and confirm.

After clearing your cache and cookies, restart your browser and try watching a YouTube video to see if it now remembers where you left off. If not, let’s move on to the next solution.


7. Update Your Browser

An outdated browser might be causing YouTube to forget your video progress. Keeping your browser up-to-date ensures compatibility with the latest features and security updates, which can help resolve issues like this.

How to Update Different Browsers

Here’s a quick guide on updating some of the most popular browsers:

Google Chrome:

  1. Click the three vertical dots in the top-right corner.
  2. Hover over “Help” and click on “About Google Chrome.”
  3. Chrome will automatically check for updates and install them if available.
  4. Restart your browser if prompted.

Mozilla Firefox:

  1. Click the three horizontal lines in the top-right corner.
  2. Select “Help” and click on “About Firefox.”
  3. Firefox will automatically check for updates and install them if available.
  4. Restart your browser if prompted.

Safari (macOS):

  1. Click the Apple logo in the top-left corner.
  2. Select “App Store.”
  3. Click “Updates” in the left sidebar.
  4. If a Safari update is available, click “Update” to install it.

3 Ways to Fix Youtube Not Remembering Where You Left Off Read More »

netflix-cannot-install-found-in-play-store

5 Ways to Fix Netflix [This app won’t work for your device]

Are you a movie and TV show enthusiast eager to binge-watch your favorite series on Netflix but can’t seem to find the app on the Play Store?

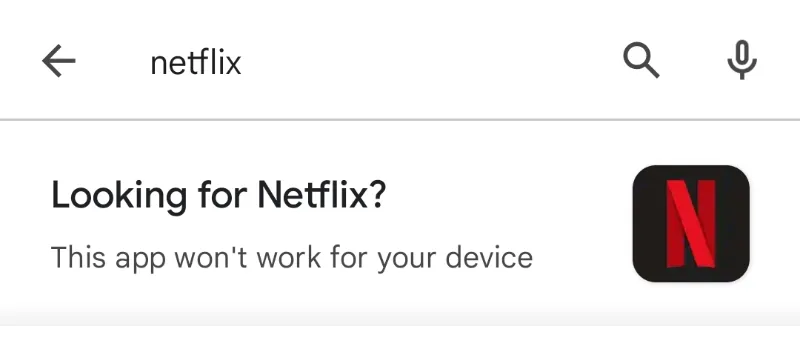
You encounter an error message in Play Store: “This app won’t work for your device.”

Fret not; you’re not alone! Sometimes, the Netflix app can be a bit elusive in the Google Play Store, making it difficult to install and enjoy its wide range of content.

In this blog post, we’ll dive into five effective ways to fix the issue of Netflix not being found or installed on the Play Store.

By following these simple steps, you’ll be ready to kick back and dive into your favorite shows in no time. So, grab your popcorn, and let’s get started!

How to Fix NetFlix Error Message “This app won’t work for your device’

Here are the five (5) methods you can try to resolve the problem.


Method 1. Install the Netflix APK file

This is the fastest and more effective method here.

Sometimes, when the Netflix app is unavailable on the Play Store, or you’re facing issues with the app, you might consider installing the Netflix APK file from a legitimate and trustworthy third-party website like APKPure.com.

An APK (Android Package Kit) is a file format allowing you to install apps on Android devices manually.

Here’s how to safely install the Netflix APK from APKPure.com:

  • Go to the APKPure site and search for Netflix.
  • Download the APK file: On the Netflix app page, tap the “Download APK” button. The APK file will be downloaded to your device.
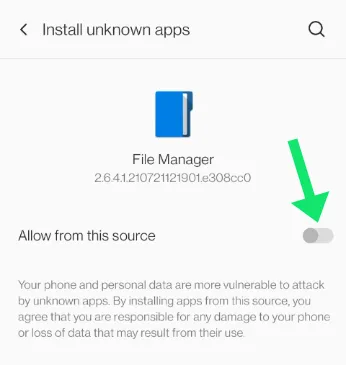
  • Install the APK file: Follow the on-screen instructions. During installation, you may encounter a message asking you to allow the installation of unknown apps from this source.

Allow it by toggling ON. As long as an app is outside the Google Play Store, Android will, by default, block it from installation until you allow it.

netflix-allow-install-unknown-apps-android
  • Complete the Installation: Tap “Install” and wait for the installation to complete. Once the installation is finished, you can launch the Netflix app and sign in with your Netflix account.

Method 2. Check Your Device’s Compatibility

One of the primary reasons you might encounter the error message is due to device compatibility issues.

Netflix aims to be accessible on a wide range of devices, but sometimes specific devices or older models might not be fully supported. Here’s how to check if your device is compatible with the Netflix app:

  • Visit the Netflix Help Center: Open your device’s web browser and go to the Netflix Help Center at help.netflix.com. This official support site for Netflix users provides valuable information about device compatibility and app requirements.

  • Search for supported devices: In the Help Center’s homepage search bar, type “supported devices” or “device compatibility” and hit enter.

  • Review the list of supported devices: You’ll see a list of articles related to device compatibility. Click on the one that corresponds to your device type (e.g., Android, iOS, Smart TV, etc.) and carefully review the list of supported devices and their requirements.

  • Compare your device’s specifications: Check your device’s specifications, such as the operating system version, processor, and available storage, to see if it meets the requirements specified by Netflix. You can usually find this information in your device’s “Settings” app under “About device” or “About phone.”

If your device is not on the list of supported devices or doesn’t meet the requirements, you may need to consider upgrading to a compatible device or exploring alternative streaming platforms.

If your device is compatible but still encountering issues, try the other methods mentioned in this blog post to resolve the problem.


Method 3. Use Netflix’s Official Website for Installation

You can try installing it directly from Netflix’s official website. This method ensures that you’re getting the official app from a trusted source.

Here’s how to install the Netflix app from their website:

  • Allow installation from unknown sources: First, you need to allow your Android device to install apps from unknown sources. Go to your device’s “Settings” app, tap “Security” or “Apps & notifications,” and enable the “Unknown sources” or “Install unknown apps” option.

Please note that this step is not required for iOS devices, as this method only applies to Android devices.

  • Visit Netflix’s official website: Open your device’s web browser and go to www.netflix.com.
  • Sign in to your Netflix account: Click or tap the “Sign In” button at the top-right corner of the page and enter your Netflix account credentials.

  • Access the download page: Once you’ve signed in, scroll down to the bottom of the page and click or tap on “Get the App” or “Download Netflix App” under the “Download” section.

  • Download the Netflix app: You’ll be redirected to a page with a download link for the Netflix app. Click or tap on the “Download Now” button to download the app.

  • Install the app: Once the download is complete for Android devices, locate the downloaded APK file in your device’s “Downloads” folder or the folder where your downloaded files are stored. Tap the APK file to begin the installation process. For iOS devices, you will be redirected to the App Store to download and install the app.

  • Launch Netflix: After the installation is complete, open the Netflix app, sign in with your Netflix account, and start streaming your favorite shows and movies.

By following these steps, you can install the Netflix app directly from their official website and bypass any issues you may have encountered with the Play Store.


Method 4. Clear Google Play Store Cache and Data

Clearing the cache and data of the Google Play Store can help resolve various issues, including app installation and visibility issues, like the inability to find the Netflix app.

Doing this gives the Play Store a fresh start, as it can help remove temporary files and corrupted data and resolve glitches. Here’s how to clear the cache and data for the Google Play Store:

  • Open your device’s Settings app: Tap on the “Settings” app on your device’s home screen or app drawer to access the settings menu.

  • Navigate to the Apps section: Scroll down and tap on “Apps,” “Applications,” or “Application Manager,” depending on your device’s settings menu. This will display a list of all the apps installed on your device.

  • Locate the Google Play Store app: Scroll through the list of apps to find the “Google Play Store” app and tap on it to access its settings.

  • Access storage settings: In the app’s settings menu, tap on “Storage” or “Storage & cache” to view the options for managing the app’s storage.

  • Clear cache and data: Tap on “Clear Cache” and “Clear Data” (or “Clear Storage,” depending on your device) to remove the temporary files and data associated with the Google Play Store app. A warning prompt may appear, asking you to confirm the action. Tap “OK” or “Yes” to proceed.

Please note that clearing the app data may require you to sign in to your Google account again in the Play Store app.

After clearing the cache and data, open the Google Play Store app and try searching for the Netflix app again. If the issue persists, consider trying the other solutions mentioned in this blog post.


Method 5. Update Your Device’s Software

Outdated software on your device can lead to compatibility issues with the Netflix app.

Regularly updating your device’s software ensures that you have the latest features, bug fixes, and security patches, which can help resolve app-related issues. Here’s how to update your device’s software:

For Android devices:

  • Open the “Settings” app on your device.
  • Scroll down and tap “System” or “Software update.”
  • Tap “Check for updates” or “Update.” If an update is available, your device will display the details.
  • Tap “Download” or “Install now” to start the update process. Make sure your device is connected to Wi-Fi and has sufficient battery life to complete the update.

For iOS devices:

  • Open the “Settings” app on your device.
  • Tap “General” and then “Software Update.”
  • If an update is available, tap “Download and Install.” Make sure your device is connected to Wi-Fi and has enough battery life to complete the update.

Conclusion

Dealing with Netflix installation issues can be frustrating, but with the tips and solutions provided in this blog post, you’re now better equipped to resolve any problems and get back to enjoying your favorite shows and movies.

If you’ve tried all the mentioned solutions but are still unable to install or use the Netflix app, it’s time to reach out to Netflix Support.

The support team can help diagnose and resolve any issues that may be specific to your device or account. Here’s how to contact Netflix Support:

  • Visit Netflix Help Center: Open your device’s web browser and go to the Netflix Help Center at help.netflix.com. This is the official support site for Netflix users, offering a wealth of information and assistance.
  • Search for your issue: In the search bar on the Help Center’s homepage, type in keywords related to your issue (e.g., “installation problem,” “error message,” etc.) and hit enter. Browse the search results to see if a relevant article can help you resolve your issue.
  • Access the Contact Us section: If you’re unable to find a solution in the Help Center articles, scroll down to the bottom of the page and click or tap on “Contact Us” or “Call or Chat” under the “Need Help?” section.
  • Choose a support method: You’ll be presented with several contact options, including Live Chat and Phone support. Choose the method that best suits your needs and preferences.
  • Provide necessary information: When you connect with a Netflix Support representative, be prepared to provide your account details, a description of your issue, and any troubleshooting steps you’ve already taken. This will help the support team diagnose and resolve your issue more effectively.
  • Follow instructions: The Netflix Support representative will guide you through any additional troubleshooting steps and provide you with a solution or escalate your issue to the appropriate department if necessary.

By contacting Netflix Support, you can get personalized assistance for your specific issue and ensure a smooth streaming experience with the Netflix app.

Remember, the support team is there to help, so don’t hesitate to reach out if you need assistance.


5 Ways to Fix Netflix [This app won’t work for your device] Read More »

vpn-over-tor

7 Reasons Why You Shouldn’t Use A VPN With Tor [Explained]

You might have heard about combining VPNs with Tor for an extra layer of security and anonymity. But is it really a good idea?

Today, we’re exploring 7 reasons why you shouldn’t use a VPN with Tor.

By the end of this post, you’ll clearly understand the potential issues and better alternatives to protect your privacy online.

But before diving into the reasons, let’s have a quick refresher on VPNs and Tor. VPNs (Virtual Private Networks) encrypt your internet traffic and mask your IP address, making it harder for snoopers to track you online.

On the other hand, Tor (The Onion Router) is a network of volunteer-operated servers that helps you browse the internet anonymously by bouncing your connection through multiple nodes.

Sounds like a perfect match, right? Well, not so fast!

Let’s see why using a VPN with Tor might not be the best idea after all.

Fun Fact: Did you know Tor was originally developed by the US Navy for protecting government communications? Now, it’s available for everyone to use!

Why You Should Not Use A VPN With Tor Browser

Here are the seven (7) reasons not to do so.


Reason 1: Compromised Anonymity

Another reason to be cautious about using a VPN with Tor is that it can potentially compromise your anonymity.

While both VPNs and Tor are designed to protect your privacy, combining them might not offer the level of anonymity you’d expect.

When you use Tor through a VPN (Tor over VPN), your VPN provider can see that you’re connecting to the Tor network.

This information, coupled with your real IP address, can be used to identify if the VPN provider is compelled to share its logs with authorities or if the provider itself is compromised.

On the other hand, using a VPN through Tor (VPN over Tor) can expose your real IP address to the VPN provider if there’s a leak. The last Tor exit node can also see your connection to the VPN server.

In either case, the added layer of security you’d expect by combining a VPN with Tor might not be as bulletproof as it seems.

Instead of enhancing your anonymity, it could actually put you at greater risk. As they say, “two heads are better than one,” but in this case, maybe not!


Reason 2: VPN Logging Policies

Using a VPN with Tor can also be problematic due to VPN logging policies. Even though many VPN providers claim to have a strict “no-logs” policy, some may still keep logs of your activity.

In the event of a data breach or law enforcement request, these logs can be used to trace your online activities back to you.

When you use Tor without a VPN, your internet traffic is less likely to be tracked, as the Tor network is designed to keep your browsing activity anonymous.

However, when you add a VPN into the mix, you’re placing your trust in the VPN provider to keep your data secure and private.

As you can see, it’s essential to consider the VPN provider’s logging policies and history before deciding to use a VPN with Tor. In some cases, using Tor alone might be a safer option for preserving your privacy.

So, should you use Tor without a VPN? It depends on your specific needs and the level of trust you have in your VPN provider. Remember, when it comes to privacy, trust is key.


Reason 3: Tor Over VPN vs. VPN Over Tor

Confused about whether you should use Tor through VPN or VPN through Tor? Well, this can be a tricky decision. Each method has its pros and cons, but neither is perfect when it comes to preserving your privacy.

With Tor over VPN, you first connect to a VPN server and then access the Tor network. This setup hides your Tor usage from your ISP but exposes your connection to the VPN provider.

Moreover, the VPN provider can see your real IP address and the fact that you’re using Tor.

On the flip side, VPN over Tor involves connecting to the Tor network first and then to a VPN server.

While this method hides your VPN usage from your ISP and makes it difficult for websites to block Tor users, it has its drawbacks.

The last Tor exit node can see your connection to the VPN server; your real IP address could be exposed if there’s a leak.

Ultimately, deciding between Tor over VPN or VPN over Tor depends on your priorities and threat model.

However, using a VPN with Tor may not offer the level of anonymity and privacy you’re looking for. Sometimes, simpler is better.


Reason 4: Potential Security Vulnerabilities

Another reason to be cautious about using a VPN with Tor is the possibility of security vulnerabilities. While both VPNs and Tor are generally considered secure, combining them can introduce new risks.

For instance, some VPNs may have weak encryption or be vulnerable to DNS leaks. These issues can compromise your privacy and defeat the purpose of using a VPN with Tor in the first place.

Additionally, Tor exit nodes can be operated by malicious actors who may attempt to intercept and analyze your traffic.

Moreover, using a VPN can create a single point of failure in your security setup. If the VPN provider gets hacked or its servers are seized, your privacy could be at risk. In contrast, Tor’s decentralized nature makes it more resilient to such attacks.

In short, combining a VPN with Tor might seem like a good idea on paper, but it can introduce new security risks that could leave your data exposed.


Reason 5: Slower Connection Speeds

One of the main reasons you might want to avoid using a VPN with Tor is the slower connection speeds.

When you use Tor, your data gets routed through multiple nodes, which already impacts your browsing speed. Adding a VPN to the mix only makes it worse.

VPNs can slow down your internet connection due to encryption and the distance between you and the VPN server.

Combining Tor with a VPN means you’re subjecting your data to two layers of encryption and routing, which can cause a significant decrease in performance.

Imagine it like this: You’re trying to get from point A to point B, but instead of taking a direct route, you have to pass through several checkpoints (Tor nodes) and detours (VPN servers). That’s bound to take longer, right?

So, if you’re looking for a smooth and speedy browsing experience, using a VPN with Tor might not be the best option.

Fun Fact: The name “Onion Router” comes from the layered encryption used by Tor, resembling the layers of an onion!


Reason 6: Legal Concerns and Jurisdiction

When considering using a VPN with Tor, you should also be aware of legal concerns and jurisdiction. While Tor and VPNs are legal in most countries, some have restrictions or outright bans on these technologies.

For instance, countries with strict internet censorship, like China, have made it illegal to use VPNs without government approval.

In such cases, using a VPN with Tor could draw unwanted attention and lead to potential legal consequences. Check out this post on how to bypass China’s firewall using a VPN for more information.

Furthermore, VPN providers may be subject to the laws and regulations of their country.

This means that if a VPN provider is based in a country with mandatory data retention laws or a history of surveillance, your privacy could be at risk.

When choosing a VPN, it’s crucial to research the provider’s jurisdiction and its implications for your privacy. For a comparison of VPN providers, you can read our post on Private Internet Access vs. Hide.me.


Reason 7: Trustworthy Alternatives

Finally, it’s worth noting that there are trustworthy alternatives to using a VPN with Tor.

If you’re looking for enhanced privacy and security, consider exploring other options without the potential issues we’ve discussed.

For instance, you could use the Tor Browser Bundle, which is specifically designed for secure and anonymous browsing.

The Tor Browser Bundle comes with built-in privacy features, such as HTTPS Everywhere and NoScript, to help protect your data and maintain your anonymity online.

Another option is to use privacy-focused search engines like DuckDuckGo, which don’t track your search history or collect your personal data.

Additionally, you can explore other privacy tools and encryption methods to help protect your data online.

While using a VPN with Tor might seem like a great way to boost your privacy and security, it’s not without its drawbacks.

Weighing the pros and cons of this setup, it’s worth considering alternatives that better suit your needs and provide a more reliable layer of protection.


Conclusion

Now that we’ve explored why you shouldn’t use a VPN with Tor, it’s essential to evaluate your privacy needs and choose the right tools accordingly.

While combining a VPN with Tor may not be the best solution for everyone, understanding the potential risks and alternatives can help you make an informed decision about how to protect your privacy online.


7 Reasons Why You Shouldn’t Use A VPN With Tor [Explained] Read More »

orion-web-browser-privacy

A Comprehensive Guide to Orion Web Browser Privacy Features

Have you ever found yourself asking, “Is the Orion browser private?” or “Is the Orion browser any good?

If so, you’re in the right place! In today’s digital world, privacy is more important than ever, and we’re all on the hunt for a browser that keeps our data safe and secure.

That’s why I’ve decided to dive deep into the world of Orion browser privacy to help you determine if it’s the right choice. So grab a cup of coffee, and let’s get started!

Why is Privacy Important in Today’s Digital World?

Privacy has become a hot topic these days and for good reason! With data breaches, cyberattacks, and intrusive ads following us around the internet, it’s no wonder we’re all a little paranoid.

But why is privacy so important, you ask?

Well, for starters, our personal information is valuable, not just to us but also to businesses and hackers alike.

Companies can use our data to target ads and develop products, while cybercriminals can use it for identity theft or other nefarious purposes.

As a result, maintaining privacy helps protect us from these threats and keeps our online experience more enjoyable.


Orion Browser: A Brief Overview

Before we dive into Orion browser privacy, let’s get acquainted with the browser itself.

Orion is a relatively new player in the world of internet browsing, but it’s already gaining attention for its commitment to user privacy and security.

What Sets Orion Apart from Other Browsers?

Orion’s main selling point is its focus on protecting user privacy without sacrificing performance. The developers behind the browser have gone the extra mile to ensure your data stays safe while surfing the web.

Plus, it’s lightweight and fast, which means you won’t have to trade speed for security.


Orion Browser’s Privacy Features

If you’re wondering, “Is Orion browser safe?” the answer lies in its impressive lineup of privacy features. Let’s dive into what makes Orion stand out in the privacy department:

1. Enhanced Tracking Protection

Orion’s built-in tracking protection blocks third-party trackers by default, ensuring that websites can’t follow you around the internet and collect your data without your consent.

2. Privacy-focused Search Engine

By default, Orion uses a privacy-focused search engine that doesn’t log your search queries or track your online activities. This helps keep your search history private and prevents targeted ads.

3. Private Browsing Mode

Orion’s private browsing mode (aka “incognito mode”) ensures that your browsing history, cookies, and site data are not saved, offering an additional layer of privacy.

4. Cookie Management

Orion allows you to manage cookies more effectively, giving you the option to block third-party cookies or even delete cookies when you close the browser.

5. Ad Blocker

The browser comes with a built-in ad blocker, which prevents annoying ads from disrupting your browsing experience and helps protect your privacy by reducing the chance of ad trackers collecting your data.

6. Fingerprinting Protection

Fingerprinting is a sneaky tracking technique that uses your device’s unique characteristics to identify you. Orion’s fingerprinting protection ensures that websites can’t use this method to track you.

With these features in mind, it’s clear that Orion takes privacy seriously. But how can you make the most of these tools? Let’s discuss some tips for maximizing your privacy while using Orion.


How to Maximize Your Privacy on Orion Browser

Now that we’ve explored Orion browser’s privacy features, let’s talk about how you can use them to their full potential and keep your online activities as private as possible.

Customize Privacy Settings

Orion offers several customization options in its privacy settings.

Make sure to explore these options and tailor them to your specific needs, such as enabling or disabling certain features or choosing how aggressively the browser should block trackers.

Use a VPN or Proxy

While Orion does a great job protecting your privacy, using a VPN or proxy can add an extra layer of protection.

These tools help hide your IP address, encrypt your internet traffic, and make it even harder for websites and third parties to track you.

Keep Your Browser Updated

Orion’s developers are constantly working on improvements and security patches. Make sure you’re using the latest version of the browser to benefit from the most up-to-date privacy features and fixes.


Comparing Orion Browser to Other Privacy-focused Browsers

In the quest for privacy, it’s always good to know your options. So, let’s see how Orion stacks up against some of the other popular privacy-focused browsers out there:

Brave Browser

Brave is well-known for its emphasis on privacy and security. Like Orion, it features a built-in ad blocker, tracking protection, and fingerprinting protection.

However, Brave also rewards users with its native cryptocurrency (BAT) for viewing privacy-respecting ads. Orion doesn’t offer a similar rewards system, but both browsers provide a solid foundation for privacy-conscious users.

Tor Browser

Tor Browser is famous for its ability to access the dark web and its focus on anonymity. While Orion offers strong privacy features, it doesn’t provide the same level of anonymity as Tor.

If you’re looking for total anonymity, Tor might be the better option, but keep in mind that it can be slower and less user-friendly than Orion.

DuckDuckGo Privacy Browser

DuckDuckGo, known for its privacy-focused search engine, also offers a mobile browser with robust privacy features.

While Orion and DuckDuckGo share many similarities, such as tracker blocking and private search, DuckDuckGo’s browser is currently available only for mobile devices.

Orion will be a better choice if you need a privacy-focused browser for your desktop.


Conclusion: Is Orion the Right Browser for Your Privacy Needs?

When it comes to privacy, the Orion browser definitely has a lot to offer.

With features like enhanced tracking protection, a privacy-focused search engine, and fingerprinting protection, it provides a secure browsing experience that rivals many of its competitors.

Ultimately, deciding whether Orion is the right browser for you depends on your specific needs and preferences. If you’re looking for a fast, user-friendly browser with strong privacy features, then Orion is worth a try.

However, if you need complete anonymity or are interested in earning rewards for viewing ads, you might want to explore other options like Tor or Brave.

In any case, it’s crucial to prioritize your online privacy and choose a browser that aligns with your values.

After all, as the saying goes, “On the internet, nobody knows you’re a dog” – and with the right browser, you can keep it that way!

So, what do you think? Is the Orion browser any good for your privacy needs? Give it a spin and find out for yourself!


A Comprehensive Guide to Orion Web Browser Privacy Features Read More »

orion-browser-vs-chrome

7 Differences Between Orion Browser and Chrome Web Browser

Today, we’re diving into the world of web browsers and exploring the differences between Orion and Google Chrome.

Now, you might be thinking, “Why should I even care about a new browser when Chrome has been my go-to for years?”

Well, stick around, and I’ll show you why Orion is making waves and how it stacks up against the tried-and-true Google Chrome.

Fun Fact #1: Orion browser is so lightweight that it can even run smoothly on older computers or devices with limited hardware capabilities, giving them a new lease on life!

Orion Browser vs. Chrome Web Browser

Here are the seven (7) differences between the two.


1. Privacy and Security

Orion’s Focus on Privacy

Orion is making a splash in the browser world with its strong emphasis on privacy. Unlike some other browsers, Orion doesn’t track your browsing habits or sell your data to advertisers.

In fact, it even includes a built-in ad blocker and tracker blocker to keep those pesky ads and sneaky trackers at bay.

With Orion, you can browse the web with confidence, knowing that your personal information stays private.

Google Chrome’s Data Collection

While Google Chrome is known for its convenience and seamless integration with other Google services, it’s no secret that it collects a lot of data about your browsing habits.

This data is used to personalize your online experience, but it also means that your information might be shared with third parties for targeted advertising.

If privacy is a top concern for you, this is one area where Orion might have the edge.


2. Performance and Speed

Orion’s Lightweight Design

Orion is all about speed and efficiency. Its lightweight design means it uses fewer system resources, resulting in faster page load times and a smoother browsing experience.

Orion’s creators’ prioritized performance optimization, so you’ll definitely notice the difference when you’re zipping around the web like a superhero!

Google Chrome’s Resource Usage

Google Chrome is known for its speed, but it can also be quite the resource hog. As we all know, having lots of tabs open in Chrome can sometimes slow down your computer or even cause it to crash.

This is because Chrome uses a separate process for each tab, which can eat up your computer’s memory and processing power.


3. Customization and Extensions

Orion’s Personalization Options

One of the cool things about Orion is its customization options. You can tweak the appearance and functionality to your heart’s content, making it truly feel like your browser.

Orion offers a wide range of themes, color schemes, and various layout options to help you create the perfect browsing experience. Who doesn’t love a little personal touch?

Google Chrome’s Extension Ecosystem

When it comes to extensions, Google Chrome is the king of the hill. With a massive library of extensions available in the Chrome Web Store, you can find tools to do just about anything – from productivity boosters to fun little games.

Chrome’s robust extension ecosystem is one of its most attractive features and a significant reason for its popularity.

Fun Fact #2: The first extension for Google Chrome was called "Google Mail Checker," an extension showing the number of unread emails in your Gmail account. Talk about a trip down memory lane!

4. Built-in Features

Orion’s Unique Tools

Orion comes with some nifty built-in features that make it stand out from the crowd. One such feature is the “Sidebar,” which provides quick access to your bookmarks, history, and downloads.

It’s super convenient and keeps everything you need within easy reach. Orion’s split-screen mode lets you view two websites side by side, perfect for multitaskers and researchers alike.

Google Chrome’s Standard Features

Google Chrome offers a solid set of built-in features, like syncing your bookmarks and browsing history across devices, autofill for passwords and forms, and the ability to cast content to a compatible device.

While these features might not be as unique as Orion’s, they’re still incredibly useful for everyday browsing.


5. Cross-Platform Availability

Orion’s Platform Support

Orion is designed to be accessible to as many users as possible, which is why it’s available on various platforms, including Windows, macOS, Linux, and even mobile devices like iOS and Android.

This means you can enjoy the same Orion experience across all your devices, making it super convenient and user-friendly.

Google Chrome’s Widespread Compatibility

One of the reasons for Google Chrome’s popularity is its widespread compatibility across different platforms. Just like Orion, Chrome is available on Windows, macOS, Linux, iOS, and Android.

Google’s commitment to keeping Chrome up-to-date ensures that it remains compatible with the ever-evolving tech landscape.


6. User Interface and Design

Orion’s Clean and Intuitive Layout

One of the first things you’ll notice about Orion is its clean and intuitive user interface. The designers really put thought into making it easy to navigate, with a streamlined layout and minimal distractions.

Orion’s design focuses on providing a clutter-free browsing experience, which is something many users appreciate.

Google Chrome’s Familiar Look

Google Chrome’s interface is familiar to millions of users around the world, and there’s something to be said for sticking with what works.

Chrome’s design is simple and user-friendly, with a minimalist approach that keeps things uncomplicated. It’s easy to see why so many people find Chrome’s design appealing and easy to use.

Fun Fact #3: Orion includes a built-in note-taking feature, making it easy to jot down ideas or save snippets of text without leaving the browser. Say goodbye to switching between apps!

7. Search Functionality

Orion’s Enhanced Search Capabilities

Orion takes search functionality to the next level with its enhanced search features. The browser’s smart search suggestions help you quickly find what you’re looking for by providing relevant suggestions as you type.

Plus, Orion’s search engine integration allows you to choose from multiple search engines, giving you the freedom to use the one that best suits your needs.

Google Chrome’s Default Search Features

Google Chrome’s search functionality is pretty straightforward, but that’s not necessarily bad. By default, Chrome uses Google as its search engine (no surprise there!), providing you with fast and accurate search results.

While Chrome’s search features might not be as advanced as Orion’s, they still get the job done.


Conclusion

So there you have it, folks! We’ve explored the differences between Orion and Google Chrome, covering everything from privacy and security to design and search functionality.

While Google Chrome remains the market leader and a popular choice for many, Orion’s focus on privacy, lightweight design, and unique features make it a strong contender in the web browser arena.

Ultimately, the choice between Orion and Google Chrome comes down to your personal preferences and priorities.

If privacy, customization, and a clutter-free interface are high on your list, you might want to give Orion a try.

On the other hand, if you value Google’s extensive ecosystem, Chrome’s tried-and-tested features, and a familiar interface, then Chrome might be the better fit for you.


7 Differences Between Orion Browser and Chrome Web Browser Read More »

hromium-web-browser-pros-and-cons

7 Advantages & 7 Disadvantages of Using the Chromium Browser

Choosing the right web browser is crucial in today’s digital world. With a plethora of options available, it’s essential to weigh the pros and cons before making a decision.

One browser that’s been gaining popularity is the Chromium browser. But is Chromium a good or bad browser?

In this blog post, we’ll dive into the 7 advantages and disadvantages of Chromium to help you make an informed choice. So, buckle up, and let’s get started!

Fun fact #1: Chromium is the open-source project that serves as the foundation for Google Chrome, Microsoft Edge, and many other browsers!

What is Chromium Browser?

Chromium is an open-source web browser project initiated by Google. It serves as the base for many popular browsers, including Google Chrome, Microsoft Edge, and Opera.

As an open-source project, Chromium allows developers from around the world to contribute, making it a constantly evolving and improving platform.

The browser is known for its focus on simplicity, speed, and security, but it’s not without its drawbacks.

So, what are the advantages and disadvantages of Chromium? Let’s explore them in the following sections.

Fun fact #2: Chromium was first released in 2008, and since then, it has become the backbone for more than just browsers – it powers a variety of applications and even operating systems like Chrome OS!


Advantages of Chromium Browser

There are several advantages to using Chromium as your web browser, which we’ll explore in detail below.

1. Open Source Nature

Chromium’s open-source nature allows developers to access its source code, modify it, and even create their own browsers based on the platform. This enables a wealth of innovation and collaboration, leading to a better and more versatile browser experience.

2. Regular Updates

The Chromium project is continuously updated by its community of developers, ensuring that it stays current with the latest web technologies, security fixes, and performance improvements.

3. Customizability

Chromium allows users to customize their browsing experience with various themes, extensions, and settings. This flexibility enables you to tailor the browser to your specific needs and preferences.

4. Enhanced Security

Chromium is known for its strong focus on security, with features like sandboxing and regular security updates. These measures help protect users from online threats, making it a safe choice for browsing the web.

5. Faster Performance

Chromium is built for speed, offering faster page load times and a more responsive browsing experience compared to some other browsers.

6. Wide Range of Extensions

As the foundation for browsers like Chrome, Chromium supports a vast array of extensions and add-ons, allowing you to further enhance your browsing experience with additional features and functionalities.

7. Developer Friendly

Chromium is a popular choice among developers due to its open-source nature, extensive documentation, and developer tools. These features make it an ideal platform for web development and testing.


Disadvantages of Chromium Browser

Despite its numerous advantages, there are also some downsides of Chromium to consider before choosing it as your primary web browser.

1. Lack of Official Support

Since Chromium is an open-source project, it doesn’t have the same official support and resources as other browsers, like Google Chrome or Microsoft Edge.

This means that users may need to rely on community forums and online resources for help with issues they encounter.

2. Privacy Concerns

Although Chromium offers better privacy than Chrome, some users still have concerns about its association with Google and potential data collection practices.

These concerns may lead privacy-conscious users to choose alternative browsers.

3. Incompatibility with Proprietary Media Formats

Chromium lacks support for certain proprietary media formats, such as H.264 video or MP3 audio, which can limit its compatibility with some websites and online content.

4. Higher System Requirements

Chromium is known to be resource-intensive, often requiring more RAM and CPU usage than some other browsers. This can lead to slower performance on older or less powerful devices.

5. No Automatic Updates

Unlike Google Chrome, Chromium does not have an automatic update feature.

This means users must manually update the browser, which can be a hassle and may lead to missed security patches or performance improvements.

6. Potential Instability

As an open-source project with frequent updates, Chromium can sometimes experience instability or compatibility issues with certain extensions or websites.

This can result in a less reliable browsing experience for some users.

7. Limited User Interface Customization

While Chromium offers some customization options, its user interface is relatively basic and lacks some of the polish and features found in other browsers.


Conclusion

In summary, the Chromium browser comes with its fair share of advantages and disadvantages.

Its open-source nature, customizability, enhanced security, and wide range of extensions make it an appealing choice for many users.

However, the lack of official support, privacy concerns, and potential instability might deter others from choosing Chromium as their go-to browser.

Ultimately, whether Chromium is a good or bad browser depends on your specific needs and preferences.

By weighing the pros and cons outlined in this blog post, you can make a more informed decision about whether Chromium is the right browser for you.


7 Advantages & 7 Disadvantages of Using the Chromium Browser Read More »

how-to-print-signal-chat-message

3 Ways To Print Chat Messages From The Signal App [Guide]

If you’ve ever wondered, “How to print Signal messages?” or “Can I print a Signal conversation?” then you’re in the right place!

Whether you want to preserve memories, keep a record of important information, or have a physical copy of your chat history, printing your messages from the Signal app is a great idea.

Before diving into the different methods, let’s quickly review what the Signal app is all about.

Signal is a highly secure, encrypted messaging app that allows users to send text messages, photos, and videos. It’s become increasingly popular due to its focus on privacy and security.

Let’s dive into the various ways you can print your chat messages from the Signal app. We’ll explore methods involving exporting and non-exporting techniques, so you can choose the one that suits your needs best.

How to Print Signal Messages?

Here are the three (3) methods to do so.


Method 1: Exporting chat messages and printing

If you’re curious about “How do I export chat from the Signal app?” this method is for you! Exporting chat messages is one of the most straightforward ways to print your Signal conversations.

Here’s a step-by-step guide to help you:

Step-by-step guide to exporting chats

  1. Open the Signal app on your device.
  2. Tap on the conversation you want to export.
  3. In the top-right corner, tap on the three-dot menu icon.
  4. Select “Export chat” from the menu.
  5. Choose a location on your device to save the exported file.

How to open the exported file

The exported chat will be saved as a .txt file. You can open it using any text editor or word processing software, like Notepad or Microsoft Word.

Printing the chat messages

  1. Open the exported .txt file in the text editor or word processor.
  2. Press “Ctrl + P” (Windows) or “Cmd + P” (Mac) to open the print dialog box.
  3. Select your printer and configure your print settings.
  4. Click “Print” to print your chat messages.

Method 2: Taking screenshots and printing

If exporting isn’t your preferred method, or you need to print a few specific messages, taking screenshots is another option.

This method works well for shorter conversations or when you want to print a single message.

How to take screenshots on different devices:

  • On iPhones: Press the Side button and the Volume Up button at the same time.
  • On Android devices: Press the Power and Volume Down buttons simultaneously.
  • On Windows: Press the “PrtScn” key or use the “Snipping Tool.”
  • On Mac: Press “Shift + Cmd + 4” and drag the crosshair to select the area you want to capture.

Organizing the screenshots

Save your screenshots in a folder on your computer or device. Rename them to maintain chronological order, making it easier to follow the conversation when you print.

Printing the screenshots

  1. Open the folder containing your screenshots.
  2. Select all the images you want to print (use “Ctrl + Click” or “Cmd + Click” to select multiple files).
  3. Right-click on the selected images and choose “Print.”
  4. Select your printer in the print dialog box and configure the print settings.
  5. Click “Print” to print your chat messages as images.

Using screenshots is a flexible way to print specific parts of your Signal conversation, but it may require more manual effort if you’re dealing with a long chat.


Method 3: Copying and pasting chat messages into a document

If you’re looking for a method that allows you to format and organize your chat messages before printing, copying and pasting them into a document is a fantastic option. Here’s how:

How to copy and paste messages on different devices:

  • On mobile devices (iOS and Android): Press and hold the message you want to copy, then tap “Copy” in the pop-up menu.
  • On desktop (Windows and Mac): Click and drag to select the text you want to copy, then press “Ctrl + C” (Windows) or “Cmd + C” (Mac) to copy the text.

Formatting the chat messages in a document:

  1. Open your preferred word processing software, like Microsoft Word or Google Docs.
  2. Create a new document and paste the copied chat messages using “Ctrl + V” (Windows) or “Cmd + V” (Mac).
  3. Format the text as desired by adding dates and labels or separating different chat messages with line breaks.
  4. Save the document once you’ve finished formatting.

Printing the document:

  1. Open the document containing your chat messages.
  2. Press “Ctrl + P” (Windows) or “Cmd + P” (Mac) to open the print dialog box.
  3. Select your printer and configure the print settings.
  4. Click “Print” to print your chat messages.

This method is excellent for those who want to add extra formatting and organization to their printed chat messages.

Plus, it’s simple to do!


Tips for organizing and preserving chat messages

Now that you know the different methods to print your Signal chat messages, keeping them organized and well-preserved is essential, especially if you’re printing important conversations or memories.

Here are some useful tips:

Labeling and dating your printed chats

  • Add a title at the top of the printed pages, including the names of the chat participants.
  • Include the date range of the conversation to help you easily locate specific chats in the future.

Storing printed chats safely

  • Use acid-free paper for printing your chat messages, as it’s more resistant to yellowing and deterioration over time.
  • Store your printed chats in a cool, dry place, away from direct sunlight, which can cause the ink to fade.
  • Consider placing your printed chats in sheet protectors or a binder to keep them organized and protected from dust, moisture, or accidental spills.

By taking these steps, you can ensure that your printed Signal chat messages remain in good condition and are easy to find whenever you need them.


Conclusion

Printing your chat messages from the Signal app can be a great way to preserve memories, keep a record of important information, or have a physical copy of your conversation history.

We’ve explored three methods to achieve this:

  1. Exporting chat messages and printing
  2. Taking screenshots and printing
  3. Copying and pasting chat messages into a document

Each method has pros and cons, so choose the best one for your needs. Remember to follow our tips on organizing and preserving your printed chat messages to ensure they stay in great condition for years to come.


3 Ways To Print Chat Messages From The Signal App [Guide] Read More »

does-data-recovery-people-look-into-your-files

Do Data Recovery People Look At Your Files? [Explained]

Data privacy is a hot topic in today’s digital world, and one question that often comes up is, do data recovery people look at your files?

It’s a valid concern as most of us store sensitive information on our devices, and the thought of someone else snooping through our personal data can be unsettling.

This blog post aims to explore the data recovery process and the role of data recovery professionals and to address concerns about data privacy.

In doing so, we will discuss the ethics and confidentiality in the data recovery industry, legal protections and regulations, and steps you can take to safeguard your data during recovery.

What Do Data Recovery Professionals Actually Do?

Data recovery professionals are experts in retrieving lost, deleted, or inaccessible data from various storage devices such as hard drives, solid-state drives, and USB flash drives.

But what happens during data recovery?

The process typically involves using specialized software or tools to scan the storage media, identify recoverable files, and restore them to a usable state.

Data recovery specialists play a crucial role in helping individuals and businesses regain access to valuable information that might otherwise be lost.

Their expertise is essential in cases of accidental deletion, file corruption, or even physical damage to the storage device.

But with this expertise comes great responsibility, as they may need complete access to your drive or volume to recover your data.

Fun Fact #1: Data recovery is not the same as digital forensics. While both involve extracting data from digital devices, data recovery focuses on retrieving lost data, while digital forensics involves analyzing digital evidence for legal purposes. Learn more about the differences at our data recovery vs. digital forensics article.

The Need for Full Access to Drives and Volumes

In order to recover deleted or lost content, data recovery specialists often require full access to your entire drive or volume.

This is because when a file is deleted, it isn’t immediately removed from the storage media. Instead, the space it occupies is marked as available for new data.

The original file may still exist, but recovering as new data is written over it becomes increasingly difficult.

Having complete access allows data recovery professionals to thoroughly search the drive for any recoverable data, maximizing the chances of a successful recovery.

This means that, in the process, they might come across your other files, even if those aren’t the ones you need to recover.

Fun Fact #2: File carving is a technique used by data recovery experts to extract files from a storage device without relying on file system information. This can be especially useful when the file system is damaged or corrupted. Check out our list of the best file carving tools to learn more.

Data Recovery Ethics and Confidentiality

When it comes to data privacy, it’s normal to ask questions like, is it safe to use a data recovery service?

The good news is that reputable data recovery professionals adhere to strict ethical guidelines and confidentiality agreements to protect their client’s privacy.

These ethical guidelines include maintaining professional boundaries, not disclosing or misusing any client data, and ensuring that all recovered data is securely returned to the client.

Confidentiality agreements, also known as Non-Disclosure Agreements (NDAs), legally bind data recovery professionals to keep their clients’ information private.

While it’s true that data recovery specialists have full access to your files, it doesn’t mean they’re actively looking at your personal content.

Their primary goal is to recover your lost data, and they’re bound by ethical and legal obligations to protect your privacy.


Safeguarding Your Data During Recovery

To ensure your data privacy during recovery, consider the following steps:

  • Select a reputable data recovery service: Look for a company with a proven track record, positive customer reviews, and a commitment to data privacy. Reputable services often have confidentiality agreements and comply with data protection regulations.

  • Encrypt sensitive data before sending it for recovery: Encryption adds an extra layer of security by making your data unreadable without the decryption key. While this may not be necessary for all situations, it can provide peace of mind if you’re particularly concerned about privacy.

  • Ask the right questions to ensure privacy: Before selecting a data recovery service, ask about their data privacy policies, confidentiality agreements, and the steps they take to safeguard your information. This will help you make an informed decision and build trust with the service provider.

Is it safe to use recovery software?

This is another common question, and the answer largely depends on the software you choose. Opt for well-reviewed, reputable software that clearly states its commitment to data privacy.


Legal Protections and Regulations

Data protection laws in the US, UK, and Canada play a crucial role in safeguarding your privacy during the data recovery process.

These regulations set guidelines for how companies should collect, use, and store personal information, including data recovery services.

In the US, data privacy is regulated by various federal and state laws, such as the Health Insurance Portability and Accountability Act (HIPAA) and the California Consumer Privacy Act (CCPA).

The UK’s General Data Protection Regulation (GDPR) is the primary legislation governing data privacy.

Meanwhile, in Canada, the Personal Information Protection and Electronic Documents Act (PIPEDA) sets the rules for data privacy.

Data recovery professionals who breach these privacy laws may face severe penalties, including fines and legal actions. This serves as a strong deterrent and encourages ethical behavior in the industry.


Conclusion

Data privacy is a significant concern for individuals and businesses alike, and it’s natural to wonder if data recovery professionals look at your files.

As we’ve discussed, the reality is that they require full access to your drive or volume to recover your lost data effectively.

However, ethical guidelines, confidentiality agreements, and data protection regulations work together to protect your privacy throughout recovery.

To safeguard your data during recovery, choose a reputable service, consider encrypting sensitive data, and ask questions about the provider’s privacy policies.

Also, trust in the legal protections holding data recovery professionals accountable for maintaining your privacy.

By understanding the data recovery process and taking steps to protect your information, you can confidently recover lost data while keeping your privacy intact.

Remember to check out our other resources, such as our digital forensics tools and software article, to learn more about related topics in the world of technology.

Happy data recovery, and here’s to maintaining your digital privacy!


Do Data Recovery People Look At Your Files? [Explained] Read More »