admin

How-to-know-if-someone-saved-your-contact-on-whatsapp-secretly

3 Ways To Know If Someone Saved Your Number On Whatsapp Secretly

WhatsApp is a popular messaging app used by millions of people around the world. It offers a wide range of features, including voice and video calls, file sharing, and end-to-end encryption for secure messaging.

One important aspect of using WhatsApp is knowing if someone has saved your number in their contacts.

This information can be useful for various reasons, such as confirming if someone has received your message or knowing if someone is intentionally ignoring you.

In this post, we’ll explore how to know if someone saved your number on WhatsApp without them knowing.

How To Know If Someone Had Saved Your Number in their WhatsApp Contact

Here’s everything you need to know.


How Does WhatsApp Save Contact Information?

When you first install WhatsApp, it will automatically sync with your device’s contact list.

If anyone in your contact list uses WhatsApp, their name and phone number will be added to your WhatsApp contacts.

However, just because you have someone’s phone number in your device’s contact list does not mean they have it saved on their WhatsApp account.

WhatsApp saves contact information in two places: on your device and within the app.

If you save someone’s contact information on your device, such as in your phone’s address book, it will automatically appear in your WhatsApp contacts.

When you save someone’s phone number on WhatsApp, it is only saved on the app and not in your device’s contact list.

This means that while you may have someone’s phone number saved on your device, they may not save it on their WhatsApp account.


How to Check if Someone Saved Your Number on WhatsApp

If you’re curious to know if someone has saved your number on WhatsApp, you can try a few methods.

Keep in mind that these methods are not foolproof, and there’s no guarantee that they will work in all situations.


Method 1: Check the Profile Picture

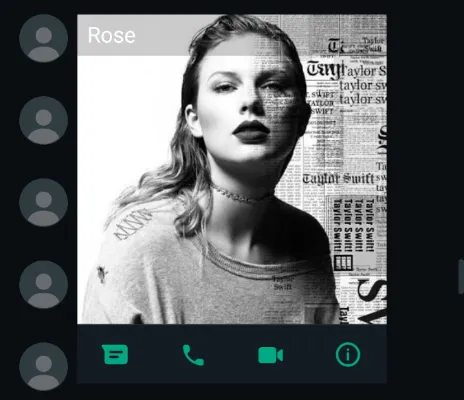
One way to know if someone has saved your number on WhatsApp is by looking at their profile picture.

If you can see their profile picture, it means that they have your number saved on their WhatsApp account.

However, if their profile picture is not visible to you, it doesn’t necessarily mean that they don’t have your number saved.

They may have hidden their profile picture from certain contacts or everyone.


Method 2: Check the About Section

whatsapp-about-section

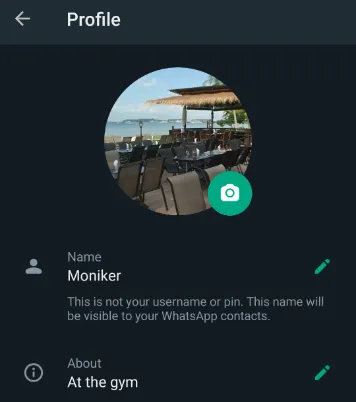
Another way to check if someone saved your number on WhatsApp is by looking at their About section.

If they have added any information to their About section, such as a status message or a bio, it means that they have your number saved.

However, if their About section is blank, it doesn’t necessarily mean that they don’t have your number saved.


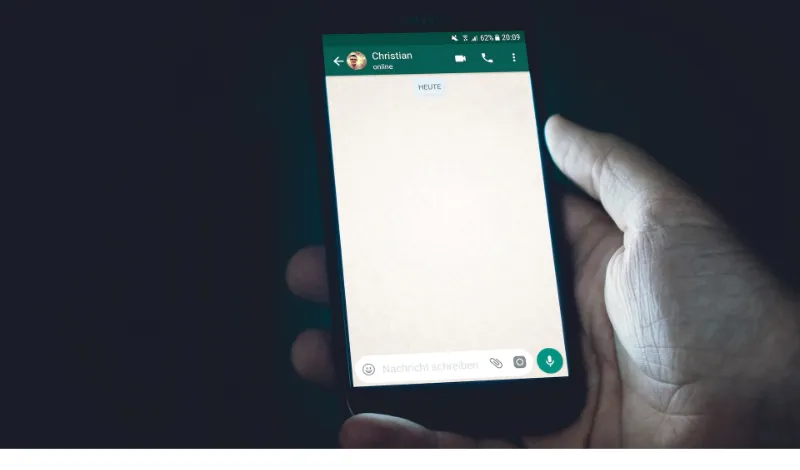
Method 3: Send a Message

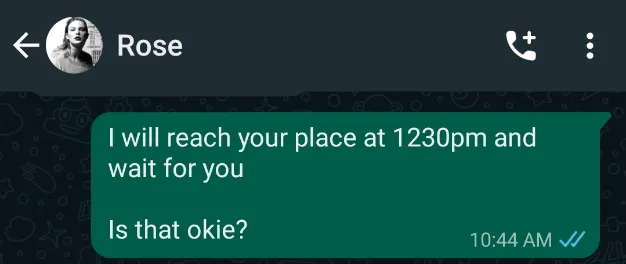
Finally, you can try sending a message to the person in question.

If your message is delivered and you can see two checkmarks next to it, it means that they have your number saved on their WhatsApp account.

However, if your message remains undelivered or only shows one checkmark, it doesn’t necessarily mean that they don’t have your number saved.

They may have their notifications turned off or may not have seen your message yet.


Can You Really Know If Someone Saved Your Number on WhatsApp?

While the methods described in the preceding section may indicate whether someone has saved your WhatsApp number, they are not conclusive.

According to WhatsApp’s privacy policies, the app does not notify users when someone adds or removes them from their contacts list.

This means there is no surefire way to know if someone has saved your phone number to their WhatsApp account.

Furthermore, some users’ privacy settings may be set up so that they do not share their profile picture or About section with specific contacts.

In this case, just because you can’t see their profile picture or About section doesn’t mean they don’t have your phone number saved.

While it’s natural to be curious about whether someone has saved your WhatsApp number, keep in mind that there’s no foolproof way to know for sure.

The methods described in this post are only a starting point for your investigation; you should always proceed with caution and respect for the other person’s privacy.


Conclusion

In conclusion, knowing whether someone has saved your number on WhatsApp can be useful in certain situations.

While you can try a few methods to get an idea of whether someone has saved your number on their WhatsApp account, these methods are not definitive and may not always work.

WhatsApp’s privacy policy ensures that users can maintain their privacy and control who sees their profile picture and other information.

Ultimately, if you’re curious about whether someone has saved your number on WhatsApp, the best way to find out is to ask them.

However, be respectful of their privacy and don’t pressure them into sharing information they’re uncomfortable with.

If you are more privacy-focused, you should consider using a VPN service when using WhatsApp, to protect your traffic connection, your data and prevent malicious attacks.

Choose from the following reliable VPN services;

  • NordVPN (Has the most number of servers, over 5000+, in 60 countries to choose from. Uses a unique Onion Over VPN feature to mask your online traffic for maximum anonymity.)

  • Surfshark VPN (One of the few providers that allow unlimited device connections with just a single subscription. You can connect all your devices with no logs policy)

  • IPVanish (Supports all platforms, routers and TV. Uses SOCKS5 web proxy feature for faster anonymous connection speed)

At the end of the day, WhatsApp is a tool for communication, and it’s important to use it to foster positive and respectful relationships with others.


3 Ways To Know If Someone Saved Your Number On Whatsapp Secretly Read More »

screen-recording-quicktime-player

How to Stop Screen Recording with QuickTime Player [Guide]

Screen recording is a useful tool for capturing video footage of your computer screen, making it ideal for developing tutorials, walkthroughs, and presentations.

And if you’re a Mac user, you can get started right away with QuickTime Player.

In this blog post, I’ll teach you how to start and stop screen recording in QuickTime Player and some recording optimization recommendations.

You’ll be able to generate high-quality screen recordings in no time, whether you’re a seasoned pro or a newbie. So let’s get started!

How to Start & Stop Screen Recording Using QuickTime Player?

Below are the instructions to start and stop screen recording and a section on troubleshooting issues with the QuickTime player if you encounter any technical problems.


Starting a Screen Recording With QuickTime Player

To start a screen recording with QuickTime Player, follow these simple steps:

  1. Open QuickTime Player on your Mac.
  2. Click on “File” in the menu bar, and select “New Screen Recording.”
start-new-screen-recording-quicktime-player
  1. You can choose to record your entire screen or just a portion of it. Simply click and drag to select the area you want to record.
  2. You’ll see a screen recording toolbar appear. Click the <Record> button to start recording.
screen-recording-quicktime-player-record-full-selected-portion

That’s it! QuickTime Player will begin recording your screen and audio (if you choose to enable it).

Make sure to test your microphone beforehand if you plan to record audio. You can pause or stop the recording at any time by clicking on the “Pause” or “Stop” button on the recording toolbar.

If you need to cancel the recording altogether, click the “x” button in the corner of the toolbar.


Stopping a Screen Recording with QuickTime Player

Once you’re done recording, it’s important to know how to stop the recording and save it for future use.

Here’s how to stop a screen recording with QuickTime Player:

  1. Look for the <Stop> button in the menu bar. It looks like a square inside a circle.
  2. Click the <Stop> button to end your recording.
  3. Your screen recording will automatically open in a new QuickTime Player window.

That’s it! Now you can edit your recording, save it, or export it to share with others.

Keep in mind that if you recorded audio along with your screen recording, it would be saved as a separate audio file.

You can easily merge the audio and video files together in QuickTime Player or any other video editing software.


Troubleshooting Screen Recording Issues with QuickTime Player

Despite its ease of use, screen recording with QuickTime Player can sometimes encounter issues.

Here are some common issues you may face and how to troubleshoot them:

  • The recording won’t start: If you’re having trouble starting the recording, try closing other apps or restarting your computer. Also, make sure that you have enough storage space on your computer to save the recording.

  • The recording is laggy or choppy: This is usually a result of your computer’s processing power struggling to keep up with the recording. Try closing other apps and windows to free up processing power. You can also try reducing the quality of the recording by selecting a smaller area to record or lowering the resolution.

  • The audio quality is poor: If you’re recording audio and your screen recording, ensure your microphone is working properly and positioned correctly. Also, try recording in a quiet environment to avoid background noise.

  • The recording won’t save or export: This could be due to a lack of storage space on your computer or an issue with the file format. Try exporting the recording in a different file format or freeing up space on your computer.

By following these troubleshooting tips, you should be able to resolve most issues with screen recording using QuickTime Player.

If you’re still encountering issues, you can try reaching out to Apple support for further assistance.


Conclusion

This tutorial covered everything you need to know to start and stop screen recording with QuickTime Player on your Mac.

This article covers step-by-step instructions for starting a screen recording, stopping a screen recording, and troubleshooting common issues.

We also covered some tips for optimizing your screen recording and getting the best possible results.

By now, you should be able to create high-quality screen recordings using QuickTime Player with ease.

Remember to check your settings before recording, keep an eye on your storage space, and troubleshoot any issues that may arise. You’ll become a pro at screen recording in no time with practice!

If you have any questions or suggestions, feel free to leave them in the comments below. Happy screen recording!


How to Stop Screen Recording with QuickTime Player [Guide] Read More »

Set-Screen-Lock-Time-Using-Mac

How to Set The Screen Lock Time On Macbook [Delay Timeout]

If you’re a Mac user, you’ve probably noticed that your screen locks after a certain amount of inactivity.

While this is an important security feature, it can be inconvenient if the screen locks too quickly, interfering with your work.

Fortunately, you can change the screen lock time on your Mac to suit your needs.

In this blog post, we will walk you through the process of setting the screen lock time on your Mac.

In addition, we’ll give you some pointers on improving your device’s security. Let’s get started!


Why Setting Screen Lock Time on Mac is Important

Setting the screen lock time on your Mac is an important security measure to prevent unauthorized access to your device.

When you step away from your computer, the screen lock feature prevents unauthorized access to your computer.

Setting the screen lock time allows you to control how long your computer remains unlocked after inactivity, lowering the risk of someone gaining unauthorized access to your device.

It also aids in keeping your confidential information safe from prying eyes. As a result, setting the screen lock time on your Mac is critical to ensuring your privacy and security.


How to Set the Screen Lock Time on Mac

mac-system-preferences-lock-screen-options

Now that you know why setting the screen lock time on your Mac is essential, let’s dive into how to do it.

Here are the three (3) steps to set the screen lock time on your Mac:

  1. Open System Preferences: Click on the Apple icon in the top-left corner of your screen and select “System Preferences” from the drop-down menu.

  1. Click on “Lock Screen”: You will see all the available options here for customizing your lock screen.

  1. Set the Screen Lock Time: Choose from the dropdown menu to select your preferred timing (e.g., 5 minutes or Never) for the screensaver to kick in after the specified timing.

Once you have set the screen lock time, your Mac will automatically lock the screen after the specified period of inactivity.

This feature is especially helpful when you need to step away from your computer for a brief period and want to keep your information secure.


Additional Tips to Secure Your Mac

Apart from setting the screen lock time, you can take other security measures to protect your Mac from potential threats.

Here are some additional tips to enhance the security of your Mac:

  • Enable Two-Factor Authentication: Two-factor authentication adds an extra layer of security to your Mac by requiring a password and a verification code to access your account.

  • Install Antivirus Software: Installing antivirus software can help protect your Mac from viruses and malware that could potentially compromise your device’s security.

  • Keep Your Operating System Up-to-Date: Apple regularly releases security updates for macOS. Keeping your operating system up-to-date is crucial to ensure that you have the latest security features and protection against potential threats.

  • Disable Automatic Login: Disabling automatic login means you need to enter your password every time you want to access your computer, which adds an extra layer of security to your device.

By following these additional security tips, you can enhance the protection of your Mac and keep your information safe from potential threats.


Conclusion

Setting the screen lock time on your Mac is an essential security feature that can help protect your device from unauthorized access.

Following the simple steps outlined in this blog post, you can adjust the screen lock time to suit your needs and secure your confidential information.

In addition, implementing the additional security measures we’ve outlined can enhance the overall security of your device and provide added peace of mind.

Remember to stay vigilant and take necessary precautions to protect your Mac from potential threats. We hope you found this guide helpful!


How to Set The Screen Lock Time On Macbook [Delay Timeout] Read More »

how-to-split-large-CSV-file-into-multiple-smaller-files-using-Mac

3 Ways to Split Large CSV File into Multiple Files Using Mac

Handling large datasets is an essential part of data analysis and processing. However, working with large CSV files can often be challenging, especially when importing or manipulating the data.

One common solution to this problem is to split the large CSV file into multiple smaller files that are easier to manage, especially helpful if you have limited storage space or need to share the data with others.

This blog post will explore how to split a large CSV file into multiple smaller files using a Mac computer.

How to Split a Large CSV File into Multiple Smaller Files Using Mac?

Here are the three (3) ways to do so.


Method 1. Using Mac Terminal

Using the Mac terminal is an efficient way to accomplish this task.

Split CSV file using Terminal

Here’s a step-by-step guide on how to do it:

  1. Open the Mac Terminal

Use the Spotlight Search to find “Terminal” or click on the “Finder” icon on your dock, navigate to “Applications,” then “Utilities,” and finally, “Terminal.”

  1. Navigate to the folder containing the large CSV file.

For example, if your CSV file is on your desktop, you can navigate to it by typing “cd ~/Desktop” and pressing <Enter> on your keyboard.

cd ~/Desktop
  1. Split the CSV file into smaller files.

Use the <split> command to divide the CSV file into smaller files. The basic syntax for the <split> command is as follows:

split -l [number of lines per file] [name of large file] [prefix for new files]

Here’s an example command:

split -l 5000 largefile.csv smallerfile-

This command will split the large CSV file into smaller files that contain 5000 lines each. The new files will be named “smallerfile-aa,” “smallerfile-ab,” “smallerfile-ac,” and so on.

That’s it! Using the Mac terminal, you’ve successfully split a large CSV file into multiple smaller files. This method is incredibly efficient and can save you a lot of time and storage space.

Merge CSV files using Terminal

After you’ve split a large CSV file into multiple smaller files, you may need to merge them back together for further analysis or processing.

Here’s how you can merge the smaller files back into one larger CSV file using the Mac terminal:

  1. Open the Mac Terminal
  2. Navigate to the directory containing the smaller files.
  3. Merge the smaller files

To merge the smaller files back into one larger CSV file, use the <cat> command with a wildcard character (*). The basic syntax for the <cat> command is as follows:

cat [prefix for smaller files]* > [name of larger file].csv

Here’s an example command:

cat smallerfile-* > mergedfile.csv

This command will merge all the files in the directory that start with “smallerfile-” into one larger CSV file named “mergedfile.csv.”

You’ve successfully merged the smaller files back into one larger CSV file using the Mac terminal.


Method 2. Using MacUncle

macuncle-software-split-large-csv-file-into-multiple-files-using-Mac

MacUncle CSV Splitter is a software tool designed specifically for Mac computers to split large CSV files into smaller, more manageable files.

You need to download and install this macOS application.

Here are the customizable splitting options available in the tool;

Split by a number of rows:

This feature allows users to split their CSV files into smaller files based on the number of rows.

For example, if a user has a CSV file with 10,000 rows and they want to split it into 5 smaller files, they can use this feature to split the file into 5 files with 2,000 rows each.

Split by file size:

This feature allows users to split their CSV files into smaller files based on the file size.

For example, if a user has a CSV file that is 10 MB in size and wants to split it into 5 smaller files, they can use this feature to split the file into 5 files that are approximately 2 MB each.

Preset splitting options:

The tool offers several preset splitting options that allow users to quickly split their CSV files into smaller files based on common sizes, such as 1 MB, 2 MB, 5 MB, and 10 MB.


Method 3. Using SplitCSV

SplitCSV is a web-based software tool allowing users to split their large CSV files into smaller, more manageable ones.

To use SplitCSV, users need to visit the website and upload their CSV file.

The tool will then guide them through the splitting process, allowing them to choose the splitting options that work best for their needs.

The splitting options are;

Split by the number of rows

Users can choose the number of rows they want for each smaller file and the prefix and suffixes for the file names.

Split by file size

Users can choose the maximum file size they want for each smaller file and the prefix and suffixes for the file names.

Preset splitting options

Several preset splitting options that allow users to quickly split their CSV files into smaller files based on common sizes, such as 1 MB, 2 MB, 5 MB, and 10 MB.


3 Ways to Split Large CSV File into Multiple Files Using Mac Read More »

How-to-combine-split-zip-files-using-Mac

3 Ways to Combine Multiple ZIP Files Into One Using Mac

In this blog post, I will show you how to combine split files on a Mac.

Whether you’ve downloaded a large file that has been divided into multiple parts or created a split archive for easier storage and transfer, combining the pieces back into the original file can sometimes be difficult

Fortunately, several methods exist for merging split files on a Mac, and I’ll walk you through each. 

Related Post
How to Split Large ZIP file into Smaller Parts

Understanding Split Files

It is common practice to divide a large file into smaller parts to make it easier to transfer or store. When you split a file, it is divided into multiple segments, each of which is saved as a separate file.

This is also referred to as file fragmentation.

Split files are frequently used when transferring large files over the internet or saving them to external storage devices.

When sending a large file via email, for example, it may be too large to attach as a single file. In this case, the file is divided into sections and sent as individual attachments.

Split files are frequently compressed to facilitate transfer or storage. Zip compression is a popular method for compressing split files.

Split zip files use the.zip file extension and are frequently labeled as filename.zip.001, filename.zip.002, and so on.

To open and use a split file, you must first merge the individual parts back into the original file.


How to Combine Multiple Split ZIP Files using Mac

Here are the three (3) ways to merge these individual files.


Method 1. Using Terminal

The Terminal app is a native built-in application that comes with every Mac. This means you do not need to download or install it.

Because it is a lightweight application, this method is the fastest when merging ZIP files together on a Mac.

Here’s how to combine split zip files using Terminal:

  • Open Terminal

To open Terminal, go to Applications > Utilities > Terminal, or use Spotlight Search to locate it.

  • Navigate to the Directory.

For example, use the command below if your split files are located in the Desktop folder.

cd ~/Desktop
  • Combine the Files

To combine the split files, use the command below and press <Enter> on your keyboard to run it.

cat filename.zip.* > outputfilename.zip

Replace <filename> with the name of your split file and <outputfilename> with the name you want for the merged file.

The Terminal command will merge all the split files into a single zip file. Once the process is complete, you’ll have the original file ready to use.


Method 2. Use Archive Utility

Another method to combine split files on a Mac is by using the built-in Archive Utility app.

It is a built-in Mac app that allows you to extract and create archives. A compressed archive is a file that contains one or more compressed files or folders.

It can extract files from a variety of archive formats, including ZIP, TAR, and GZIP.

Here’s how to merge split zip files using Archive Utility:

  • Right-click on one of the split files and select “Open With” > “Archive Utility.
  • Combine the Files

Archive Utility will extract the contents of the first split file and automatically detect the other parts. Once the extraction is complete, you’ll have a single file with the original file name and extension.

Note: If Archive Utility doesn’t automatically detect the other parts, you can manually select all the split files and open them at once using Archive Utility. To do this, select all the split files, right-click, and select “Open With” > “Archive Utility.”

Using Archive Utility to merge split zip files is a simple and straightforward method without additional software or Terminal commands.


Method 3. Using Online Merging Tool

aspose-ZIP-merger-online-tool-combine-split-ZIP-files-using-Mac

Aspose Zip Merger is a web-based application that allows users to combine multiple split zip files into a single file. The tool supports a variety of split file formats, including .zip,.001,.002, and.part1.rar.

Go to Aspose Zip Merger’s website and upload the split zip files you want to merge. After uploading the files, you can select the output format for the merged file, such as ZIP or RAR.

One advantage of using Aspose Zip Merger is that it’s an online tool, which means that you don’t need to download and install any software on your computer.

This makes it a great option for users who need to merge split zip files on the go or from a computer without administrative privileges.


Conclusion

We’ve discussed three different methods to combine split zip files on a Mac.

Terminal commands are a powerful and flexible option allowing you to merge split files quickly and efficiently.

On the other hand, the built-in Archive Utility app is a convenient and easy-to-use option that doesn’t require any additional software.

Alternatively, if your ZIP contents are not sensitive in nature, there is always an online uploading solution, like Aspose ZIP Merger, for ease of use.


3 Ways to Combine Multiple ZIP Files Into One Using Mac Read More »

Skills-You-Need-As-A-Digital-Forensics-Expert-Analyst-Career

Career GUIDE: 7 Skills To Become A Digital Forensics Expert

Digital forensics is a sub-discipline of forensic science and a very specialized and niche field of study.

This niche involves retrieving evidence from phones, laptops, the cloud, and other storage means.

The purpose of using digital forensics to examine data from devices is to maintain complete transparency and prevent any form of data contamination and data alteration.

This is particularly useful when applying digital forensics to uncover digital evidence in criminal investigations and private lawsuits in a court of law.

This article will focus on all the skills you need to be a digital forensics expert.

What are the Skills Required for a Career in Digital Forensics

Here are the seven (7) skills needed in this career.


1. Having a Meticulous Mind

Forensic analysts must meticulously examine digital evidence because the entire analysis process can take a long time due to the increasing amount of data being analyzed and the increasing number of devices.

Having a meticulous mind that is both patient and observant is very important when facing a large amount of data.

Important evidence may slip through the analysts’ eyes if they are not sharp enough.

For example, a mobile phone cannot be treated as just one device now. It is, in fact, a combination of different apps, each having its data to analyze.

Laptops and PCs usually have many emails and document files to go through. All these require patience, time, and effort.


2. Ability to Articulate Technical Concepts

Explaining technical knowledge and know-how in a simple layman’s explanation requires time and effort.

This skill is very important because you may need to present your forensic findings in a court of law before the judge if you are in law enforcement or must explain it to your senior management in your company.

Most forensic analysts start off their career diving straight into technical skills, e.g., encryption, file metadata analysis, system artifacts, etc.,

While they know how to work on their forensic tasks, they often find it hard to articulate these in layman’s language that the public can understand easily.


3. Having an Analytical Mind

This is an important skill to have because there is no single forensic tool that can identify critical evidence for forensic analysts. After all, every case is different, and every piece of evidence is different.

Therefore the evidence is always discovered through the analysis of the forensic analyst.

You can piece together different files based on clues left behind by metadata, system logs, or even the content within the file document itself.

Maybe you are analyzing an email message and noticed a suspicious unique keyword being mentioned. As a result, you search through the entire device and find a piece of substantial evidence in it.

These are examples of an analytical mind a forensic analyst should ideally possess.

In short, you should be able to link files together based on, e.g., commonality, patterns, etc., as you go along with your forensic examination.


4. Likes to Explore Technology

The main reason there are so many sub-disciplines of digital forensics (e.g., mobile forensics, cloud forensics, memory forensics, etc.) is that these are the different technologies out there.

Having the playful mindset to try and the interest to explore new technologies are the primary keys to having a meaningful digital forensics career.

Remember, digital forensics is the aftermath of what has already happened. Therefore, discovering evidence is really about examining files and reverse-engineering technologies to see more data.

When a piece of substantial evidence lies in an unfamiliar technology the forensic analyst is unsure of, they should be curious to learn more and conduct their own research and development (R&D) before anything.


5. Extended Screen Time

Be prepared to spend long hours on the computer screen to analyze and go through document files, emails, images, videos, apps, etc.

Forensic analysts should be comfortable looking at computer screens for an extended period, depending on the current tasks on hold and the storage capacity involved.

Digital forensics depends mainly on commercial and open-source forensic tools.

These software applications are designed to work well on a wide-screen monitor, allowing forensic analysts to examine more data and make software features more accessible.


6. Multi-Tasking Between Devices

It is common for forensic analysts to be working on two (2) or more devices at any given time.

Juggling between examining different devices is considered a time-saving and more efficient way of performing digital forensics work.

You could be working on a laptop here, and you may need to work on another PC there.

Forensic extraction takes time, and processing applications takes more time too. Instead of waiting, time can be used to do forensic examinations on the next device.


7. Fundamentals of Law or Cyber Security Knowledge

Depending on where you work, if you are in government law enforcement, you may need to learn the law and criminal investigation.

Thankfully this knowledge will be provided through training once you join the agency.

If you are from the private sector, e.g., Big Four (4) accounting firms, you may need to know basic cyber security knowledge in addition to the digital forensics knowledge required.

This is because, in the private sector, they take on cyber security cases, e.g., breaches and data thefts.

Having related cyber security knowledge will surely help in this regard.


What is the Career Path

Digital forensics is employed mainly in law enforcement agencies, law firms, and private investigation companies. However, in recent years, more industry sectors have used forensic experts.

The Big Four (4) accounting firms, e.g., KPMG and Deloitte, all have their digital forensics experts in their teams as it is now common to audit and safeguard digital data and digital assets.

Getting professional forensic certifications from EnCase, Cellebrite, and SANS Institute would be best to gain more technical knowledge and be open to more job opportunities.

Career Progression

Typically, you will start as a junior forensic analyst in your company or government agency before moving on to more senior roles such as forensics consultant, forensics manager, and forensic expert in some organizations.

You may get the chance to learn more than one specialized area of digital forensics. For example, learning both computer forensics (examining laptops and PCs) and mobile forensics (investigating mobile phones and tablets)

The more you learn in this niche, the more valuable you will become.

Besides staying in your organization, you can consider moving to bank institutions or big accounting firms, which need forensic experts to analyze and audit data.

What is the Salary range like as a Digital Forensics Analyst?

According to Glassdoor, the average annual salary of a digital forensic analyst is about USD 78,000/-.

This largely depends on who you work for, government law enforcement or private corporations.

As a newly-recruited junior forensic analyst, you can expect a salary range of around USD 53,000/-.

As you gain more knowledge and experience in this field, you can expect a top-tier salary range of up to USD 150,000/– as a digital forensic expert.

You can move on to a higher pay scale if you move sideways into a senior management role or sales role.


Career GUIDE: 7 Skills To Become A Digital Forensics Expert Read More »

Does-Digital-Forensics-Require-Coding-Programming-Skills

Does Digital Forensics Require Coding or Programming Skills?

A career as a digital forensics analyst sounds exciting, especially when it involves uncovering digital evidence, helping to apprehend suspects, and testifying in a court of law as an expert witness giving expert opinions.

But what are the prerequisites involved?

Do you need Python coding skills, assembly language, or C++ language before you can become a digital forensics expert?

This article will answer all the questions relating to this specialized niche field of study as a career.

Are Coding and Programming Skills Necessary in Digital Forensics?

When learning digital forensics or pursuing a career in this field, it is not necessary to have coding and programming skills. You do not need these prerequisites to get started with digital forensics.

In fact, most commercial and open-source forensic tools have fully automated features, e.g., automated file carving, automatic parsing of system artifacts, etc., using the graphical user interface (GUI) that enables forensic analysts to focus more on the data analysis portion.

Forensic analysts do not need to code their own applications or do any form of programming.

Digital forensics software is built and designed to be GUI-friendly to facilitate point-and-click file analysis.

When it comes to attending digital forensics courses and certifications, there are no coding and programming tests or requirements as well.

The main competency of any digital forensic analyst lies in their ability to perform file analysis, e.g., finding out where a certain file comes from or using metadata to tell a story of what really happened.

What are the actual topics being taught in the field of Digital Forensics?

These are the actual technical skills required by forensic analysts (most of which can still be learned while on the job);

  • General knowledge of basic file systems (e.g., NTFS, exFAT, APFS)
  • General knowledge of operating systems (e.g., Windows, macOS, Linux)
  • Disassembly and assembly of hardware (e.g., removal of hard drives from desktop PCs)
  • Understanding of system artifacts (e.g., Windows Registry, system log files)
  • The usage of commercial and open-source forensic tools (e.g., how to use the features)

What academic qualification (e.g., degree) do you need to apply for a digital forensics job?

For academic qualifications, this largely depends on the recruiting company.

The field of digital forensics largely depends on getting relevant forensic training (which can be done after you get the job) and spending time on the job analyzing data extraction (obtaining experience along the way).

Although a computer science or technology-related degree can certainly help in terms of better understanding forensic technology, there is no direct correlation between the two.

In short, anyone can learn digital forensics regardless of the academic discipline he/she had previously obtained, as long as the passion and interest are there.

Tools used in Digital Forensics

Digital forensics software can be broadly classified into two (2) types, namely commercial and open-source tools.

Commercial Forensics Tools

These paid tools include technical & customer support, as well as frequent new updates. Some of them are;

  • OpenText EnCase
  • Exterro FTK
  • Cellebrite UFED

Open-Source Forensics Tools

They are free to use; however, they lack customer support and frequent version updates to support newer devices. Some of them are;

  • Autopsy
  • Sleuthkit
  • SIFT Workstation

Does Digital Forensics Require Coding or Programming Skills? Read More »

benefits-challenges-pros-cons-digital-forensics

7 Advantages & Disadvantages of Digital Forensics [Pro Cons]

Digital forensics is a discipline of forensic science and is commonly used to collect, preserve, analyze, and present data in a scientifically sound manner.

Not to be confused with data recovery, digital forensics itself does include the ability to recover data, in addition to its unique preservation and collection capabilities.

This article will focus on the benefits and challenges involved when it comes to digital forensics.

What are the Pro and Cons of Digital Forensics

The benefits and pitfalls of digital forensics are listed down below.


Advantages

Here are the seven (7) advantages of using digital forensics.


1. Better than relying on memory

Having the exact file on hand is always better than basing it on memory.

Using digital forensics techniques to recover files always serve as a better way, as compared to relying solely on memory.

For example, retrieving emails or conversations that happened some years ago can prove the intention and implication of certain parties involved.

Digital forensics can also reconstruct full or partial files, such as a previously-visited webpage that is no longer available.

The ability to uncover the actual file beats all other descriptions or collaborative evidence.

2. Preservation of Data

When using digital forensics, a forensic image is acquired from a physical device (e.g., phone, laptop, etc.).

This image is an exact bit-by-bit copy of the contents of the device extracted, and it cannot be altered in any way.

A forensic analyst can safely examine the image without worrying about contaminating the data integrity or changing its timestamps.

In short, there will be no changes done to the image, and data is therefore preserved.

3. Admissibility in Court

Forensic images are admissible in a court of law as digital evidence because it preserves the data, no one can alter any files, and it is a bit-by-bit exact copy of the extracted data from the physical device.

The digital forensics methodology is a scientific process based on computer science that will result in a constant, repeatable outcome every time.

Therefore it is a reliable and consistent means of producing digital evidence.

4. Better Analysis of Data

Files, folders, and system artifacts can be examined in detail.

  • Metadata analysis can collaborate findings and results, such as looking at file timestamps (e.g., data modified/created), author of a document, location based on a photo taken by the phone, etc.
  • File association can be determined quickly, for example, by tracing a PDF document found in the Downloads folder that is the result of the user visiting a certain website and downloading it from the web browser.
  • System files such as from the operating system used can be used to determine when is the last time the computer was shut down, how many users were there and log files showing user activity.

5. Identifying a User to a Person

Forensic analysts can use the files found to tie the person as the owner of the physical device.

This can be done in several different ways;

  • The logins and passwords found in Notes or documents that identify the owner
  • The photos and videos of the owner found inside the device
  • The files and metadata bearing the name of the owner

6. Recovery of Deleted Files

Digital forensics can recover certain deleted files, depending on how much of the file reside remains.

When conditions are favorable, it is technically possible to recover files that had been previously overwritten or deleted in a full or partial state.

Most digital forensics tools can do this, and you can go specifically to file carving tools if you have more in-depth file recovery needs.

7. Crime Deterrence

Law enforcement agencies who use digital forensics to retrieve digital evidence, are using their findings and statistics to educate the public on the risks and pitfalls of falling prey to hackers and misuse.

Prevention and education serve as crime deterrence purposes, in a bid to lower the future cybercrime rate.

The forensic tools and technical capabilities used in digital forensics can also be used to deter others from even trying to commit certain crimes.


Disadvantages

Here are the seven (7) disadvantages of using digital forensics.

1. Too Specialized

When it comes to studying and training in this area, this field of study can be too specialized and too niche.

Digital forensics started with the invention of digital devices, such as mobile phones and personal computers. Therefore it only starts somehow from the late 1990s to the early 2000s onwards.

From an academic point of view, schools are not well-equipped with the right lecturers as the professionals are currently still working in the workforce.

From a training standpoint, it can be confusing where to start as there are several sub-disciplines of digital forensics. Some of the common ones are;

  • Computer forensics (PCs, Mac, mass storage devices. etc)
  • Mobile forensics (phones and tablets)
  • Cloud forensics (Gmail, iCloud, etc)
  • Network forensics (intranet)
  • Memory forensics (examining RAM dumps)

To get into this field, you are likely required to be recruited by law firms, law enforcement, or even private investigative companies.

2. Expensive Tools

Commercial forensic software and hardware tools are generally expensive in terms of cost since they are very specialized and require lots of research & development to come out with forensic capabilities.

Commercial software typically requires recurring annual renewal as well and the cost can add up to a substantial amount over a long period of time.

Moreover, it is a good forensic practice to compare two (2) different tools when it comes to extracting digital evidence from devices as no one software can do everything.

In doing so, the cost of owning multiple software can add up.

It is also possible to rely on free, open-source forensic tools. However, most do not come with technical support if you need assistance or a proper guide and some may be using a command-line interface.

Unless you are technically competent, you are likely to rely on commercial tools since they are easier to use.

3. Expensive Training

Digital forensics training is known to be expensive as it is taught by the current forensic practitioners who are still working in the current workforce.

There are two (2) types of digital forensics training one can choose from;

  • Vendor-specific training (e.g. by EnCase or Cellebrite and taught using their own tools)
  • Vendor-neutral training (e.g. by SANS Institute and taught using a variety of different forensic tools)

Most digital forensics courses tend to travel internationally and one should be prepared to cater to travel and accommodation costs as well.

Prior to attending these training courses, it is also recommended that participants have some hands-on experience with the software or hardware first to familiarise themselves.

4. Difficult to Learn

You will be learning file systems (e.g. NTFS, exFAT), operating systems (e.g. Windows, macOS), system artifacts (e.g. Windows registry), and the features of the software or hardware being taught.

Most of this knowledge can be very hard to self-taught without attending any courses since it requires hands-on with these commercial tools.

You need to have a certain level of computer proficiency before deciding to learn digital forensics.

5. Longer Processing Time

Data is ever-increasing on mobile phones and computers. It is now common to have 1 TB of data storage on our devices.

Since digital forensics involves examining data, it will take a longer processing time as data increases.

For example, it is common for a mobile phone to have at least 20 different apps or more. This means having to process and analyze more data types for forensic analysts.

6. Need for Custom-built Forensic Computers

To acquire forensic images from devices and to analyze these large data, you require a powerful custom-built computer to handle the processing requirements.

Technical requirements may include;

  • Larger storage drive for forensic images
  • Faster CPU processors to acquire and analyze data faster
  • More RAM memory for data processing

This additional cost has to be catered into the budget.

7. Processes, Documentation, and Presentation

If the purpose of using digital forensics is to admit the digital evidence in Court, the forensic analyst may have to take the stand to present his/her evidence.

This also means the possibility of cross-examination by the other legal counsel.

The chain of evidence, custodians involved, and proper forensic methodology used are crucial here.

The process of retrieving the evidence may be questioned, and the parties involved in handling the physical device may be called upon to give evidence in Court.

In gist, be prepared to explain and account for the entire process of handling and retrieving evidence. Forensic analysts need to be competent in their understanding of what they are doing.


7 Advantages & Disadvantages of Digital Forensics [Pro Cons] Read More »

mac-resource-forks-system-metadata-files

3 Ways to Compress ZIP on Mac Without _MACOSX and .DS_Store

When you create a ZIP archive on your Mac using the built-in archive utility or other 3rd party software, the compressed file may contain a folder named “_MACOSX”.

This “_MACOSX” folder contains metadata about the archive and is visible when extracting on non-Mac systems, such as on Windows PC.  

Other metadata files created by Mac include.DS_Store, AppleDouble, etc.

In Apple’s terms, these are called Mac resource forks.

This article will show you how to remove and avoid having these Mac resource forks (system) files when compressing (zipping) files and folders.

How to ZIP Files on Mac without having the .DS_Store and _MACOSX folders

Here are the five (5) ways to do so.


Method 1. Delete Within the ZIP File

The fastest and easiest way is to delete the Mac system files from the ZIP file itself.

This is useful If you already have the compressed file containing the Mac system files and do not want to redo the whole compression process again.

Follow the steps below to do so.

  • Open the Terminal app. You can search “Terminal” using the magnifying glass icon in the top-right corner.
  • Navigate to the compressed file you already had. For example, if it is on the Desktop, use the command below;
cd Desktop
  • Now use the command below to delete the hidden system folder “__MACOSX folder”
zip -d compressed.zip __MACOSX/\*

Replace <compressed.zip> with the actual zip file you have.


Method 2. Use CleanArchiver

cleanarchiver-compress-without-ds.store-resource-forks

CleanArchiver is a simple and effective archiving utility for macOS and you will need to install this small application to compress files and folders into a ZIP package.

It supports standard archive types such as gzip, bzip2, and zip as well as compressed disk images.

The compression tool can exclude macOS system files, such as .DS_Store, _MACOSX, and custom icon file (Icon\r) in your zipped archive.


Method 3. Compress using Mac Terminal

When you use the Mac Terminal app to compress files and folders, there will not be any Mac-related system files created.

All you need to do is use a few simple commands.

  • Place the file/folder in an easy directory, e.g. Desktop, and navigate to it.
cd Desktop/newfolder
  • Use the following command to ZIP the folder WITHOUT __MACOSX, _DS_Store, and other Mac system metadata files.
zip -r compressed.zip . -x '.*' -x '__MACOSX'

From the example above, you have compressed “newfolder” located on your Desktop and named it “compressed.zip”.

Optional Step: You can verify the contents inside the zip file (ensure that no system files are included) using the command below;

zipinfo compressed.zip

Once done, you can now copy this zipped file to any Windows PC to unzip it.


Method 4. Use WinArchiver Lite

winarchiver-lite-zip-without-macosx-ds_store

WinArchiver Lite is a macOS application that can create zip folders fully compatible with Microsoft Windows Operating System.

During compression, the tool can exclude any Mac OS X files (.DS_Store, AppleDouble, etc.) from a Zip file automatically.

Some of the main features include;

  • Set 4-digit password protection on the zipped file (optional)
  • Supports multibyte characters (e.g. Japanese, Korean, Chinese)
  • Drag & Drop interface for quick file compression

Method 5. Use BetterZip

betterzip-compress-file-mac-without-system-files

BetterZip is a macOS archiving application that can create archives in popular formats, such as ZIP, DMG, TAR, 7-ZIP, and many others.

The compression tool allows you to filter out unwanted files during archive extraction. This includes Thumbs.db, .DS_Store and other Mac system files.

Some of its main features include;

  • Support opening and extracting of over 30 archive formats
  • Ability to join split files with enumerated file extensions, e.g, 001, 002, etc
  • Ability to preview files before the actual extraction

3 Ways to Compress ZIP on Mac Without _MACOSX and .DS_Store Read More »