How to

add-google-drive-to-mac-finder

How to Add Google Drive to Mac Finder [Step-by-Step- Guide]

Have you ever found yourself asking, “How do I add Google Drive to my Mac?

If you have, then you’re in the right place. We’re going to embark on a journey, unveiling step-by-step the process of adding Google Drive to your Mac’s Finder.

But why use Google Drive on Mac Finder?

Good question. Imagine your Google Drive is a magical box where you can store almost anything. It can hold a ton, from your favorite photos to crucial work documents.

Integrating Google Drive into your Mac Finder gives you direct access to this magic box right from your desktop. It’s like creating a shortcut to your favorite ice cream store in your living room – total convenience!

Fun Fact #1: Did you know that Google Drive can store up to 15GB of data for free? That's like having a closet that never fills up!

How to add a Google Drive folder into Mac’s Finder


Step 1. Getting Started with Google Drive

To add Google Drive to your Mac Finder, we must first ensure you have a Google Drive account set up. Think of it as your ticket to the magic carpet ride. Without it, there’s no ride.

Setting up a Google Drive account is as easy as pie. If you already have a Google or Gmail account, then congratulations, you’re halfway there! Google Drive comes as a standard feature with any Google account. Just head over to Google Drive; voila, your magic carpet awaits.

Don’t have a Google account? No worries, mate. Just head over to Google’s account creation page and follow the prompts.


Step 2. Installing Google Drive for Desktop on Your Mac

Alrighty then, now that we’re all set with Google Drive, it’s time to bring that magic carpet to your Mac. In other words, it’s time to install Google Drive for the desktop.

Download and Install Google Drive

  • Start by navigating to the Google Drive download page.
  • Choose “Download for Mac.”
  • Once downloaded, open the installer and follow the on-screen instructions. It’s a bit like assembling a piece of furniture; follow the guide, and you’ll have it up in no time!

Sign In to Your Google Drive Account

  • After installation, open Google Drive from your applications.
  • Now, sign in with your Google account. You’re essentially giving the magic carpet your home address so it knows where to land!

Step 3. Adding Google Drive to Mac Finder

Now, we’ve come to the real deal – how to add Google Drive to Finder. Buckle up because this is the part where the magic carpet and the tour guide come together.

Step-by-Step Guide on How to Add Google Drive to Mac Finder

  • After signing into Google Drive, you should see a pop-up window asking if you want Google Drive to appear in Finder. Click on “Open System Preferences” to allow it.

  • In the System Preferences, go to “Extensions,” then select “Finder.” You should see a checkbox next to Google Drive. If it’s unchecked, go ahead and check it. This action is like officially inviting Google Drive into the Mac Finder family.

  • Voila! Google Drive should now appear in the sidebar of any Finder window. It’s just like creating a shortcut to Google Drive in Finder.

It’s always a good idea to verify if everything worked as expected. Just open Finder, and you should see Google Drive sitting there, happy as a clam.

If not, don’t worry; we have a troubleshooting section coming up next.


Step 4. Using Google Drive on Mac Finder

Welcome to the club, my friend! You now have Google Drive integrated into your Mac Finder. So, what’s next? It’s time to get the most out of it.

Accessing Your Files and Folders

Just open Finder, click on Google Drive in the sidebar, and presto! All your files and folders are right there, just a click away. It’s as if your magical box of documents got a VIP pass to your desktop.

Managing Your Files and Folders

Adding, deleting, moving – you can manage your files just like you would with any other folder on your Mac. The bonus? Changes you make here automatically sync with your Google Drive on the web.

It’s like having a personal secretary taking notes and updating your files.

Want to find a specific document in Google Drive through Finder? You bet! Just use the search bar in the Finder window. Yes, you can search Google Drive in Finder.


Tips and Tricks for Maximizing Google Drive in Mac Finder

Now that you’ve added Google Drive to Mac Finder, it’s time to dive deeper and discover some tips and tricks that’ll take your Google Drive game to the next level.

  • Use the ‘Share’ function directly from Finder: Right-click on any file within the Google Drive section in Finder, and you’ll see an option to ‘Share using Google Drive’. This function is a timesaver when you need to share a file quickly. It’s like having a personal courier at your fingertips.

  • Optimize storage: If you’re tight on space on your Mac, you can select ‘Online Only’ for certain files or folders. This will keep the files in the cloud but remove them from your local storage. It’s like having a bigger magic box with the same size carpet.

  • Organize with colors: In Finder, you can assign colors to your files and folders in Google Drive. It’s a handy way to organize and quickly identify your stuff.

Conclusion

Remember, adding Google Drive to Mac Finder is like having a personal magic carpet at your command. It’s an effective way to streamline your workflow and access your files quickly and efficiently.

Still have questions? Or maybe you’re curious about other aspects of Google Drive?

Don’t forget to check out our post on Google Docs vs. Google Drive to understand the difference better. Or maybe you’re curious about your files’ security in Google Drive?

Then, this post about whether Google Drive encrypts files will be a good read.


How to Add Google Drive to Mac Finder [Step-by-Step- Guide] Read More »

google-drive-clear-recent-activity

How to Clear Recent History in Google Drive [Android, iOS, Web]

Ever find yourself asking, “How do I delete recent activity on Google Drive?” Don’t worry; you’re not alone.

And here’s some good news for you: clearing your recent history in Google Drive is easier than trying to find a charger when your phone’s on 1%!

Before diving in, let’s define Google Drive’s recent history. It’s like that buddy who always remembers where you’ve been and what you’ve done – in this case, the files you’ve recently opened or edited.

It can be handy, like when you forget that really important doc’s name (we’ve all been there), but sometimes, it can feel a little too much like someone reading over your shoulder.

Why should you care about clearing your Google Drive’s recent history?

Besides the obvious privacy reasons, it can also help declutter your digital workspace. Ever tried to focus on work when your desk is messy? It’s kind of like that.


What’s Being Stored in Your Google Drive Recent History?

In your recent history, Google Drive keeps track of the files you’ve opened or edited. It’s like a digital memory of your work.

That presentation you whipped up last night at 2 am? It’s there. The adorable cat photo you couldn’t resist peeking at? Yup, that’s there too.

What’s cool (or not, depending on your perspective) is that Google Drive can handle a ton of different file types.

Remember when we said it supports over 30 different file types in the intro? To give you an idea, you can open and view .mov files right in Google Drive.


How to Clear Google Drive Recent History Activity

Here are the methods for the 3 platforms you can use to clear your activity history;


1. Clearing Recent History on a Computer

Here’s a simple step-by-step guide:

  • Open Google Drive in your web browser.
  • On the left side, you’ll find the ‘Recent‘ tab. Click on it.
  • Now you’ll see all your recently accessed or edited files. To remove them from your recent history, right-click on the file and select ‘Remove from Recent.’
  • Repeat this for any other files you want to remove.

Easy as pie, right? And guess what? You can also do this on your mobile device. Let’s see how.

2. Clearing Recent History on Android Devices

Got an Android? No problem! Just follow these steps:

  • Open the Google Drive app on your device.
  • Tap on the ‘Menu‘ button (it looks like three horizontal lines), and then select ‘Recent.’
  • You’ll see a list of your recently accessed files. To remove a file from this list, tap on the three dots next to the file and then tap ‘Remove from Recent.’
  • Repeat for any other files you want to clear.

And there you have it! But what about our friends on team iPhone? Don’t worry; we haven’t forgotten about you.

3. Clearing Recent History on iOS Devices

For those of you on an iPhone, the steps are pretty much the same as on Android:

  • Open the Google Drive app.
  • Tap the ‘Menu’ button and then select ‘Recent.’
  • To remove a file from your recent history, tap the three dots next to it and then tap ‘Remove from Recent.’
  • Do this for any other files you want to remove.

Things to Keep in Mind When Clearing Your Recent History

Clearing your recent history on Google Drive is as straightforward as asking Siri to play your favorite song.

But, as with any tech-related stuff, there are a few quirks you should be aware of. It’s a bit like when you get a new gadget; you need to get to know the ins and outs of using it effectively.

So, here are a few things to keep in mind:

  • It’s all or nothing: Unfortunately, there’s no ‘Clear All’ button when it comes to your Google Drive’s recent history. You’ve got to remove files one by one, like picking up pieces of LEGO off the floor. But hey, it’s a small price to pay for privacy and a tidy Drive!

  • Only your view is changed: Removing files from your recent history only changes your view. The file isn’t deleted from Google Drive or removed from other users’ recent views if it’s a shared file. It’s kind of like turning off the radio; just because you can’t hear the music doesn’t mean the song isn’t still playing!

  • You can’t undo this action: Once you remove a file from your recent history, there’s no bringing it back. Consider it a one-way ticket. So, make sure you really want to remove that file before you do.

  • Mobile app variations: Depending on your app’s version and device, the steps to clear your recent history might vary slightly. So, if you ask, “How do I delete recently viewed on the Google Drive app?” don’t stress. Sometimes, all you need is a little bit of exploration.

Other Helpful Google Drive Privacy Tips

Managing your Google Drive’s recent history is only one part of the privacy puzzle. It’s a great start, but there’s more to the world of Google Drive than just your recent files.

Consider this section like the extra toppings on your favorite pizza – it makes the whole experience even better!

  • Sharing Settings: When sharing a file or a folder, ensure you know who you’re sharing it with and their permissions. It’s a bit like lending your car keys – you wouldn’t want to give them to just anyone, right?

  • Two-Factor Authentication: Enable two-factor authentication for an extra layer of security on your Google account. It’s like having a secret handshake – only you know it, making it harder for anyone else to get in.

  • Regular Clean-ups: Regularly review and clean up your Drive to ensure you’re not holding onto unnecessary files. Consider it digital spring cleaning!

  • Check for unsupported files: Google Drive supports a plethora of file formats, but not everything. Make sure the files you’re storing are supported by Google Drive. We have a list of Google Drive supported video formats that might be useful.

  • Encryption: Did you know Google Drive has built-in encryption? But if you’re looking for extra security, there are ways to add another layer of encryption to your files. Check out our post on Does Google Drive encrypt files? to find out more!

Conclusion

Now you’re well-equipped to clear your recent history activity on Google Drive, whether you’re on a computer or on your Android or iOS device.

You’ve also got a few other handy privacy tips up your sleeve, ready to put into action. Remember, in the digital world, knowledge is power – and now, you’ve got plenty of it!

Keep in mind that Google Drive is a powerful tool that can do much more than store your files. It can hold an astonishing number of photos, play various video file formats, and even open .zip files!


How to Clear Recent History in Google Drive [Android, iOS, Web] Read More »

open-google-drive-unsupported-file-type

3 Ways to Fix and Open Unsupported File Types in Google Drive

Ever found yourself smack dab in the middle of a project, only to hit a roadblock with an “unsupported file type” warning on Google Drive?

You’re probably left scratching your head, asking, “How do I fix unsupported files in Google Drive?

Well, you’ve come to the right place! We’re about to embark on a fun, informative journey to make sense of these pesky file formats and teach you how to open unsupported file types.

We’ll go over why this happens, how to solve it, and how to prevent it in the future.

Did you know that Google Drive directly supports more than 30 types of files in its web interface? This includes all the popular ones, from PDFs to MP3s.

Despite this, there can be hiccups when it comes to less common file types. Stick with us to learn more about this.

How to Open Unsupported File Types in Google Drive

These three (3) solutions will help you overcome compatibility hurdles and make the most out of your Google Drive experience.


Method 1. Download and Open Locally

When you come across an unsupported file type in Google Drive, one of the simplest ways to access its contents is by downloading it to your computer and opening it using compatible software.

Here’s how you can do it:

  • Locate the file: Open Google Drive and navigate to the folder storing the unsupported file.

  • Select the file: Check the box beside the file or right-click on it to bring up the options menu.

  • Download the file: Click on the “Download” option in the menu. Google Drive will begin downloading the file to your computer’s default downloads folder.

  • Find the file on your computer: Once the download is complete, open the file explorer on your computer and locate the downloaded file.

  • Open with compatible software: Right-click on the file, select “Open with,” and choose a compatible application or software that supports the file type. For example, you can use VLC Media Player or Windows Media Player if you’re trying to open a video file.

Using this method, you can easily bypass the unsupported file type limitation and access the content of the file on your local machine.


Method 2. Use a Compatible App or Extension

Google Drive offers a wide range of compatible apps and extensions that can help you overcome the limitations of unsupported file types.

Follow these steps to utilize this method effectively:

  • Install the required app or extension: Open the Chrome Web Store and search for an app or extension that is capable of opening the unsupported file type. For example, if you have a file in Adobe Illustrator format (.ai), you can search for an Illustrator viewer or converter app.

  • Add the app or extension to Chrome: Once you find a suitable app or extension, click on the “Add to Chrome” button to install it.

  • Open the file with the app or extension: Go back to Google Drive, find the unsupported file, right-click on it, and select “Open with.” Choose the newly installed app or extension from the list.

  • Follow the prompts: The app or extension will guide you through the process of opening and viewing the file. It may also provide options for converting the file to a more widely supported format.

Using compatible apps or extensions can significantly enhance your ability to open and work with unsupported file types directly within Google Drive, saving you the hassle of downloading and opening files locally.


Method 3: Convert the File to a Supported Format

If you frequently encounter unsupported file types in Google Drive, converting them to a supported format is a reliable solution.

Here’s how you can convert the file:

  • Locate the file: Find the unsupported file in Google Drive.

  • Right-click and select “Open with”: Choose the “Open with” option from the menu and select a compatible Google Workspace application, such as Google Docs, Sheets, or Slides, depending on the file type.

  • Convert the file: After the file is opened in the selected Google Workspace application, go to the “File” menu and choose the “Save as” or “Download as” option. Select a supported file format for the conversion. For example, you can convert a Google Docs to a Microsoft Word (.docx) format or a PDF (.pdf) format.

  • Save the converted file: Once you’ve selected the desired format, click “Save” or “Download” to save the converted file to your Google Drive.

By converting the unsupported file to a compatible format using Google Workspace applications, you can ensure that you can open and edit the file directly within Google Drive without any compatibility issues.


Conclusion

Encountering unsupported file types in Google Drive can be frustrating, but with the right methods, you can overcome this challenge and gain access to the content of these files.

You can read about our related posts on how Google Drive handles .mov files and how it opens ZIP files.

Choose the method that suits your needs and preferences, and never let unsupported file types hinder your productivity and workflow within Google Drive.

With these solutions, you can maximize your cloud storage experience and enjoy seamless file management.


3 Ways to Fix and Open Unsupported File Types in Google Drive Read More »

Fix-Google-Drive-Quota-Exceeded

3 Ways to Fix Google Drive Quota Exceeded [Solved]

Have you ever been cruising along in your Google Drive, only to hit the dreaded “quota exceeded” message? It’s a bit like running out of gas on a road trip. Well, you’re not alone.

How do I fix the Google Drive exceeded quota issue?

That’s a question we’ve heard quite often. Before jumping into the fixes, let’s understand what this means.

When Google says “quota exceeded,” it basically means that your Google Drive is full.

Just like when your backpack is stuffed to the brim, and you can’t squeeze in that extra snack, Google Drive also has a limit to how much data it can store.

But don’t worry; we’re here to help you navigate this tech hiccup. We will explore three ways to tackle the “Google Drive quota exceeded” issue; trust us, it’s easier than you think!

If you’re curious about how Google Drive can be a great tool for students, check out our post on how Google Drive helps students.

Fun fact #1: Did you know that when it was first introduced in 2012, Google Drive offered a whopping 5GB of storage for free? That's like carrying around 1,000 songs in your pocket! 

Understanding the “Google Drive Quota Exceeded” Issue

Alright, so we’ve hit this roadblock named “Google Drive quota exceeded.” What does that even mean? Basically, it’s Google’s way of saying, “Hey, your storage is full. No more room for new stuff.”

Each Google Drive account comes with 15GB of free storage. This space is shared across Google Drive, Gmail, and Google Photos.

Now, if you’re a bit of a digital hoarder (hey, no judgment here), you might find yourself bumping into the “quota exceeded” message.

Imagine you’re planning a road trip with a small car. You start loading up your luggage, snacks, and maybe a cooler, and suddenly there’s no room left for your favorite inflatable flamingo floaties.

That’s the same principle here. Your Google Drive is the car, and your files are all the things you want to bring along.

Fun fact #2: Your emails in Gmail, including all those attachments, count towards your Google Drive storage limit. Bet you didn't see that coming!

Method 1. Upgrade Your Google Drive Storage Plan

Our first solution is just like upgrading to a bigger car for that road trip I mentioned earlier. If your Google Drive is bursting at the seams, it might be time to consider upgrading your storage plan.

Why Upgrade?

Well, think of it like this. If you’re a movie buff with a large film collection, a single shelf might not cut it. You need more space, so you get a bigger shelf. The same applies to your digital files.

Upgrading your Google Drive storage plan gives you more space to store all those important files, photos, and maybe even 1000 shots of your pet (we’ve all been there).

How to Upgrade?

Upgrading your Google Drive is as easy as pie. All you need to do is head over to Google’s storage plans page, select the plan that suits you, and you’ve got more space!

Fun fact #3: Google's storage plans are now called Google One. Not only do you get more storage, but you also get a few extra perks, like access to Google experts and the option to add your family to your plan.

Method 2. Free Up Storage Space

Alright, folks, let’s talk about our second solution. It’s a bit like decluttering your closet. Got clothes you haven’t worn in a year? Time to let them go.

The same goes for your Google Drive – if there are files you don’t need anymore, why not free up some space?

Why It’s Important to Keep Your Drive Clean?

Just like keeping your room clean makes it easier to find that one sock you’re always losing, keeping your Drive tidy makes it easier to find your files.

Plus, the less unnecessary stuff you have, the less likely you are to hit that pesky “quota exceeded” issue.

Easy Steps to Free Up Space

Cleaning up your Drive is a breeze. Start by deleting files you no longer need. Remember, they’ll go to the Trash folder, so make sure to empty that too.

Got a bunch of old emails with large attachments? Those can go too. And don’t forget about those backed-up photos and videos on Google Photos – if they’re backed up elsewhere, consider removing them from your Drive.


Method 3. Utilize Google Drive Alternatives or Cloud Storage

Okay, so we’ve upgraded our storage and tidied up our Drive, but what if we’re still bumping against that quota?

Well, there’s a wide world of cloud storage out there, and it might be time to explore alternatives or additional options to Google Drive.

Why Look for Alternatives?

Remember that road trip we’ve been talking about? Well, sometimes, one car just isn’t enough.

Maybe you’ve got a bunch of friends who want to join, or maybe you’ve found some cool stuff you want to bring back along the way. Either way, having an extra car (or two) can come in handy.

The same goes for cloud storage. Having more than one option can give you more space to store your digital stuff.

Top Google Drive Alternatives

There’s a buffet of cloud storage services out there, each with its own perks. Dropbox offers easy syncing and file sharing.

Microsoft OneDrive integrates seamlessly with Office 365. And Apple’s iCloud is a great option for Apple device users.


Conclusion

We’ve been on quite a journey, haven’t we? From understanding the “Google Drive quota exceeded” issue to exploring ways to tackle it, we’ve covered quite a bit of ground.

Like a road trip, it’s been an adventure of discoveries and fun facts.

Remember, whether you’re upgrading your Google Drive storage, tidying up your digital space, or exploring other cloud storage options, the goal is to ensure you have enough room for all your important files.

So, the next time you bump into the “quota exceeded” message, don’t worry. You’ve got the map, the keys, and the know-how to navigate this tech roadblock.


3 Ways to Fix Google Drive Quota Exceeded [Solved] Read More »

send=large-file-telegram

9 Ways to Send Large Files On Telegram [Exceed Size Limit]

Ever been in the middle of sending a file over Telegram, only to get hit with the dreaded “file too large” error?

Telegram has a maximum allowed file size of 2 GB per file.

In today’s digital era, we’re constantly sharing and receiving files. Pictures, videos, documents, you name it. And when it comes to apps that make this task easier, Telegram is the champ.

But like any app, it has its limits. That hurdle we all stumble upon is the file size limit.

Now, what if I told you there are ways around this? That you could send your large files over Telegram without the app batting an eyelid? Sounds like magic, right?

How to Send Large Files On Telegram?

In this comprehensive guide, I’m going to walk you through nine (9) different ways to share large files on Telegram.


Method 1. Splitting and Compressing Files

Splitting Files

When a file’s too large, one way around it is to split it into smaller, more manageable pieces. Think of it as dividing a long movie into several episodes.

And the tool for this job? It’s a software called HJSplit.

HJSplit is a free application that helps you split files of any type and size. It’s as simple as selecting your file, choosing your split file size, and hitting the ‘start’ button.

Your file will be neatly divided into smaller parts that fit right under Telegram’s file size limit.

Compressing Files

Our second method is compressing files, which is like vacuum-packing your clothes to make them fit into a small suitcase. In this case, we’re using a tool called 7-Zip.

7-Zip is an open-source software that uses compression to reduce the size of your files. You need to right-click your file, select ‘7-Zip’, and then ‘Add to archive.’

You can choose the level of compression – the higher the level, the smaller the file. Just remember, higher compression might mean a longer time to compress and decompress.


Method 2. Cloud Storage Services

Uploading to Cloud Storage

The first part of this method is to upload your file to a cloud storage service. It’s like sending your file on a little vacation to the cloud.

And for this trip, we’ve got three top-notch travel agents – pCloud, Sync.com, and MEGA.

pCloud is a secure and user-friendly cloud service that offers up to 10GB of free storage. You can upload your files easily and access them from any device. And the best part? No file size limits!

Sync.com is another great option, with a focus on privacy and security. It offers 5GB of free storage and allows you to share files and folders with end-to-end encryption. It’s like sending your file in an armored car!

MEGA is a cloud storage heavyweight offering a whopping 15GB of free storage. It also provides robust security features, and its easy-to-use interface makes uploading and sharing files a breeze.

Sharing Cloud Storage Links

Once your file is safely stored in the cloud, you can generate a shareable link. This link is like a golden ticket that gives the recipient access to download the file.

And voila! You’ve successfully circumvented the Telegram file size limit without breaking a sweat.

Remember, the aim of the game here is to make the file-sharing process as smooth as possible. So, choose the cloud storage service that suits your needs the best.


Method 3. File Transfer Services

File transfer services are your best buddies when you’re dealing with large files. They are specifically designed to handle file sizes that regular messaging apps can’t.

A bunch of these services are available, but one of the popular ones is WeTransfer. WeTransfer allows you to send files up to 2GB for free without sign-up.

It’s as easy as entering your recipient’s email, adding your files, and hitting the “Transfer” button.

Another solid option is Filemail. Their free plan lets you send files up to a whopping 50GB! Yes, you read that right.

Plus, the interface is super intuitive and user-friendly.

Sharing File Transfer Service Links

These services work by uploading your file to their server and then generating a download link. You can share this link directly on Telegram.

The recipient clicks on it and is led to the download page. It’s like giving someone directions to a secret treasure chest!


Method 4. External File Hosting Services

Uploading to External File Hosting Services

First, you must upload your large file to the hosting service. This might sound complicated, but it’s as easy as pie with user-friendly services like Dropbox and Google Drive.

Dropbox is a fantastic tool that lets you upload files and share them via a link. The free plan gives you up to 2GB of storage space.

It’s got a clean interface that’s simple to navigate, making file sharing a breeze.

Google Drive, on the other hand, offers a whopping 15GB of free storage. It’s perfect if you already have a Google account, as it integrates seamlessly with other Google services.

Sharing External File Hosting Service Links

Once your file is uploaded, these services generate a unique link for your file. You can share this link directly in your Telegram chat.

When your recipient clicks the link, they’ll be taken straight to the file for download. It’s as if you’re giving them an exclusive backstage pass to your concert of files!


Method 5. FTP Servers

Setting up an FTP Server

To start, you’ll need to set up an FTP server. This might sound like rocket science, but it’s a walk in the park with tools like FileZilla Server and Serv-U.

FileZilla Server is a free, open-source FTP server. It’s easy to install and set up, allowing you to share files of any size.

Just remember to set up your firewall and router correctly to allow FTP connections.

Serv-U is another reliable FTP server software. Although it’s not free, it offers a ton of features and is known for its security and performance.

Sharing FTP Server Details

Once your server is all setup, you can upload your large file to it. You’ll then provide the recipient with the FTP server details (server address, username, and password).

It’s like giving them a secret map to a hidden treasure chest!

They’ll need an FTP client, like FileZilla Client, to connect to your server and download the file.


Method 6. Peer-to-Peer (P2P) File Sharing

And now, onto the sixth method – P2P file sharing. Imagine it as a round table where everyone can both give and take files. It’s a bit more technical but like a potluck dinner for files!

Using P2P File-Sharing Software

P2P file sharing involves using software that connects your computer to a network of others, allowing you to share large files directly.

It’s like connecting a bunch of computers with invisible strings and sliding your files across to the other side.

Two popular P2P software are BitTorrent and uTorrent. These programs break your file into small chunks and share them across the network.

Other users can then download these chunks, which the software reassembles into the original file.

Sharing P2P File Sharing Links

Once you’ve uploaded your file to the P2P network, you can create a torrent file. This file acts like a roadmap, guiding others to the chunks of your file on the network.

You can then share this torrent file or magnet link on Telegram. Your recipient will need a P2P client (like BitTorrent or uTorrent) to download the file.


Method 7. Video Streaming Platforms

Ready for round seven? This time, we’re going to look at using video streaming platforms. It’s like hosting your own mini-movie premiere but for your files!

Uploading to Video Streaming Platforms

If the large file you want to share on Telegram is a video, then video streaming platforms like YouTube and Vimeo can be your best pals.

YouTube is a platform we all know and love. It allows you to upload videos of almost any size for free. You can set your video to ‘unlisted’ if you want it to be accessible only to people with the link.

Vimeo is another fantastic platform, especially for high-quality videos.

Its free version has a 500MB weekly upload limit, but if you’re dealing with larger videos or more frequent uploads, they offer paid plans that increase this limit.

Sharing Video Streaming Links

Once your video is uploaded and ready, these platforms generate a unique URL for your video. You can share this link directly in your Telegram chat.

When your recipient clicks the link, they’ll be able to watch the video directly on the platform. It’s like inviting them to a private screening of your video!


Method 8. Email Services

We’re nearing the end, folks, but we’ve still got some great methods up our sleeve! Number eight on our list is using email services.

It’s like sending a package but in the virtual world.

Using Email Services

Email services, like Gmail and Outlook, allow you to attach files to your emails. But they do have a limit on the size of attachments – Gmail, for example, caps it at 25MB.

But here’s the hack: both Gmail and Outlook automatically upload larger files to their respective cloud storage platforms (Google Drive and OneDrive) and include a download link in your email. So technically, you can send larger files!

Sharing Email Attachments

Once your file is attached and your email is sent, you can copy the download link for the file. You can then share this link directly in your Telegram chat. It’s like sending a letter with a key to a secret lockbox!


Method 9. External File Sharing Platforms

Alright, my tech-savvy friends, we’ve made it to the final round! The ninth method is using external file-sharing platforms. These are like public libraries, but for files!

Uploading to External File-Sharing Platforms

File-sharing platforms are websites that allow you to upload and share large files. They’re built for this purpose and handle large files like a champ.

Two popular platforms are MediaFire and Zippyshare.

MediaFire is a simple-to-use service that offers up to 10GB of free storage. You can upload files of any type, and it generates a direct link that you can share.

Zippyshare, on the other hand, allows you to share files up to 500MB without even needing an account. The interface is straightforward, making the process a breeze.


Conclusion

Well, we’ve journeyed through the vast landscape of file sharing, exploring the nooks and crannies of nine different methods to share large files on Telegram.

From splitting and compressing files, all the way to external file-sharing platforms, we’ve seen it all.

No more will the file size limit be a hurdle in your path. You now have the tools to send those hefty files, whether it’s a video, a high-resolution image, or that 200-page report you’ve been working on.

Remember, each method has its own perks, so consider what works best for you and your file-sharing needs.


9 Ways to Send Large Files On Telegram [Exceed Size Limit] Read More »

fix-telegram-not-receiving-verification-code

11 Ways to Fix Telegram Not Receiving Code for Verification

Have you ever been in a situation where you’re trying to log into your Telegram account, but you find yourself asking: “Why am I not getting a verification code from Telegram?” or “Why won’t Telegram send me an SMS code?

Well, you’re not alone! This can be quite frustrating, especially when you need to access your chats and messages ASAP.

In today’s post, we’re going to explore the different ways to fix Telegram not receiving the code for verification.

How to Fix Telegram Not Receiving Code For Verification

Here are the eleven (11) ways you can use to rectify the problem.


Method 1. Mobile Apps for Virtual Numbers

The fastest way is often using a mobile app to get a virtual number. It can be a handy workaround for not receiving your Telegram verification code.

These apps provide you with an alternative phone number that can be used to receive SMS verification codes. Here’s how you can go about it:

  • Hushed: Hushed is another app offering virtual numbers, with options for temporary and permanent numbers. The app provides various plans, giving you the flexibility to choose the one that fits your requirements. You can use the virtual number from Hushed to join Telegram with a fake number.

  • Numero eSIM: Numero eSIM is an app that offers virtual numbers using eSIM technology. It supports multiple phone numbers on a single device and has a wide range of available numbers from different countries. With various plans to choose from, you can select the best option for your needs and use the virtual number for Telegram and other services.

Method 2. Using Online SMS Receiving Services

Online SMS receiving services can be a handy option as these websites provide temporary virtual numbers that can receive SMS messages, allowing you to complete the Telegram verification process.

SMSReceiveFree can get SMS text messages from all over the world. In addition, these virtual numbers can be used to verify and register for websites like Twitter and Google.

All messages and phone numbers are thrown away after seven (7) days. Every month, new virtual phone numbers are added to the list.

Even if the sender is located in a different nation, these virtual mobile numbers can still receive messages from anywhere in the world.

AnonymSMS is a completely free online service that lets you receive SMS messages without entering your mobile or cell phone number.

These temporary numbers are based on a genuine SIM, and new virtual numbers are added daily.

In most cases, communications are received immediately. Hit the refresh button to get to it. After a while, all visible and utilized virtual numbers will become inactive, and you can choose another number to use.


Method 3. Verify Your Phone Number

If you’re still struggling to receive a verification code from Telegram, double-checking the phone number you’re using might be the solution.

Mistreating a digit or two is easy, especially if you’re rushing or distracted.

Here’s how to verify your phone number:

  • Double-check the number: Make sure the phone number you’re entering is the correct one and is currently active. Ensure there are no extra digits or missing numbers.
  • Check the country code: The international country code is vital to your phone number, especially if you’re outside the US. Make sure the correct country code is entered before your phone number. For example, if you’re in the UK, your country code is +44, and in Canada, it’s +1.
  • Remove any extra zeroes: If your phone number starts with a zero, try removing it when entering your number into Telegram. For example, if your number is 01234 567890, enter it as 1234 567890.
  • Try a different number: If you have access to a different phone number, try using that one. Sometimes, certain numbers might have issues receiving verification codes from Telegram due to carrier restrictions or other issues.

After verifying your phone number, try to request the code again. Hopefully, the verification code will enter your inbox, and you’ll be able to log into Telegram without a hitch!


Method 4. Disable VPN or Proxy

If you’re using a Virtual Private Network (VPN) or a proxy server, it could be causing issues with Telegram sending you a verification code.

While VPNs and proxies are great for privacy and accessing content from different regions, they can sometimes interfere with apps and services like Telegram. Here’s how to disable them:

Disable VPN:

  • Go to your device’s settings.
  • Find the section for VPN settings. It’s typically under “Network & Internet” on Android and “General” on iOS.
  • If a VPN connection is active, there should be an option to disconnect or turn off the VPN.

Disable Proxy:

  • If you’re using a proxy server, you’ll typically find this in your device’s Wi-Fi settings.
  • Go to the Wi-Fi network you’re connected to and look for an option for “Proxy” or “Advanced options.”
  • If a proxy is set up, you should see an option to disable it or set it to “None.”

Method 5. Check SMS Settings

Sometimes, your device’s SMS settings might interfere with receiving verification codes from Telegram. This might be particularly relevant for those of you asking, “Why can’t I receive the SMS verification code?

Here’s how you can check your SMS settings:

For Android:

  1. Check your default SMS app: Some users have reported issues with certain SMS apps not receiving verification codes properly on Android. You can switch your default SMS app to another one, such as Google’s Messages, to see if that resolves the issue.
  2. Check blocked numbers: Make sure Telegram or the number sending the verification code hasn’t been accidentally blocked. You can usually find this in your phone’s settings under “Blocked numbers” or “Spam and blocked.”

For iOS:

  1. Check for Do Not Disturb: If you’ve enabled Do Not Disturb mode, it might prevent you from receiving SMS notifications. You can check this in your settings under “Do Not Disturb.”
  2. Check for blocked numbers: Like Android, ensure you haven’t accidentally blocked Telegram or the number sending the verification code. You can find this in your settings under “Phone” and then “Blocked Contacts.”

Method 6. Clear App Cache and Data

Sometimes, clearing the app’s cache and data can work wonders to resolve issues like not receiving verification codes. Don’t worry; this won’t delete your messages or chats! Here’s how to do it:

For Android:

  • Open your device’s Settings app.
  • Tap on “Apps” or “Applications.”
  • Scroll down and find Telegram, then tap on it.
  • Tap on “Storage” and then hit “Clear Cache” and “Clear Data.”

For iOS:

On iOS devices, you’ll need to delete and reinstall the app to clear its cache and data.

  • Press and hold the Telegram app icon.
  • Tap on “Remove App” or “Delete App.”
  • Confirm the deletion.
  • Head to the App Store and download Telegram again.

Method 7. Update Telegram App

An outdated version of the Telegram app might be causing issues with receiving verification codes.

To ensure you’re using the latest version, head over to your device’s app store (Google Play Store for Android or App Store for iOS) and check for updates.

If there’s an update available, go ahead and install it. This might be the solution to get those elusive verification codes coming your way!


Method 8. Check Your Internet Connection

First, let’s ensure your internet connection is up and running. Sometimes, the simplest solution is the most overlooked.

A stable connection is essential for receiving your verification code from Telegram. Here’s what you can do:

  • Check if your Wi-Fi or mobile data is turned on and connected.
  • Try opening a website or using another app that requires an internet connection to see if it’s working properly.
  • If you’re on Wi-Fi, try moving closer to the router or restarting it. In some cases, a weak signal might be the culprit.

Method 9. Check if Telegram Servers Are Down

Sometimes, the issue might not be on your end. Telegram servers could be experiencing temporary downtime, making it impossible for you to receive your verification code.

You can visit websites like Downdetector or Outage to check if that’s the case. Report to see if other users are reporting issues with Telegram.

If you find that the servers are indeed down, you’ll have to wait until they’re back up and running to receive your code.


Method 10. Restart Your Device

When in doubt, turn it off and on again! Restarting your device can help resolve minor glitches that might be preventing Telegram from sending you a verification code.

Just press and hold your device’s power button, select the restart option, and give it a minute to reboot. Once it’s back up, try logging into Telegram again and see if the verification code comes through this time.


Method 11. Contact Telegram Support

If all else fails, it’s time to reach out to the experts. You can contact Telegram Support directly to help you resolve the verification code issue.

To get in touch with them, visit the Telegram support page (https://my.telegram.org/support) and submit a request detailing your problem.

Be sure to include your phone number and any other relevant information. They should be able to help you get your account up and running in no time!


11 Ways to Fix Telegram Not Receiving Code for Verification Read More »

view-open-AVIF-file-image-format-windows-mac-android-ios

How to Open & View AVIF Image Format [PC, Android, iOS, Mac]

Opening a AVIF image file format is fairly easy, depending on the type of operating systems you are using.

In this article, we will address all the solutions you need to view AVIF images, regardless if you are using a Windows PC, a Mac computer, using Android or iOS mobile device.

What is an AVIF Image?

Developed by the Alliance for Open Media with participating members such as Amazon, Google and Microsoft, the AVIF Image File format (.avif) is a compressed image file that competes with the likes of JPEG and WebP formats.

Below is a summary of all the methods to open AVIF images, depending on your operating system.

S/noOpen WithOperating System
1Google ChromeAll OS
2ImageGlassWindows
3qViewmacOS
4AVIF Image Viewer & ConverterAndroid
5Use latest iOS & macOS versionsiOS
6PhotoKit AVIF Image ViewerAll OS / Cloud service

How to Open and View AVIF Image File Format?

Here are the six (6) ways to open AVIF image files for all operating systems and devices.


1. Open with your Web Browser

Several web browsers now have support for the AVIF image format.

At the time of this article, you can use Google Chrome, Brave browser and Firefox browser to view AVIF images.

Currently, the Safari browser does not support opening AVIF format, but this may change in the near future.

open-avif-image-file-format-using-web-browser-google-chrome

To view the AVIF format using your web browser, do the following;

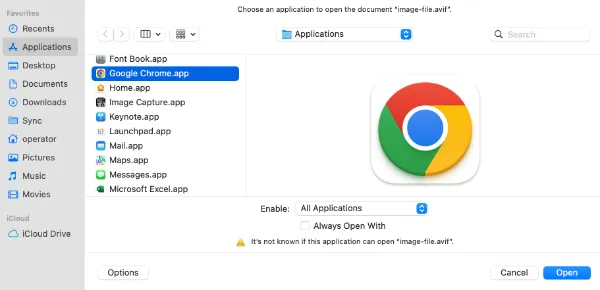
  1. Right-click on the AVIF file, choose <Open With> and select <Other>
  2. Select <All Applications> from the drop-down menu in the Enable option.
  3. Choose Google Chrome on the left pane and click <Open>
  4. You can now view your AVIF image file using the Chrome browser.

2. Install ImageGlass for Windows

imageglass-AVIF-view-open-image-format

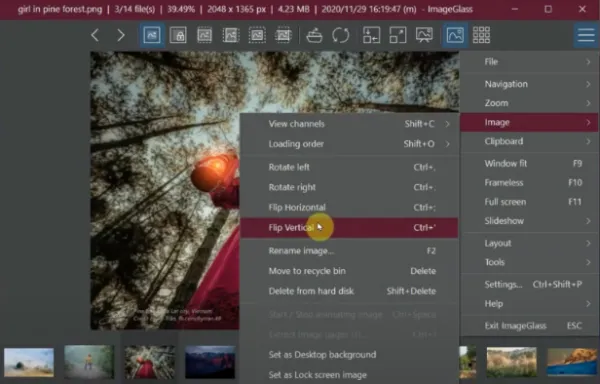
ImageGlass is a lightweight, versatile and simple open-source Windows application that supports opening over 80+ image formats, such as AVIF, SVG, HEIC, RAW and many more.

Appearance-wise, it has a minimalist design look that comes with image editing features. Some of the main features include;

  • Losslessly rotate/save the viewing image.
  • Drag-n-drop viewing image supported.
  • Ability to view/extract multi-page image files (TIF, ICO) separately.
  • Six zoom modes
  • Conversion to 10 different formats

3. Install qView for Mac

qview-for-Mac-view-open-AVIF-image-file-format

qView is a lightweight and minimalist image viewer for Mac that instantly opens up AVIF file formats and other image files. It runs on low memory and requires low CPU usage.

qView also has additional features, such as file history, rotation/mirroring and animated GIF controls.

The free and open-source software supports all standard image formats, including BMP, GIF, JPG, PNG, TIFF, and WebP image formats.


4. Install AVIF Image Viewer for Android

Android-AVIF-Image-Viewer-Converter-app-open-view

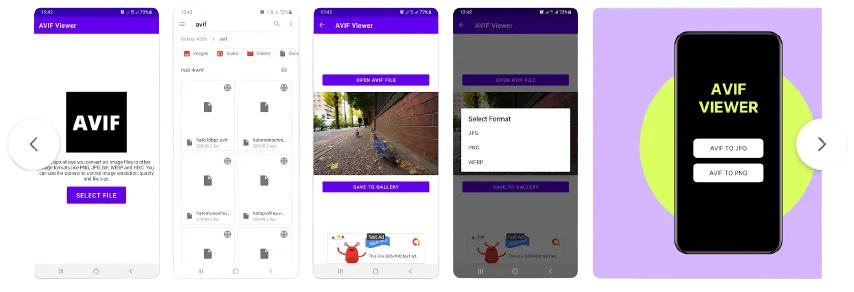
AVIF Image Viewer & Converter is a lightweight Android mobile app that recognises and opens AVIF image file formats.

For a start, users can view AVIF images using the app and have the option to save them to the Gallery in JPG, PNG or WebP format.

With the new encoding feature, users can convert images to AVIF format.


5. Use the latest iOS / macOS version

apple-devices-latest-version-view-open-AVIF-image-file-format

For Apple iPhone, iPad mobile devices and macOS computers running iOS 16, iPadOS 16 and macOS 13 Ventura, there will be the automatic built-in capability to support AVIF images through Preview, Finder and Image viewing features.

If you are not on the latest macOS or iOS version, you can also try to open AVIF files using Google Chrome or Opera web browsers. Both web browsers are tested to be able to display AVIF images.

Safari web browser version 16.0 is also said to be able to support AVIF image file formats natively.


6. Use an Online AVIF viewer

photokit-avif-image-viewer

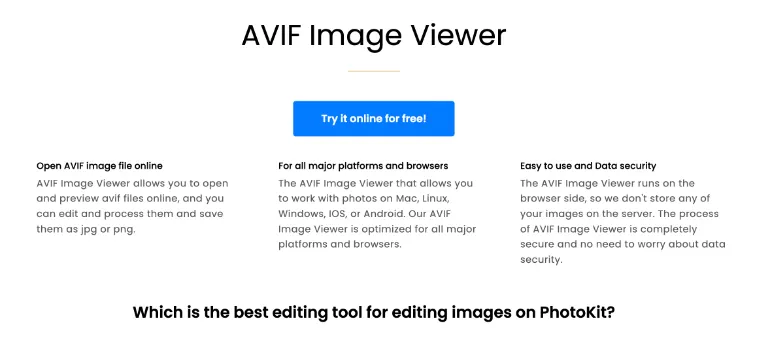
Photokit AVIF Image Viewer is an online AVIF image viewing and editing service that runs on the web browser side and not on the site’s server.

You upload your AVIF file and preview them through your web browser. Then, you can edit the image file using a wide range of tools, such as adjusting exposure, correction, using the palette, inserting sketching or even adding cartoons.

After editing, you can save them in jpg or png format.


How to Open & View AVIF Image Format [PC, Android, iOS, Mac] Read More »

view-AVIF-image-format-using-Mac

7 Ways to Open & View AVIF image file format using Mac

When you are using macOS, there are several ways to preview and open the AVIF image file format.

Developed by the Alliance for Open Media with participating members such as Amazon, Google and Microsoft, the AVIF Image File format (.avif) is a compressed image file that competes with the likes of JPEG and WebP formats.

How to open and view AVIF image file format on Mac?

Here are the seven (7) different methods you can use to open AVIF files on a Mac computer.


1. Open with a Web browser

view-AVIF-image-format-open-using-web-browser

Several web browsers now have support for the AVIF image format.

At the time of this article, you can use Google Chrome, Brave browser and Firefox browser to view the image.

Currently, the Safari browser does not support opening AVIF format, but this may change in the near future.

To view the AVIF format using your web browser, do the following;

open-AVIF-image-file-format-using-google-chrome-web-browser
  1. Right-click on the AVIF file, choose <Open With> and select <Other>
  2. Select <All Applications> from the drop-down menu in the Enable option.
  3. Choose Google Chrome on the left pane and click <Open>
  4. You can now view your AVIF image file using the Chrome browser.

2. Use PhotoKit AVIF Image Viewer

photokit-avif-image-viewer

Photokit AVIF Image Viewer is an online AVIF image viewing and editing service that runs on the web browser side and not on the site’s server.

You upload your AVIF file and preview them through your web browser. Then, you can edit the image file using a wide range of tools, such as adjusting exposure, correction, using the palette, inserting sketching or even adding cartoons.

After editing, you can save them in jpg or png format.


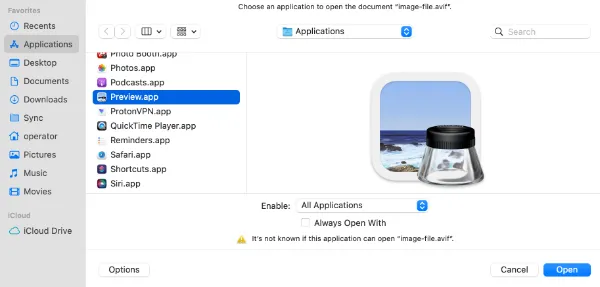
3. Open with Preview.app

Depending on your macOS version, you can try opening the AVIF image file using the Mac Preview app.

open-avif-image-file-format-using-preview-mac

Try the following;

  • Right-click on the AVIF image file, choose <Open With> and select <Other>
  • Select <All Applications> from the drop-down menu in the Enable option.
  • Choose Preview.app on the left pane and click <Open>

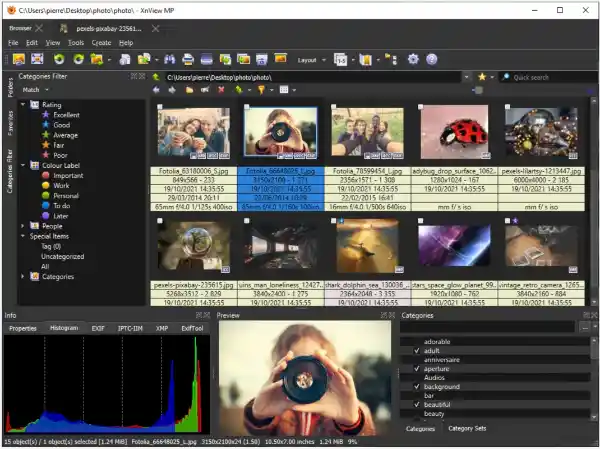
4. Install XnViewMP for Mac

xnviewmp-image-viewer-open-AVIF-format

XnViewMP is a versatile photo viewer and editor that supports a wide range of image formats and supports Windows, Mac and Linux.

You can use XnViewMP to view AVIF formats in thumbnail view, fullscreen view, image compare, view EXIF metadata and many more.

For editing features, the powerful image viewer support resizing, cropping, lossless rotation, adding of filters & effects, etc.

XnViewMP supports over 500 image formats, including AVIF, TIFF, GIF, JPEG, PNG, etc.


5. Install AVIFQuickLook

This is a macOS QuickLook plugin for AVIF image file format and can be found in Github.

To install AVIFQuickLook, do the following;

  1. Grab the latest AVIFQuickLook.qlgenerator from the Release Page, or build using Xcode.
  2. Open Finder
  3. Shift + Command + G, input ~/Library/QuickLook/ and press Enter. For macOS Catalina above, use /Library/QuickLook/ instead.
  4. Drag AVIFQuickLook.qlgenerator into this folder. You may need to enter the password

6. Install qView for Mac

qview-image-viewer-AVIF-format-open

qView is a lightweight and minimalist image viewer for Mac that opens up AVIF file formats and other image files instantly. It runs on low memory and requires low CPU usage.

qView also has other features such as file history, rotation/mirroring and animated GIF controls.

The free and open-source software supports all common image formats including bmp, gif, jpg, png, tiff, and webp.


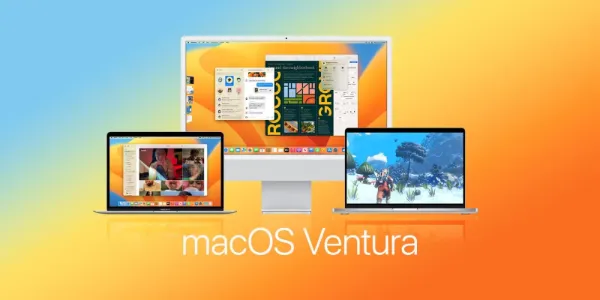
7. Use macOS Ventura and latest iOS version

macOS-ventura-open-preview-AVIF-image-file-format

If you are using macOS Ventura, there is already a built-in support for opening AVIF image files using Prview and Finder.

Released in October 2022, macOS Ventura has several updates to its predecessor, macOS Monterey, and this includes the native support for AVIF image file format.

To view AVIF images natively, update your Apple devices to make sure they are running the latest betas of iOS 16, iPadOS 16, and macOS Ventura.


7 Ways to Open & View AVIF image file format using Mac Read More »