admin

chromium-vs-brave

7 Key Features: Chromium Vs. Brave [Comparing Web Browsers]

Today, we’re diving into an epic showdown between two standout browsers: Chromium and Brave. These open-source browsers have captured the attention of many with their unique offerings in a competitive market.

But before we delve into our detailed comparison, let’s kick things off with two fun facts about our contenders:

If you want to see how Chromium stacks against another major browser, please check out our comparison of Chromium vs. Firefox.


Quick Answer

If you’re in a rush and need a quick comparison between Chromium and Brave, here it is:

Chromium is an open-source browser project that forms the basis for many other browsers, including Google Chrome and Brave.

It’s known for its minimalistic design and high customizability. However, it doesn’t have built-in ad-blocking and privacy features.

On the other hand, Brave is a privacy-focused browser that comes with built-in ad-blocking capabilities. It’s faster than Chromium because of its aggressive approach toward ads and trackers.

Additionally, Brave offers a way for users to earn cryptocurrency by opting into privacy-respecting ads.


Understanding Chromium and Brave

Let’s start with the basics. Chromium is an open-source web browser project initiated by Google. It forms the foundation for Google Chrome and many other browsers, like Opera and our second contender, Brave.

It’s minimalistic, lightweight, and highly customizable. However, it doesn’t auto-update or include built-in Adobe Flash.

Contrarily, Brave is a free and open-source web browser developed by Brave Software, Inc., with a strong emphasis on privacy and security.

Built on the Chromium platform, it inherits many benefits but with notable enhancements. Brave comes with an in-built ad-blocker and shields for privacy.

Interestingly, it also offers a unique concept called Brave Rewards, where users can opt-in to privacy-respecting ads and earn the cryptocurrency BAT (Basic Attention Token).


Comparison Between Chromium vs. Brave

Here are the seven (7) features we compared;


Feature 1: User Interface

Diving into the first feature, let’s discuss the user interfaces of Chromium and Brave.

Chromium offers a clean, simplistic, and straightforward interface. It’s uncluttered and easy to navigate, giving users a no-nonsense browsing experience.

One might argue it’s a little too bare-bones, but that’s the beauty of Chromium – it offers a blank canvas for customization.

Conversely, Brave presents a more modern and intuitive interface. It incorporates a similar layout to Chromium due to its roots, but adds more color and design elements.

Brave’s new tab page features image backgrounds, a clock widget, and blocked stats about ads and trackers, making it more interactive and informative.

If you prefer a more minimalistic approach, Chromium might be the one for you. If you enjoy more design elements and built-in widgets, Brave could be your browser of choice.


Feature 2: Performance

Performance is a key factor when choosing a web browser, and both Chromium and Brave have their strengths in this area.

Chromium, with its minimalistic design, is generally lightweight and quick. However, it’s worth noting that Chromium’s performance can depend on the number and type of extensions you use.

As a raw, unrefined browser, Chromium doesn’t have many features that often slow other browsers down, which can make it faster.

In comparison, Brave was designed with speed in mind. Its in-built ad-blocker removes unwanted ads and trackers, significantly reducing page load times.

Brave often outperforms other browsers in speed tests, making it an excellent choice if performance is your top priority.

In short, both Chromium and Brave provide reliable performance, with Brave taking the lead due to its aggressive ad and tracker blocking.


Feature 3: Privacy and Security

When it comes to privacy and security, both Chromium and Brave have their unique approaches.

Chromium is secure in its own right, featuring regular updates and security patches from its active community of developers.

It’s important to remember that while Chromium is open-source and doesn’t contain some privacy-invading features in Chrome, it still doesn’t offer extensive privacy features out of the box.

On the other hand, Brave is designed with a priority for privacy. The browser blocks third-party ads and trackers by default, reducing the data collected about browsing habits.

It also features HTTPS Everywhere, automatically upgrading connections to HTTPS for improved security. Brave even offers a Tor option for enhanced privacy.

If you’re keen on a basic secure browsing experience, Chromium could serve you well. But Brave should be your choice if you prioritize privacy and want built-in data protection features.


Feature 4: Extensions and Customizability

Extensions can greatly enhance your browsing experience, and both Chromium and Brave shine in this department.

Chromium, being the base of many browsers including Google Chrome, supports a wide range of extensions available in the Chrome Web Store.

This makes Chromium highly customizable, allowing users to tailor their browsing experience to their liking. But remember, too many extensions can slow down your browsing speed.

Brave also supports most extensions available in the Chrome Web Store, thanks to its Chromium backbone.

However, Brave takes an extra step in security by allowing users to control which websites the extensions can interact with, thus enhancing your privacy and security.

In a nutshell, if you’re a fan of browser extensions and customization, both Chromium and Brave will serve you well. But if you value the extra layer of control over extensions’ permissions, Brave has an edge.


Feature 5: Data Syncing

The ability to sync data across devices is crucial for many users. Here’s how Chromium and Brave handle data syncing.

Chromium allows you to sync bookmarks, settings, passwords, and more using a Google account.

However, it’s worth mentioning that syncing in Chromium is not as streamlined as in Google Chrome due to the lack of Google’s proprietary services.

On the contrary, Brave offers its own Sync feature, allowing you to sync bookmarks, settings, passwords, and more across multiple devices.

The syncing process is end-to-end encrypted for added security, meaning only you can access your data.

In conclusion, both Chromium and Brave offer data syncing, with Brave providing a more secure and robust solution.


Feature 6: Ad Blocking

Ad blocking is an important feature for a smooth browsing experience. Let’s see how Chromium and Brave compare in this aspect.

With Chromium, ad-blocking is not built-in. You’ll have to rely on third-party extensions from the Chrome Web Store to block ads.

While this provides flexibility in choosing your preferred ad blocker, it adds another layer of complexity as you need to install and manage the extension.

Conversely, Brave has robust built-in ad-blocking features. The Brave Shields feature blocks intrusive ads and prevents trackers from collecting your data.

This results in faster page loads and a cleaner browsing experience, all without the need for additional extensions.

While both browsers allow ad-blocking, Brave provides a more integrated and user-friendly solution with its built-in features.


Feature 7: Battery and Data Usage

Lastly, let’s compare how Chromium and Brave affect your device’s battery and data usage.

Chromium is a lightweight browser that doesn’t consume much processing power.

However, like other web browsers, its battery and data usage can increase significantly when running heavy websites, streaming content, or using many extensions.

In contrast, Brave is specifically designed to reduce battery and data usage. Brave minimizes the data loaded by blocking unwanted ads and trackers, reducing power consumption.

This makes Brave an excellent choice for mobile users or those with limited data plans.

While both Chromium and Brave are efficient in their own ways, Brave’s aggressive ad and tracker-blocking features give it an advantage regarding battery and data usage.


Frequently Asked Questions (FAQs)

Q1. Is Brave browser based on Chromium?

Yes, Brave is based on Chromium. This means it inherits many of Chromium’s strengths, including speed, stability, and access to the vast array of extensions in the Chrome Web Store.

However, Brave adds its own unique features, including robust privacy protections and a built-in ad blocker.

Q2. Is Brave faster than Chromium?

In most cases, Brave is faster than Chromium. This is largely due to Brave’s built-in ad blocker, which removes unwanted ads and trackers, reducing page load times and making the browser run more smoothly.

However, the speed can vary depending on the specific websites visited and the number and type of extensions installed.

Q3. Can you use Chrome extensions on Brave?

Since Brave is built on Chromium, it supports most extensions available in the Chrome Web Store. This gives Brave users great flexibility to customize their browsing experience.

Q4. Is Brave more secure than Chromium?

While both browsers offer secure browsing experiences, Brave goes a step further with its aggressive approach to privacy. Brave blocks third-party ads and trackers by default, includes automatic upgrades to HTTPS, and even provides an option to use Tor for enhanced privacy.

Q5. Do Brave and Chromium support data syncing across devices?

Yes, both browsers allow you to sync bookmarks, settings, passwords, and more across multiple devices. However, Brave provides end-to-end encryption for its Sync feature, meaning only you can access your data.

Q6. Is Chromium as good as Chrome?

Chromium is the open-source project that forms the foundation for Google Chrome. While they share many features, there are key differences.

Chromium is a more stripped-down version and doesn’t include some proprietary features that Chrome does, such as automatic updates and built-in Flash support.

However, Chromium does not come with some tracking features in Chrome, making it a more privacy-friendly choice.


Conclusion

Choosing between Chromium and Brave largely depends on what you value most in a web browser.

Brave might be your best bet if you’re looking for a browser with more control over extensions’ permissions and built-in privacy features.

However, if you appreciate open-source software and want a browser that offers a wide array of extensions without any frills, Chromium could be the right choice.

To wrap it up, it’s safe to say that both browsers have their unique strengths and can cater to different user preferences.

We hope this comparison has provided you with a clearer understanding of these two prominent browsers, allowing you to make an informed decision that best suits your browsing needs.


7 Key Features: Chromium Vs. Brave [Comparing Web Browsers] Read More »

optical-disk-storage-pros-cons

15 Pros and Cons of Using Optical Disk Storage [Explained]

Optical disk storage has been a prevalent method of storing data for decades.

This form of data storage has been utilized for various purposes, from music on CDs to movies on DVDs and Blu-ray discs.

As with any technology, it has its own set of pros and cons, which we’ll delve into in this blog post.

Fun Fact #1: Did you know that the first consumer optical disc data storage format was the LaserDisc, invented and developed by Philips, MCA, and Pioneer, and introduced in 1978?

What is Optical Disk Storage?

Optical disk storage is a kind of data storage that utilizes light to read and write information.

This method usually uses circular and flat disks, with data encoded onto them in a spiral track. These disks, including CDs, DVDs, and Blu-rays, are composed of tiny bumps and flat areas.

When a laser shines on these surfaces, the reflections are interpreted as binary data, the fundamental language of computers.

There are different types of optical disks, the most common ones being Compact Discs (CDs), Digital Versatile Discs (DVDs), and Blu-ray discs.

The primary differences among them lie in storage capacity, with CDs offering around 700MB, DVDs providing about 4.7GB to 9GB, and Blu-ray discs boasting a capacity of up to 50GB.

Fun Fact #2: The term "optical" in optical disk storage comes from using a laser to read and write data.

How Does Optical Disk Storage Work?

Optical disk storage uses light, particularly lasers, to read and write data. Here’s how it operates:

When data is written to an optical disk, a high-powered laser burns tiny pits into the disk’s surface, representing binary data.

A lower-powered laser shines onto the disk’s surface to read the data. This laser light is reflected back to an optical sensor.

The sensor detects changes in light, which correlate to the pits and lands (the non-burnt areas of the disk). These differences in reflectivity are translated into binary data that your computer can understand.


Pros and Cons of Using Optical Disk Storage

Firstly, let’s delve into the benefits of optical disk storage. Here are the eight major pros of this form of data storage:

1: Pro: Long lifespan

Optical disks can have a significantly longer lifespan than other storage mediums, especially when stored properly. They can potentially last for decades without data loss.

2: Pro: Immune to electromagnetic interference

Unlike hard drives and flash storage, optical disks are not susceptible to damage or data corruption from electromagnetic fields. This makes them a safer choice for long-term storage in certain environments.

3: Pro: High capacity

Certain types of optical disks, like Blu-ray discs, offer a large amount of storage space. A single-layer Blu-ray disc can store up to 25GB, and a dual-layer can hold up to 50GB.

4: Pro: Portability

Optical disks are compact and lightweight, making them easy to transport. You can carry a stack of CDs or DVDs with you far more easily than hard drives or solid-state drives.

5: Pro: Compatibility

CD and DVD drives are commonplace in computers worldwide, and files stored on these mediums can be accessed by almost any device with the appropriate drive.

6: Pro: Affordability

Compared to other forms of data storage, optical disks are relatively cheap. You can buy them in bulk for just a few dollars.

7: Pro: Data security

Once data is written on a write-once optical disk, it cannot be altered, providing a secure way to store data.

8: Pro: Resilience to data corruption

Due to the way data is stored on them, optical disks are less prone to data corruption than other types of storage mediums.


While optical disk storage offers numerous advantages, it also has its drawbacks. Let’s examine the seven major cons of this storage medium:

9: Con: Slow write speed

Compared to modern solid-state drives, optical disks have a slower write speed. This might not be an issue for small files, but it can be time-consuming for larger ones.

10: Con: Can be physically damaged

Scratches, exposure to extreme temperatures, and other physical damages can make data on the disk unreadable. Proper care and handling are required to maintain the disk’s lifespan.

11: Con: Dependent on the reader device

You’ll need a reader device, like a CD or DVD drive to access data stored on an optical disk. These drives are becoming less common in modern computers, especially laptops.

12: Con: Limited rewrite capability

Rewritable CDs and DVDs have a finite number of times they can be written to and erased, far less than that of a hard drive or SSD.

13: Con: Low storage compared to HDD/SSD

While a Blu-ray disk might hold a decent amount of data, it’s still much less than what you can store on a hard drive or SSD. Optical disks might not be the most efficient storage solution for large volumes of data.

14: Con: Physical space requirement

Although individual optical disks are small and portable, storing large quantities can take up considerable physical space.

15: Con: Environmental sensitivity

Optical disks can be sensitive to environmental conditions. Extreme temperatures, humidity, and sunlight can degrade the disk over time, potentially leading to data loss.


Factors to Consider When Choosing a Storage Option

Deciding on the right storage option depends on your specific needs and circumstances. Here are some factors you might want to consider:

Data Size

If you’re dealing with a large volume of data, you might find that hard drives or SSDs offer the capacity you need. On the other hand, if your data is relatively small, a few CDs or DVDs might suffice.

Accessibility

How often do you need to access the stored data? A hard drive or SSD might be more suitable if you need to access your files frequently and quickly. Optical disks can be a reliable option for less frequently accessed or archived data.

Durability

Optical disks could be safer if you’re in an environment with strong magnetic fields or require robust data preservation. However, they are vulnerable to physical damage, so proper care and storage are essential.

Cost

Optical disks are usually cheaper than hard drives or SSDs, making them a cost-effective choice for individuals or businesses on a budget.


Frequently Asked Questions (FAQs)

Here, we’ll tackle some common questions when discussing optical disk storage.

Q1: What is the advantages and disadvantages of optical storage?

A: The advantages of optical storage include a long lifespan, immunity to electromagnetic interference, high capacity (for certain types), portability, compatibility, affordability, data security, and resilience to data corruption.

The disadvantages, on the other hand, include slow write speed, susceptibility to physical damage, dependence on reader devices, limited rewrite capability, lower storage capacity compared to HDD/SSDs, physical space requirements, and environmental sensitivity.

Q2: Are optical disks still relevant today?

A: While the prevalence of optical disks has diminished with the rise of cloud storage and solid-state drives, they are still relevant in certain situations.

They are often used for long-term archival storage because of their durability and longevity. Additionally, they remain a cost-effective solution for distributing software, music, movies, and other media in physical format.

Q3: Can data on an optical disk be recovered if the disk gets scratched?

A: It depends on the severity of the scratch. Minor scratches may not affect the data, but deep scratches can cause data loss.

Scratch repair kits are available that might help recover some of the data, but they don’t guarantee a 100% recovery rate. It’s best to handle optical disks carefully to avoid scratches.


Conclusion

With its long lifespan and resilience to electromagnetic interference, optical disk storage remains a viable data storage solution, especially for long-term archival purposes.

Yet, weighing these benefits against the drawbacks, like slower write speeds and susceptibility to physical damage, is essential.

Like all technology, optical disk storage isn’t one-size-fits-all. It’s crucial to consider your specific needs, budget, and environment when choosing a storage medium.

Whether preserving cherished family photos, backing up critical business documents, or just trying to free up space on your primary device, the right storage solution can make all the difference.


15 Pros and Cons of Using Optical Disk Storage [Explained] Read More »

chromium-vs-firefox

7 Key Features: Chromium Vs. Firefox [Compare Web Browsers]

Whether you’re an internet enthusiast or a casual browser, the question of which web browser to use can often be daunting.

Among the multitude of choices, two names frequently pop up in the debate – Chromium and Firefox. These open-source software platforms have gained considerable popularity over the years.

But the battle between them still lingers: Is Chromium better than Firefox? Or does Firefox offer a better internet navigation experience?

We’re here to dissect this topic, delving deep into both browsers’ intricate features, performance metrics, and security aspects.


Quick Answer

Chromium would be better for speed enthusiasts and those who appreciate minimalistic design and higher customizability. It’s fast, open-source, and offers robust developer tools.

However, if you are more concerned about privacy and love a user-friendly interface with plenty of built-in features, Firefox may be the browser you want to use.

Here’s a summary table for a quick comparison of the seven features between Chromium and Firefox:

ChromiumFirefox
Feature 1: SpeedGenerally faster, especially on web applications.Slower compared to Chromium, but the difference is minimal for general browsing.
Feature 2: RAM UsageKnown for high RAM usage, especially with multiple tabs open.More efficient in terms of memory usage compared to Chromium.
Feature 3: PerformanceProvides a smooth browsing experience, particularly for web developers.Great for everyday browsing with robust performance.
Feature 4: User Interface and ExperienceClean and minimalistic design but less user-friendly for non-tech savvy users.More intuitive and user-friendly interface, with more built-in features.
Feature 5: Security and PrivacySecure, but less privacy-friendly due to data integration with Google services.Known for its emphasis on user privacy and offers a range of privacy tools.
Feature 6: Compatibility and Extension SupportExtensive support for extensions; however, only from the Chrome Web Store.Supports a wide array of extensions, including some not available on Chromium.
Feature 7: Open-Source Community and SupportHas an active open-source community but less interactive due to its size.Has a very active and interactive open-source community with plenty of support.

What are Chromium and Firefox?

Before we delve into the comparison, let’s first understand Chromium and Firefox.

Chromium: Brief History and Key Features

Chromium is an open-source web browser project started by Google. Its minimalist interface and high-speed performance have caught the attention of tech-savvy users.

Chromium serves as the foundation for several browsers, including Google Chrome. This means other browsers can utilize its source code to develop their own versions, which is exactly what Google did with Chrome.

This has led to a massive expansion of Chromium’s influence in the web browsing world. Chromium is renowned for its developer-friendly tools, extensive customization options, and impressive speed.

Firefox: Brief History and Key Features

Firefox is a free and open-source web browser developed by the Mozilla Foundation. Once the top contender against Internet Explorer, Firefox has long been celebrated for its commitment to user privacy and customization options.

Its attractive, user-friendly interface and the ability to handle multiple tabs efficiently make it a favorite among many internet users.

Firefox’s flexibility and its focus on maintaining an active, supportive open-source community are also big pluses. Moreover, Firefox has robust built-in features that enhance the browsing experience.

Chromium vs. Firefox: The Face-Off

Here is the comparison of seven (7) features between the 2 web browsers;


Feature 1: Speed

Chromium generally takes the upper hand regarding browsing speed, especially when dealing with complex web applications.

Due to its connection with Google, Chromium can optimize certain services, like Google Docs or YouTube, to run more smoothly.

However, for general browsing, you might not notice a significant difference between the two.


Feature 2: RAM Usage

Chromium is notorious for its high RAM usage, especially when multiple open tabs. This can slow down other operations on your computer.

In contrast, Firefox uses memory more efficiently, which is beneficial if you’re working on a less powerful machine or like to keep many tabs open.


Feature 3: Performance

In terms of overall performance, both browsers hold their ground pretty well. Chromium, with its lean architecture and Google’s backing, offers a smooth browsing experience.

It’s particularly favorable for web developers due to its robust developer tools.

Firefox, on the other hand, offers excellent performance for everyday browsing. It’s optimized to handle many tabs without hogging your computer’s resources, a definite plus for heavy internet users.


Feature 4: User Interface and Experience

Chromium sports a clean, minimalistic design. It’s less cluttered but might feel less user-friendly for non-tech-savvy users.

The lack of built-in features means you must rely on extensions for additional functionalities.

Firefox offers a more intuitive and user-friendly interface. It has more built-in features like a screenshot tool, reader mode, and an extensive library of add-ons.

This makes the browser highly customizable right out of the box, enhancing user experience without relying heavily on external extensions.


Feature 5: Security and Privacy

When it comes to security, both browsers do a good job. They get regular updates to protect users from the latest threats. However, the main distinction comes with privacy.

Chromium, despite being open-source, is closely tied to Google’s ecosystem. This may raise privacy concerns due to Google’s data collection practices.

But remember, you can tweak Chromium’s settings to enhance privacy.

Firefox, in contrast, has a strong reputation for its emphasis on privacy. It provides an array of privacy tools, like tracking protection, Facebook Container, and even a built-in VPN service in some regions.

Is Chromium as safe as Firefox? Yes, in terms of security, but if privacy is your primary concern, Firefox might be your better bet.


Feature 6: Compatibility and Extension Support

Chromium supports many extensions available on the Chrome Web Store, making it highly adaptable to your specific needs.

However, it doesn’t support some types of add-ons like those built with XUL (a technology that Firefox used to use).

On the other hand, Firefox supports various extensions, including some unavailable on Chromium. So, if there’s a particular extension you can’t live without, it’s worth checking which browser supports it.


Feature 7: Open-Source Community and Support

Chromium and Firefox are open-source projects, meaning their source code is available for anyone to see, use, modify, and distribute.

Due to its scale and corporate backing, Chromium has a massive open-source community. This means plenty of people are constantly working on it and updating it. However, due to its size, you might find the community less interactive and personal.

Firefox, on the other hand, has a very active and interactive open-source community. The Mozilla Foundation has always promoted a sense of community, and you’ll find plenty of support, discussions, and user interaction.

If you love being part of a community or need regular support, Firefox might feel more welcoming.


Frequently Asked Questions (FAQs)

Q1. Is Chromium better than Firefox?

It depends on your personal needs. If you’re after speed, high customizability, and extensive developer tools, Chromium might be your cup of tea. However, if you value privacy, user-friendly features, and an active open-source community, Firefox is a strong contender.

Q2. Is Chromium as safe as Firefox?

Both browsers are secure and receive regular updates to tackle the latest online threats. However, if you’re talking about privacy, Firefox might have an edge due to its built-in privacy tools and less data sharing with advertisers.

Q3. Can I use Firefox extensions on Chromium?

No, Firefox extensions are not compatible with Chromium. Each browser has its own library of extensions or add-ons.


Conclusion

Choosing between Chromium and Firefox largely depends on your needs and preferences.

Chromium tends to be faster and offers extensive developer tools, while Firefox prioritizes user privacy and offers a more user-friendly interface with more built-in features.

Both have active open-source communities, but the experience can be quite different.

Ultimately, the best way to decide is to try both browsers and see which one suits your browsing habits better. And remember, your choice of browser is not a lifelong commitment.

You can always switch if your needs or preferences change. Happy browsing!


7 Key Features: Chromium Vs. Firefox [Compare Web Browsers] Read More »

install-protonvpn-ubuntu-debian-linux

3 Ways to Install ProtonVPN on Ubuntu, Debian & Linux Distros

Today, we’re diving deep into the world of privacy and security on the internet.

How, you ask? By guiding you on how to install ProtonVPN on Ubuntu, Debian, and Linux!

ProtonVPN is a high-speed Swiss VPN that safeguards your privacy. But it’s not just about security; it’s about freedom, too.

With ProtonVPN, you can browse the web without restrictions, accessing any content you wish, regardless of where you are.

Fun Fact: Did you know that the ProtonVPN project was officially launched on March 20, 2017? The project is the brainchild of the same team that developed ProtonMail, one of the world’s largest encrypted email services!

Why Use ProtonVPN?

Whether you’re seeking enhanced internet privacy or a means to overcome geographical restrictions, ProtonVPN is a fantastic choice.

But what exactly sets ProtonVPN apart in the crowded VPN market?

Internet Freedom: ProtonVPN allows you to bypass geo-restrictions and censorship. You can access your favorite websites and content from anywhere around the globe.

High-Level Security: Thanks to its Swiss-based operations, ProtonVPN operates under some of the world’s most stringent privacy laws. The VPN service ensures your data is encrypted and safe from prying eyes.

No Logs Policy: ProtonVPN has a strict no-logs policy, unlike some VPN providers. This means it doesn’t track or record your online activities, enhancing internet privacy.

Support across multiple platforms: This particularly benefits you, the Linux user! ProtonVPN supports a variety of Linux distributions, including the ever-popular Ubuntu and Debian.


How to Install ProtonVPN on Ubuntu, Debian, and other Linux distros

Here are the three (3) methods to do so;


Method 1: Installing ProtonVPN on Ubuntu

Here is a step-by-step guide on installing ProtonVPN on your Ubuntu operating system. Let’s jump right in:

Step-by-Step Guide

Step 1: Open the terminal. You can do this by pressing CTRL + ALT + T or searching for ‘terminal’ in your system’s search bar.

Step 2: Update your system packages. Type the following command and hit Enter.

sudo apt update && sudo apt upgrade

Step 3: You must install the necessary Python tools for ProtonVPN. Enter the following command

sudo apt install -y openvpn dialog python3-pip python3-setuptools.

Step 4: Once the Python tools are installed, installing the ProtonVPN-CLI is time. Input the following command

sudo pip3 install protonvpn-cli.

Step 5: After installation, initialize ProtonVPN-CLI by typing

sudo protonvpn init

Follow the prompts to enter your ProtonVPN OpenVPN username and password.

Step 6: Now that everything is set up, you can connect to a ProtonVPN server. Use this command below to connect to the fastest server.

sudo protonvpn c -f

Method 2: Installing ProtonVPN on Debian

For those using the Debian operating system, we’ve got you covered. Here’s your step-by-step guide to setting up ProtonVPN on Debian:

Step-by-Step Guide

Step 1: Open your terminal. You can do this by clicking on ‘Activities’ and searching for ‘terminal’.

Step 2: Ensure your system packages are up to date by entering this command and pressing Enter: sudo apt-get update && sudo apt-get upgrade.

Step 3: Debian requires the same Python tools as Ubuntu for ProtonVPN. Enter the following command to install them: sudo apt-get install -y openvpn dialog python3-pip python3-setuptools.

Step 4: After installing the necessary Python tools, it’s time to install ProtonVPN-CLI. Type in this command: sudo pip3 install protonvpn-cli.

Step 5: Initialize ProtonVPN-CLI by entering: sudo protonvpn init. You will be prompted to input your ProtonVPN OpenVPN username and password.

Step 6: With everything set up, you can now connect to a ProtonVPN server. Use the command: sudo protonvpn c -f to connect to the fastest available server.


Method 3: Installing ProtonVPN on Other Linux Distributions

Though Ubuntu and Debian are popular, some might use other Linux distros. So, let’s cover how to install ProtonVPN on other Linux distributions.

Step-by-Step Guide

Step 1: Open your terminal. The method to do this may vary based on your Linux distribution.

Step 2: Update your system. Depending on your Linux distribution, you might need to use a different command from those provided for Ubuntu and Debian.

Step 3: Install necessary Python tools for ProtonVPN. Enter the following command: sudo apt-get install -y openvpn dialog python3-pip python3-setuptools.

Step 4: With the necessary Python tools installed, installing the ProtonVPN-CLI is time. Type in this command: sudo pip3 install protonvpn-cli.

Step 5: Initialize ProtonVPN-CLI by entering: sudo protonvpn init. You will be prompted to input your ProtonVPN OpenVPN username and password.

Step 6: Now, you can connect to a ProtonVPN server. Use the command: sudo protonvpn c -f to connect to the fastest server.


Frequently Asked Questions (FAQ)

As we near the end of our guide, let’s address some common questions you may have about installing ProtonVPN on Linux distributions.

Q1. Is Proton VPN available for Ubuntu?

Yes, ProtonVPN is available for Ubuntu. It supports many Linux distributions, including Ubuntu, Debian, Fedora, and CentOS.

Q2. How to install ProtonVPN on Linux distros?

Installing ProtonVPN on Linux distros involves downloading and installing the ProtonVPN Linux client, opening your terminal, logging in with your ProtonVPN account credentials, and connecting to a ProtonVPN server. For a more detailed guide, refer to our step-by-step guides earlier in this article.

Q3. How to install Proton VPN on Linux terminal?

ProtonVPN is installed and operated via the Linux terminal.

The general process involves updating your system packages, installing Python tools, installing ProtonVPN-CLI, initializing ProtonVPN-CLI, and then connecting to a server.

These steps are executed through terminal commands outlined in our step-by-step guides.


Conclusion

And there you have it – your comprehensive guide to installing ProtonVPN on Ubuntu, Debian, and other Linux distributions.

From understanding why you might want to use ProtonVPN, to the prerequisites for installation, to step-by-step guides and even troubleshooting common issues, we’ve covered it all!

Remember, the key to a smooth installation is to follow each step carefully and ensure your system meets the requirements.

Whether you’re looking to bolster your internet privacy or bypass geo-restrictions, ProtonVPN is a great tool in your arsenal.

Do you have more questions about ProtonVPN or other VPN-related topics? Leave a comment below, and we'll do our best to help you!

3 Ways to Install ProtonVPN on Ubuntu, Debian & Linux Distros Read More »

fix-protonvpn-not-connecting

7 Ways to Fix ProtonVPN Mac Not Working [Connection Timeout]

ProtonVPN, a renowned VPN service, offers online privacy and security to millions of users worldwide.

But even the most reliable services can encounter hiccups, and in this case, we’re addressing ProtonVPN troubleshooting on a Mac system, specifically the pesky problem of connection timeout errors.

Having issues with your VPN connection is quite frustrating, especially when you’re in the middle of something important.

You’re not alone in asking, “Why is my VPN connection not connecting?” But don’t worry; we’ve got you covered.

This guide will walk you through multiple methods to get your ProtonVPN connection back on track. Let’s get started!

Fun Fact: Did you know that ProtonVPN is one of the few VPNs headquartered in Switzerland, a country known for strong privacy laws?

How To Fix ProtonVPN Not Working

Here are the seven (7) methods you can use;


Method 1: Change ProtonVPN Server

Experiencing constant ProtonVPN connection timeout? It might be due to server congestion.

Each VPN server has a capacity limit, and if too many users connect to the same server, it can slow down, leading to disconnections or timeouts.

Changing your ProtonVPN server could potentially resolve this issue. You might be surprised at how often this solution works!

Guide to Change ProtonVPN Server:

  • Open the ProtonVPN application on your Mac.
  • Disconnect from the currently connected server by clicking the ‘Disconnect’ button.
  • Browse through the server list and choose a different server.
  • Connect to the new server and check if your connection is stable.

Method 2: Change VPN Protocol

VPN protocols define how data is routed through a connection. ProtonVPN offers multiple protocols, and each one has its pros and cons.

The protocol you’re using could be causing connection timeout errors. If that’s the case, switching to another protocol might be the solution you’re seeking.

Steps to Change VPN Protocol in ProtonVPN:

  • Open the ProtonVPN application.
  • Click ‘ProtonVPN’ in the menu bar and select ‘Preferences’.
  • Navigate to the ‘Connection’ tab.
  • In the ‘VPN Protocol’ dropdown, select a different protocol. ProtonVPN typically supports OpenVPN (UDP/TCP) and IKEv2.
  • Click ‘Save,’ then disconnect and reconnect to ProtonVPN.

Give each protocol a try and see which one works best for you. Each has its strengths: OpenVPN is known for its reliability and security, while IKEv2 is often faster and reconnects quickly if your internet connection drops.


Method 3: Check Firewall Settings

A firewall blocks unauthorized access while permitting outward communication on your computer. This is an essential part of your system’s security.

However, your firewall might sometimes be overprotective and block ProtonVPN, leading to VPN connection issues.

Modifying your firewall settings to allow ProtonVPN could solve the problem.

Adjusting Firewall Settings for ProtonVPN:

  • Open System Preferences on your Mac.
  • Click on ‘Security & Privacy’.
  • Choose the ‘Firewall’ tab.
  • Click on the lock icon in the bottom left corner to make changes.
  • Enter your administrator username and password.
  • Click on ‘Firewall Options…’.
  • Look for ProtonVPN in the list and ensure it’s set to ‘Allow incoming connections’.
  • If it’s not on the list, click the ‘+’ button, find ProtonVPN in the Applications folder, and add it.
  • Click ‘OK’, then restart ProtonVPN.

By allowing ProtonVPN through your firewall, you should hopefully see an end to your connection timeout errors. But if you’re still experiencing difficulties, remember there are other methods to try.


Method 4: Update ProtonVPN

Regular updates are crucial for all software, and ProtonVPN is no exception. Each new update can come with bug fixes, improvements, and even new features that help the application run smoother.

So, if your ProtonVPN is not working, it’s worth checking if you’re running the latest version. An outdated version could be the reason behind your connection timeout errors.

Step-by-step Guide to Update ProtonVPN on Mac:

  • Open ProtonVPN on your Mac.
  • Go to the ProtonVPN menu in the top left corner.
  • Click on ‘Check for Updates’.
  • If there’s an update available, click on ‘Update Now’.
  • Wait for the update to complete, then restart ProtonVPN.

Method 5: Restart your Mac

Believe it or not, sometimes the simplest solutions are the most effective. If you’re experiencing ProtonVPN MacOS problems, restart your Mac well.

It’s a way to clear out temporary files, free up system resources, and give your Mac a fresh start. It could very well resolve the connection timeout error.

Steps to Restart your Mac Safely:

  • Click on the Apple menu in the top-left corner of the screen.
  • Choose ‘Restart’ from the drop-down menu.
  • Wait for your Mac to restart, and then relaunch ProtonVPN.

Remember, restarting is not just limited to your Mac. If you’re facing VPN connection issues, consider restarting your VPN application.

Also, don’t forget that your internet router might need a restart to improve connectivity issues.


Method 6: Reinstall ProtonVPN

Sometimes, returning to square one is best when all else fails. Uninstalling and reinstalling ProtonVPN can be a comprehensive fix if your ProtonVPN is not working.

This method ensures that you start afresh, eliminating any minor glitches that might have crept in.

Steps to Reinstall ProtonVPN on Your Mac:

  • Open ‘Finder’ and go to the ‘Applications’ folder.
  • Find ProtonVPN, then drag and drop it into the Trash.
  • Empty your Trash to fully uninstall the application.
  • Restart your Mac.
  • Download the latest version of ProtonVPN from their official website.
  • Install ProtonVPN by dragging the downloaded file into the ‘Applications’ folder.
  • Open ProtonVPN and check if the connection issue has been resolved.

Remember to re-enter your login details after reinstalling.


Method 7: Contact ProtonVPN Support

Sometimes the best course of action is to get help directly from the experts. If your ProtonVPN is not working and you’ve tried all the above methods without success, it’s time to contact ProtonVPN’s support team.

Their team of technical experts will be able to guide you through advanced troubleshooting steps or fix potential issues on their end.

Here’s how you can reach out to them:

Contacting ProtonVPN Support:

  • Visit the ProtonVPN website.
  • Scroll down to the bottom of the page and click on ‘Support’.
  • You’ll find a ‘Contact Us’ button – click on it.
  • Fill in the form with all the necessary details and clearly explain your issue.
  • Click ‘Submit’ and wait for their response.

Providing as much detail as possible to the support team is important. This includes the type of error, when it started happening, and the steps you’ve already taken to try and resolve it.


Frequently Asked Questions (FAQ)

While troubleshooting ProtonVPN MacOS problems, you might have some lingering questions. Here are some commonly asked questions and their quick answers:

Q1: Why is my VPN connection not connecting?

A: There can be several reasons your VPN isn’t connecting, including server issues, firewall restrictions, outdated software, or incorrect settings. Following the methods mentioned above should help you resolve these issues.

Q2: Why does ProtonVPN keep disconnecting?

A: ProtonVPN could disconnect due to server congestion, unstable internet connection, outdated VPN software, or firewall settings blocking the VPN. Changing servers, checking your internet connection, updating the software, or adjusting firewall settings may resolve the problem.

Q3: How can I speed up ProtonVPN?

A: Try changing VPN protocols, connecting to a different server, or checking your internet connection for inconsistencies. Ensure that your Mac’s system and ProtonVPN software are updated to their latest versions.

Q4: Does uninstalling and reinstalling ProtonVPN delete my settings?

A: Yes, uninstalling ProtonVPN will typically erase your settings. After reinstalling, you’ll have to re-enter your login details and reconfigure your preferences.


Conclusion

Navigating ProtonVPN MacOS problems and VPN connection issues can be a bit of a headache. But with the right strategies and patience, you can usually get your VPN connection running smoothly again.

Start simple: restart your Mac, or the ProtonVPN application might be all you need. If that doesn’t work, proceed through the methods we’ve covered, checking your connection after each step.

From adjusting firewall settings and changing VPN servers to switching protocols and even reinstalling the application, there are potential fixes. And if all else fails, ProtonVPN’s support team will help you.

A stable VPN connection is key to maintaining your privacy and freedom online, so don’t get discouraged if you encounter hurdles. You’ve got the knowledge and tools you need to handle these issues.


7 Ways to Fix ProtonVPN Mac Not Working [Connection Timeout] Read More »

featured-image-neve-speed-test-results

How FAST is the Neve WordPress Theme? (Speed Test Results)

We put the popular Neve WordPress Theme to the ultimate speed test, and now we know why it is often ranked among the fastest WordPress themes.

Why read WordPress themes users’ reviews and opinions that we can test out on our own?

We have a spare domain name and a fast web hosting service, so why not use it for speed testing various WordPress Themes?

And this is what we did.

Here it goes.

Speed Test – Environment

WordPress Theme used: Neve version 3.4.9

Web Hosting: We are using a fast and reliable web host called WPX Hosting.

Installation: We used our testing domain (https://testedsite.com), and it is used purely for conducting WordPress Themes speed tests. On top of that, we have it on a brand new reset WordPress database before installing the theme. This is to ensure our speed tests do not conflict with any other web elements.

Configuration: As brand-new as possible, there are no extra posts, pages, media or even plugins to influence our speed test experiment. The aim here is to make the Neve theme as lightweight and essential as possible.

Speed Test – Sites Used

These are the five (5) sites that we used to conduct speed tests;

  1. PageSpeed Insights
  2. GTMetrix
  3. Pingdom Tools
  4. WebPageTest
  5. ByteCheck

Speed Test – Results

S/noSpeed Test – Sites usedResults
1PageSpeed InsightsScore 100,
FCP 1.3 sec, Speed Index 1.9 sec, LCP 1.5 sec
Time to Interactive 1.3 sec, TBT 0ms, CLS 0
2GTMetrixGrade A,
Performance 100%, Structure 100%,
LCP 574ms, TBT 0ms, CLS 0
3Pingdom ToolsGrade A 92,
Page Size 35.1 KB,
Load Time 751ms, Requests 7
4WebPageTestFirst Byte 0.221 sec
FCP 0.473 sec, Speed Index 0.5 sec, LCP 0.472 sec,
TBT 0ms, CLS 0
5ByteCheckTTFB 226ms,
Total Time 430ms, Header Size 557 bytes,
Request Size 188 bytes

Conclusion

The Neve WordPress theme scored excellent in most of our speed tests, particularly PageSpeed Insights and GTMetrix tests.

It scored a perfect 100 on both test sites, with super-fast First Contentful Paint (FCP) and Largest Contentful Paint (LCP) timing.

FCP measures how your visitors perceive the performance of your website, as opposed to what a speed test tool measures.

LCP tells us the time it takes to load the most significant capacity piece of content on your site, and it can be an image or graphic.

The timing of 226 milliseconds is considered very good for The Time To First Byte (TTFB).

TTFB is the total duration between when your web browser requests the web page and when that first byte arrives.

In summary, the Neve WordPress Theme is excellent with blazing-fast coding that excelled against all our five (5) speed test sites. It is ranked one of our fastest WordPress themes in this article.

To install Neve, you can either;

  • Search for “Neve” in your WordPress interface via Appearance – Themes – Add New
  • Visit the Neve Official website

The entire speed test experiment and results can also be seen here in this video.

How FAST is the Neve WordPress Theme? (Speed Test Results) Read More »

convert-images-into-webp-for-mac

How to Install and Convert Images into WebP format on Mac

Here’s how to easily convert your images into the new WebP format on your Mac.

This is an offline method, and there is no need for you to rely on and trust any online 3rd-party services when you upload your images to them.

What are the types of image formats supported?

Only image files can be converted into WebP format. The following image file types are supported; PNG, JPEG, TIFF, WebP or raw Y’CbCr samples. Take note that animated PNG files are not supported in this conversion.

How to install and convert images into WebP format using a Mac?

Here are the steps to do so.

Installing Homebrew

First, you need to install the Homebrew application on your Mac if you haven’t.

  • Launch the Mac Terminal app by typing “Terminal” in your Spotlight Search. It is the magnifying glass icon on the top right-side of your screen.
  • Check first if you have Homebrew installed by typing the command below. A homebrew application is needed before you can install the WebP tool.
which brew

If you encounter this message that says <brew not found>, this means you do not have Homebrew installed.

If you already have Homebrew installed, skip to the Installing cwebp step.

  • To install Homebrew, copy and paste the command below into Terminal.
/bin/bash -c "$(curl -fsSL https://raw.githubusercontent.com/Homebrew/install/HEAD/install.sh)"
  • After installation, if you see this error message below, run the command below to complete the installation.
homebrew-application-update-message-in-mac-terminal
git -C /usr/local/Homebrew/Library/Taps/homebrew/homebrew-core fetch --unshallow

Installing cwebp

You must install the encoder application, cwebp, on your Mac.

The cwebp encoder compresses an image using the WebP format.

  • Use the following command to install the webp tool.
brew install webp

When completed, WebP is now fully installed on your Mac.

Converting Images into WebP formats

  • For example, to convert a JPG image into WebP format, use the command below;
cwebp -q 75 original.jpg -o converted.webp

Change <original.jpg> to your desired original image file. Rename <converted.webp> into your preferred filename, but you must keep the .webp extension at the end.

-q 75 refers to the compression rate.

If you use -q 50, you get a more reduced image size than a -q 75 compression. However, reduced image size may also result in more loss of image quality, so depending on your image quality needs, you should test the compression rate and check against your image quality. For example, if you want the best compression quality, you should use -q 100.

  • If you want a lossless image quality (one that converts itself into WebP format but yet retains all its image quality without any loss), you should use this command;
cwebp -lossless command.png -o converted.webp

To know more about compressing an image file using cWebP and all its other parameters and options, Google has a dedicated page that explains it all.

Check out this video tutorial on installing and converting images into WebP format using macOS Terminal.

What are the advantages of using WebP format?

Developed by Google in 2010, the WebP format is a strong competitor to the current image formats like JPEG, PNG and GIF.

WebP has achieved a better image compression rate, resulting in the image file being smaller in size. Moreover, WebP offers both lossless and lossy formats. Lossless compression retains all the image quality of the original file, whereas Lossy compression discards certain image data to achieve more file size reduction than Lossless compression.

Google had also stated that WebP lossless images are actually approx. 26% smaller in file size compared to PNG files and WebP lossy images are approx. 2%-34% smaller than their JPEG counterparts.

The popularity of the WebP format is increasing, with chat applications like Telegram. and Signal using it for faster sending, receiving and displaying purposes.

Web content creators like bloggers, photographers and social media influencers should consider WebP formats in addition to their usual JPEG and PNG image files. In situations where image loading speed matters, this will be where WebP formats will beat the rest of the competition with their reduced file size.

Conclusion

Installing the cwebp tool on Mac is a free, quick and easy way of converting images into the newer WebP format offline.

There is no need for internet connectivity since WebP is now installed on your laptop, and you do not have to upload your images to any online 3rd-party image conversion services.

The image conversion is due entirely via the Mac Terminal app, and through our testing, the output is very fast, almost instant, on many occasions.

WebP format is here to stay, with all major web browsers supporting it. The file size is reduced significantly yet retains much of its original quality.

Content creators like bloggers and social media influencers should consider using this newer format as it is smaller and offers both lossless and lossy formats.

How to Install and Convert Images into WebP format on Mac Read More »

featured-image-astra-wordpress-theme-speed-test-results

How FAST is Astra WordPress Theme (Speed Test Results + Data)

Astra is the most downloaded WordPress theme, and the speed test data in this article will tell you why.

With over 1 million+ downloads, Astra is easily the most popular and the most used WordPress theme.

Astra has over 180+ starter WordPress themes (both free and paid) for you to choose from. Once you have installed Astra in your WordPress, activate the [Importer Plugin] to download your preferred Starter Templates.

In this article, we are going to conduct speed tests on the Astra theme to see how well it fares across 5 different test sites.

Speed Test – Environment

WordPress Theme used: Astra WordPress Theme version 3.7.5

Web Hosting: We are using a fast & reliable web hosting service called WPX Hosting

Installation: We reset our entire WordPress database and settings to achieve a clean start. We used our dedicated test domain for this experiment (https://www.testedsite.com).

Configuration: To make the speed test as accurate as possible, there will be no extra posts, pages, media or even plugins to influence our experiment. The aim is to use a clean Astra theme, making it as lightweight as possible.

Speed Test – Sites Used

These are the five (5) sites that we used to conduct speed tests;

  1. PageSpeed Insights
  2. GTMetrix
  3. Pingdom Tools
  4. WebPageTest
  5. ByteCheck

Below are the screenshots of the test results for each site.


PageSpeed Insights

astra-theme-pagespeed-insights-speed-test-results

GTMetrix

astra-theme-gtmetrix-speed-test-results

Pingdom Tools

astra-theme-pingdom-speed-test-results

WebPageTest

astra-theme-webpagetest--speed-test-results

ByteCheck

astra-theme-bytecheck-speed-test-results

Overall Results

Here are all the speed test results displayed in one table.

S/noSpeed Test – Sites usedResults
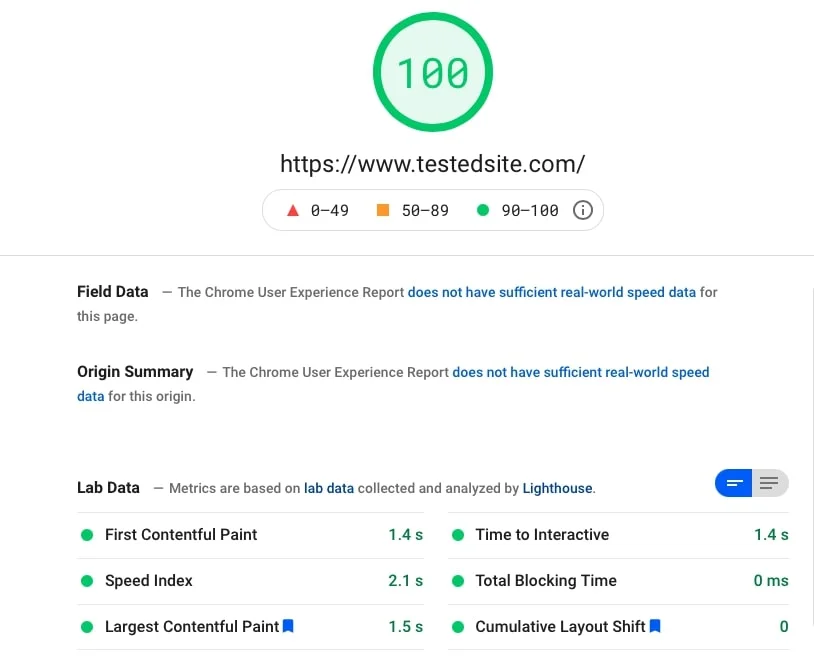
1PageSpeed InsightsScore 100,
FCP 1.4 sec, Speed Index 2.1 sec, LCP 1.5 sec
Time to Interactive 1.4 sec, TBT 0ms, CLS 0
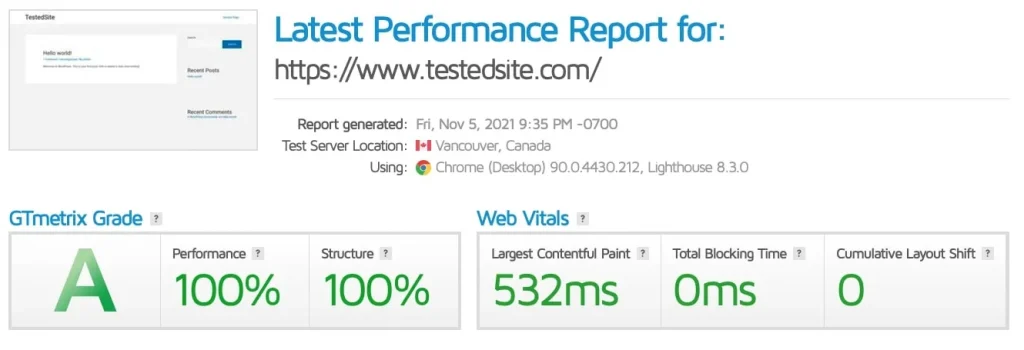
2GTMetrixGrade A,
Performance 100%, Structure 100%,
LCP 532ms, TBT 0ms, CLS 0
3Pingdom ToolsGrade A 93,
Page Size 47.7 KB,
Load Time 183ms, Requests 7
4WebPageTestFirst Byte 0.492 sec
FCP 0.836 sec, Speed Index 0.8 sec, LCP 0.835 sec,
TBT 0ms, CLS 0
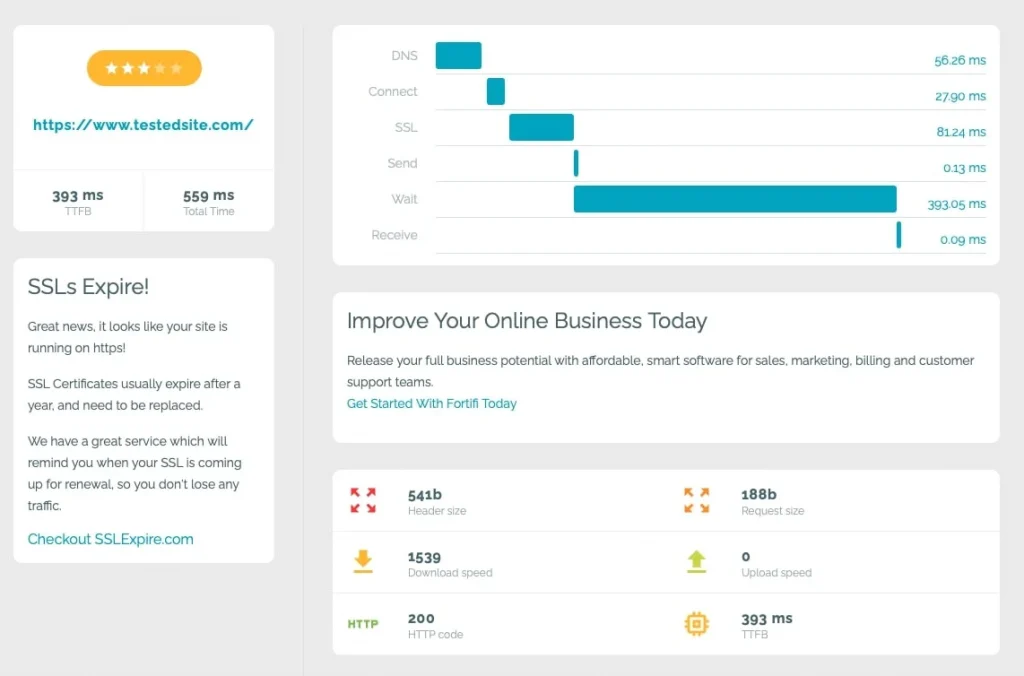
5ByteCheckTTFB 393ms,
Total Time 559ms, Header Size 541 bytes,
Request Size 188 bytes

Conclusion

The Astra WordPress Theme is one of the fastest themes out there we have tested.

It scored a perfect 100 on Google’s PageSpeed Insights and GTMetrix tests, with commendable FCP and LCP timing.

FCP measures how your visitors perceive the performance of your website, as opposed to what a speed test tool measures.

LCP tells us the time it takes to load the most significant capacity piece of content on your site, and it can be an image or graphic.

It is not easy to score a high A 93 on Pingdom Tools, and Astra is definitely one of the few themes out there that can do it.

Time To First Byte (TTFB) is a blazing fast speed of 393 milliseconds. For this test, the lesser time, the better it is.

TTFB is the total duration between when your web browser requests the web page and when that first byte arrives.

To install Astra, you can either;

  • Search for “Astra” in your WordPress interface via Appearance – Themes – Add New.
  • Visit the Astra Officlal website

The entire speed test experiment and results can also be seen here in this video.

How FAST is Astra WordPress Theme (Speed Test Results + Data) Read More »

featured-image-hello-elementor-speed-test-results

Hello Elementor WordPress Theme Speed Test – How Fast Is It?

A truly versatile and speedy WordPress Theme based on our tested data.

Ever wondered to know precisely how WordPress themes fare in terms of putting them into different speed test sites?

We conducted a series of individual speed tests on several popular WordPress Themes.

So how do we do that?

We used our dedicated domain name (https://www.testedsite.com), reset and started a brand new WordPress database, and finally, installed each WordPress theme we wanted to test out.

This article will focus on the highly-rated Hello Elementor WordPress theme.

Speed Test – Environment

WordPress Theme used: Hello Elementor version 2.4.1

Web Hosting: We used a fast & reliable web hosting service called WPX Host.

Installation: To ensure our speed test experiment is as accurate as possible, we reset our WordPress database to revert to its basic default settings and installed the Hello Elementor theme onto it.

Configuration: Again, to minimize any speed test disruptions, there will be no CDN used, no other WordPress plugins, no additional or removal of any posts, pages and media.

Speed Test – Sites Used

These are the five (5) sites that we used to conduct speed tests;

  1. PageSpeed Insights
  2. GTMetrix
  3. Pingdom Tools
  4. WebPageTest
  5. ByteCheck

Speed Test – Results

S/noSpeed Test – Sites usedResults
1PageSpeed InsightsScore 99,
FCP 1.5 sec, Speed Index 2.1 sec, LCP 1.6 sec
Time to Interactive 1.5 sec, TBT 0ms, CLS 0
2GTMetrixGrade A,
Performance 100%, Structure 100%,
LCP 233ms, TBT 0ms, CLS 0
3Pingdom ToolsGrade A 92,
Page Size 26.5 KB,
Load Time 1.02 second, Requests 7
4WebPageTestFirst Byte 0.313 sec
FCP 0.521 sec, Speed Index 0.5 sec, LCP 0520 sec,
TBT 0ms, CLS 0
5ByteCheckTTFB 164ms,
Total Time 343ms, Header Size 563 bytes,
Request Size 188 bytes

Conclusion

The Hello Elementor theme scored very well on all five (5) speed tests.

It has achieved full marks of 100 for GTMetrix and 99 for PageSpeed Insights.

For most speed measurement metrics, the lower the timing, the faster the WordPress theme is.

The First Contentful Paint (FCP) is at a low of 1.5 seconds, and the Largest Contentful Paint (LCP) is also at a low of 1.6 seconds.

FCP measures how your visitors perceive the performance of your website, as opposed to what a speed test tool measures.

LCP tells us the time it takes to load the biggest capacity piece of content on your site, and it can be an image or graphic.

The “Time To First Byte” (TTFB) is also at a low of 164 milliseconds.

TTFB is measured from when your web browser requests the web page to when that first byte arrives.

In summary, you should consider installing the Hello Elementor theme on your blog or even for your business site. There is plenty of customization available.

Visit Hello Elementor official homepage

Hello Elementor WordPress Theme Speed Test – How Fast Is It? Read More »

how-fast-is-twenty-twenty-one-wordpress-theme-speed-test

How FAST is Twenty Twenty-One WordPress Theme: Speed Test Results

We put the default WordPress theme into our speed tests and are pleased with the results.

twenty-twenty-one-webpage-interface

WordPress offers its default theme, Twenty Twenty-Three, for every new user.

So just how fast is this theme?

We put it to the ultimate speed test in this article and show you the results.

Speed Test Environment

WordPress Theme used; Twenty Twenty-Three version 1.0

Web Hosting; We are using a fast and reliable WordPress host called WPX Hosting

Installation; We installed the theme on our dedicated test domain (https://www.testedsite.com) on top of a newly reset WordPress configuration.

Considerations; No CDN used, no additional WordPress plugins, no amendments or removal of posts, pages or media, no configuration of WordPress Settings and the WordPress database newly reset.

Speed Test – Sites used

These are the five (5) sites that we used to conduct speed tests;

  1. PageSpeed Insights
  2. GTMetrix
  3. Pingdom Tools
  4. WebPageTest
  5. ByteCheck

Speed Tests – Results

The table below shows all the speed test results from all five (5) sites.

S/noSpeed Test – Sites usedResults
1PageSpeed InsightsScore 97,
FCP 1.3 sec, Speed Index 4.4 sec, LCP 1.5 sec
Time to Interactive 1.3 sec, TBT 0ms, CLS 0
2GTMetrixGrade A,
Performance 100%, Structure 98%,
LCP 577ms, TBT 0ms, CLS 0
3Pingdom ToolsGrade A 91,
Page Size 47.9 KB,
Load Time 1.16 sec, Requests 8
4WebPageTestFirst Byte 0.199 sec
FCP 0.702 sec, Speed Index 0.7 sec, LCP 0.693 sec,
TBT 0ms, CLS 0
5ByteCheckTTFB 378ms,
Total Time 532ms, Header Size 555 bytes,
Request Size 188 bytes

Conclusion

The default WordPress theme, Twenty Twenty-One, scored a very high-performance grade (A) for both PageSpeed Insights and GTMetrix tests.

Provided that your domain is hosted on a fast & reliable web hosting service, this theme has proven itself from these speed tests that it is worth using.

The Time to First Byte (TTFB) is a fast 378 milliseconds which means visitors can expect a quick web page loading on your site.

Twenty Twenty-One is recommended to be used by anyone if they want a clean and speedy WordPress theme.

If you had previously uninstalled the theme, you could always get it back via the official WordPress website.

The entire speed test experiment and results can also be seen here in this video.

How FAST is Twenty Twenty-One WordPress Theme: Speed Test Results Read More »