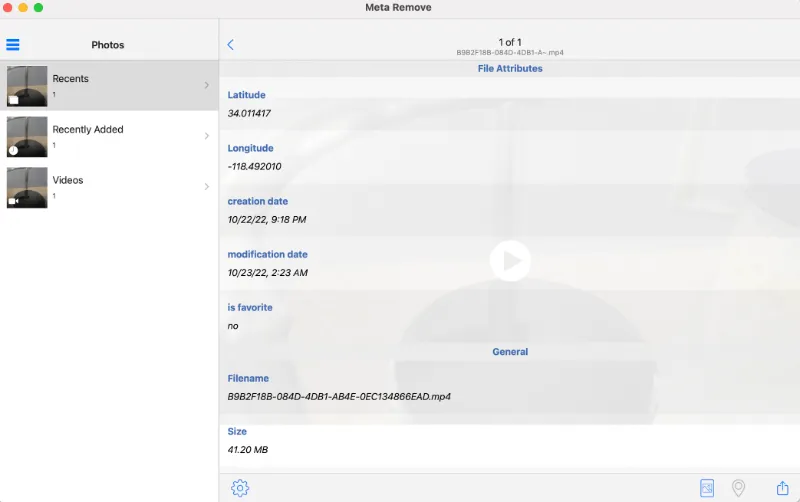
Video files can contain EXIF data and other sensitive metadata information, such as GPS location (longitude & latitude coordinates), file creation and modified timestamps, etc. Using macOS, you can delete these metadata from the video files.
Before you can remove, you need to make sure these video files really contain EXIF data and other metadata values.
To correctly view the EXIF metadata of video files, you should install EXIFTool by Phil Harvey. It supports Windows and macOS operating systems.
You can use ExifTool by Phil Harvey to view metadata, as well as removing EXIF data and other metadata information.
To delete metadata using ExifTool, navigate the Terminal app to the video file directory and use the command below;
exiftool -all= video.mp4
Exiftool will renamed your original video file. Your original video file (with metadata) will be renamed as “video.mp4-original”. Note the -original name at the end of the filename.
The newly created video file with no metadata will be called video.mp4.
ExifTool supports a wide variety of video formats, such as mp4, mkv, 3gp, avi, divx, flv and many more.
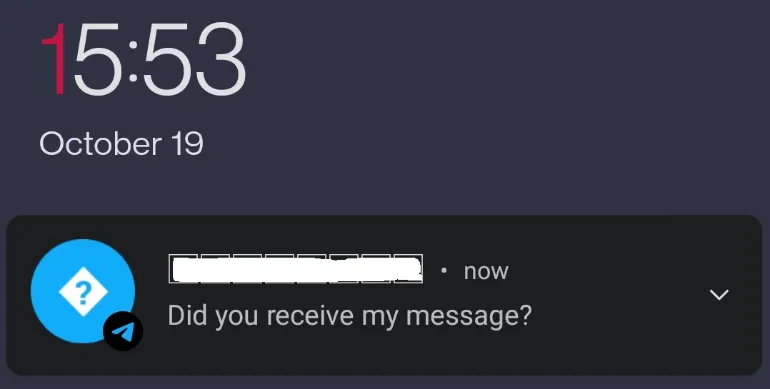
What are the tell-tale signs to know if someone has blocked you on the Telegram app?
Here are the eleven (11) ways you can use to find out if you are being blocked in Telegram.
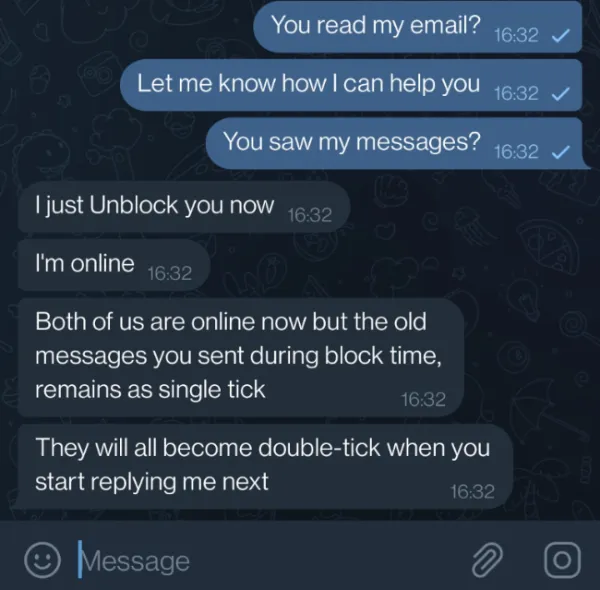
1. Paradox of single & double-ticks
When the person starts to UNBLOCK you and send you messages, you will notice a strange phenomenon where all your previously sent messages still have only single ticks.
This seems to be a paradox because the person must have seen all your previous messages before they can send you their following replies. It does not make sense at first glance.
The only explanation for this paradox is that you were blocked previously and recently unblocked.
Once you start to send replies, all these single ticks of yours will become double ticks.
2. Observing too many unread messages
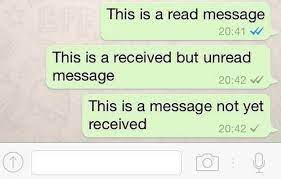
A double-tick beside your sent message indicates the “read” state in Telegram settings. This suggests that the recipient has received and read your message.
When you are being blocked in Telegram, these messages are not immediately informed; therefore, a sizable portion of your sent messages are frequently “unread.”
The person may continue to use Telegram as usual, as they will still be notified of incoming messages from others who are not blocked. Your message will eventually be “read” when that person decides to unblock it. In this case, you can see that all your sent but “unread” messages will become “read” at the same time.
Tell-tale signs
Observe if your messages often get delayed “read,” and a significant portion of them get “read” at the same time when the person unblocks you.
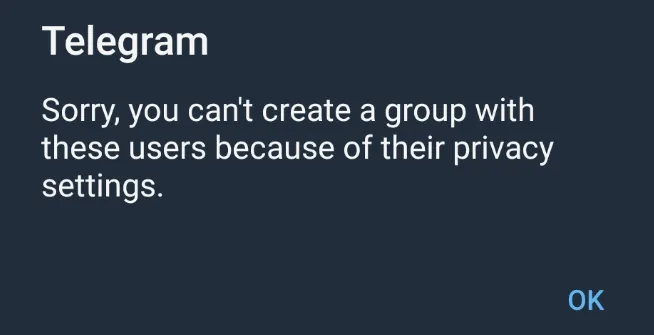
3. Unable to add the person in a Group Chat
One quick way to know if you are being blocked is to try adding the person to a new Group chat.
You will encounter the following error: “Sorry, you can’t create a group with these users because of their privacy settings.“
When you see this, you are likely to be blocked by this person.
This situation only applies to you. For the person who blocked you, they can add you (if they wish) to another new Group. They will not receive any Telegram error messages.
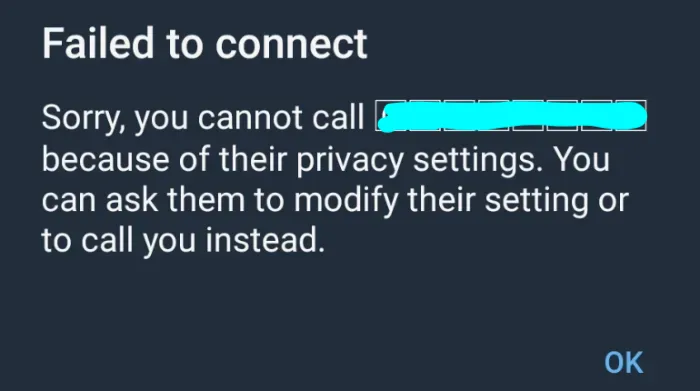
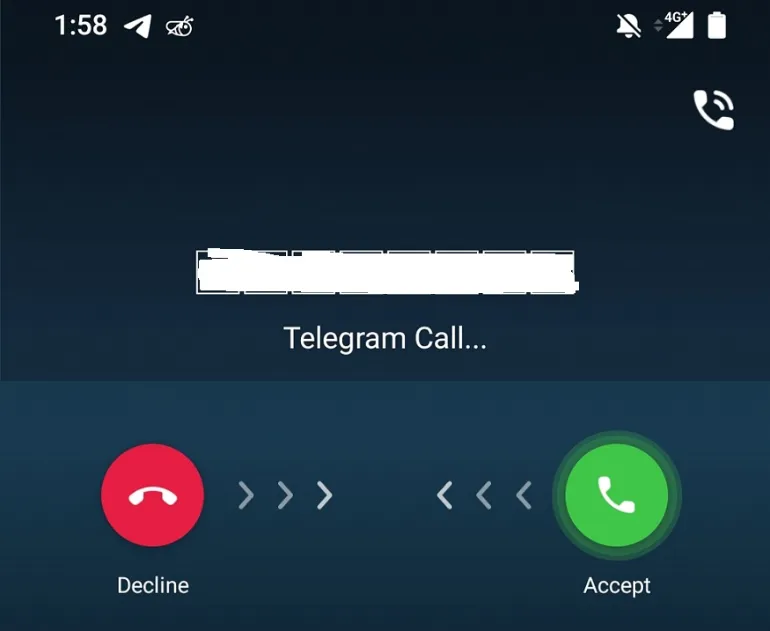
4. Unable to make Telegram Call
When you are blocked, you cannot make a Telegram Call to the person.
Try making a Telegram Call to the person, and you will encounter this error message that says, “Sorry, you cannot call <person> because of their privacy settings. You can ask them to modify their settings or to call you instead.“
5. Use another phone number to send a Telegram message
The best way to confirm if you are being blocked is to send a message to the person using another phone number.
You may want to pretend to be another person with a new Telegram account and ask the person some questions to get them to reply to you. Unfortunately, if they respond, this means you are likely to be blocked in your old Telegram account.
6. No presence of pop-up message notification
Be present while the target phone is being used, such as when it is set down on a desk.
Make sure you are close enough to feel the phone vibrate and see the screen of the phone.
Now, send your Telegram message to the target phone.
Observe if the phone has any notification rings when you send the message.
Even if you are not being muted, your Telegram messages should have a visual pop-up notification on their screen.
Observation
You are likely to be blocked or muted if there are no visual pop-up notifications of your message.
7. Analysis of Last Seen Timestamp
When you are blocked, you will see the person’s status as “last seen a long time ago“.
The best evidence is physically seeing the person using the Telegram app, but you still see this timestamp status. Or you had communicated with the person using another Telegram account, yet the timestamp status remains the same.
8. No Display/Profile Pic Shown
When the person is blocking you in Telegram, you can no longer see their display or profile picture.
The blocked display pic will be like the image shown above (5. Absence of Online status).
9. Absence of Online status
As mentioned above, you will always see the person’s status as “last seen a long time ago”.
Therefore, you will never see the “Online” status of the person, as long as you remain blocked in Telegram.
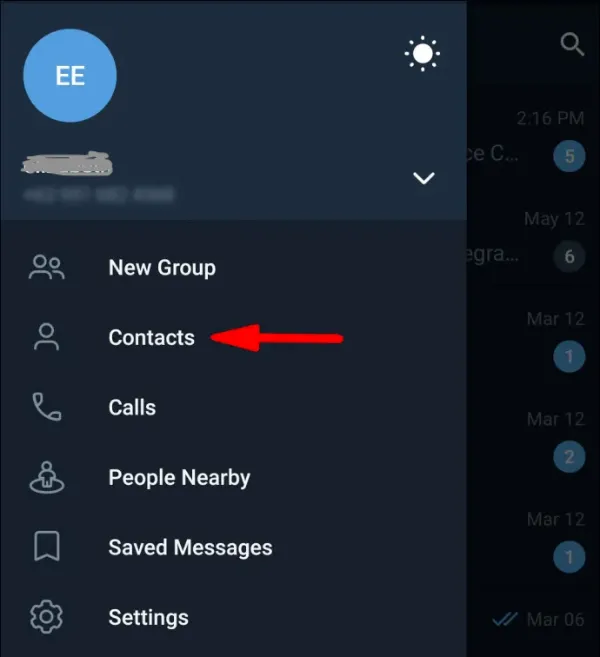
10. You no longer appear in their Contacts list
If you’re not on someone’s contact list, they may have blocked you.
Blocking someone on Telegram will prevent them from appearing in your contact list.
This is because the person you blocked has decided to hide their profile from you.
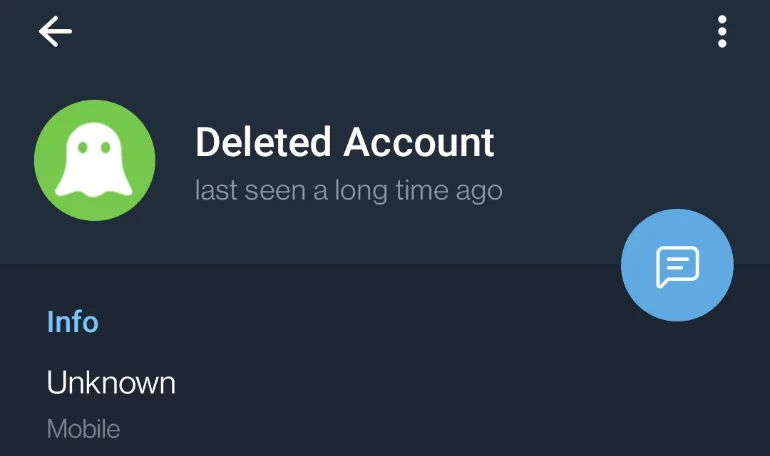
11. Check if Account is deleted
Telegram users can choose to delete their accounts and once removed, the deleted account can behave similar to a person who had blocked you in Telegram, e.g. your messages keep getting single ticks and etc.
To make sure the person did not delete their Telegram account, go into their profile and see their name. You should not see “Deleted Account” here.
If you did not see it, you are highly to be blocked by the person as the person is still using the Telegram app.
Learning to play the piano these days does not necessarily require a physical piano. Virtual piano software is convenient, sounds great and has tons of customization & connectivity features.
Depending on the virtual piano app, it can work on web browsers, different operating systems and different types of devices, such as mobile phones and computers.
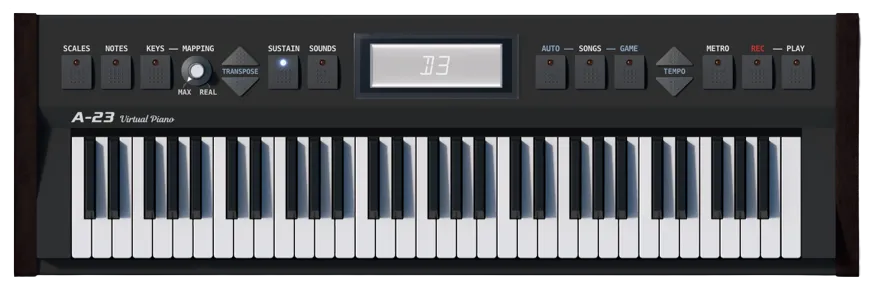
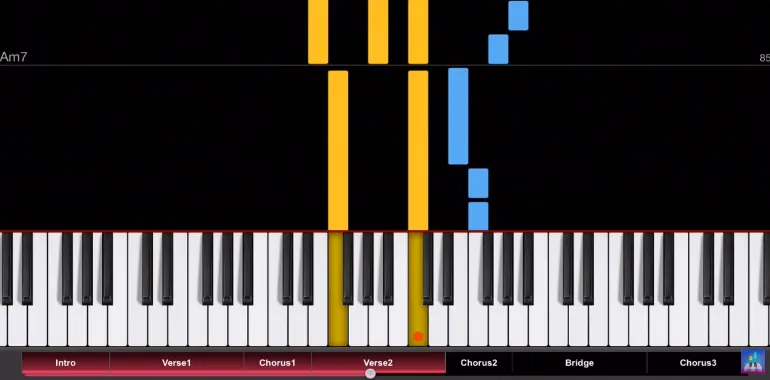
Virtual Piano Simulator is a realistic-looking browser-based piano instrument that is good at mirroring the distribution of white and black keys in a real piano.
When playing piano songs, users will realize that all five octaves are available for them to use. Users can also record and save their own music compositions. Sharing with friends and family is also accessible with invitation links.
Key Features
Adjustable sound and tempo using Sustain, Metronome, Transposition, and Tempo buttons
Free Interactive songs to choose from
Ability to access additional musical instrument sounds such as Organ, Harpsichord, Harp or Synthesizer.
Virtual Piano allow users to learn how to play the piano in a quick, easy and enjoyable manner. The software turns your computer or mobile device keyboard into a piano keyboard, containing letters corresponding to the keys from a QWERTY keyboard.
When playing a song, you can press both the black and white keys together at the same time. In addition, there is a scroll bar under the keys to allow users to play all the octaves of a grand piano.
Key Features
Do not require users to know how to read music notation
Thousands of free music sheets
Maps QWERTY keyboard to piano keys
Credit, edit and refine customized music sheets
Choose from 24 different classical instruments, such as Violin, Saxophone and many more.
Online Pianist simulates a real piano keyboard with 7 1/4 octaves of 88 keys, a Metronome, a sustain pedal and many others. Unfortunately, for mobile devices, only five octaves are available.
Key Features
Real keys mode – corresponding computer keys for the middle octaves & piano keys of a real piano
Simulate a piano’s sustain pedal
Adjust the Metronome based on BPM (beats per minute) or time signature
Using the letter notes feature to display ABC or DoReMi letter notes on the piano keyboard keys
Apronus Virtual Piano enable users to use their keyboard to play on their virtual online piano simulator. Each key on the piano keyboard from C3 to C5 can be played by pressing an associated key on the computer keyboard.
The keys from the keyboard A, S, D rows and the Z, X, C rows are programmed to play white key chords for rich melodies.
This is an offline version of the virtual piano as well.
Key Features
Create a custom-made chord button
Configure buttons to be associated with a computer keyboard key
Ability to record and playback
Savings recordings to a local drive
Bookmarking chords by generating a link that encodes all the chords from your buttons
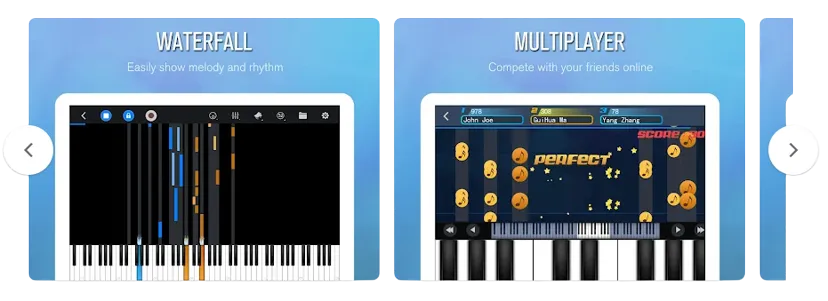
Perfect Piano is an intelligent piano simulator developed for Android phones and tablets. With built-in authentic piano sounds, the app can teach users how to play the piano and be entertaining at the same time.
After installation, users can have a widget on their home screen to quickly play the piano without opening the app itself.
The app supports Timbre plugins such as bass, electric guitar, saxophone, etc. and has an 88-key piano keyboard.
Key Features
Support USB MIDI Keyboard
MIDI and ACC audio recording
Multiplayer Connection & Competition (real-time chat and challenge)
Three play modes: autoplay, semi-auto play, note pause
With more than 50 million downloads, Piano+ is one of Android’s most popular virtual piano apps.
The virtual piano app has an impressive sound to mimic that of a grand piano while allowing users to compose their own music after playing and learning using the 88-key piano app.
Key Features
MIDI keyboard recording, allowing the creation of own MIDI files to share with the community
Huge music library with lots of classical piano songs, kids’ songs, pop and many more
Daily challenges to unlock themes and customization
If you’ve been muted on Telegram, there are some tell-tale signs you can look out for to find out.
The Telegram mute action hides pop-up notifications. This means that the person will not be notified of your incoming messages.
However, all of your sent messages will still be visible when the person opens the Telegram app. So it’s up to them to decide if they want to read them.
How Do You Know If Someone Has Muted Your Telegram Messages?
Here are the seven (7) ways you can use to see if someone has muted your Telegram messages.
1. Presence of pop-up message notification
Be present while the target phone is being used, such as when it is set down on a desk.
Make sure you are close enough to feel the phone vibrate and that you can see the screen of the phone.
Now, send your Telegram message to the target phone.
Observe if the phone has any notification rings when you send the message.
Even if you are not being muted, your Telegram messages should have a visual pop-up notification on their screen.
Observation
You are likely to be muted if there are no visual pop-up notifications of your message.
2. Observing too many unread messages
A double-tick beside your sent message indicates the “read” state in Telegram settings. This suggests that the recipient has received and read your message.
Since they are not immediately informed when someone mutes your Telegram chat, a sizable portion of your delivered messages are frequently “unread.”
The person may continue to use Telegram as usual, as they will still be notified of incoming messages from other people who are not muted. Your message will eventually be “read” when that person decides to review it. In this case, you can see that all sent, but “unread” messages become “read” at the same time.
Observation
Observe if your messages often get delayed “read,” and a significant portion of them get “read” at the same time.
3. Send a Test message (e.g. using tempting or urgent content)
Our goal here is to test in real-time if the person has muted their Telegram message.
If the person doesn’t reply to you in a reasonable amount of time, there is a high chance that they have muted you.
The closer you are physically to the person, the better the results. For example, if your girlfriend’s Telegram messages remain “unread” even though she checks her phone regularly, you’re muted.
Observation
Send a tempting, curious or even urgent message to the person, and give it reasonable time for a reply.
4. Analysis of Last Seen Timestamp
It would help if you compared the timestamp of your message to the recipient’s most recent sighting.
If you sent a Telegram message an hour ago, and the recipient’s last saw timestamp was recent, but your message is still listed as “unread,” you may have been muted.
Observation
The person’s last seen timestamp was very recent on Telegram, but your messages remain “unread” for hours or longer.
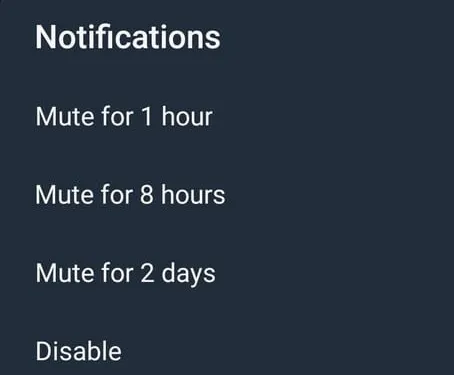
5. Mute Duration
Currently, there are four (4) mute durations available in Telegram.
1 hour
8 hours
Mute for 2 days
Disable
The <Disable> option is a permanent mute duration until the person un-mutes it.
Sometimes the best thing to do is wait til the mute duration is over and hope you aren’t muted permanently.
After the muting duration has passed, your Telegram messages will return to normal, and the other person will receive your message notifications again.
Observation
Wait for the mute duration to expire since it can be set to 1 hour, 8 hours or 2 days.
6. Presence of Mute Icon
You can take the phone, open Telegram, and check to see if the “Mute” icon appears next to your name.
You are muted if you see this icon (see the image above).
To unmute yourself, long-press your name and click on the ringtone icon on the top menu.
7. Use Telegram Calling
This applies to both Telegram’s voice and video calling features.
When you initiate a Telegram call, the other party will be notified (unless they specifically set it to <Nobody> under the Calls option in Settings)
Even if you are muted, the Telegram audio/video call will be sent to that person’s phone, and they will have to accept or decline your call.
Conclusion
Make a Telegram Voice call to the person.
If this is not picked up, there will still be a pop-up notification on the phone screen.
Your Telegram messages are more likely to be read now that the recipient has been notified.
How Do You Know If Someone Has Muted Your WhatsApp Messages?
Here are the seven (7) signs you can use to see if someone has muted your Whatsapp messages.
1. Presence of pop-up message notification
Be physically near the person and the target phone, for example, when it is placed on a desk. Make sure you can visually see the phone screen and close enough to detect if the phone is vibrating.
Now, send your WhatsApp message to the target phone.
Observe if the phone has any notification rings when you send the message.
Even if you are not being muted, your Whatsapp messages should have a visual pop-up notification on their screen.
Observation
You are likely to be muted if there are no visual pop-up notifications of your message.
2. Observing too many unread messages
In Whatsapp settings, a double-tick (grey or blue) equates to the “read” status. This means your message has been delivered and read by the person.
When someone mutes your WhatsApp message, a good chunk of your sent messages are often “unread” since the person does not get notified in real-time.
The person is likely to be using Whatsapp as usual since they still get notified of incoming messages from others they did not mute.
Your messages will eventually get “read” once the person decides to check them out. When this happens, you will notice that all your sent, but “unread” messages will get “read” at the same time.
Observation
Observe if your messages often get delayed “read,” and a big portion of them get “read” at the same time.
3. Sending a tempting or urgent message
The aim here is to test whether the person has muted your Whatsapp messages in real-time.
If the person did not reply to you in a reasonable time, you could be sure that they had muted you.
The results will be better if you are physically near the person. For example, if the person checks their phone regularly, but your Whatsapp messages remain ” unread”, you have been muted.
Observation
Send a tempting, curious or even urgent message to the person, and give it reasonable time for a reply.
4. Analysis of Last Seen Timestamp
You need to observe the timestamp of your sent message versus the last seen timestamp of the person.
If you had already sent your Whatsapp message an hour ago and the last seen timestamp of the person was recently, but yet your message remains “unread”, this is an indicating sign of you being muted.
Observation
The person’s last seen timestamp was very recent on Whatsapp, but your messages remain “unread” for hours or longer.
5. Mute Duration
Currently, there are three (3) mute durations available in Whatsapp.
8 hours
1 week
Always
Sometimes the best way is to wait it out and hope it is not muted to “Always” (permanent).
After the mute duration, your Whatsapp messages will return to normal, and the person will receive your message notification.
Observation
Wait for the mute duration to expire since it can be set to 8 hours or 1 week.
6. Presence of Mute Icon
Depending on your situation, you can take the phone, open Whatsapp, and see if this “Mute” icon is next to your name (see image above).
This icon means you are being muted.
To unmute yourself, press the three dots menu on the top-right and select <Unmute notifications>.
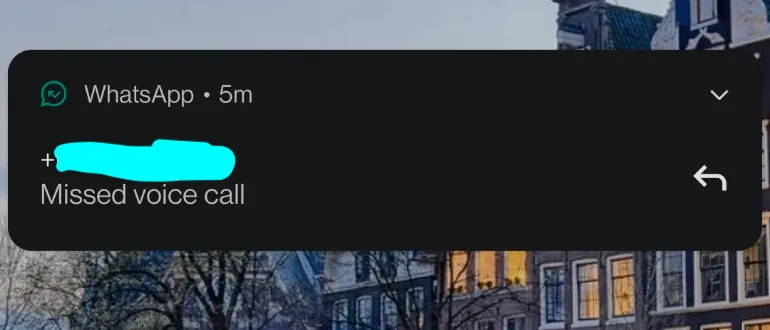
7. Use Whatsapp Calling
This applies to both Whatsapp Voice and Video calling features.
The person will get notified when you start a Whatsapp call to them.
Even if you are being muted, your Whatsapp voice/video call will get through to the person’s phone, and the person will have to either pick up or reject your call.
Conclusion
Give the person a Whatsapp Voice call. If this is not picked up, there will still be a pop-up notification on the phone screen.
The chances of your Whatsapp messages getting read now are high since the person is notified.
Many of our data records are stored in database management systems (DBMS) and in the event of a mishap or data breach or theft incident, there is both a legal and technical requirement need to adopt a database forensics investigation process using specialized tools to carefully uncover what had happened.
Most of the common DBMS are;
MySQL
Oracle
PostgresSQL
Microsoft SQL Server
MongoDB
Before we look at Database Forensics, we have to understand what is Digital forensics. it is a scientific application of analysing digital evidence, mainly used in a court of law and has several sub-disciplines such as cloud forensics, mobile phone forensics, etc.
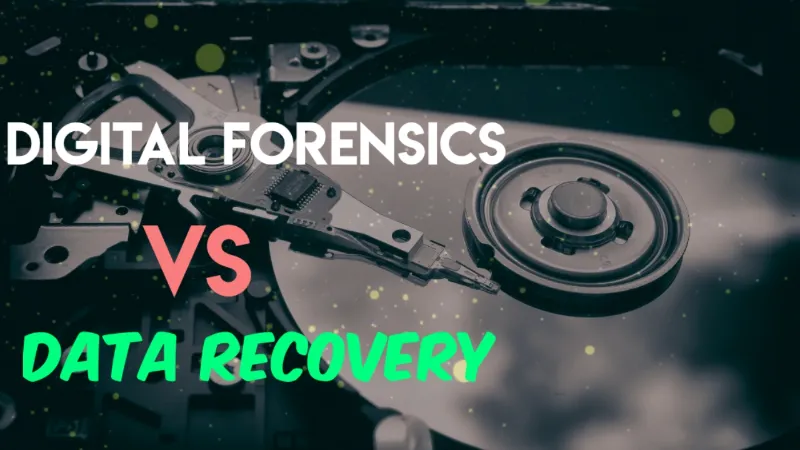
Digital forensics is not to be confused with the concept of data recovery, although both are similar in many ways. Forensics, as a whole, is used for investigation purposes.
What is Database Forensics?
Database forensics is a sub-field of the digital forensics discipline that deals with the preservation, extraction, analysis and presentation of digital evidence and findings.
With scientific forensics in mind, it is often used in litigation, criminal investigation and organisational inquiry purposes. However, it can also be used as a specialized database extraction skill to query the database and find out what happened.
Examiners using database forensics tools can expect to be looking more in-depth, such as analysing file metadata, record timestamps, database artefacts and system artefacts.
Which are the Best Database Forensics Software?
Here are the seven (7) BEST Database Forensics software tools that you can use to analyse and recover deleted database entries.
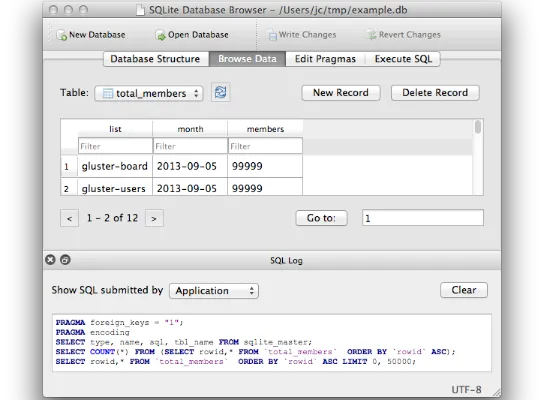
Popular among users and developers who want to create, search and edit databases compatible with SQLite, DB Browser for SQLite is a free, lightweight open-source tool with a clean interface.
The database software supports Windows, macOS and Linux operating systems. One prominent feature of this tool is the ability to export multiple tables to CSV, all in a single group, to analyse together.
Suitable for database forensics, the program comes with a Windows portable app version that does not require installation. You can run this program from an external USB flash drive when examining computer systems.
Some of the useful features are;
Create and compact database files
Create, define, modify and delete tables
Import and export tables from/to CSV files
Import and export databases from/to SQL dump files
Examine a log of all SQL commands issued by the application
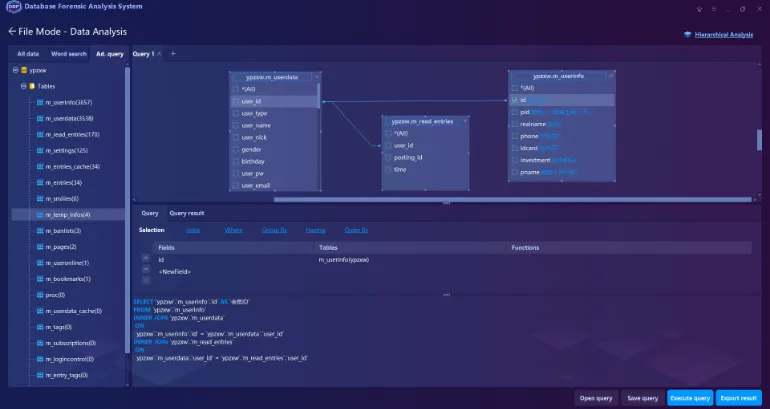
Database Forensic Analysis System is a commercial software that supports multiple relational and non-relational databases such as Oracle, SQLite, MySQL, mongoDB, redis and Cassandra.
The database forensic software assist in resolving the problems about the deleted /corrupted/fragmented database files, false file system, restriction of application system accessibility, etc.
Some of the main features include;
Unrestricted Accessibility to the database files – no need for password or account info from the application system
Extraction and Recovery for the normal/deleted/damaged database files – e.g. tables, views, triggers
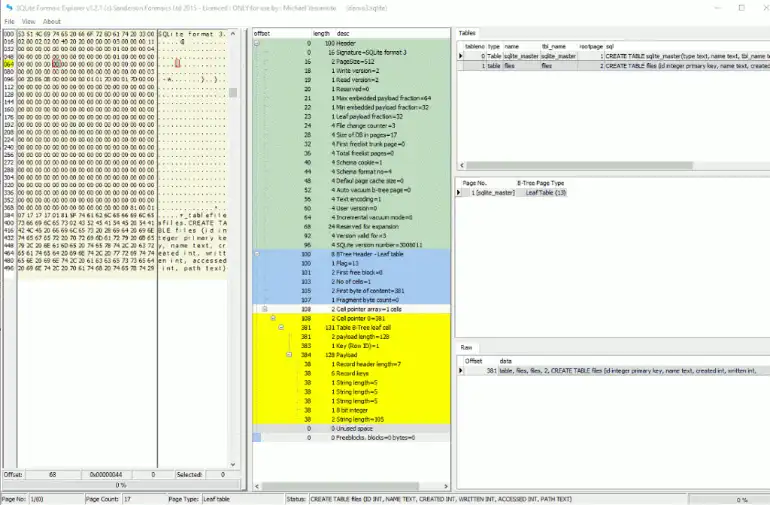
This commercial forensic software suite is a must-have for any forensic investigators to make the tasks of recovering SQLite records from disk, image and database simpler.
The Forensic Toolkit for SQLite is a suite of three (3) comprehensive software tools namely;
The Forensic Browser for SQLite
Forensic Recovery for SQLite
SQLite Forensic Explorer
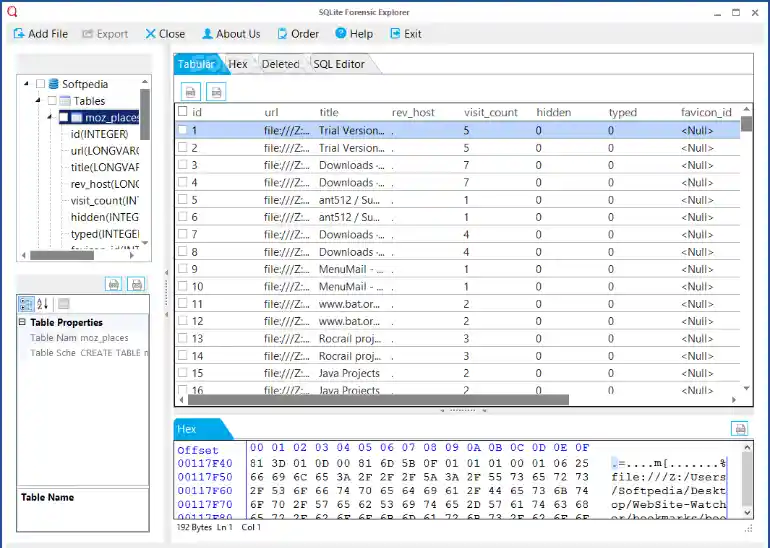
It is an investigative tool designed to show every single byte of an SQLite database, journal or WAL file along with its decoded data. It is also an forensic tool to aid in the recovery of databases, tables and records.
Some of the features include;
examining unused spaces in tables and indexes,
viewing how each record in encoded and stored in a table or index,
exploring the free list and every page within it
Overview of the type and content of the database, which can be SMS, passwords or any other valuable evidence
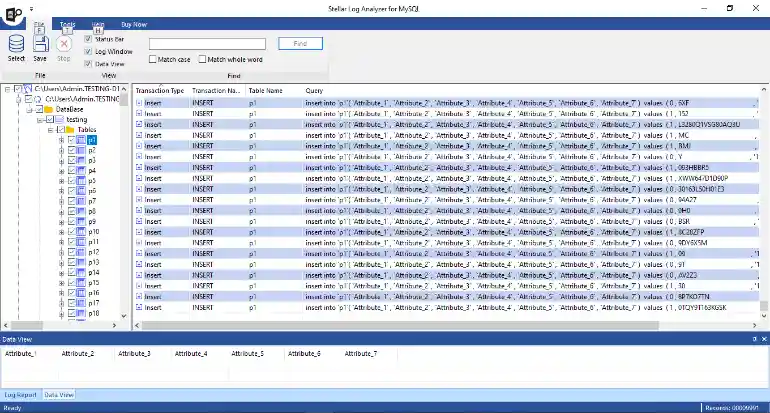
This commercial forensic tool was designed specifically for database administrators to analyze log files transactions of MySQL Server databases and recover deleted transaction logs.
Log Analyzer for SQL scans the forensic details of Redo, General, and Binary logs to identify abnormalities in the MySQL database.
The forensic tool helps you preview the type of transaction (insert, delete, and update), the time of the transaction, the name of the transaction, and the table name involved in the query.
Some of the features include;
Saving of logs in multiple formats, such as MySQL, CSV, HTML, and XLS format.
Date filters on log transactions and log transaction data to analyze the data for a particular time period
Option to save log report of the MySQL log file analysis process
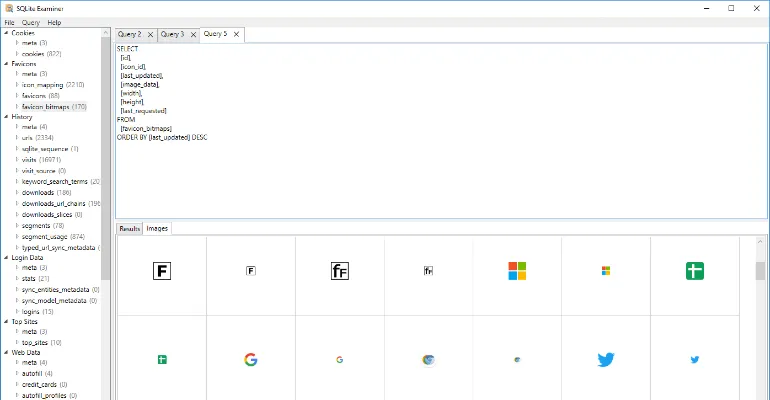
SQLite forensics explorer is designed for investigators and administrators to restore lost and deleted databases and exporting these entries in different formats.
The forensic tool reveals the intention of the user who deletes the database records by not only recovering the deleted data but also highlights the data which is deleted or secure deleted.
Some of the main features are;
Sort data with colour schema – different colours for normal data, deleted data, unallocated data, etc
Manage multiple custodians
Recover associated journal files
Indexing of SQLite databases for further investigation or judicial proceeding
Foxton forensics has a free tool called SQLite Viewer that is used for inspecting the contents of SQLite databases.
The forensic software has a database searcher that automatically load all SQLite databases from folder and subfolders. Images are stored in the database are also automatically extracted and viewable by examiners in the built-in gallery interface.
SQLite Viewer has a hex viewer to examine BLOBs and export them to a file for further analysis.
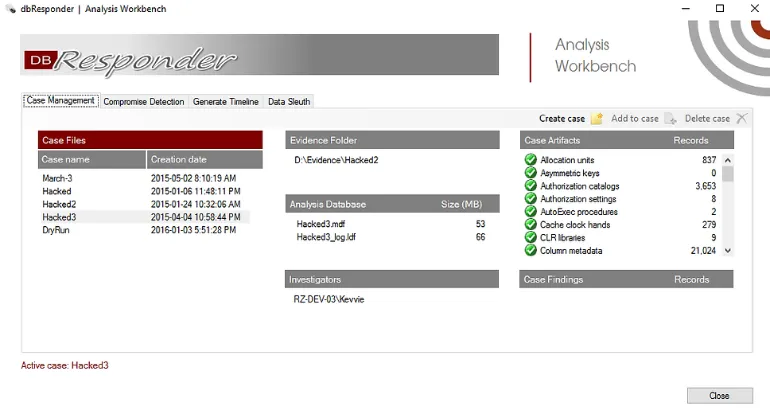
dbResponder is a free, SQL Server forensics tool that is capable of automated preservation and advanced analysis of database artefacts.
The forensic tool is useful for data breaches preparation & response and is developed by Kevvie Fowler who is a partner and National Cyber Response leader for KPMG.
The software can acquire database artefacts from a single or multiple SQL servers. All artefacts collected are forensically preserved with timestamps, metadata and hashes.
There are certain routine habits you can do to clean your Mac device and to boost its performance.
All these can be done simply using command lines and inserting them into your Mac Terminal app.
Learning to use command lines are very useful as graphical user interface (GUI) can change when software versions get a major upgrade, however the command lines are always the same.
How to Clean and Speed Up macOS Using the Terminal Command line?
Here are the five (5) easy Mac terminal command lines you can use to clean and speed up your macOS device.
1. Clear up RAM memory
For every application we use and every system process that is running, they are stored in the Random Access Memory (RAM) of your MacBook.
Even when they are not active at the moment, they are still stored as inactive RAM. In short, they are still taking up space in your RAM.
Freely up these inactive RAM can smooth up your Macbook performance significantly. To do so, use this command in Terminal.
sudo purge
2. Flush DNS Cache
DNS Cache stores all the IP addresses of the websites you visited.
You may encounter 404 error code when visiting certain webpages. This may be caused by the location of the web server changes before the entry of your DNS cache updates.
Regularly flush your DNS Cache so that you always get the latest nameservers and ensure all websites you visit are working fine.
macOS keeps certain logs files in their system and these background logs are mainly for crash reports and error reporting purposes.
The more you use your MacBook, the more log files you have.
Removing these logs files regularly can significantly clean up your macOS performance and free up more disk space.
To do so, use this command in Terminal.
cd ~/Library/Logs
sudo rm -rf ~/Library/Logs/*
4. Remove System Logs
Apple periodically clean this up automatically and these system log files occur from previous system upgrades and updates. However sometimes it can get really big in size, e.g. 10GB.
It is a good practice to clear them regularly. To do this, use this command in Terminal.
sudo rm -rf /private/var/log/*
5. Restart your Mac regularly
Mac users usually do not reboot their Mac computers because it is easier to just close the laptop lid when you are using the Macbook.
However, Mac devices are computers and they need a fresh reboot and restart once a while.
As a good practice of habit, try to restart your Mac computer once a week. The entire rebooting and restarting should only take a minute or so.
To reboot, use this command in Terminal.
sudo shutdown -r now
Optional Steps
Empty your Trash regularly
Trash can contain large gigabytes of files over a period of time. Freeing up the space will increase your storage capacity, as well as reducing your system resources.
Select on the Trash icon on your Dock and click <Empty>.
Update to the latest macOS version
It is important to keep your system up-to-date with the latest version to protect your computer from vulnerbitilies as well as getting the latestest features.
Try to search for any new updates once a month. To do so, use this command in Terminal.
softwareupdate -l
Uninstall Unwanted Applications
Always check your installed application regularly and make sure you un-install those that you no longer need.
These unwanted applications take up storage space and take up system resources at times, especially those operate in the background and uses your system resources all the time.
To un-install application from your Mac computer, go to Finder and select <Applications>, right-click on the unwanted application and click <Move to Trash>.
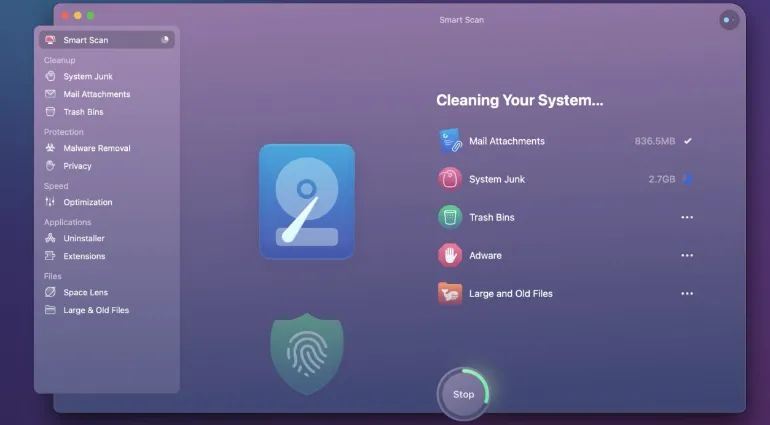
Install CleanMyMac X
Probably the most convenient Mac cleaning tool with lots of positive reviews, CleanMyMac X is a easy & automated cleaning utility for your Mac device that helps you remove system junk and speed up your system resources.
The software looks into your system files, photos, emails, iTunes, analyze large and old files automatically and reports back to you on its suggestion. The user ultimately decides which to clean and which to retain, based on the software’s recommendations.
Within digital forensics tools, a certain amount of data recovery features are built into them. However, it cannot contain every data recovery capability, and digital forensics is not the same as data recovery.
So how do you choose Digital Forensics over Data Recovery?
This article will cover all the differences and intended uses for each method.
What is the difference between Digital Forensics and Data Recovery?
Here are the seven (7) key differences between them.
1. Admissibility in a Court of Law
This is probably the most important difference between the two.
When you use digital forensics methodology and tools to extract data from electronic devices, the data can become useful digital evidence for criminal investigation cases and even corporate crime investigations, e.g. checks into employee misconduct, data leaks, etc.
If you want to introduce digital evidence in court, use digital forensics methodology and tools.
For data recovery, this is used frequently by those who really need to find back lost files, e.g. old photo memories. In-depth file reconstruction can be performed and requires time to restore back.
If you want to recover important files that have been deleted, overwritten or lost, use the data recovery method.
2. Changes to the Data / Files
In terms of their content and metadata, file changes when they get copied, opened, printed or edited.
Digital forensics preserves the integrity of the data extracted from the device. This means all the files in the device are intact, and there is no contamination made to these files. Therefore, no changes, including metadata changes, are introduced.
Files remain the same as the last time it was used.
Data recovery will make changes to the files since they had to be copied and data craved to uncover previously deleted content or versions.
The act of data carving will also overwrite certain portions of the disk space, thus making changes to the disk-allocated or unallocated space.
3. Angle of Focus
In digital forensics, one tends to be more interested in system & app artefacts such as the computer’s login date/time, the list of websites one visits, the last edit date of the document, and the timeline of all events on the device, etc. These findings can incriminate vs exculpate someone.
In data recovery, one will be more interested in recovering deleted, overwritten, hidden and lost files. Often, the technique of data carving will be used to “carve” out the lost file from the disk partition. However, this process usually takes a long time and can take a few days, depending on the storage capacity and size of the hard drive.
4. Methodology used
This refers to the difference in steps and processes involved in achieving the output.
The methodology used in digital forensics involves the four (4) steps shown in the table below.
Steps
Digital Forensic Stage/s
Comments
1
Collection
The proper seizure procedure of devices to prevent physical damage and file contamination
2
Preservation
The forensic process of acquiring (imaging) a forensic image of the device
3
Analysis
The examination stage to uncover any inculpatory or exculpatory digital evidence using digital forensic tools
4
Presentation
Explaining the forensic findings, typically presented in a court of law when used by law enforcement agencies
For data recovery, there are four (4) phases, namely;
Phase 1: Repairing the hard drive
Phase 2: Imaging the hard drive
Phase 3: Logical recovery of the files, partitions, Master Boot Record and filesystem structures
Phase 4: Repair damaged files
5. Hardware & Software Tools used
There are differences in both the hardware and software used.
Digital forensics uses physical write-blockers to ensure the imaging of the data is always in read-only mode. This prevents any accidental writing to the device. The software used is different as well.
The software used is also different. For example, mobile forensics uses software like Cellebrite UFED and Oxygen Forensic tools, while cloud forensics uses software like Magnet AXIOM.
Data recovery uses hard drive diagnosis equipment to check disk health and attempt disk repair. Examples of software tools used are; Recuva for Android devices, Dr Fone for iOS devices and PhotoRec for mass storage devices like memory cards and USB flash drives.
6. Specialized Learning & Courses
In digital forensics, you need to learn how to use commercial forensics tools, either through employment or open-source forensics tools like Autopsy or SIFT Workstation.
Besides learning about file systems (e.g. NTFS, FAT, Android) and operating systems (e.g. macOS, Windows), you can expect to get hands-on on dismantling computer parts, especially taking out hard drives from laptops.
For data recovery, you need to learn the internal mechanisms of hard disk operations and the newer solid-state drives (SSDs). You can expect some hands-on in dismantling computer parts as well.
7. Seeking Professional Help
Although digital forensics is mainly a law enforcement capability for criminal offences, there are more and more private sector companies performing digital forensics for the public. Digital evidence can now be used in civil cases, matrimony cases, etc.
You can easily look for a digital forensics company online. In addition, the big four (4) accounting firms also have their own in-house digital forensics team.
Data recovery companies, on the other hand, are plenty to choose from. Choose someone who can differentiate between digital forensics and data recovery and be honest in their pricing and waiting time.
If your hard drive is spoilt and undetectable, expect to pay a higher price due to disk repair procedures.
FAQ
Can digital forensics recover deleted, overwritten and lost files?
Using digital forensics tools, there are some data recovery features in it.
Depending on the seriousness of overwritten data, it is sometimes possible to reconstruct back a part of the file. For example, an image JPEG file can be partially reconstructed if certain portions of its data are intact and not overwritten.
On the other hand, this cannot apply to file types like PDF, where the whole data needs to be intact before reconstruction can happen.
Therefore, if a file is deleted but not yet overwritten by other files, there is a high chance of recovery.
Can encryption be detected using digital forensics or data recovery methods?
Encryption can be detected using digital forensics tools, such as OpenText EnCase. These encrypted files/folders will be flagged as encrypted compound files. The correct password will still be needed to unzip, mount or decrypt it.
Data recovery methods cannot detect the presence of encryption files or folders.
Can you permanently delete data so that digital forensics and data recovery methods cannot recover it back?
Yes, this is possible. Take, for instance, using a typical hard disk drive or a USB flash drive. You can use a command line or Minitool Partition Wizard to zero out your disk once.
Data in the cloud (e.g. Google Drive, iTunes, webpages, social media sites) are constantly prone to changes or deletion. Therefore, cloud forensics is often referred to as taking a snapshot of the data at that moment in time.
Therefore it is important to use proper cloud forensic software to collect and preserve this digital evidence.
Cloud forensics tools are especially important if you use them for law enforcement cases (criminal offences) or corporate crime investigations, e.g. checks into employee misconduct, data leaks, etc.
Cloud data can be very useful where evidence no longer resides on local storage, e.g. computers & mobile phones, due to deletion or overwriting.
What do I need to perform cloud forensics and social media extraction?
You will still need the following;
The correct login credentials and authentication token for the software to gain access to the account and begin cloud extraction.
A clean computer, preferably with a wired connection (stable connection) and enough storage space (for the extracted cloud data)
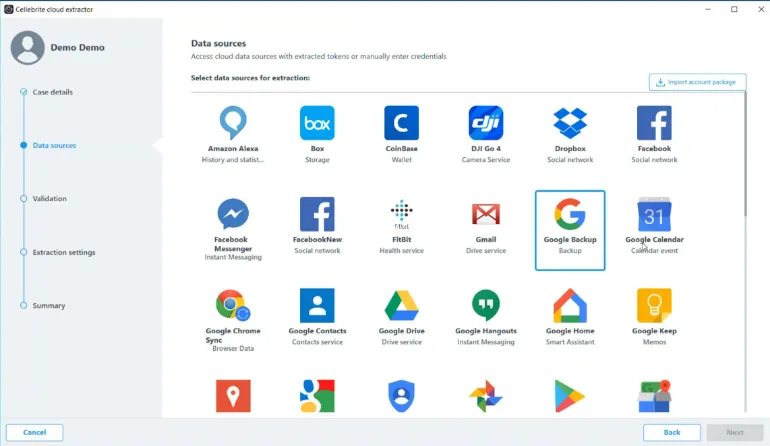
What are the Best Cloud Forensics and Social Media Extraction Tools?
These are the five (5) cloud forensics and social media extraction that collect cloud data in a forensically-sound manner and can be used in a court of law as digital evidence.
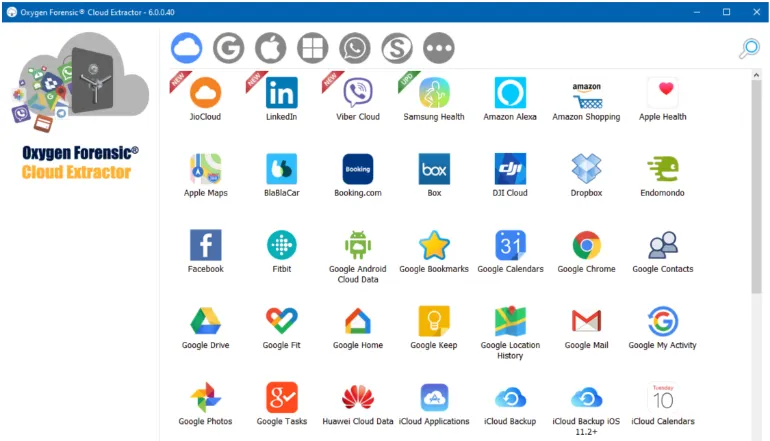
Founded in 2000, Oxygen Forensics is a Russian company headquartered in Alexandria, Virginia and provides mobile forensics capabilities to law enforcement, federal agencies and enterprises.
The digital forensic tool has had a built-in feature called Cloud Extractor since 2014, which acquires data from popular cloud storage and cloud email providers. Gmail, Google Drive, OneDrive, iTunes, Facebook, Instagram, Twitter and many more are some of them.
With the extracted cloud data, Cloud Extractor provides additional analytic features, e.g. Timeline (data in a chronological manner), Social Links (frequently communicated parties) and Image Categorization (sorting of images using built-in AI).
Cloud Support & Features
Supports over 100+ cloud services
Acquisition from Google, iCloud, Microsoft cloud services, popular SaaS offerings like Dropbox & Box and social media sites like Facebook, Instagram, etc
Cloud access via various authorization methods, support 2FA and data decryption
Allow users to configure proxy settings for each cloud service
XI Social Discovery is a case-centric workflow platform that enables users to correctly capture web content while maintaining data preservation and retaining metadata values.
The social media extraction tool collects and searches data from social networks and online web pages.
Unlike the traditional method of manual webpage exporting and taking screenshots, XI Social Discovery collects the web data, allows users to search & analyse them and aggregates all these data into a single user interface.
Cloud Support & Features
Support data types from Facebook, Instagram, Twitter, Youtube, Tumblr, LinkedIn, Webpages, Gmail and many more
Reporting feature based on filter and data extraction
Data is forensically-sound in the process of cloud extraction
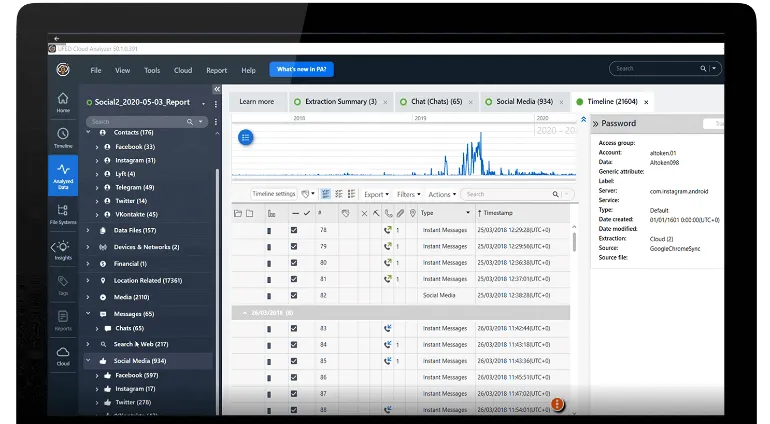
Magnet AXIOM offers a comprehensive solution for lawfully recovering and analyzing cloud-based evidence in various ways from suspects, victims, witnesses, and publicly available cloud sources, e.g. social media and webpages.
The social media and cloud extraction tool allow users to extract, recover, analyze and report on their cloud evidence and open-source intelligence (OSINT) data in one single case interface.
Cloud Support & Features
Support cloud extraction from over 50+ cloud services
Ability to import Warrant Returns formats from Internet Service Providers (ISPs)
Support ingestion of user-generated archive files from Facebook and Google (e.g. Google Takeout)
Gain access to cloud account via login credentials and 3rd party tokens and keychains
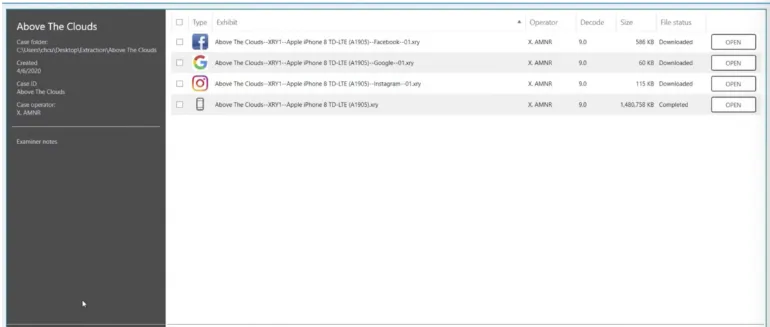
Since entering the mobile forensics industry in 2007, Cellebrite UFED has been the major player in this field for many years.
Cellebrite is an Israeli digital intelligence company focusing mainly on extracting data from mobile devices. The company has several offices across the world, including Washington D.C, Germany and Singapore.
One of Cellebrite’s product, the UFED Cloud, allow users to collect, preserve and analyze popular cloud services, social media data, instant messaging apps, web pages and many more.
Cloud Support & Features
Support over 50+ popular cloud services and social media sites
Lawful access to time-sensitive online evidence using cloud forensics methodology
Ability to import extracted cloud data into the UFED Digital Intelligence platform for further review and analysis
Ability to visualise data in a unified format, e.g. timeline format and maps format
MSAB is a Swedish company that specialises in using forensic technology for mobile device examination and analysis. The company’s main product is the XRY, their flagship mobile forensics software for extracting mobile data.
The company has a separate component product called the XRY Cloud, which is used to perform cloud forensics. XRY cloud can be used as a standalone tool or as part of the complete MSAB ecosystem suite of tools.
XRY Cloud offers two (2) modes of cloud extraction. First is the automatic mode, which requires the device to have online access to extract the app token, e.g. Facebook token. The second mode uses the usual login credentials (ID/password) and does not require the device’s presence.
Cloud Support & Features
Support over 50+ cloud services
Cloud extraction from Whatsapp, Snapchat, iCloud, Facebook, Google services, etc
Use of Cloud Tokens to gain access if login credentials cannot be obtained
Digital Forensics is an application of science to collecting, preserving, analysing, and presenting digital data. Mobile Forensics is a sub-branch under the scope of digital forensics, and it specializes solely in the forensic extraction of mobile devices (smartphones).
There are other sub-disciplines as well, such as cloud forensics, memory forensics and many more.
To examine a mobile device, one needs to overcome and understand the various types of chipsets used (e.g. MTK, Exynos, Snapdragon), the operating system (Android, iOS), the connectivity ports (e.g. USB Type-C), software security version, encryption used, etc.
Commercial tools largely dominate most of the mobile forensics software used in this industry. However, these companies invested heavily into the research & development (R&D) of gaining access to modern-day phones, developing support for thousands of mobile apps and parsing them nicely in an intuitive interface for their users.
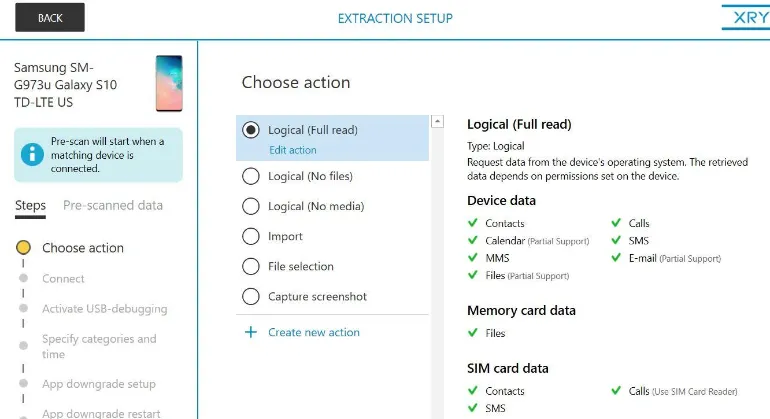
What are the Best Mobile Forensics Tools?
Here are the five (5) best mobile forensics software tools used by law enforcement and private organisations worldwide.
Since entering the mobile forensics industry in 2007, Cellebrite UFED has been the market leader in this space for many years.
Cellebrite is an Israeli digital intelligence company focusing mainly on extracting data from mobile devices. The company has several offices across the world, including Washington D.C, Germany and Singapore.
The UFED capability is available on desktop computers (UFED4PC) and a standalone handheld console (UFED Touch2).
Cellebrite UFED – Key Features
Unlocking of mobile devices via pattern bypass and PIN locks
Perform logical, file system and physical extractions
Use of bootloaders, automatic EDL capability, smart ADB connection and more
Wide range of supported mobile devices across many different brands
Extract evidence from mobile phones, SIM cards, drones, SD cards, GPS devices and more
Like Cellebrite UFED, Oxygen Forensics is a Russian company headquartered in Alexandria, Virginia and provides mobile forensics capabilities to law enforcement, federal agencies and enterprises.
The forensic software is an all-in-one platform that can extract mobile forensic images, decode them and parse them in its interface for investigators to analyse quickly. Furthermore, multiple extractions can be investigated in a single Oxygen Forensic interface to have a complete picture of all the acquired data.
Oxygen Forensics – Key Features
File system level extraction on most mobile devices
Drone forensics possible
Bypass screen lock on popular Android devices
Cloud extraction – Acquire data from cloud services and storage
MSAB is a Swedish company that specialises in using forensic technology for mobile device examination and analysis. It offers frontline extraction support (i.e. rugged forensic kit model) and forensic lab solution (i.e. software, kiosk or tablet form).
The company’s product is designed to recover and analyze the contents of a digital device in a forensically secure manner and offers three (3) different products, namely;
MSAB Product
Function
XRY
The extraction of the mobile device and the decoding & indexing of the mobile data
XAMN
The analysis, reporting and filtering of the extracted data
XEC
The digital forensics management solution for seamless data distribution between users, locations, departments and other agencies.
MSAB XRY – Key Features
Logical and Physical examinations of over 40,000+ mobile devices and app profiles
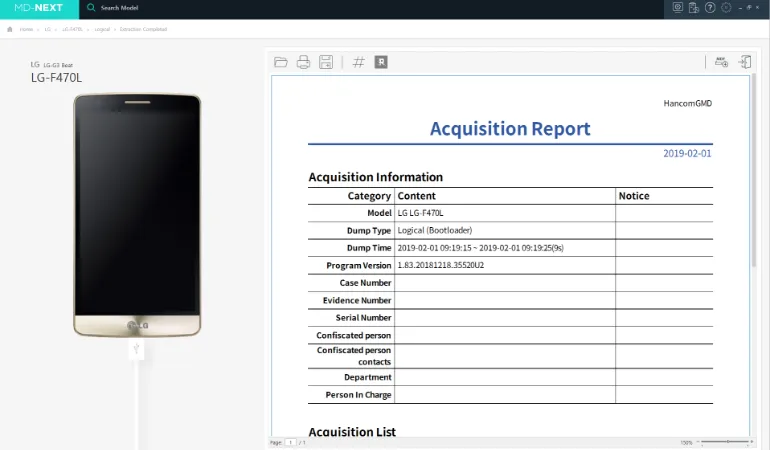
Hancom has been a Korean company specialising in forensic mobile device extraction since 2005. It offers an integrated digital and mobile forensic solution that supports over 15,000+ mobile phones, particularly Korean-made brands such as Samsung and LG.
The company offers three (3) mobile forensics software, namely;
Software
Function
MD-NEXT
The data extraction software for mobile devices, wearables, drones, IoT devices, etc
MD-RED
The analysis software for data recovery, examination and reporting of the extracted data
MD-LIVE
The first responder software for live data extraction and analysis from mobile devices
Hancom MD-NEXT – Key Features
Supports data acquisition for various global smartphone manufacturers (Samsung/Apple/LG/HTC/ZTE etc.) model
ADB Pro extraction: Supports data acquisition using vulnerability attacks from Android-based devices
Supports Android Live, MTP, iOS full filesystem Backup, Vendor backup protocol, Local backup, USIM
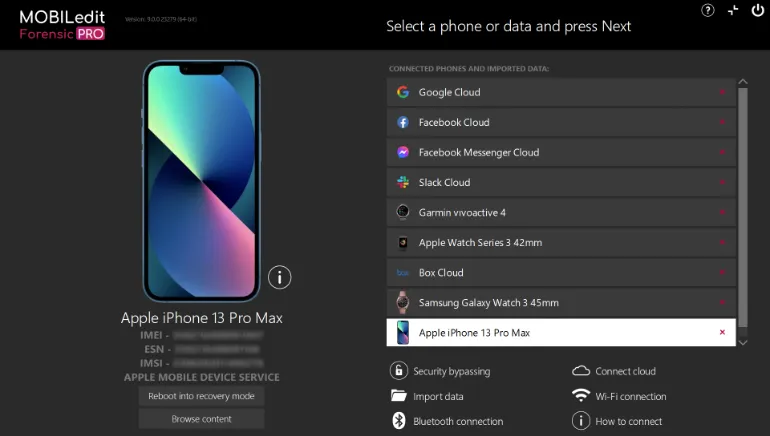
MOBILedit is an all-in-one solution for data extraction from mobile devices, smartwatches and cloud services. It has built-in security bypassing feature that allows users to acquire supported phone models without needing a pattern or pattern unlock.
Another valuable and unique feature is their open database of supported mobile apps. Users can quickly check against this database to see if MOBILedit current supports a particular app. If it doesn’t, there is a request button to ask the company to research that new app.
MOBILedit – Key Features
Physical and Logical data acquisition
Automated deleted data recovery
Cloud forensics acquisition, e.g. Google Drive, OneDrive, Instagram and many others
Integrates with camera ballistics technology to scientifically analyze photo origins