
Screen recording is a useful tool for capturing video footage of your computer screen, making it ideal for developing tutorials, walkthroughs, and presentations.
And if you’re a Mac user, you can get started right away with QuickTime Player.
In this blog post, I’ll teach you how to start and stop screen recording in QuickTime Player and some recording optimization recommendations.
You’ll be able to generate high-quality screen recordings in no time, whether you’re a seasoned pro or a newbie. So let’s get started!
How to Start & Stop Screen Recording Using QuickTime Player?
Below are the instructions to start and stop screen recording and a section on troubleshooting issues with the QuickTime player if you encounter any technical problems.
Starting a Screen Recording With QuickTime Player
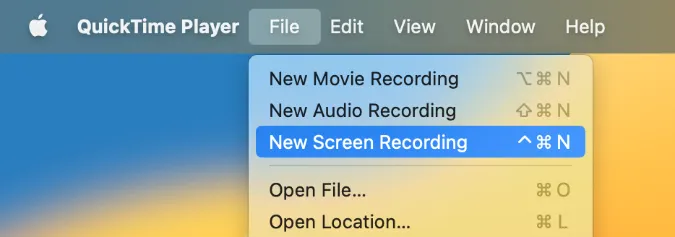
To start a screen recording with QuickTime Player, follow these simple steps:
- Open QuickTime Player on your Mac.
- Click on “File” in the menu bar, and select “New Screen Recording.”
- You can choose to record your entire screen or just a portion of it. Simply click and drag to select the area you want to record.
- You’ll see a screen recording toolbar appear. Click the <Record> button to start recording.

That’s it! QuickTime Player will begin recording your screen and audio (if you choose to enable it).
Make sure to test your microphone beforehand if you plan to record audio. You can pause or stop the recording at any time by clicking on the “Pause” or “Stop” button on the recording toolbar.
If you need to cancel the recording altogether, click the “x” button in the corner of the toolbar.
Stopping a Screen Recording with QuickTime Player
Once you’re done recording, it’s important to know how to stop the recording and save it for future use.
Here’s how to stop a screen recording with QuickTime Player:
- Look for the <Stop> button in the menu bar. It looks like a square inside a circle.
- Click the <Stop> button to end your recording.
- Your screen recording will automatically open in a new QuickTime Player window.
That’s it! Now you can edit your recording, save it, or export it to share with others.
Keep in mind that if you recorded audio along with your screen recording, it would be saved as a separate audio file.
You can easily merge the audio and video files together in QuickTime Player or any other video editing software.
Troubleshooting Screen Recording Issues with QuickTime Player
Despite its ease of use, screen recording with QuickTime Player can sometimes encounter issues.
Here are some common issues you may face and how to troubleshoot them:
- The recording won’t start: If you’re having trouble starting the recording, try closing other apps or restarting your computer. Also, make sure that you have enough storage space on your computer to save the recording.
- The recording is laggy or choppy: This is usually a result of your computer’s processing power struggling to keep up with the recording. Try closing other apps and windows to free up processing power. You can also try reducing the quality of the recording by selecting a smaller area to record or lowering the resolution.
- The audio quality is poor: If you’re recording audio and your screen recording, ensure your microphone is working properly and positioned correctly. Also, try recording in a quiet environment to avoid background noise.
- The recording won’t save or export: This could be due to a lack of storage space on your computer or an issue with the file format. Try exporting the recording in a different file format or freeing up space on your computer.
By following these troubleshooting tips, you should be able to resolve most issues with screen recording using QuickTime Player.
If you’re still encountering issues, you can try reaching out to Apple support for further assistance.
Conclusion
This tutorial covered everything you need to know to start and stop screen recording with QuickTime Player on your Mac.
This article covers step-by-step instructions for starting a screen recording, stopping a screen recording, and troubleshooting common issues.
We also covered some tips for optimizing your screen recording and getting the best possible results.
By now, you should be able to create high-quality screen recordings using QuickTime Player with ease.
Remember to check your settings before recording, keep an eye on your storage space, and troubleshoot any issues that may arise. You’ll become a pro at screen recording in no time with practice!
If you have any questions or suggestions, feel free to leave them in the comments below. Happy screen recording!


![[7 Ways] You May Not Have a Proper App for Viewing this Content](https://www.ticktechtold.com/wp-content/uploads/2023/02/Featured_error-message-you-may-not-have-a-proper-app-for-viewing-this-content-android-whatsapp.webp)
![7 Ways to FIX Telegram Banned Number [Recover Account Unban]](https://www.ticktechtold.com/wp-content/uploads/2023/03/Featured_fix-recover-telegram-this-phone-number-is-banned.webp)