You can use the Mac Terminal app for performing various daily tasks, especially deleting and emptying files.
This article will show you how to use the terminal app to move files and folders into the Trash folder and permanently delete them.
To open the Mac Terminal app, go to Spotlight search and type in <Terminal>.
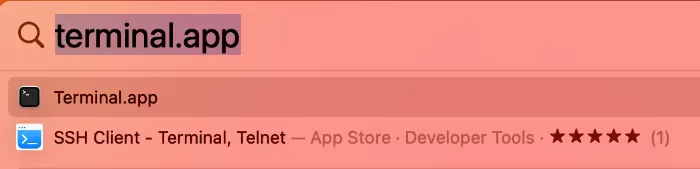
Click on the Terminal.app to launch it.
How to Move Files to Trash and Empty Trash using the Mac Terminal?
Here are the three (3) ways to do so.
1. Moving Files and Folder to Trash
Using the Mac Terminal, you can quickly move files and folders to the Trash folder.
Type the following command into Terminal.
mv file.jpg ~/.TrashReplace <file.jpg> with the actual file you want to delete.
2. Accessing the Trash
To open and view the contents of your Trash folder, you need to first grant full disk access to the terminal app.
Go to System Settings > Privacy & Security > Full Disk Access > Toggle ON the Terminal app.

Now, navigate to the Trash folder
cd ~/.TrashList down all the deleted files to be emptied.
ls -l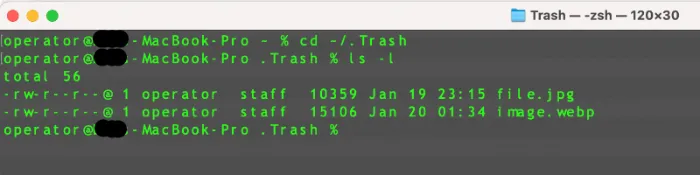
3. Emptying the Trash
To permanently delete a single file, use the following command.
rm -r file.jpgTo empty the entire trash folder, use this.
rm -rf ~/.Trash/*If the Terminal asks for higher permissions, you can add a sudo in front. So the command will be like this.
sudo rm -rf ~/.Trash/*How to Quickly Delete Files and Empty the Mac Trash Instantly?
Use the following command in Terminal.
rm file.jpgThis action will permanently delete the file.jpg without emptying it in the Trash can.
This is an irreversible action, so use it with caution.

![[7 Ways] You May Not Have a Proper App for Viewing this Content](https://www.ticktechtold.com/wp-content/uploads/2023/02/Featured_error-message-you-may-not-have-a-proper-app-for-viewing-this-content-android-whatsapp.webp)
![7 Ways to FIX Telegram Banned Number [Recover Account Unban]](https://www.ticktechtold.com/wp-content/uploads/2023/03/Featured_fix-recover-telegram-this-phone-number-is-banned.webp)