When setting up your Google Analytics, Google Search Console, Cloudflare, or even participating in ad networks, you will often be asked to insert HTML code into your WordPress header or footer files to authenticate and verify yourself as the rightful owner of the domain.
There are only three (3) ways to do this.
Firstly, ask your web hosting service to do this for you. The downside is that you will need to give the technical support staff your WordPress (WP) login credentials. This is not entirely secure.
Secondly, install a third-party WordPress plugin. This will slow down your site, depending on how many plugins you already have. The more plugins you have on your site, the more resource-heavy your site becomes in terms of speed and performance. As a rule of thumb, three (3) plugins are generally all you need for your WP site.
Thirdly, manually insert the HTML code. You can easily add or remove code in this way. It is much cleaner than installing a plugin that inserts codes the same way but requires installation.
This article will focus on how to manually insert HTML code into your WordPress site.
How to Manually Add Code to Header and Footer in WordPress Without Using Any Plugins
Here are the four (4) easy steps to do so.
Step 1: Log into your WordPress admin site.
Login to your WordPress admin for the domain (website) you want to verify.
Step 2: Go into Theme File Editor
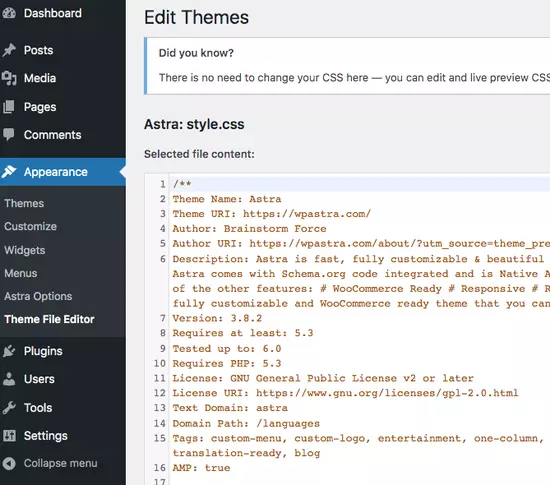
Go to <Appearance> and select <Theme File Editor>.
In this example, I will be using the Astra theme, one of the fastest WordPress themes. Most WP themes will be similar, and you need to look for the Theme Editor option.
Step 3: Edit header.php or footer.php
Look at the right-hand side of the screen, and you will see all the theme files for your WordPress theme.
Choose header.php if you want to insert code into the header.
Choose footer.php if you want to insert code into the footer.
Step 4: Manually insert the code
Take, for example, Google Analytics, where you must insert code into the <head> section.
Open the header.php file, and look out for the opening <head> tag and the closing </head> tag.
An example is shown below. The <head> and </head> are bolded below. so you can see them easily.
?><!DOCTYPE html>
<?php astra_html_before(); ?>
<html <?php language_attributes(); ?>>
<head>
<?php astra_head_top(); ?>
<meta charset="<?php bloginfo( 'charset' ); ?>">
<meta name="viewport" content="width=device-width, initial-scale=1">
<link rel="profile" href="https://gmpg.org/xfn/11">


<?php wp_head(); ?>
<?php astra_head_bottom(); ?>


</head>
You will insert the Google Analytics tracking code JUST BEFORE the closing </head> tag.
This is how you paste the code below.
?><!DOCTYPE html>
<?php astra_html_before(); ?>
<html <?php language_attributes(); ?>>
<head>
<?php astra_head_top(); ?>
<meta charset="<?php bloginfo( 'charset' ); ?>">
<meta name="viewport" content="width=device-width, initial-scale=1">
<link rel="profile" href="https://gmpg.org/xfn/11">


<?php wp_head(); ?>
<?php astra_head_bottom(); ?>


<!-- Global Site Tag (gtag.js) - Google Analytics -->
<script async src="https://www.googletagmanager.com/gtag/js?id=TRACKING_ID"></script>

<script>
  window.dataLayer = window.dataLayer || [];
  function gtag(){dataLayer.push(arguments);}
  gtag('js', new Date());
  gtag('config', 'TRACKING_ID');
</script>


</head>
The Google Analytics tracking code is bolded above and pasted before the closing </head> tag.
Step 5: Finalize and Update the File
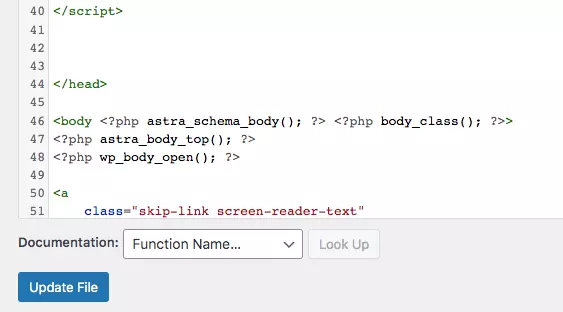
Once the tracking code is pasted correctly, click <Update File>, and you are done.
If you are doing this for Google Analytics, you will need to refresh the GA page, and the new changes will usually come within a few hours.
Recommendations (Tested & Proven)
* Binance
* Coinbase
* Crypto.com
* Bitfinex
Regardless of the country, you reside in, either of the above-tested exchanges will work for you.
All the above accept payment methods such as credit/debit cards, bank transfers, Apple Pay, Google Pay, etc.
Install the Honeygain app on the desktop, mobile or both to maximise earnings.
Payout in USD or Bitcoin (BTC).
Start earning with an upfront USD $5 balance in your app now.
The payout threshold is USD $20.

![[7 Ways] You May Not Have a Proper App for Viewing this Content](https://www.ticktechtold.com/wp-content/uploads/2023/02/Featured_error-message-you-may-not-have-a-proper-app-for-viewing-this-content-android-whatsapp.webp)
![7 Ways to FIX Telegram Banned Number [Recover Account Unban]](https://www.ticktechtold.com/wp-content/uploads/2023/03/Featured_fix-recover-telegram-this-phone-number-is-banned.webp)