So, you’re wondering, “Can Google Drive folders be password protected?”
You’re not alone. This question pops up quite often. With all its handy features, Google Drive has become a go-to for storing files, images, and videos; you name it.
But despite its popularity, a common question we hear is, “Can I restrict access to a folder in Google Drive?” That’s a very valid question. After all, we all value our privacy, don’t we?
Understanding Google Drive’s Security Measures
Google, as we all know, takes security pretty seriously. They’ve got this big, burly security protocol called Transport Layer Security (TLS) guarding the gates.
TLS is like the bouncer at a nightclub, ensuring your files travel safely from your device to the cloud and vice versa. It’s pretty tough, trust me.
Can Google Drive Folders be Password Protected?
You might be thinking, “Can I lock a file in my Google Drive?”
Well, directly, no. Google Drive doesn’t provide an option to password-protect individual files or folders.
But don’t worry; there are several other ways to beef up your Google Drive security, and we’re going to walk through each one.
How to Password Protect Google Drive Folders?
Here are the three (3) ways to do so;
Method 1: Archive and Password-Protect Files
Sometimes, the best defense is a good old-fashioned archive.
Archiving and password-protecting your files adds an extra layer of security that can keep your Google Drive files safe from prying eyes.
The Need for Archiving and Password Protection
Why archive and password-protect your files? Well, think of it as putting your most precious items in a safe.
Not only are they organized neatly away (that’s the archiving part), but they’re also locked up tight (and that’s where the password protection comes in).
Step-by-Step: How to Archive and Password-Protect Files
Here’s a quick guide to archiving and password-protecting your files:
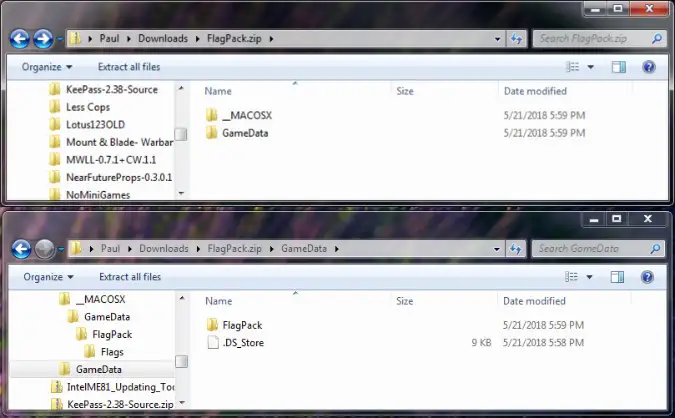
- Use a tool like WinRAR or 7-Zip. These are software programs you can download to your computer.
- Once you have your software, select the files you want to archive. Right-click, select ‘Add to archive…’, and then select ‘Set password…’ to add your secure, hard-to-guess password.
- Then, upload the newly created, password-protected archive to Google Drive.
Your files are now archived and password-protected.
Method 2: Using Third-Party Encryption Tools
When it comes to enhancing the security of your Google Drive, third-party encryption tools can be your secret weapon.
These tools can give you that extra peace of mind when storing sensitive data.
Why Consider Third-Party Encryption Tools?
Think of third-party encryption tools as a super-secret decoder ring.
They can encrypt your files, making them unreadable to anyone who doesn’t have the decryption key. It’s like speaking in a secret language that only you understand.
Choosing the Right Encryption Tool
There are several third-party encryption tools out there. Some of the popular ones include Boxcryptor, Sookasa, and VeraCrypt.
Each comes with its own features, so choosing the one that best suits your needs is important.
Remember, when choosing an encryption tool, you want to ensure it’s from a reputable company and that it uses strong encryption standards.
Using third-party encryption tools adds a robust layer of security to your Google Drive.
However, it’s worth noting that these tools are typically not free. But hey, when it comes to the security of your sensitive data, it might just be worth it.
Method 3: Password-Protect with Microsoft Office Before Uploading
Microsoft Office comes with a handy-dandy feature that allows you to password-protect your documents.
This can be a lifesaver when you want to store these documents on Google Drive but need that extra layer of security.
Password-Protecting a Word or Excel Document
Here are the steps to password-protect your Word or Excel documents:
- Open Your Document: Open your Word or Excel document in Microsoft Office.
- Navigate to File Info: Click on the ‘File’ tab at the top left corner of the screen, and then click on ‘Info’.
- Protect Your Document: Click on the ‘Protect Document’ button in the ‘Info’ pane.
- Set a Password: Click on ‘Encrypt with Password’. A dialog box will appear prompting you to enter a password. Choose a strong password, enter it, and then confirm it by entering it again. Remember, this password will be needed to open the document in the future, so don’t forget it!
Once your Word or Excel document is password-protected, it’s ready to be uploaded to Google Drive.
Uploading Your Password-Protected Document to Google Drive
- Go to Google Drive: Open Google Drive in your web browser.
- Click on ‘New’: On the top left of your screen, click on the ‘New’ button.
- Upload Your File: Select ‘File upload’, and then navigate to your password-protected Word or Excel document. Select the document and click ‘Open’.
And there you have it! Your password-protected document is now securely stored in Google Drive.
When you or anyone else tries to open the document from Google Drive, they’ll be prompted to enter the password.
Conclusion: The Power of Password Protection
Well, there you have it, folks — the ins and outs of password-protecting your files (e.g., Word and Excel) documents before storing them on Google Drive.
Sure, it might seem like a couple of extra steps, but think about the peace of mind it can bring. Knowing your files are securely tucked away and only accessible to those with the password is, as the saying goes, priceless.
Remember, a strong password is key to good security. So make sure you’re picking something that’s hard to guess.
We’ve covered a lot; if you’re interested in diving deeper, check out our post on the pros and cons of using Google Drive.
Until next time, keep your data safe and your passwords strong!

![[7 Ways] You May Not Have a Proper App for Viewing this Content](https://www.ticktechtold.com/wp-content/uploads/2023/02/Featured_error-message-you-may-not-have-a-proper-app-for-viewing-this-content-android-whatsapp.webp)
![7 Ways to FIX Telegram Banned Number [Recover Account Unban]](https://www.ticktechtold.com/wp-content/uploads/2023/03/Featured_fix-recover-telegram-this-phone-number-is-banned.webp)