admin

what-is-digital-forensics

A Comprehensive Guide to Digital Forensics [Tools & Career]

Hey there! If you’ve ever wondered, “What is digital forensics in simple terms?” you’ve come to the right place.

Digital forensics is the process of uncovering and interpreting electronic data to help solve digital mysteries.

It’s like being a detective but for the digital world! From cybercrime investigations to data breaches, digital forensics plays a crucial role in understanding and mitigating these incidents.

What is Digital Forensics?

Digital forensics is the art and science of examining electronic data to extract valuable information, whether it’s for legal, investigative, or security purposes.

This includes analyzing computer systems, mobile devices, networks, and even cloud services to find hidden evidence and understand the events that took place.

The primary goal of digital forensics is to preserve the integrity of digital evidence and present it in a way that can be used in legal proceedings or to improve cybersecurity practices.

Fun Fact #1: Digital forensics has been used to solve aviation accidents: Digital forensic experts have been called upon to investigate aviation accidents and determine the cause of the crash. By analyzing data from flight recorders, radar systems, and other digital sources, they can reconstruct the events leading up to the accident and identify any mechanical or human errors that may have occurred

Why is it Important?

In today’s digital age, we’re all surrounded by technology. Our lives are intertwined with electronic devices, from our smartphones and laptops to the ever-growing Internet of Things.

And as we rely more on these devices, the potential for digital crime increases. That’s where digital forensics comes in – it’s the key to understanding and solving digital mysteries.

Digital forensics helps us to:

  • Investigate and solve cybercrimes
  • Uncover evidence in legal cases involving digital data
  • Protect businesses and individuals from data breaches and cyber-attacks
  • Recover lost or damaged data
  • And much more!

Is digital forensics a good career? You bet it is! With the rapid growth of technology and the increasing demand for digital forensic experts, there’s never been a better time to dive into this fascinating field.

If you want to know more about the various branches of digital forensics, check out our guide on digital forensics branches.

Fun Fact #2: Digital forensics has been used to solve sports-related cases: Digital forensic techniques have been used in sports-related cases to investigate doping, match-fixing, and other forms of cheating. For example, in 2016, digital forensic evidence helped to prove that Russian athletes had engaged in state-sponsored doping, leading to their ban from the Olympics

The Digital Forensics Process

Digital forensics isn’t just about diving headfirst into a digital haystack looking for that one shiny needle; it’s a systematic process ensuring digital evidence’s integrity and admissibility.

Let’s walk through the five (5) main stages of the digital forensics process.

Identification

This is where it all begins. In the identification phase, digital forensic investigators determine the scope of the investigation and identify potential sources of digital evidence.

They’ll look for electronic devices, storage media, and network logs that may contain relevant information. The goal is to create a roadmap for the investigation so they know where to focus their efforts.

Preservation

Once potential evidence sources have been identified, preserving them is crucial. This means protecting digital evidence from accidental or intentional tampering, alteration, or deletion.

Forensic investigators use specialized techniques and tools to create a “forensic image” of the original data, which is an exact copy that can be safely analyzed without risking the integrity of the original evidence.

Collection

Now that the evidence is preserved, it’s time to collect it. This involves extracting the relevant data from the identified sources, such as computer hard drives, mobile devices, and network logs.

Following a well-documented procedure and maintaining a clear chain of custody is essential to ensure the evidence remains admissible in court.

Learn how to acquire a forensic image using the command line from our tutorial post.

Analysis

This is where the magic happens. In the analysis phase, digital forensic experts sift through the collected data to uncover hidden evidence and piece together the digital puzzle.

They’ll use various tools and techniques to recover deleted files, decrypt encrypted data, and analyze system logs to reconstruct the events that took place.

The goal is to provide a clear and accurate picture of what happened, who was involved, and how it all went down.

Check out our data recovery vs. digital forensics article to understand their differences.

Presentation

Finally, the results of the analysis need to be presented in a clear and concise manner. This could be in the form of a written report, expert testimony in court, or a presentation to a client.

The key is to communicate the findings in a way that’s easy to understand, even for those without a background in digital forensics.

Now that we’ve got a handle on the digital forensics process. Let’s explore the different types of digital forensics in the next section.


Types of Digital Forensics

Digital forensics is a diverse field with many specialized branches, each focusing on a specific aspect of the digital world.

Let’s take a closer look at some of the most common types of digital forensics.

Computer Forensics

This is probably what comes to mind when you think of digital forensics.

Computer forensics focuses on analyzing data from computer systems, including desktops, laptops, and servers. Investigators dig into hard drives, memory, and system logs to uncover evidence of cybercrimes, data breaches, and other digital incidents.

Mobile Device Forensics

With smartphones and tablets practically glued to our hands, it’s no surprise that mobile device forensics is a rapidly growing field.

Mobile forensics experts specialize in extracting and analyzing data from mobile devices, including call logs, text messages, photos, and app data. It’s a challenging field due to the sheer variety of devices, operating systems, and security measures.

Network Forensics

Network forensics monitors and analyzes network traffic to detect and investigate cyber-attacks, data breaches, and other security incidents.

Experts in this field use tools like packet sniffers and network analyzers to capture and dissect network data, helping them understand the nature of an attack and identify its source.

Cloud Forensics

As more and more data is stored in the cloud, the need for cloud forensics has grown.

This branch of digital forensics deals with the challenges of investigating data stored on remote servers and services, such as Dropbox, Google Drive, or Amazon Web Services.

Cloud forensics experts must navigate the complexities of multi-tenant environments, data privacy regulations, and jurisdictional issues.

Social Media Forensics

Social media is an essential part of our daily lives and a goldmine of digital evidence.

Social media forensics involves the examination of social media platforms, such as Facebook, Twitter, and Instagram, to uncover evidence and gain insights into digital crimes, harassment, or other incidents.

To learn more about the various branches of digital forensics and who uses them, check out our articles on digital forensics branches and who uses digital forensics.


Digital Forensics Tools and Techniques

Whether you’re a seasoned digital forensics professional or just getting started in the field, having the right tools and techniques at your disposal can make all the difference.

Let’s explore some of the most popular tools and techniques used in digital forensics.

Open-Source Tools

There are numerous open-source tools available that can help digital forensic investigators in their quest for digital evidence. Some popular open-source tools include:

  • Autopsy: A versatile digital forensics platform that supports file carving, timeline analysis, and more.
  • Sleuth Kit: A collection of command-line tools for forensic analysis of disk images and file systems.
  • Wireshark: A widely-used network protocol analyzer that allows investigators to capture and analyze network traffic.
  • Volatility: A powerful memory forensics framework for analyzing volatile memory (RAM) from a wide range of systems.

Commercial Tools

While open-source tools can be incredibly useful, there are also commercial tools available that offer additional features and support. Some popular commercial tools include:

  • EnCase: A comprehensive digital forensics suite with a wide range of capabilities, including disk imaging, file carving, and network forensics.
  • FTK: A powerful digital forensics tool that supports advanced data recovery, password cracking, and email analysis.
  • Cellebrite: A leader in mobile device forensics, offering tools for extracting and analyzing data from a wide range of mobile devices.

Find more digital forensics tools in our guide to the best digital forensics tools and software.

Techniques for Data Recovery and Analysis

In addition to using specialized tools, digital forensic investigators rely on various techniques to uncover hidden evidence and make sense of the data they collect.

Some common techniques include:

  • File carving: The process of extracting files from raw data, even if the file system metadata is missing or damaged. Learn about the best file carving tools in our guide.

  • Database forensics: Analyzing the contents of databases to uncover evidence, such as deleted records or unauthorized transactions. Check out our list of the best database forensics tools.

  • Metadata analysis: Examining the metadata of files, such as timestamps and geolocation data, to gain insights into creating and modifying digital evidence. Discover how to view EXIF metadata in our tutorial.

You’ll be well-equipped to tackle any digital investigation with the right tools and techniques in your digital forensics toolbox.

But it’s not just about the technology – understanding digital forensics’ legal and ethical considerations is equally important.


Legal and Ethical Considerations in Digital Forensics

As a digital forensics professional, it’s essential to be aware of the legal and ethical considerations that come into play when conducting investigations.

This helps ensure that the evidence collected is admissible in court and that all parties’ rights are protected.

Chain of Custody

Maintaining a clear chain of custody is critical in digital forensics. This involves documenting every step of the evidence-handling process, from the initial collection to the final presentation in court.

A well-maintained chain of custody ensures that the evidence has not been tampered with or altered and helps to establish its integrity and admissibility in legal proceedings.

Privacy and Data Protection

Privacy and data protection are important concerns in digital forensics, especially when dealing with sensitive personal information.

Investigators must be mindful of applicable privacy laws and regulations, such as GDPR in the European Union or CCPA in California, and take steps to protect individuals’ privacy.

This may include obtaining proper authorization or warrants, using encryption to secure data, and minimizing the collection of non-relevant data.

Ethical Conduct

Upholding high ethical standards is crucial in digital forensics.

Investigators should conduct their work with integrity, honesty, and professionalism, avoiding any actions that could compromise the evidence or harm innocent parties.

This may include:

  • Ensuring that investigations are based on justifiable suspicion
  • Respecting the rights of individuals involved in the investigation
  • Avoiding conflicts of interest
  • Being transparent and objective in the analysis and presentation of evidence

To learn more about the advantages and disadvantages of digital forensics, take a look at our article on the pros and cons of digital forensics.


Conclusion

Well, we’ve come a long way in this comprehensive guide to digital forensics, haven’t we?

We’ve covered the basics, walking through the digital forensics process, explored the different types of digital forensics, and discussed some popular tools and techniques.

Plus, we’ve touched on the importance of legal and ethical considerations when working in this field.

Digital forensics is an exciting and rapidly evolving field, and it’s clear that the demand for skilled professionals will continue to grow.

So, is digital forensics a good career? Absolutely! It’s a rewarding and challenging field with plenty of opportunities for growth and specialization.

If you’re interested in pursuing a career in digital forensics, it’s worth noting that while having programming skills can be beneficial, it’s not always required.

You can read more about this in our article on whether digital forensics requires coding or programming skills.

We hope this guide has provided you with valuable insights and inspired you to explore the fascinating world of digital forensics further.

Remember, knowledge is power, and the more you learn, the better prepared you’ll be to tackle the digital challenges of the future. Good luck!


A Comprehensive Guide to Digital Forensics [Tools & Career] Read More »

How-to-unbanned-from-whatsapp-quickly

7 Ways to Get UnBan From WhatsApp Quickly [Temp vs. Perm Ban]

WhatsApp has become an indispensable part of our lives, allowing us to communicate with friends, family, and colleagues all over the world.

Unsurprisingly, it’s one of the most popular messaging apps, with its simple interface and plethora of features.

However, when users are suddenly unable to access their accounts, they may wonder, “How to get unbanned from WhatsApp quickly?

The reasons for being banned on WhatsApp could range from violating the app’s terms of service to using unauthorized third-party applications.

In this blog post, we’ll look at the various types of bans, how to get unbanned, and how to avoid being banned in the first place. So, let’s get started!

Understanding WhatsApp Bans

There are two main categories: temporary bans and permanent bans.

Temporary bans

These are usually imposed when a user has been flagged for violating WhatsApp’s terms of service or for using an unauthorized third-party app, such as WhatsApp Plus or GBWhatsApp.

As the name suggests, these bans are temporary and usually last for a few hours up to a few days.

So, if you’re wondering, “How long does it take to be unbanned from WhatsApp?” it largely depends on the severity of the violation.

Permanent bans

On the other hand, permanent bans are more serious.

These bans are typically reserved for users who repeatedly violate the terms of service or engage in activities that severely harm the app’s ecosystem, like spamming or spreading malicious content.

A permanent ban raises the question, “Can I get my number unbanned from WhatsApp?” which, unfortunately, can be more challenging to address.

How to Get Unbanned Quickly

Let’s explore the methods to get unbanned from WhatsApp quickly. We’ll break it down into two sections: appealing a temporary ban and dealing with a permanent ban.

Dealing with a Permanent Ban


Method 1. Using a Virtual Phone Number app

You could try a Virtual Phone Number app if you can’t use a new number. These apps provide temporary phone numbers that can be used for account verification.

But be cautious, as using such apps might violate WhatsApp’s terms of service, leading to another ban.

A quick and easy way is to can use Hushed or Numero to register for a new WhatsApp account and receive SMS verification codes.


Method 2. Contacting WhatsApp Support

If you believe your ban was unjust or an error, you can try reaching out to WhatsApp Support for help. Be polite and explain your situation. However, remember that there’s no guarantee they’ll remove the ban.

  • Open WhatsApp and tap on “More options” (the three dots in the top-right corner).
  • Select “Settings” and then “Help.”
  • Tap on “Contact us.”
  • Write a detailed message explaining the situation and requesting assistance.
  • Tap on “Submit.”

As WhatsApp does not have a customer service phone number or email address, this is the only way to contact them.

Keep in mind that accounts that violate WhatsApp’s terms of service, such as sending spam messages, promoting illegal activities, or using unauthorized third-party apps, are banned.

If you believe your account was banned in error, make sure to explain your situation in your message to the support team.


Method 3. Creating a new account with a new number

In some cases, you might have to accept the ban and start fresh. You can create a new WhatsApp account using a different phone number.

There are several ways to bypass WhatsApp SMS verification, as well as using virtual numbers to register for a new WhatsApp account.

For online services capable of receiving SMS messages from Whatsapp for verification purposes, try OnlineSIM and Quackr.


Method 4, Seek help from the community

Sometimes, the wisdom of the crowd can provide valuable insights and potential solutions. You can reach out to online forums, social media groups, or other communities that discuss WhatsApp-related issues.

Remember that this approach’s effectiveness might vary, and always double-check any advice you receive against WhatsApp’s terms of service.


Appealing a Temporary Ban


Method 5. Uninstall unauthorized apps

If you’re using any unauthorized third-party apps like WhatsApp Plus or GBWhatsApp, uninstall them immediately. These apps violate WhatsApp’s terms of service and are a common reason for temporary bans.

Method 6. Wait it out

In most cases, the best course of action is to wait for the ban to be lifted.

Depending on the violation, temporary bans can range from a few hours to several days. Patience can be the key here.

Method 7. Update WhatsApp to the latest version

If you’re using an outdated version of the app, updating it could help lift the ban. Visit your device’s app store and make sure you have the latest version installed.


Conclusion

Getting unbanned from WhatsApp can be a stressful experience, but knowing the right steps to take can help you regain access to your account quickly.

Remember, the best way to avoid bans is to follow WhatsApp’s terms of service and maintain proper etiquette on the platform.

By respecting other users’ privacy and avoiding spammy behavior, you can enjoy a hassle-free messaging experience.

In the end, it’s crucial to stay informed and responsible when using WhatsApp.

After all, it’s a fantastic tool that connects us with our loved ones, and by following the rules, we can ensure that everyone has a great time using the app. So, let’s keep our WhatsApp experience fun, safe, and ban-free!


7 Ways to Get UnBan From WhatsApp Quickly [Temp vs. Perm Ban] Read More »

Fix-WhatsApp-Contacts-Not-Showing-Up

9 Ways to Fix Contacts Not Showing Up On WhatsApp [Solved]

WhatsApp has become a vital communication tool for millions of people all over the world, connecting friends, family, and coworkers.

However, a common problem that users face is that their contacts do not appear on WhatsApp.

This frustrating problem can result in missed messages and a sense of disconnect.

In this blog post, we’ll look at a number of solutions to help you resolve this problem and reconnect with your loved ones. So, let’s get started!

How to Fix Contact Names Not Showing Up On WhatsApp

Here are the nine (9) ways to do so.


1. Grant WhatsApp Permission to Access your Contacts

WhatsApp requires access to your phone’s address book in order to display your contacts within the app.

If you haven’t granted the necessary permissions, or if they were accidentally revoked, this could be the cause of your contacts not appearing in WhatsApp.

Here’s how to check WhatsApp’s permissions and troubleshoot permissions on Android and iOS:

How to ensure WhatsApp has the proper permissions:

For Android:

  • Open the Settings app on your phone.
  • Scroll down and tap “Apps” or “Apps & Notifications.”
  • Find WhatsApp in the list and tap on it.
  • Tap “Permissions.”
  • Make sure the toggle switch next to “Contacts” is turned on.

For iOS:

  • Open the Settings app on your iPhone.
  • Scroll down and tap “WhatsApp.”
  • Tap “Contacts.”
  • Make sure the switch next to “Contacts” is turned on (green).

2. Check your Contact’s Privacy Settings

Through privacy settings, WhatsApp allows users to control who can see their information, such as their profile picture, last seen, and online status.

If your contact has changed their privacy settings, they may be removed from your WhatsApp contact list.

How to access privacy settings:

For Android:

  • Open WhatsApp.
  • Tap the three vertical dots in the top-right corner.
  • Select “Settings.”
  • Tap “Account,” followed by “Privacy.”

For iOS:

  • Open WhatsApp.
  • Tap the “Settings” tab at the bottom-right corner of the screen.
  • Tap “Account,” followed by “Privacy.”

3. Verify your Contacts’ Phone Numbers

Your contacts may not appear in WhatsApp because their phone numbers are incorrectly stored in your phone’s address book.

WhatsApp requires the proper international format to recognize and display phone numbers in the app. Let’s go over how to check and edit the phone numbers of your contacts:

Importance of the correct international format:

The international format for phone numbers includes the country code, area code, and local phone number. This format is crucial because it helps WhatsApp identify users from different countries and ensures that your contacts are displayed correctly within the app.

Here’s an example;

  • Country Code: +1 (United States) Area Code: 415 Local Number: 555-1234
  • International Format: +1 415 555 1234

In this example, the country code for the United States is +1, and the area code for San Francisco, California is 415.

The local number is 555-1234. When formatted correctly in the international format, the country code and area code are separated by a space, and the local number is separated by spaces or hyphens.


4. Refresh your WhatsApp contacts list

Sometimes, refreshing your contacts list within the app is all that is required to resolve the issue of contacts not showing up in WhatsApp.

This simple action will prompt the app to re-check your phone’s address book for any missing contacts. Here’s how to manually refresh your contact list, as well as what to do if your contacts are still missing:

How to manually refresh your contact list:

For Android:

  • Open WhatsApp.
  • Tap the green chat icon in the bottom-right corner to access the “Contacts” tab.
  • Tap the three vertical dots in the top-right corner.
  • Select “Refresh.”

For iOS:

  • Open WhatsApp.
  • Tap the “Chats” tab at the bottom of the screen.
  • Tap the new chat icon in the top-right corner (a square with a pencil).
  • Pull down the contacts list to refresh it.

5. Sync your phone’s contacts with WhatsApp

Another possible reason your contacts are not showing up in WhatsApp is that your phone’s contacts aren’t syncing properly.

To resolve this issue, you can try enabling contact syncing or troubleshooting any sync-related problems. Here’s how:

How to enable contact syncing:

For Android:

  • Open the Settings app on your phone.
  • Scroll down and tap “Accounts” or “Users & accounts.”
  • Tap “WhatsApp” or “Add account” and then select “WhatsApp” if it’s not already listed.
  • Make sure contact syncing is enabled.

For iOS: Contact syncing is automatically enabled on iOS, so there’s no need to enable it manually.


6. Make sure you have the latest version of WhatsApp

Before we get into the more involved fixes, ensuring that you’re using the most up-to-date version of WhatsApp is crucial.

Developers continuously work to improve the app, and an outdated version could be the cause of your contacts issue. Here’s how to check for updates and update your WhatsApp:

How to check for updates:

For Android:

  • Open the Google Play Store.
  • Tap the menu icon (three horizontal lines) in the top-left corner.
  • Select “My apps & games.”
  • Scroll down to find WhatsApp in the list. If there’s an update available, it will be indicated next to the app’s name.

For iOS:

  • Open the App Store.
  • Tap your profile icon in the top-right corner.
  • Scroll down to see available updates. If an update for WhatsApp is available, it will appear in the list.

How to update WhatsApp:

For Android:

  • Follow the steps above to check for updates.
  • If an update is available, tap “Update” next to WhatsApp.

For iOS:

  • Follow the steps above to check for updates.
  • If an update is available, tap “Update” next to WhatsApp.

After updating the app, check if your contacts are now visible in WhatsApp. If not, let’s move on to the next solution!


7. Reset your phone’s network settings

Problems with your phone’s network settings can sometimes cause problems with WhatsApp, such as contacts not showing up.

Restoring your network settings to their default state can assist in resolving such issues. Remember that resetting network settings will also delete any saved Wi-Fi networks and Bluetooth pairings.

Why network settings can cause the issue:

Network settings control how your phone connects to the internet and other devices. If these settings are misconfigured, it could interfere with WhatsApp’s ability to access your contacts and other app functions.

How to reset network settings on Android:

  • Open the Settings app on your phone.
  • Scroll down and tap “System” or “General management.”
  • Tap “Reset” or “Reset options.”
  • Select “Reset network settings” or “Reset Wi-Fi, mobile & Bluetooth.”
  • Tap “Reset settings” or “Reset” to confirm.

How to reset network settings on iOS:

  • Open the Settings app on your iPhone.
  • Scroll down and tap “General.”
  • Tap “Reset.”
  • Select “Reset Network Settings.”
  • Enter your passcode if prompted and tap “Reset Network Settings” again to confirm.

8. Reinstall WhatsApp

If none of the preceding methods have worked, you may wish to reinstall WhatsApp as a last resort. Reinstalling the app may help resolve any underlying issues that are preventing your contacts from appearing.

Before you begin, make a backup of your chats and data to avoid losing any vital information. Here’s how you can reinstall WhatsApp without losing your conversations or data:

When to consider reinstalling the app:

Reinstalling WhatsApp should be considered as a final step when all other methods have failed to resolve the issue.

This process can help eliminate any lingering issues that may not have been fixed by the previous solutions.

How to reinstall without losing your chats and data:

For Android:

  • Open WhatsApp and tap the three vertical dots in the top-right corner.
  • Select “Settings.”
  • Tap “Chats.”
  • Tap “Chat backup.”
  • Tap “Back Up” to create a backup of your chats and media.
  • Once the backup is complete, uninstall WhatsApp from your phone.
  • Reinstall WhatsApp from the Google Play Store.
  • Open the app and verify your phone number.
  • Follow the on-screen instructions to restore your chat backup.

For iOS:

  • Open WhatsApp and tap the “Settings” tab at the bottom-right corner.
  • Tap “Chats.”
  • Tap “Chat Backup.”
  • Tap “Back Up Now” to create a backup of your chats and media.
  • Once the backup is complete, uninstall WhatsApp from your iPhone.
  • Reinstall WhatsApp from the App Store.
  • Open the app and verify your phone number.
  • Follow the on-screen instructions to restore your chat backup.

After reinstalling and restoring your chats, check if your contacts are now visible in WhatsApp. If the issue still persists, it’s time to contact WhatsApp Support.


9. Contact WhatsApp Support

If you’ve tried all of the methods listed above and your contacts are still not showing up in WhatsApp, it’s time to contact WhatsApp Support.

Their team can assist in investigating the problem and providing additional advice on how to resolve it.

Here’s how to get in touch with WhatsApp Support and what you should include in your support request:

How to reach WhatsApp Support:

For Android:

  • Open WhatsApp.
  • Tap the three vertical dots in the top-right corner.
  • Select “Settings.”
  • Tap “Help.”
  • Tap “Contact us.”

For iOS:

  • Open WhatsApp.
  • Tap the “Settings” tab at the bottom-right corner of the screen.
  • Tap “Help.”
  • Tap “Contact Us.”

What to include in your support request:

When contacting WhatsApp Support, be sure to provide the following information:

  • A clear description of the issue you’re experiencing, including the fact that your contacts aren’t showing up in WhatsApp.
  • The steps you’ve already taken to try to resolve the issue.
  • Your phone’s make and model, as well as the operating system version.
  • The version of WhatsApp you’re using.

WhatsApp Support may take some time to respond, but they should be able to provide further assistance in resolving the issue with your contacts.

Remember to be patient and provide any additional information they may request to help expedite the process.


9 Ways to Fix Contacts Not Showing Up On WhatsApp [Solved] Read More »

how-long-does-whatsapp-keep-chat-histor

How Long Is Chat History Saved In WhatsApp? [Explained]

If you use WhatsApp frequently, you may be wondering how long the app keeps your chat history.

WhatsApp is a popular messaging app that is used by millions of people around the world. End-to-end encryption makes it a safe platform for communicating with family, friends, and colleagues.

In this blog post, we’ll look at how WhatsApp stores chat history, how long it keeps it, and what you can do to manage it.

How WhatsApp Stores Chat History

WhatsApp stores your chat history in two places;

  1. On your device (local backup)
  2. On WhatsApp servers (if you’ve enabled cloud backup)

1. Local Backup

When you send or receive a message, it is initially stored on your device.

This means that all messages and media sent and received via WhatsApp are saved on your phone’s internal memory or external storage.

WhatsApp offers a local backup option on your device, allowing you to keep a copy of your chat history on your device’s internal storage or external storage, such as an SD card.

Local backups are created automatically at 2 a.m. every day, but you can create a backup manually at any time by going to “Settings” > “Chats” > “Chat Backup” and selecting “Back Up Now.”

Local backups include all of your messages, photos, and videos but not voice messages. You must enable the “Include videos” option in your backup settings if you want to back up your voice messages.

It’s important to note that local backups are stored on your device in an unencrypted format, which means that anyone with access to your device could view your chat history.

To prevent unauthorized access, it is recommended that you password-protect your device or use an app locker.

Overall, local backups are a convenient way to keep a copy of your chat history on your device’s storage. However, taking appropriate precautions to safeguard your backup and prevent unauthorized access is critical.


2. Cloud Backup

Furthermore, WhatsApp offers a cloud backup option, which automatically uploads your chat history to its servers.

When you enable cloud backup, WhatsApp makes regular backups of your chat history and media files on its servers. Depending on your settings, backups are performed daily, weekly, or monthly.

WhatsApp uses end-to-end encryption to ensure the security and privacy of your messages. End-to-end encryption ensures that you and the recipient(s) can only read your messages.

Even if your messages are saved on the servers, WhatsApp servers cannot read them. The only exception is when you report a message to WhatsApp, in which case they can review it.

It’s important to note that if you use WhatsApp on multiple devices, your chat history may not sync.

Currently, WhatsApp only supports syncing chat history between an iPhone and an Android device that backs up to Google Drive. In all other cases, your chat history will be saved on each device separately.


How Long Is WhatsApp Chat History Saved?

Unless you delete it, your WhatsApp chat history is saved indefinitely on your device. This means that you can access the messages at any time as long as they are saved on your device.

If you delete a message or a chat, it is permanently deleted from your device and cannot be recovered unless you have a backup.

If cloud backup is enabled, WhatsApp chat history is saved on its servers for 90 days. This means that if you lose or change your device, you can restore your chat history from the backup for up to 90 days.

If you do not back up your chat history for more than 90 days, it will be deleted from WhatsApp servers and cannot be recovered.

It’s also worth noting that if you don’t use the app for an extended period of time, WhatsApp may delete your chat history from its servers.

If you do not open WhatsApp for 120 days, your account will be marked as inactive, and your chat history may be deleted from WhatsApp servers.

However, this is an uncommon occurrence, and most users will not have any problems with their chat history being deleted due to inactivity.

Overall, WhatsApp chat history is saved on your device indefinitely and for up to 90 days on WhatsApp servers if cloud backup is enabled.

It is critical to back up your chat history on a regular basis to prevent it from being deleted from WhatsApp servers and to keep your chat history safe and accessible.


How to Access and Export WhatsApp Chat History

It is simple to access your WhatsApp chat history. Open the WhatsApp app and navigate to the desired chat.

To view older messages, scroll up. You can keep scrolling up until you reach the beginning of the chat history.

If you want to export your chat history, WhatsApp provides an option to do so. Here’s how to export your WhatsApp chat history:

  1. Open the chat you want to export.
  2. Tap on the menu icon (three dots) in the top right corner.
  3. Tap <More> and then <Export Chat>
  4. You’ll be prompted to choose whether you want to include media or not. Select your preferred option.
  5. Select the app or method you want to use to share the exported chat. You can send it via email, save it to your device, or share it via other messaging apps.

You can keep a copy of your messages on your device or share them with others by exporting your chat history. You can also use this feature to manually back up your chat history if you haven’t enabled automatic cloud backup.

It’s important to note that exporting your chat history will not remove it from your device or the WhatsApp servers. You can still access your chat history in the app even after exporting your chat history.


Tips to Manage WhatsApp Chat History

Here are a few useful ways you can consider using to manage your chat history;

Delete individual messages or entire chats

If you have messages or chats that you don’t want to keep, you can delete them. To delete a message or chat, press and hold the message or chat, tap the trash icon, and select “Delete.”

Deleting messages or chats can help free up space on your device and make finding the messages you need easier.

Backup your chat history regularly

To prevent your chat history from being lost, it’s important to back it up regularly. You can enable automatic cloud backup in WhatsApp by going to “Settings” > “Chats” > “Chat Backup.”

You can choose to back up your chats daily, weekly, or monthly. Choosing daily backups is recommended to ensure that your most recent messages are always backed up.

Export your chat history periodically

Besides automatic backups, exporting your chat history manually is a good idea. This allows you to keep a copy of your messages on your device, even if you lose access to your backup.

You can export your chat history by following the steps mentioned earlier.

Use the “Storage Usage” feature

WhatsApp has a feature that allows you to check which chats and media are taking up the most space on your device. To access this feature, go to “Settings” > “Storage and data” > “Storage usage.”

This feature can help you identify which chats or media files you can delete to free up space on your device.


Conclusion

Wrapping up, WhatsApp is a popular messaging app that is used by millions of people worldwide. End-to-end encryption makes it a safe platform for communicating with family, friends, and colleagues.

If you’ve enabled cloud backup, WhatsApp saves your chat history on your device and on its servers.

Your chat history is saved indefinitely on your device, but it is only saved for 90 days on WhatsApp servers if cloud backup is enabled.

WhatsApp allows you to access and export your chat history and manage it by deleting messages or chats, backing up to the cloud, exporting it regularly, and using the “Storage Usage” feature.

It is critical to manage your chat history in order to keep it organized, accessible, and secure.

You can delete unnecessary messages or chats, regularly back up your chat history, export it, and free up space on your device. By following these guidelines, you can keep your WhatsApp chat history organized and secure.

Overall, understanding how WhatsApp stores and manages your chat history can help you get the most out of the app.

Whether you use WhatsApp for personal or professional purposes, managing your chat history can help you stay organized while also keeping your important messages safe and accessible.


How Long Is Chat History Saved In WhatsApp? [Explained] Read More »

digital-forensics-branches

The 9 Different Branches Of Digital Forensics [Explained]

Digital forensics is crucial in investigating and prosecuting cybercrime, fraud, and other illegal activities.

As technology advances, the need for specialized digital forensics expertise becomes increasingly important.

Digital forensics is the use of various techniques and tools to collect, analyze, and preserve electronic data so that it can be used in court.

We will discuss the various branches of digital forensics in this blog post and investigate the key characteristics of each main branch.

Whether you’re an aspiring digital forensics professional or simply curious about this fascinating field, this blog post will give you a comprehensive overview of the various branches of digital forensics.

What Are The Main Branches Of Digital Forensics?

Digital forensics is a broad field that encompasses a variety of specialized branches; each focused on investigating specific types of digital devices or data.

Here are the nine (9) different branches of digital forensics;


1. Computer Forensics

Computer forensics is perhaps the most well-known branch of digital forensics. It involves the investigation of computers to recover evidence related to cybercrime, fraud, and other criminal activities.

Computer forensics involves collecting and analyzing data from a computer’s hard drive, memory, and other storage devices.

This data can include deleted files, browsing history, chat logs, and other types of digital artifacts that can provide valuable information about the computer user’s activities.


2. Mobile Device Forensics

Mobile device forensics is another important branch of digital forensics.

It involves the investigation of mobile devices such as smartphones and tablets to recover evidence related to cybercrime, fraud, and other criminal activities.

Mobile device forensics involves collecting and analyzing data from a mobile device’s storage, SIM card, and other components. This data can then be used as evidence in a court of law.

This data can include text messages, call logs, browsing history, and other types of digital artifacts that can provide valuable information about the mobile device user’s activities.


3. Network Forensics

Network forensics involves the investigation of network traffic to uncover evidence related to cybercrime, fraud, and other criminal activities.

Network forensics involves collecting and analyzing data from network devices such as routers, switches, and firewalls. This data can then be used as evidence in a court of law.

This data can include packet captures, network logs, and other types of digital artifacts that can provide valuable information about network activity.


4. Memory forensics

Memory forensics involves the investigation of a computer’s memory to uncover evidence related to cybercrime, fraud, and other criminal activities.

Memory forensics involves collecting and analyzing data from a computer’s RAM, virtual memory, and other components.

This data can include information about running processes, network connections, and other digital artifacts that can provide valuable information about the computer user’s activities.


5. Database Forensics

Databases are used to store a wide range of information, including financial data, medical records, and personal information, making them a prime target for cybercriminals.

Database forensics involves collecting and analyzing data, including transaction logs, database backup files, and other types of digital artifacts that can provide valuable information about database activity.


6. Cloud Forensics

Cloud forensics is a branch of digital forensics that involves the investigation of data stored in cloud computing environments.

Cloud computing has become increasingly popular in recent years due to its scalability, cost-effectiveness, and convenience. However, as more data is stored in the cloud, it has become a prime target for cybercriminals.

Cloud forensics involves collecting and analyzing data from cloud storage, virtual machines, access logs, configuration files, and other types of digital artifacts that can provide valuable information about cloud activity.


7. Internet of Things (IoT) Forensics

As more devices become connected to the internet, the potential for cybercrime and digital forensics investigations related to IoT devices continues to grow.

IoT forensics involves collecting and analyzing data from IoT devices such as smart home devices, wearable technology, and industrial control systems.

This data can include device logs, network traffic, and other types of digital artifacts that can provide valuable information about IoT activity.


8. Drone Forensics

Drones have become increasingly popular in recent years due to their versatility and accessibility, but as their usage has increased, so has the potential for cybercrime and digital forensics investigations related to drones.

Drone forensics involves collecting and analyzing data from drones, such as flight logs, camera footage, and other digital artifacts that can provide valuable information about drone activity.

This data can provide insight into the flight path of the drone, as well as any video or images captured by the drone’s camera.


9. Multimedia Forensics

Multimedia data can include images, videos, audio recordings, and other types of digital media.

Video data can be found in surveillance cameras, social media, and other sources of recorded footage.

Video forensics is often used to determine the authenticity of a video file format for any signs of alteration or manipulation. It can also be used to enhance the quality of a video file, e.g., by reducing shaky or blurry scenes.

Audio data can be found in various sources such as phone recordings, voice mail messages, or video footage with audio.

Audio forensics is mainly used to remove background noises in an audio recording and analyze the audio information.


Conclusion

Digital forensics is critical to investigating and prosecuting cybercrime, fraud, and other criminal activities.

The field of digital forensics encompasses a variety of specialized branches; each focused on investigating specific types of digital devices or data.

Digital forensics professionals must be proficient in using specialized software and hardware tools and knowledgeable about the legal requirements for collecting and presenting electronic evidence.

In addition, they must have strong analytical and problem-solving skills to identify relevant data and piece together a clear picture of what happened.

Whether you’re interested in pursuing a career in digital forensics or simply curious about this fascinating field, it’s clear that digital forensics plays a crucial role in maintaining the security and integrity of our increasingly digital world.


The 9 Different Branches Of Digital Forensics [Explained] Read More »

who-uses-and-need-digital-forensics

Who Benefits From Using Digital Forensics: 5 Types of People

Digital forensics is an important field that involves recovering, analyzing, and preserving digital evidence from electronic devices.

It can be used to investigate cybercrimes, data breaches, and other digital security incidents. But who exactly benefits from the use of digital forensics?

In this section, we’ll take a look at some of the main groups that rely on digital forensics.

Who Benefits from the Use of Digital Forensics?

Here are the five (5) groups of people who need to use digital forensic technology in their field of work.


1. Law Enforcement Agencies

Digital forensics can be used to recover data from computers, mobile devices, and other electronic storage media, such as mass storage devices and memory cards.

These agencies use digital forensics to gather evidence in criminal investigations, such as cyberstalking, child exploitation, and financial crimes.

These evidentiary data can include emails, chat messages, images, videos, and other types of digital evidence.

One of the biggest challenges for law enforcement agencies is keeping up with the ever-evolving nature of the digital crime.

Criminals are constantly finding new ways to use technology to commit crimes, and law enforcement agencies need to be able to keep up.

Digital forensics is essential for law enforcement agencies because it enables them to stay ahead of the curve and investigate crimes effectively.

In fact, it has become so important to law enforcement that many agencies now have dedicated cybercrime & digital forensic units.

Fun Fact #1: Did you know that digital forensics was used to catch the infamous Silk Road founder Ross Ulbricht? Law enforcement agencies were able to use digital evidence to tie him to the dark web marketplace and secure his conviction.

If you’re interested in pursuing a career in digital forensics, check out our guide on digital forensics careers.


2. Legal Professionals

Legal professionals, such as attorneys and paralegals, also benefit from the use of digital forensics. Digital forensics can be used to collect and analyze evidence in a wide variety of legal cases.

It can help attorneys build strong cases by providing them with digital evidence that can be used to prove or disprove claims, establish timelines, and provide context to other forms of evidence.

One of the key benefits of digital forensics for legal professionals is the ability to recover deleted or hidden data.

For example, if an individual is accused of fraud, digital forensics can be used to recover deleted emails or documents that may provide evidence of fraud.

In addition, digital forensics can be used to analyze metadata, which can help legal professionals determine when and where a particular file was created or modified.

Digital forensics can be used in a wide variety of legal cases, including intellectual property theft, breach of contract, employment disputes, and more.

Also, it can be used in criminal cases to investigate cybercrimes and other digital security incidents.

Digital forensics is not really a highly technical field. Anyone can learn it as it does not involve any coding skills. This is why legal professionals can use this in their field.

Fun Fact #2: Did you know that digital forensics played a role in the investigation of the Panama Papers scandal? Digital evidence was used to track the activities of the law firm involved in the scandal and identify the individuals and organizations involved.

3. Corporations

Corporations are another group that can benefit greatly from the use of digital forensics.

In today’s digital age, corporations are vulnerable to a wide variety of digital security threats, such as data breaches and insider threats.

Digital forensics can help corporations identify and investigate these threats and recover from any damage that may have been caused.

One of the key benefits of digital forensics for corporations is the ability to investigate data breaches.

Digital forensics can be used to determine how a breach occurred, which database was compromised, and who may have been responsible.

This information can be used to improve the corporation’s security posture and prevent future breaches.

In addition to investigating security incidents, digital forensics can also be used to investigate employee misconduct.

For example, if a corporation suspects that an employee has stolen intellectual property or engaged in other illegal activities, digital forensics can be used to collect evidence and support disciplinary or legal action.

Fun Fact #3: Did you know that digital forensics played a role in the investigation of the Volkswagen emissions scandal? Investigators used digital evidence to uncover the company’s use of “defeat devices” to cheat emissions tests.


4. Individuals

Individuals can also benefit from the use of digital forensics. In today’s digital age, individuals rely on digital devices and platforms for many aspects of their personal and professional lives.

This means that they are also vulnerable to digital security threats, such as data loss and cyber-attacks. Digital forensics can help individuals recover lost data and investigate security incidents.

One of the key benefits of digital forensics for individuals is the ability to recover lost or deleted data.

Digital forensics can be used to recover data from computers, mobile devices, and other electronic storage media. This can be especially helpful for individuals who rely on digital devices for their work or personal lives.

In addition to recovering lost data, digital forensics can also be used to investigate cyber attacks and other digital security incidents.

Although there are differences between using data recovery tools vs. digital forensics tools, individuals can have the flexibility to choose either one since both types of tools have the capabilities to recover lost data.

For example, if an individual’s social media account is hacked, digital forensics can be used to identify the source of the attack and help the individual regain control of their account.

Fun Fact #4: Did you know that digital forensics has been used to help individuals recover lost or stolen smartphones? By analyzing data from the device, digital forensics experts can often recover lost contacts, photos, and other data.


5. Cybersecurity Researchers and Analysts

Cybersecurity researchers and analysts are another group of personnel that can benefit from using digital forensics.

Digital forensics can help researchers and analysts identify and analyze digital threats and vulnerabilities and develop effective strategies for preventing and mitigating these threats.

One of the key benefits of digital forensics for cybersecurity researchers and analysts is the ability to analyze digital evidence from cyber attacks.

By examining the evidence left behind by cyber attackers, researchers and analysts can better understand the attacker’s motives, methods, and tools.

This information can then be used to develop effective countermeasures to prevent future attacks.

In addition to analyzing digital evidence from cyber-attacks, digital forensics can also be used to analyze network traffic, identify vulnerabilities in software and hardware systems, and investigate incidents of insider threats.

By using digital forensics to identify and address these vulnerabilities, researchers, and analysts can help improve overall cybersecurity posture.

Fun Fact #5: Did you know that the Stuxnet worm, discovered in 2010 and widely believed to have been developed by the US and Israeli governments, was one of the most complex and sophisticated cyber weapons ever discovered? Digital forensics played a key role in analyzing the worm and identifying its origins.


What is Digital Forensics?

Digital forensics, also known as computer forensics or cyber forensics, is the process of collecting, analyzing, and preserving electronic data for use in investigations and legal proceedings.

It involves the use of specialized tools and techniques to recover data from computers, mobile devices, and other electronic storage media.

Digital forensics can be used in a wide variety of contexts, including criminal investigations, civil litigation, and corporate security incidents.

It can help investigators identify and analyze digital evidence, such as emails, chat messages, images, videos, and other types of digital data.


Conclusion

In conclusion, digital forensics is a field with numerous applications and benefits.

It is an essential tool for law enforcement agencies, legal professionals, corporations, and individuals alike.

By using digital forensics to recover, analyze, and preserve digital evidence, these groups can investigate crimes, prevent security breaches, and recover lost data.

If you’re interested in learning more about digital forensics, be sure to check out some of the resources and articles we’ve linked to throughout this post.


Who Benefits From Using Digital Forensics: 5 Types of People Read More »

creation-date-telegram-channel-group

3 Ways to Check the Creation Date of Telegram Channel & Group

Are you looking for the creation date of a Telegram channel or group?

Whether or not you are a member of the channel or group, knowing the creation date can provide useful information about its history and development.

Unfortunately, Telegram makes it difficult to find the creation date, and many users have difficulty locating this information.

This blog post will go over three different methods for determining the creation date of a Telegram channel or group.

We’ve got you covered, from using the Telegram app to relying on third-party websites and even exploring the creator’s profile.

So, whether you’re a curious user or a social media marketer, keep reading to learn how to find out when a Telegram channel was created.

How to Check the Creation Date of a Telegram Channel or Group

Here are the three (3) ways to do so.


Method 1. Using TGStat

TGStat is a third-party website that provides statistics and analytics for Telegram channels and groups.

It offers a variety of tools and features for Telegram users, including searching for channels and groups, tracking their growth and engagement, and checking the creation date.

This is how you can use TGStat;

  • Go to the TGStat website and search for your Telegram Channel or Group
  • Select the right channel or group and scroll down the page until you see the <Channel’s age>.

Alternatively, you can use a faster method by using this URL address;

https://tgstat.com/channel/@name/stat

Replace @name with your actual Telegram Channel or Group name.


Method 2. Search Old Chats

telegram-group-channel-creation-date-earliest-message

You can know the exact creation date of a Telegram Channel or Group by looking at the timestamps of the oldest messages in the chat.

The timestamp will show you the date and time the message was sent, so you can estimate when the group or channel was created based on the date of the oldest message.

The quickest way of doing so is to get to the earliest chat messages by scrolling through the media files.

Here’s how to do so;

  • Open the Telegram app and go into the Telegram Channel or Group
  • Tap on the Profile icon
  • Under the <Media> tab, scroll down to the earliest media file and select it.
  • Click the menu icon on the top-right (3 dots) and select <Show in chat>. You will be brought to the earliest chats where the first media file is shared.
  • Scroll to the earliest chat message to see the creation date of the Telegram Channel or Group.

This is the actual Channel or Group creation date. This is not the date that you joined the channel or group.


Method 3. Using Telegram Bot

There is a Telegram bot called “Creation Date Bot.”

This bot allows users to find out the creation date of any Telegram account, including your own account or the account of other users.

To use the bot, open the link from @creationdatebot and click on the <Start> button to initiate a conversation with the bot.

By default, the bot will automatically display the account creation date of the logged-in Telegram account in the day, month, and year format.

Type the following command into the bot;

/cd groupname

Replace “groupname” with the Telegram Channel or Group name.

The bot will return the creation date of the Telegram channel or group.


3 Ways to Check the Creation Date of Telegram Channel & Group Read More »

how-to-know-teelgram-account-creation-join-date

3 Ways To Check Your Telegram Account Creation Date

Telegram is a well-known instant messaging app that allows users to send and receive messages, photos, videos, and other types of content.

If you use Telegram, you might be curious about the exact date you created your account.

You may require this information for a variety of reasons, including troubleshooting issues with your account or for security purposes.

In this blog post, we will go over several methods for determining the creation date of your Telegram account.

We’ll look at both manual methods, like checking your chat history, and automated methods, like using a Telegram bot.

Whether you’re a seasoned Telegram user or new to the platform, this guide will provide you with the knowledge you need to determine your Telegram account creation date.

How To Check Telegram Account Creation Date

Here are the three (3) different ways to know the date that you join and start using the Telegram app.


Method 1. Using Telegram Settings

Using the Telegram app itself, you can know the account creation date via its Settings.

To find out, follow the steps below;

  • Open the Telegram app on your device.
  • Go to the <Settings> section by tapping on the three-line icon at the top left corner of the screen.
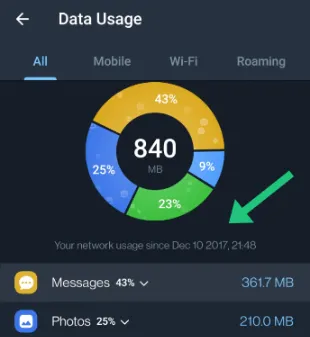
  • Select <Data and Storage>
  • Choose <Data Usage>

You will be able to see all your network data used in the app since you joined Telegram until date.

At the top of the page, you will see your Telegram account creation date when you first joined the app.


Method 2. Using Telegram Bot

telegram-bot-check-account-creation-date

There is a Telegram bot called “Creation Date Bot.”

This bot allows users to find out the creation date of any Telegram account, including your own account or the account of other users.

To use the bot, open the link from @creationdatebot and click on the <Start> button to initiate a conversation with the bot.

By default, the bot will automatically display the account creation date of the logged-in Telegram account in the day, month, and year format.


Method 3. Check Your Old Chats

If you want to determine the approximate creation date of your Telegram account, you can check the date of the oldest message in your chat history.

Here’s how you can do it:

  • Open the Telegram app on your device.
  • Go to your chat list and find your oldest chat in your chat history. This could be a chat with a friend or a group chat.
  • Scroll up to the very first message in the chat.
  • You are specifically looking for messages that were sent by you. Check the timestamp on the message to determine the date it was sent.
  • Use this information to estimate the date when you created your Telegram account.

Keep in mind that this method will only give you an approximate creation date, as you may have deleted older chats.

If you want a more accurate account creation date, you can use Method 1 or Method 2 mentioned above.


3 Ways To Check Your Telegram Account Creation Date Read More »

What-to-do-with-old-computer-monitors

11 Useful Ideas on What To Do With Old Computer Monitors

Old computer monitors can take up a lot of space in your home or office, and you may be wondering what to do with them.

Fortunately, many creative ways to repurpose or recycle your old monitors can help reduce waste and save you money.

In this blog post, we’ll explore 11 useful ideas on what to do with old computer monitors that you might find helpful.

What Can You Do With Old Computer Monitors?

Here are the eleven (11) creative ways to repurpose them;


1. Donate Your Old Monitor to a Local Charity or Nonprofit Organization

If your old monitor is still in good working condition, you might consider donating it to a local charity or nonprofit organization.

Many schools, libraries, and community centers may be in need of monitors for their computer labs or educational programs.

This is a great way to give back to your community while also reducing e-waste.

2. Recycle Your Old Monitor Properly

If your old monitor is broken or outdated and can’t be donated, it’s important to recycle it properly to prevent harmful materials from ending up in landfills.

Many electronics retailers and recycling centers offer free e-waste recycling programs. You can also check with your local government to see if they offer e-waste disposal services.

3. Repurpose Your Old Monitor as a Secondary Display

You can repurpose your old monitor as a secondary display if you have a desktop computer or laptop.

This can be especially useful if you’re a gamer, graphic designer, or multi-tasker who needs more screen real estate.

Simply connect your old monitor to your computer using an HDMI, VGA, or DVI cable, and adjust your display settings to extend your desktop across both screens.

4. Turn Your Old Monitor into a Digital Picture Frame

Another creative way to repurpose your old monitor is to turn it into a digital picture frame.

You can display your favorite photos, artwork, or even videos on your old monitor by connecting it to a media player or computer.

Also, software programs can turn your old monitor into a slideshow display. This is a great way to showcase your memories and add a personal touch to your home or office decor.

5. Convert Your Old Monitor into a Television or Gaming Display

You can also convert your old monitor into a television or gaming display.

This is especially useful if you have an old monitor with a good display resolution and you want to watch TV shows or movies or play video games on a bigger screen.

You can do this by connecting your old monitor to a TV tuner or gaming console using an HDMI or VGA cable.

You can turn your old monitor into a high-quality entertainment center with the right connections.

6. Create a DIY Standing Desk with Your Old Monitor

If you want to improve your posture and reduce sitting time, you can create a DIY standing desk with your old monitor.

All you need is a standing desk converter, an adjustable desk riser, and a mount or bracket to attach your old monitor.

With your old monitor mounted at the right height, you can work, browse, or game in a comfortable standing position.

This is a great way to improve your health and productivity while repurposing your old monitor.

7. Transform Your Old Monitor into a Smart Mirror

Another unique and tech-savvy way to repurpose your old monitor is to transform it into a smart mirror.

You’ll need a two-way mirror film, a Raspberry Pi, and a smart mirror software program to make this happen.

With a few technical tweaks, your old monitor can display your calendar, weather updates, news feeds, and more while functioning as a regular mirror.

This is a great way to add a modern touch to your home or office while also reusing your old monitor.

8. Use Your Old Monitor for Home Security Monitoring

You can use your old monitor as a dedicated home security monitoring station if you have an old monitor and a home security system.

Simply connect your old monitor to your security camera system using an HDMI or VGA cable, and adjust your display settings to view your camera feeds.

This is a great way to keep an eye on your home and property without having to purchase an expensive new monitor or security system.

9. Sell Your Old Monitor Online or Locally

If you don’t want to repurpose or recycle your old monitor, you can also sell it online or locally.

There are many online marketplaces, such as eBay or Craigslist, where you can list your old monitor for sale.

You can also check with local electronics stores or computer repair shops to see if they buy used monitors.

This is a great way to earn some extra cash and make sure your old monitor is put to good use by someone else.

10. Turn Your Old Monitor into a Retro Gaming Console

If you’re a fan of retro games, you can turn your old monitor into a retro gaming console.

This will require technical know-how and additional equipment, such as emulator software and gaming devices like Raspberry Pi or PC.

Once set up, you can play classic arcade games and console games on your old monitor.

This is a fun and nostalgic way to repurpose your old monitor and enjoy some old-school gaming.

11. Use Your Old Monitor as a Digital Whiteboard

If you’re an educator, business professional, or someone who enjoys drawing and brainstorming, you can turn your old monitor into a digital whiteboard.

You’ll need a stylus and a software program that allows you to draw on the screen, such as Microsoft Whiteboard or OpenBoard.

With a few adjustments to your old monitor’s settings, you can start sketching out ideas, collaborating with others, and creating digital presentations or diagrams.

This is a great way to repurpose your old monitor for professional or personal use.

Conclusion

Many creative and useful ways exist to repurpose or recycle your old computer monitor.

Whether you choose to donate it to a local charity, repurpose it as a digital picture frame, or turn it into a retro gaming console, you can give new life to your old monitor and reduce e-waste in the process.

With these 11 creative ideas, you’re sure to find a solution that fits your needs and helps you get the most out of your old monitor.


11 Useful Ideas on What To Do With Old Computer Monitors Read More »

check-telegram-login-active-session-activity

How to Check Your Telegram Login History [Privacy Guide]

In this blog post, I’ll show you how to view your Telegram login history.

With rising privacy concerns, it’s critical to understand who is accessing your account and from which device. “Can someone log into my Telegram without my knowledge?” you may wonder.

That is a possibility, but by the end of this post, you will understand how to track your own Telegram activity.

Telegram is a popular, secure messaging app known for its end-to-end encryption and features such as self-destructing messages, secret chats, and channels.

However, having an extra layer of security to protect your account from unauthorized access is always a good idea.

By reviewing your Telegram login history, you can ensure the security of your account and be alerted to any suspicious activity.

So, let’s get started with checking your Telegram login history.


Why Check Telegram Login History?

You might be wondering why checking your Telegram login history is important.

Well, there are a few reasons why you should keep track of your login sessions:

  • Security: Checking your Telegram login history can help you identify any unauthorized access to your account. If you notice any suspicious activity, you can take immediate action and change your password to secure your account.

  • Privacy: By monitoring your login sessions, you can protect your privacy. You can see who has access to your account and from which devices.

  • Peace of mind: By regularly reviewing your login sessions, you can know that your account is secure and that you’re the only one who has access to it.

So, with these reasons in mind, let’s dive into the steps to check your Telegram login history.


Steps to Check Telegram Login History

Now that you understand why it’s important to check your Telegram login history, let’s go through the steps to do so:

Step 1: Open Telegram App

The first step is to open the Telegram app on your device. If you’re not already logged in, enter your phone number and verification code to access your account.

Step 2: Go to Settings

Once you’re logged in, click on the three horizontal lines in the top left corner of the screen to access the Telegram menu. From there, click on <Settings>

Step 3: Select Privacy and Security

In the <Settings> menu, scroll down and select <Privacy and Security>

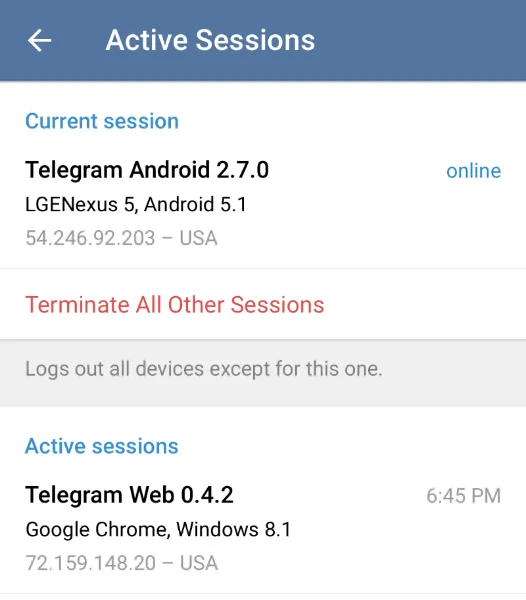
Step 4: Choose Active Sessions

Under <Privacy and Security>, look for the <Active Sessions> option and click on it.

Step 5: Review Login History

You’ll now see a list of all the active sessions that are currently logged into your account. You can see each active session’s device type, IP address, and location here.

If you notice any suspicious activity, you can click <Terminate All Other Sessions> to log out of all sessions except for the one you’re currently using.


How to Interpret Telegram Login History

Now that you know how to check your Telegram login history, it’s important to understand how to interpret the information provided. Here are some things to keep in mind:

  • Device Type: The device type tells you which device was used for logging in to your Telegram account, such as a mobile phone or desktop computer.

  • IP Address: The IP address is a unique identifier that tells you the location of the device used to log in. Seeing an IP address from an unfamiliar location could be a sign of unauthorized access.

  • Location: The location shows you the city and country of the device used to log in. If you see a location that doesn’t match your location, it could indicate unauthorized access.

By regularly reviewing your Telegram login history, you can ensure that your account is secure and take action if you notice any suspicious activity.

If you notice any unauthorized access, you must change your password immediately to protect your account.


Conclusion

In conclusion, checking your Telegram login history is an important step in ensuring the security and privacy of your account.

By following the simple steps outlined in this post, you can easily review your login history and keep track of any unauthorized access to your account.

Remember, regularly monitoring your login sessions can give you peace of mind and prevent any potential security breaches.

If you ever notice any suspicious activity, take immediate action to protect your account by changing your password and terminating all other sessions.

We hope you found this guide helpful and informative. If you have any questions or comments, feel free to leave them below. Thank you for reading!


How to Check Your Telegram Login History [Privacy Guide] Read More »