admin

Apple-Operating-System-macOS-Mac-OS-X

Complete List of Apple Mac Operating Systems [OS X & macOS]

Apple usually releases a new operating system (OS) every 1-2 years for their MacBook computers. There are two (2) main OS variants for Apple, namely the earlier Mac OS X versions and the newer macOS versions.

macOS Ventura is the latest and current Apple operating system for MacBook devices.

This article will list down and include all the different Apple OS versions, release dates, version numbers and codenames.

Complete List of all Apple Mac Operating Systems, in order of Release Date

S/NoReleased DateVersionCodeName
1March 24th, 2001Mac OS X 10.0Cheetah
2September 25th, 2001Mac OS X 10.1Puma
3August 23rd, 2002Mac OS X 10.2Jaguar
4October 24th, 2003Mac OS X 10.3Panther
5April 29th, 2005Mac OS X 10.4Tiger
6October 26th, 2007Mac OS X 10.5Leopard
7August 28th, 2009Mac OS X 10.6Snow Leopard
8July 20th, 2011Mac OS X 10.7Lion
9July 25th, 2012Mac OS X 10.8Mountain Lion
10October 22nd, 2013Mac OS X 10.9Mavericks
11October 16th, 2014Mac OS X 10.10Yosemite
12September 30th, 2015Mac OS X 10.11El Capitan
13September 20th, 2016macOS 10.12Sierra
14September 25th, 2017macOS 10.13High Sierra
15September 24th, 2018macOS 10.14Mojave
16October 7th, 2019macOS 10.15Catalina
17November 12th, 2020macOS 11Big Sur
18October 25th, 2021macOS 12Monterey
19October 24th, 2022macOS 13Ventura

Below is the list of all the macOS versions ever released to date.
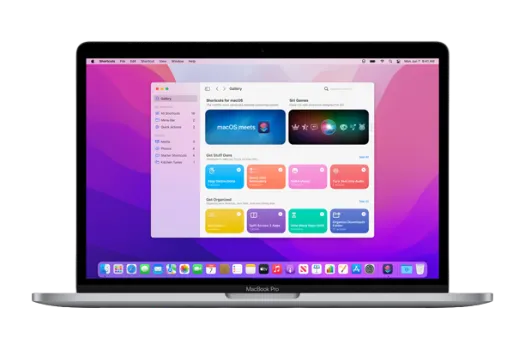

macOS Ventura

macOS-ventura-theme-appearance-dock

Released on October 24th 2022, macOS Ventura is the nineteenth release, and its version is referred to as macOS 13.

The wallpaper colours for this macOS release are a combination of dark orange and blue.

New features include;

  • Support for AVIF and WebP image format,
  • Ability to edit and un-send recent iMessage
  • Hands-off features in FaceTime enable the ability to transfer a call between multiple Apple devices.
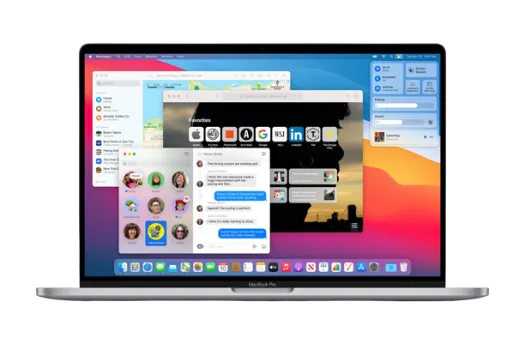
macOS Monterey

apple-macos-monterey-theme-colour-interface-dock

Released on October 25th 2021, macOS Montetry is the eighteenth release and often referred to as macOS 12.

The wallpaper colour for this macOS release is a dark shade of purple.

New features include;

  • Live Text allows users to copy, paste, translate and lookup texts from images.
  • Low Power mode for longer battery life
  • New Password Manager for Mac

macOS Big Sur

apple-macOS-big-sur-theme-colour-interface-dock

Released on November 12th 2020, macOS Big Sur is the seventeenth release and is referred to as macOS 11.

The wallpaper colours for this macOS release are a combination of different shades of red, purple, orange and blue.

New features include;

  • Quick toggles for Control Center for Wi-Fi, Bluetooth, screen brightness, etc
  • Faster search and indexing of Spotlight search
  • Encryption at the file level

macOS Catalina

Apple_macOS-catalina-interface-colour-theme-dock

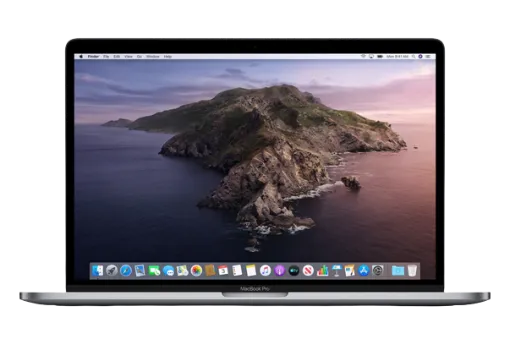
Released on October 7th 2019, macOS Catalina is the sixteenth release and is referred to as macOS 10.15

The chosen colours for this macOS release are different shades of purple.

New features include;

  • Removal of iTunes
  • Activation Lock prevents unauthorized use and drives erasure of T2 security chip devices.
  • Voice control navigation of the operating system

macOS Mojave

apple-macos-mojave-interface-dock-colour-theme

Released on September 24th 2018, macOS Mojave is the fifteenth release and is referred to as macOS 10.14

The wallpaper colour for this macOS release is dark blue.

New features include;

  • Add Group FaceTime
  • Revamp Apple App Store
  • Metadata preview in Finder

macOS High Sierra

apple-macos-high-sierra-interface-dock-colour-theme

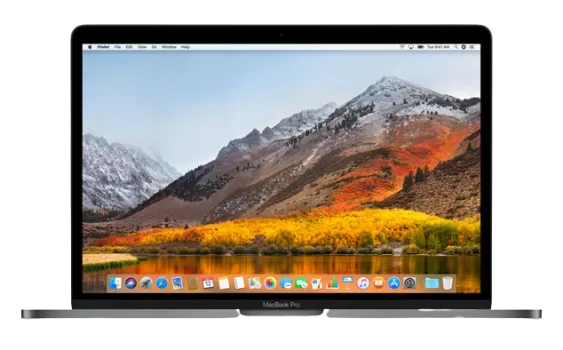
Released on September 25th 2017, macOS High Sierra is the fourteenth release and is referred to as macOS 10.13

The wallpaper colours for this macOS release are shades of orange and yellow.

New features include;

  • Improved Siri for a more natural and expressive voice
  • Support for High-Efficiency Video Coding (HEVC)
  • Apple File System (APFS) replaces HFS Plus as the macOS default file system.

macOS Sierra

apple-macos-sierra-interface-dock-colour-theme

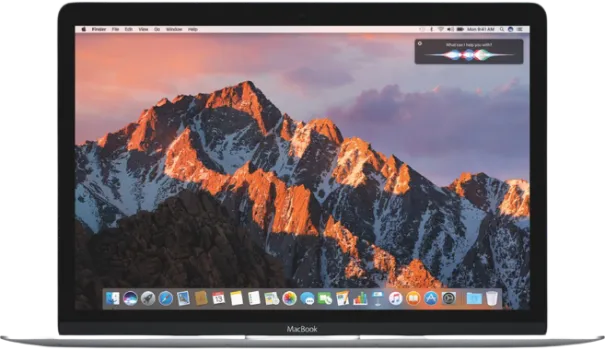
Released on September 20th 2016, macOS Sierra is the thirteenth release and is referred to as macOS 10.12

The wallpaper colour for this macOS release uses different shades of yellow.

New features include;

  • Introduction of Picture-in-Picture for playing video across the system
  • Night Shift feature to reduce blue light at night to aid sleep
  • improved Photos app to group similar pictures through better scene and object recognition

Complete List of Apple Mac Operating Systems [OS X & macOS] Read More »

Differences-between-Telegram-X-vs-Telegram

7 Differences in Telegram X vs Telegram [Features Compared]

In 2018, Telegram announced the Telegram X project, aiming to re-invent the original Telegram experience as a whole in terms of speed, user experience and experimenting with new features.

When you search for “Telegram” in the Google Play Store, you will notice two (2) different versions, namely the Telegram app and the Telegram X app.

This article will explain the key differences between Telegram X and the original Telegram app.

List item
List item
List item

History of Telegram X

Originally released as a third-party client named “Challegram”, it was acquired by Telegram and renamed “Telegram X”.

Challegram was based on the open TDLib (Telegram Database Library), making it easier for Telegram developers to develop the project further.

Currently, Telegram X is only available for Android devices.

What new features in Telegram X that cannot be found in the original Telegram app?

These are the seven (7) main features and differences that only exist in Telegram X.


1. Pop-up Preview (Ghost mode)

telegram-x-pop-up-preview

The pop-up preview feature (called ‘Ghost” mode) is useful when you can read the incoming message without having incurred a read status.

To preview a message, long-press on it, and a pop-up preview will appear. You can read the entire message, and the message will remain unread.

Underneath the pop-up preview, you have the following options as well;

  • Mute the message
  • Mark the message as Read
  • Archive the message
  • Delete the message

2. Faster and Smoother Experience

telegram-x-faster-smoother

When using an older phone, use Telegram X, and you will observe a noticeable difference.

Telegram X appears faster and smoother in terms of messaging and navigating between menus and chats. This is due to its app design’s improved animation speed and user interface.


3. Incognito Keyboard for Privacy

telegram-x-turn-on-incognito-keyboard-privacy-secret-chat-feature

In Telegram X, you can turn ON the <Incognito Keyboard> option to tell your keyboard of your choice, not to update any personalized data, e.g. typing history, on the words you type in the Secret Chat feature.

This ensures further privacy when using Secret Chat correspondences.

This option can be found under the <Settings> menu and by choosing the <Privacy and Security> option.

As of now, there is currently no such option in the original Telegram app.


4. Passcode Locking the App

telegram-x-passcode-lock-pin-password-pattern-gesture-fingerprint

In Telegram X, you can lock your app using five (5) different methods, namely PIN, Password, Pattern, Gesture or Fingerprint.

Gesture lock uses any handwritten symbol you can draw on the screen.

In the original Telegram app, you only have two (2) methods: setting a 4-digit numeric passcode and fingerprint to lock your Telegram app.


5. Adding HTTP Proxy for Connection

telegram-x-add-http-proxy

Telegram X has a new feature where you can add an HTTP Proxy connection.

You can find this under <Settings>, choose <Data and Storage> and click <Proxy>.

As for the addition of MTPROTO and SOCKS% proxies, they are available in the original Telegram app.


6. New Swiping Gestures

telegram-x-swiping-right-calls-menu

In Telegram X, swiping left will bring out the menu page where you can choose your account, settings, saved messages and more.

Swiping right on Telegram X will bring you to the Calls menu to see your voice and video call records.

In the original Telegram app, swiping right will archive the chosen message.


7. Attachment Menu

telegram-x-new-attachment-menu-category

In Telegram X, attachments are sorted into five (5) categories: Media, Docs, Links, Audio and Groups.

Only Media, Music and Groups categories are available in the original Telegram app.


What are the missing features in Telegram X compared to the original Telegram app?

These are the features that are missing in the Telegram X app.

  • Chat Folders – Create folders for work, personal, studies, etc
  • Telegram Premium – Paid app subscription is only available on the original Telegram app.
  • Animated Profile Pics – neither animated GIF nor video formats are supported.
  • People Nearby – Cannot search for location-based telegram groups and users

Can you install and use Telegram X while keeping the original Telegram app?

Yes, you can have both Telegram X and the Telegram app installed on your device and use them simultaneously.

All you need to do is to install Telegram X alongside your Telegram app and log in with your existing account.

You will get prompted that there are two sessions with different app versions. This is correct since you are using the same account on other apps.

Always check your sessions for security reasons to ensure that these sessions are yours.

On Telegram X, go to <Settings> and <Devices>. Under the <Other Devices> section, you will see two (2) app sessions.

telegram-x-other-devices-mutiple-sessions

7 Differences in Telegram X vs Telegram [Features Compared] Read More »

Does_Telegram_Compress_Images

Does Telegram Compress Images? [Tested and Proven Results]

Telegram app offers two (2) ways to send images. One is the compressed method (the default method), and the other is the uncompressed method, preserving the original image quality.

This article will show you how to send using the two (2) methods and test what changes Telegram made during the image compression process.

Does Telegram Compress Images?

Yes, Telegram offers the compression of images by default. However, you can also choose the uncompressed method as well.

It is up to the user to choose whichever method they prefer.

What are the changes Telegram makes during image compression?

We did a test experiment using an original image (6000 pixels x 4000 pixels) that is 891 KB in size, using the compressed method (default) to see the difference.

The table below shows the changes made to the original image.

PropertiesOriginal ImageCompressed Image
Filenameoriginalimage.jpgIMG_20221123_15913_076.jpg
Resolution (in pixels)6000 x 40001280 x 853
File Size891 KB40 KB

Telegram makes three (3) changes to the image file during image compression. They are;

  • Filename
  • Resolution
  • File Size

The original image filename had been changed, mainly to reflect the “yyyymmdd” date time format.

Telegram also altered the image resolution, shrinking it from 6000 x 4000 pixels down to 1280 x 853 pixels.

Lastly, Telegram reduced the image file size from 891 KB to a mere 40 KB.

What are the different ways of sending images on Telegram?

Below are the two (2) different methods you can use.


Method 1. Sending UnCompressed Image

This method will teach you how to send an uncompressed image using Telegram.

Select your image and click on the three (3) dots (menu option) on the top-right.

telegram-send-image-3-dots-menu-option-uncompressed

Now you will see the option that says <Send without compression>. Click on it.

telegram-send-without-compression-image

Your image has now been sent over to the receiver in its uncompressed state.


Method 2. Sending Compressed Image (Normal Way)

This is the default method for Telegram users.

Just select your image to send over and click the blue arrow icon (bottom right) to send.

telegram-send-compressed-image-default

Your image’s filename, resolution and file size will all be altered and reduced.


Does Telegram Compress Images? [Tested and Proven Results] Read More »

Acquire-Forensic-Image-Using-Command-Line

3 Methods to Acquire Forensic Images Using the Command Line

In digital forensics, you can use the command line to acquire forensic evidence images in several formats, such as the Expert Witness Format (EWF) files, the EnCase Evidence Files E01, dd (RAW), SMART and AFF.

This article will show you how to use the command line in Windows, Mac and Linux to acquire forensic images.

How to Acquire Forensic Images in E01 and dd formats using the Command Line?

Here are the three (3) different ways you can use the command line to perform forensic image acquisition.


Method 1. Acquire E01 format using the command line

Using Linux and Mac, you need to install the libewf and ewf-tools to acquire E01 evidence files.

Type the following to install from APT;

sudo apt install libewf-dev ewf-tools

Begin E01 acquisition

Once installed, you can acquire a disk image in E01 format using the following command;

sudo ewfacquire -t /Cases/001/001_2022_USB_folder /dev/sdc
  • -t option here allows us to specify a destination folder.
  • /Cases/001/001_2022_USB_folder refers to our destination folder where we store our E01 evidence files.
  • /dev/sdc refers to the target disk we want to acquire.

Change all the options and parameters according.

Once you hit <Enter>, you may be asked additional questions like inputting a case number and specifying a segment size for each evidence file.

You can use S 4G to have the segment size of the evidence size to be 4 gigabytes per file.

Verify E01 acquisition

Verifying your E01 is essential to ensure that you got the forensic imaging process done correctly.

The acquisition hash must match the verification hash. Both hash values must be the same.

This can be checked using the following command.

ewfinfo /Cases/001/001_2022_USB_folder.E01
ewfverify /Cases/001/001_2022_USB_folder.E01

You must point to the first E01 file, which will automatically verify the subsequent evidence files.


Method 2. Acquire dd (RAW) format using the command line

Using Linux and Mac, you can acquire the raw dd image format.

Note that this raw image does not require additional installation as it is built-in onto Linux and Mac operating systems.

Begin dd (RAW) acquisition

Login to the Terminal as a root user, type the following and key in your user password;

sudo su

Before you acquire any drives, always list the drives using this command;

df- h

As the dd (raw) format does not contain any computation hash in its header, it is important that you need to hash the drive first, so you can verify it after the forensic image is done.

md5sum /dev/sdb1  > /media/originalMD5

Start the forensic acquisition process

dd if=/dev/sdb1 of=/media/diskImage.img bs=1k
  • if refers to the input file. This is the target disk
  • of refers to the output file. This is your destination drive/folder
  • bs refers to block size. You can leave it as 1K default.

Verify dd (RAW) acquisition

Once the acquisition is completed, verify your forensic evidence file by hashing it again to ensure it matches the original hash.

md5sum /media/diskImage.img  > /media/verificationMD5

Method 3. Acquire RAW, SMART, E01 and AFF formats using FTK Imager Command Line

Using Windows, you can use the FTK Imager command line version, a popular forensic image acquisition tool to acquire forensic images.

The command line imager can be run on an external USB flash drive and plugged into the target machine.

Type the following to see the Help manual.

ftk imager --help

Begin forensic acquisition

Before you acquire any drives, always list all the attached physical drives in the target machine first. Use the following command;

ftkimager --list-drives

Begin forensic acquisition using;

ftkimager.exe C:/ F:\path\to\destinationfile\image001 --e01
  • C:/ is the target disk you want to image
  • F:\path\to\destinationfile\image001 is the destination drive/folder you want to image onto
  • -e01 is the E01 evidence file format you want as the output. You can change this into dd, SMART or AFF.

Verify forensic acquisition

Verify the forensic evidence files using the following;

ftkimager --verify F:\path\to\destinationfile\image001

Once completed, you will get the message that says, “Image verification complete”

Make sure that the computed hash and the verification hash match.


3 Methods to Acquire Forensic Images Using the Command Line Read More »

export-download-youtube-watch-history-data

How to Download and Export YouTube Watch History [and More]

When watching YouTube videos, your watch history is, by default, stored in your Google account (unless otherwise excluded by you via Settings). In addition, you can download and export your YouTube activities to an offline HTML or JSON file format.

You will only have watch history if you are logged in using your Google account (Gmail) while watching YouTube videos.

How to export YouTube Watch History?

Here are the two (2) different ways you can use to export your YouTube watch history.


1. Export via Google Takeout

Google Takeout is a feature from Google that allows users to export their information when it comes to using Google’s services, such as YouTube, Chrome web browser, Google Maps, etc.

For YouTube, you can have the option to export all or selected YouTube data, such as comments, likes, subscriptions, and many more.

To download your YouTube data using Google Takeout, follow the steps below.

  • Ensure you are logged into your YouTube account and go to the Google Takeout page.
  • Scroll down the list and select <YouTube and YouTube Music>
google-takeout-select-youtube-data

There are some optional export configurations you can make here.

youtube-watch-history-google-takeout-html-json
  • You can choose your export output as HTML or JSON format under the <Mutiple formats> setting.
google-takeout-export-youtube-watch-history-select-history
  • You can exclude most YouTube data, such as subscriptions, playlists, etc. and include only the history. This can be found in the <All YouTube data included> setting.
  • Click <Next step> and choose <Send downlink link via email>.
  • Click <Create Report>. You will receive the download link in your Gmail inbox (check your Spam) and on the actual Google Takeout webpage.
google-takeout-ready-to-download-via-email

You have now successfully downloaded your YouTube watch history (and any other Google data you have selected) offline in HTML or JSON format.


2. Export via YouTube History Page

YouTube provides a single webpage called “History Page” that displays the list of your watched history. You can export this page.

To access it, follow the steps below.

youtube-history-watch-login-account

Go to the YouTube homepage and ensure you are logged in to your Google account.

On the left pane, click on <History> to display your list of previously watched videos.

Now click on <Manage all history> on the right pane.

youtube-history-page-export-save-as-pdf-webpage-complete.webp

You will now see the <Youtube History> page.

To export the list of watched videos, you can right-click anywhere on the page and choose;

  • Select <Print> and save as PDF document format or
  • Save as Webpage Complete as HTML webpage format.

How to Download and Export YouTube Watch History [and More] Read More »

digital-storytelling-storyboarding-tool

7 BEST Digital StoryTelling & Storyboarding software tools

An excellent digital storytelling tool is a linear narrative outline for a narrative or story. It can consist of storyboarding, adding scripts, video, sound, etc., and is suitable for educational use or business presentations.

Digital storytelling tools help to visualize your concept in video form, anticipate everything before the actual shooting, and communicate possible issues with your team. Creating animation and comics are also available in some digital storytelling tools.

What are the Best Digital StoryTelling and StoryBoarding Tools?

Here are the seven (7) digital storytelling tools you can use.


1. Animoto

animoto-digital-storytelling

Animoto is a free, cloud-based educational video maker that produces videos from most media files, such as photos, videos, music, etc.

There are several professional-looking templates users can choose from. Some useful categories are Education, Amazon Promo, Real Estate, Workplace and many more.

Suitable for;

  • Small business – Capture the audience’s attention with videos
  • HR and People operations – Increase engagement and company culture
  • Marketing Agencies – For brand promotion and product showcase

2. Boords

boords-digital-storyboarding-storytelling

Boords is an online professional set of digital storyboarding and storytelling software tools designed for filmmakers and can be used to create storyboards, short lists and animatics.

Useful features include;

  • Automatic frame and version numbering – sync any changes
  • One-click animatics – complete with frame timing, subtitles and sound
  • Secure online sharing and frame specific comments

3. Canva StoryBoard

canva-storyboarding-digital-storytelling-tool

Canva Storyboard is a free, printable, digital storyboard online tool with plenty of customizable templates for users to choose from.

The drag-and-drop platform has many high-quality images, illustrations, icons, stickers, colour schemes and font combinations.

Canva Storyboard can be used for comic strips, videography presentations, and short or long-form videos.

Once done, users can download the digital storyboard offline or share it easily with others.


4. StoryBoardThat

storyboardthat-digital-storytelling

StoryBoardThat is a free digital storyboarding online creation service that uses the drag-and-drop concept to create outstanding visuals for teaching, learning and communicating.

The storyboarding platform allows for storyboard creation, graphic organizers, comics and visual sets. It includes many layouts, characters and scenes.

Suitable for;

  • Personal use – for Projects, Planning, Graphic Novels, Comics, Books, etc
  • Educational use – Secure (FERPA, CCPA, COPPA, & GDPR Compliant
  • Business use – Over 200 business resources with multi-user account collaboration

5. Plot

plot-digital-storyboarding-storytelling-tool

Plot is an affordable storyboard creator optimized for mobile devices and computer screens.

It is suitable for professional output in film, documentary, television, animation and many more formats.

Useful features include;

  • Adding Script – scenes and action directly into the storyboard
  • Create simple illustrations with included shapes, clipart and brushes
  • Collaborate among colleagues and clients for reviews and comments
  • Exporting offline storyboard for review

6. Pixon

Pixon is a comic and storyboard builder designed specifically for teachers and suitable as an education tool.

Useful features include unlimited classrooms, easy logins using Google or Microsoft accounts and automatic marking of read status.

The content library holds several different topics and is suitable for creating comics that work for any academic subject, such as mathematics or science.


7. MakeBeliefComix

makebeliefcomix-digital-storytelling

MakeBeliefComix is possible for anyone to create comics online, even if they are not good at drawing.

Using simple buttons and choosing from the content library, users only need to pick some characters, add a background scene and include speech bubbles with text to narrate their story.

MakeBeliefComix is a platform for students to create their own comics and tell their stories.

Besides creating comics, there are also interactive PDF printables available, as well as creating interactive journaling e-books.


7 BEST Digital StoryTelling & Storyboarding software tools Read More »

Speed-Up-Android-Modify-Animation-Scale-Speed-Faster

How to Make Android Run Smoother [Speed Up Animation Scale]

One of the easiest and fastest ways to tweak your Android device to make it run faster and operate smoother is by modifying your Animation Scale settings under Developer Options mode.

Doing so will affect the speed of transitions and animation on your device, and you will experience a boost in terms of performance.

Why adjust the Animation Scale in Android Settings?

Every time you open an app or switch between different apps, transitions and animations are played, and your device needs to process them constantly.

By reducing the speed of the animation, your Android device can run faster and perform operations smoother.

How to Speed Up Your Android by Modifying Animation Scale?

Here are the three (3) steps to do so.


Step 1. Enable Developer Options (hidden)

android-enable-developer-options-mode-build-number

To enable the hidden Developer Options on your Android device, go to Settings > About Phone.

Tap on the <Build Number> several times until it says Developer options have now been enabled.

To access the Developer Options, go to Settings > System, and you will see it there. Alternatively, you can do a search on the Settings page using the word “developer” (see the image below).

search-developer-options-android-settings

Step 2. Scroll to the Drawing section

android-developer-options-drawing-section-animation-scales

In Developer Options mode, scroll down until you see the Drawing section.

You need to adjust the scale speed for the following three (3) animation settings;

  • Window animation scale (default 1x)
  • Transition animation scale (default 1x)
  • Animator duration scale (default 1x)

Their default speed is 1x, which is the normal animation speed for all Android devices.


Step 3. Reduce the Animation Speed

modify-adjust-android-animation-scale-speed-developer-options-mode

By reducing the animation speed by half, you can speed up all the transition effects on your phone, making it run smoother and faster.

Reduce all three (3) animation settings to .5x (which is half of 1x).

To do this, tap on each of them and choose <Animation scale .5x>.

Restart your phone, and you will experience a faster and smoother Android device.


Conclusion

Speeding up Android animations will make your device run faster and have a smoother operating system experience.

If you want to go further, you can choose <Animation off>. This will speed up the transitions and animations the fastest. Depending on your device, some have reported a loss of smoothness in the operating system. Of course, you can always test the speed scale to your preference.

If any changes made in Developer Options are causing some problems, you can always revert back by resetting all changes or simply turning Developer Options mode off.


How to Make Android Run Smoother [Speed Up Animation Scale] Read More »

Reveal-see-check-URL-shortener-links-unshorten

7 Ways to Safely Reveal URL Shortener Links BEFORE Clicking

Before you click on a URL shortener link, you need to check and expand it to show you the original URL address. It would be best if you transformed the short URL to show you its real destination URL address and ensure that the webpage is safe to visit.

This article will focus on all the proven and tested methods to reveal a URL shortener link to its correct URL address.

How to Un-Shorten and Reveal the Actual URL from a URL Shortener Link?

Here are seven (7) different ways you can use to check.


1. UnShorten.me

unshorten.me.URL-link-reveal

When using UnShorten.me, you can have a big snapshot of the destination URL homepage, the destination domain and, of course, the actual destination URL.

The snapshot helps get a glimpse of the website you intend to click on and is clear enough to read some of the content there.

The site supports revealing URL links from URL shorteners such as FB.me (Facebook), t.co (Twitter), bit.ly, TinyURL, ow.ly and others.

You can even use their API to un-shorten various URLs in XML, JSON or simple RAW format.


2. Link UnShortener

linkunshorten-reveal-link-shortener-check

Not only does LinkUnShortener shows you the destination URL, but you can also check if the destination URL is safe to visit through its security checks.

When you expand the URL, you will get the following details;

  • The site info – typically the title of the page (if any)
  • Domain Info – WHOIS information such as the owner of the domain, the domain registrar, the creation and the expiration of the domain name
  • Security Checks – Check the reputation and security of the destination URL

There are links to VirusTotal, SSL Checker, Web of Trust and many others for security checks that you can use to check destination URLs’ safety and security.


3. CheckShortURL

checkshorturl-reveal-url-shortener-links

CheckShortURL provides a screenshot of the destination URL page, the actual URL and the followingvaluablel details;

  • Title of the page
  • Description of the page (as per shown on search engines)
  • Author of the page
  • Security checks on Web of Trust, SiteAdvisor, Norton and others.

sdfdsfsdf


4. URL Expander

urlex-reveal-url-shortener-links

URL Expander is useful when you have a batch of URL link shorteners to un-shorten.

You can instantly input a batch of URLs (limited to 100 requests per day) and see the page’s destination URLs (results), or you can download the results as a CSV file format.

To go over 100 requests, you will have to use the paid version. API access is also available for paid users.

URL Expander supports almost all URL shortening services: t.co, bit.ly, amzn.to, tinyurl.com, ow.ly, youtu.be and many more.


5. WhereGoes

wheregoes-reveal-URL-link-shortener

WhereGoes provides the free service using a URL Redirect Checker that follows the path of a URL link shortener to enable troubleshooting of link issues and perform internet marketing intelligence.

Besides revealing and showing you the destination URL, you can see all the links being redirected through, for example, PHP redirects, htaccess redirects, NGINX redirects and JavaScript redirects, before reaching the destination URL.


6. UnShorten.It

Sunshorten.it-reveal-URL-link-shortener

UnShorten.It is a straightforward free online service that reveals andun-shortensn the URL link shorteners you have by showing you the destination URL and providing you with safety ratings on the URL page.

You can get the safety ratings in terms of Trustworthiness and Child Safety. This is provided by the Web of Trust community.


7. Preview Mode

tinyurl-preview-url-shortener

Some URL shorteners come with a built-in preview feature that gives users a sneak preview of the actual URL before clicking on it.

For TinyURL, you can add the word “preview.” in front. See the example below.

https://tinyurl.com/3wa5rn4x

https://preview.tinyurl.com/3wa5rn4x

For Bitly, you can add the plus “+” sign at the end of the URL. See the example below.

bit.ly/2xTleYF

bit.ly/2xTleYF+

7 Ways to Safely Reveal URL Shortener Links BEFORE Clicking Read More »

Featured_[Ho-to-tell-if-someone-copied-files]

7 Ways to Tell If Someone had Copied Files On Your Computer

You suspect someone has accessed and checked on your laptop or desktop computer and probably copied files from it. You want to prove if your files are actually copied and if tracing of the person involved is possible.

This article will list down all the ways, signs and evidence to determine if your files are being copied.

How to Tell that Someone had Copied Files on Your Computer?

Here are the seven (7) tell-tale signs to tell (and prove) that someone has copied files on your computer.


1. Check the history list of attached USB devices

usb-device-history-check

Whenever a USB device is plugged into a computer, the Windows operating system keeps a list of USB device history. These can be USB flash drives, USB portable hard drives, memory cards using USB adapters, etc.

This method is frequently used in the field of digital forensics by examiners who need to prove the existence of a particular device, as it can show the unique serial number of the USB device attached.

USB Detective is a digital forensics software tool that extracts USB device information, such as serial numbers, last connected timestamp, first connected timestamp, etc.

You should download the USB Detective Community version, which is free to use, and you can export the findings in an Excel format.


2. Check the Timestamp of the File

file-properties-timestamp-created-accessed-modified

If you suspect a particular file or files within a folder have been copied, you can check the file’s properties, especially on the <Date Created> and the <Date Accessed> attribute values.

To check, right-click on the file and select <Properties>.

<Date Created> attribute can prove that a file is newly copied or created on the computer. <Date Accessed> attribute can prove that someone had opened a file previously.

You should be looking for files that had been accessed or created in the time frame that you are not using the computer.


3. Check Recent Files

windows-recent-files-explorer-list

Windows keep a history of recently-accessed files in the Windows menu for convenience when we need to open them again.

This feature is useful and provides a quick glance if any files have been opened while you are away.

For Windows, press the keyboard “Windows + R” to open the Run dialog box and type in “recent“.

A folder will appear to show you a list of all your recent files.

For Mac, it is called <Recents>. You can find them in your Finder app and on the left-hand pane.


4. Check the CCTV camera

cctv-camera-check-person-access-computer

Is this a residential home or a workplace environment? Does it have a CCTV camera looking at the angle of your computer?

Looking through the video footage is a sure way of identifying the person who had physical access to your computer and copied your files.

Be wary that CCTV footage recordings usually do not store for long due to overwriting and storage capacity constraints. So go in and retrieve the videos at the earliest time possible.


5. Check the Movement of Peripherals

keyboard-mouse-moved-shifted-person-using-your-computer

Sometimes the most obvious signs can be where your keyboard, mouse and monitor screen are shifted.

The person may accidentally move/shift your keyboard or any other peripherals while copying files at your computer.

If you have a keen eye for where you usually place your hardware, you may notice it immediately.


6. Check Keylogger Logs

keylogger-check-file-copy-access-computer

If you had previously installed a keylogger on your own computer, you could now check your logs to see all activity records, including the file copied activity.

A keylogger is commonly installed on someone’s computer to monitor keystrokes, folder access and visited websites.

But you can also install a keylogger on your own computer if you suspect someone is frequently accessing and copying your files.

You can use a keylogger like Refog to monitor all activities on your computer, take periodic snapshots, and send the images to your email address.


7. Check Audit Logs

audit-logs

This method requires you to check audit activity logs, and it only applies if you have previously installed and configured auditing software on your computer, probably on a company’s server.

If you have not done so, you can refer to this setup guide to enable the File and Folder Access Auditing feature in Windows Server configurations, for file copied activities.

You can also try Filesure for Windows to track who and which system process is accessing your files and what they are doing with them.


7 Ways to Tell If Someone had Copied Files On Your Computer Read More »

extract-youtube-comments-download

5 Ways to Download and Export Youtube Comments on any Video

When watching Youtube videos, you can also download and export all the Youtube comments that come with them, usually in Excel (XLS) or CSV file format.

There are several different ways to do so, each having its own strengths and limitations.

Depending on your preference and needs, this article will list down all the methods you can use to export Youtube comments from its video.

How to download Youtube Comments

Here are the five (5) different methods you can use, depending on your preference,


1. ExportComments

exportcomments-export-youtube-comments-download

As long as it is a public Youtube video, you can copy the URL and paste it into ExportComments, and it will export out all the available comments.

ExportComments is free to use and is limited to a maximum of 500 comments. To increase the limit, three (3) different paid versions allow users to export up to a maximum of 250,000 comments per export.

Users can export for output in Excel or CSV file format.

Key Features

  • Include exporting of nested comments (comments within comments)
  • Support exporting of most international languages
  • Support Youtube, Facebook, Twitter, Instagram, Tiktok, Discord and many more.

2. Youtube Comments Downloader

Youtube Comments Downloader is a straightforward tool that automatically expands all the nested comments to display for you.

Copy and paste the URL of the Youtube Video, and this online extraction tool removes all videos, images and ads and displays only all the Youtube comments in their raw form.

From there, you can either print it and save as PDF format, print it out as physical printouts, or save it as a webpage HTML file.


3. Coberry

coberry-export-comments-youtube-download

Coberry is an online service that helps you export Youtube comments, add Youtube videos as campaigns, and add tags to those campaigns to monitor a group of assets for statistical reporting.

After exporting comments, Coberry allows users to export as CSV files or in Plain Text format.

Key Features

  • Analyze sentiments to know the tone of the audience
  • Sort by chronological order, most like or most commented order
  • Filter by keyword
  • Filter by commentor (author)

4. Sudota Comment Tool

export-download-youtube-comments-sudota-social-tool

If you are the owner of your Youtube channel, Instagram business page or Facebook business page, then Sudota Comment Tool is suitable for you.

This Google Sheet extension tool allows you to export Youtube comments on your Google Sheets instantly, and you can also reply to those comments from there.

Key Features

  • Auto-stream Facebook / Instagram comments or reactions to your Google Sheets
  • You can search posts with post links or select from your published post
  • Refresh new comments to the downloaded sheet

5. Botster Youtube Comment Scraper

botster-youtube-comment-extractor

Botster is an online service that runs a variety of custom bots, including a bot for extracting Youtube comments.

The maximum number of comments it can extract and download is capped at 500,000. Botster is free for the first try and subsequently runs on paid credits model. Depending on the extraction volume, users may have to pay for more extraction.

Extracted Youtube comments can be in the form of Google Sheets, Excel, CSV or JSON file format. The output will also include specific details such as user nickname, comment date, comment upvotes and more.


Why can’t some Youtube Comments be downloaded and exported?

Here are the three (3) main reasons why some Youtube comments cannot be downloaded and exported.

Comments from Private Users

Youtube comments made by private users cannot be exported out. This is due to Youtube’s security policy.

Spam Comments

When Youtube comments are filtered and marked as spam, these comments cannot be exported and downloaded as well.

Suspended or Disabled Accounts

When a Youtube account has been suspended or disabled, all the previous comments made from this account will also be affected.


5 Ways to Download and Export Youtube Comments on any Video Read More »